|
|
|

|
|
| Search | Car Forums | Gallery | Articles | Helper | AF 350Z | IgorSushko.com | Corporate |
|
| Latest | 0 Rplys |
|
|||||||
| WIP - Muscle Car / Hot Rod Post topics for any "Works In Progress" Muscle Car-Hot Rod vehicles projects in this sub-forum. |
 |
 Show Printable Version | Show Printable Version |  Email this Page | Email this Page |  Subscribe to this Thread
|
|
|
Thread Tools |
 03-20-2007, 09:02 PM
|
#46 | ||
|
AF Regular
 Join Date: Aug 2006
Location: Tucson, Arizona
Posts: 249
Thanks: 0
Thanked 0 Times in 0 Posts
|
Re: 1969 Firebird 'mild' custom--bringing new life to an absolutely lousy kit
Quote:
|
||

|

|
|
03-24-2007, 03:19 PM
|
#47 | |
|
AF Enthusiast
Thread starter

Join Date: Aug 2006
Location: Portland, Oregon
Posts: 633
Thanks: 2
Thanked 7 Times in 1 Post
|
Re: 1969 Firebird 'mild' custom--bringing new life to an absolutely lousy kit
Well, things didn't go as I had planned, and the interior's not done yet. But instead of posting another "almost there..." update, I decided to show my current progress. So, without further delay...
As you may recall, the interior tub for this kit was not extraordinary. I had already ground off the molded-on pedals, then set the tub aside for later. When I began fiddling with the interior, I realized that AMT had, for whatever reason, molded the floorboards a scale 2 inches too high! The interior was way too shallow and the seats were cut-off. Although it's hard to see the interior on a hardtop car, I still try to go for authenticity, so I decided to fix the problem. Although that entailed a lot of work, it was worth it in the end, as usual. So, here are the pictures: I didn't show the original tub this time; it is earlier in the thread. Here are the floor pans cut out. 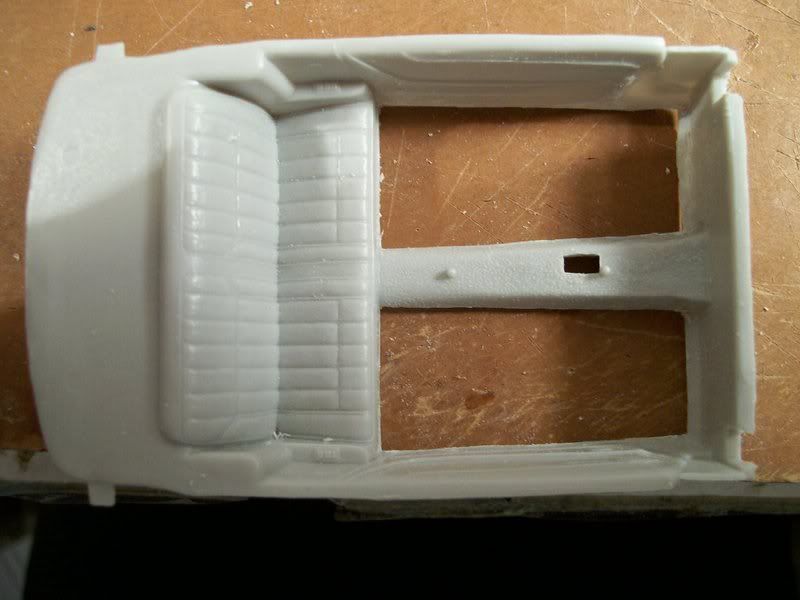 Here are the skirts I made to extend the interior height. They are made from .04" and .01" (on the tranny tube) styrene. 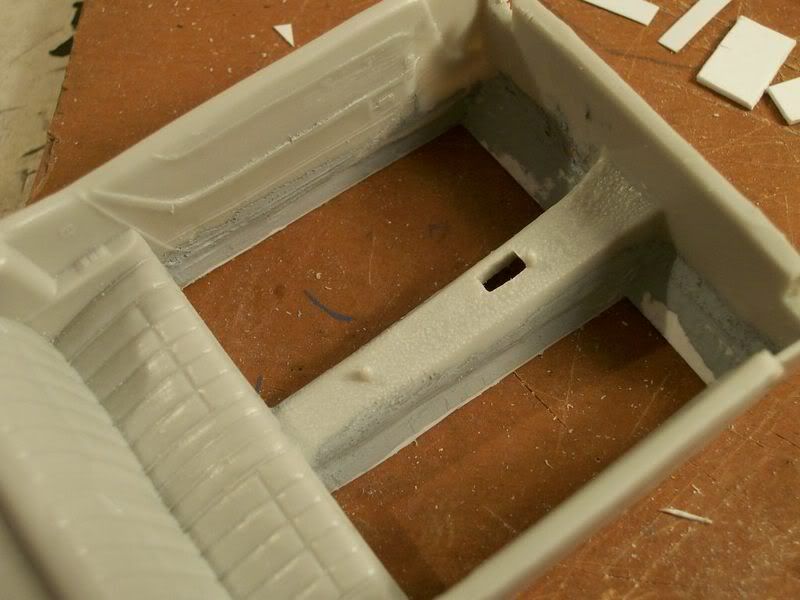 You can see the putty I put on; it's really rough because you can't get a file in some spots very easily. No matter; it'll be carpeted later. A better shot: 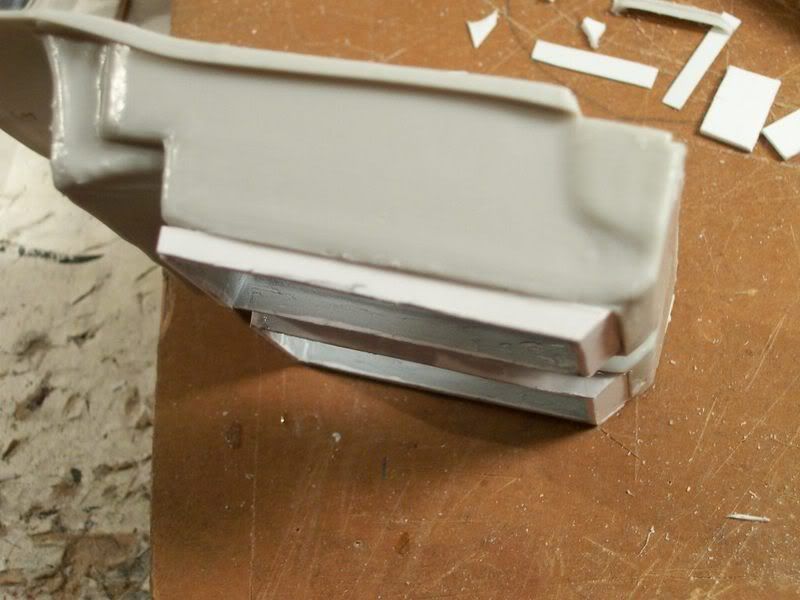 I couldn't see these really well in my interior reference shots, but I did the best I could to make the molded arm rests on the doors. Imagining that they would also be the door pulls, I hollowed them partially out. They are cobbled together from various pieces of styrene. 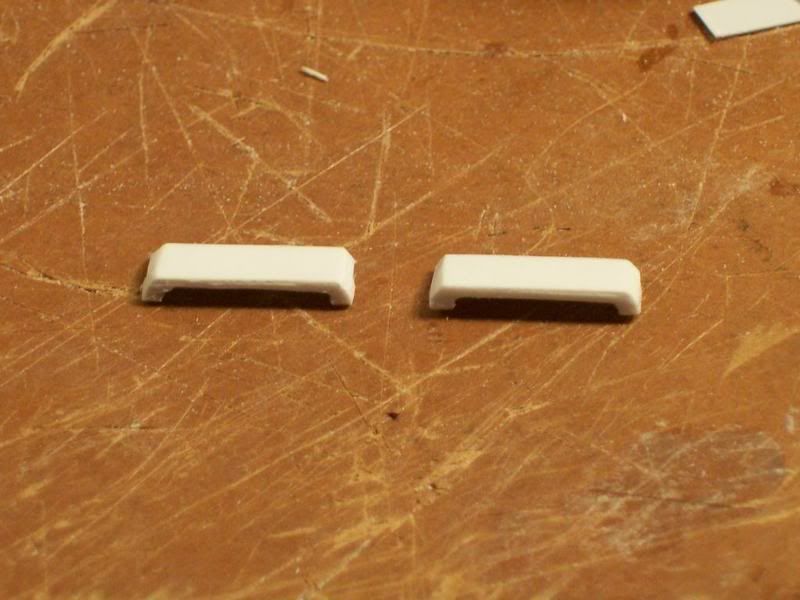 Installed:  New .01" styrene floorboards in: 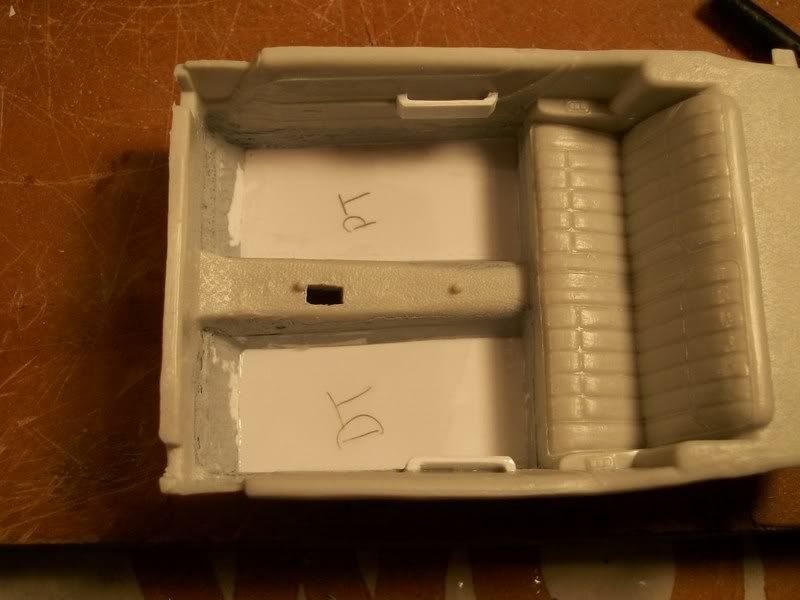 I also made some seat rails, to enhance realism. 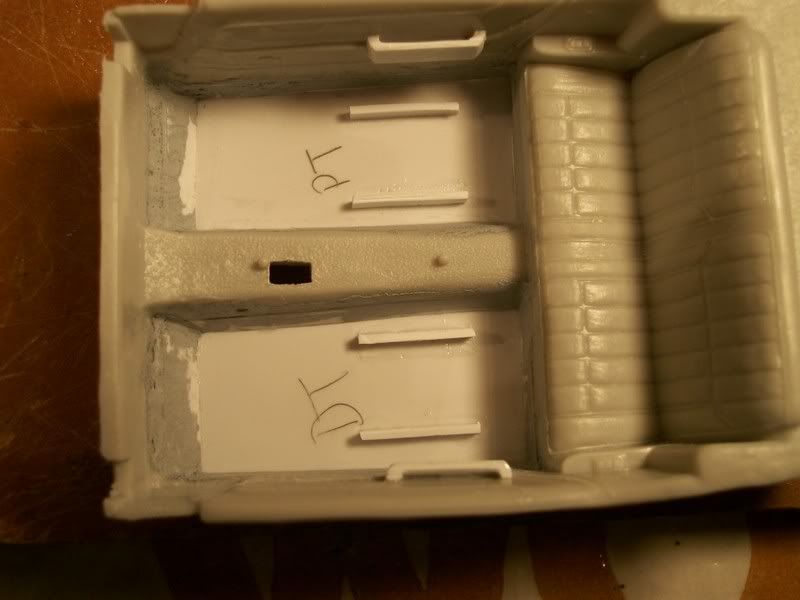 Speaking of seat rails, here is a seat. I didn't remember to take a "before" picture, but you can see where I glued the white styrene to the gray original. That's how cut-off the seats were! 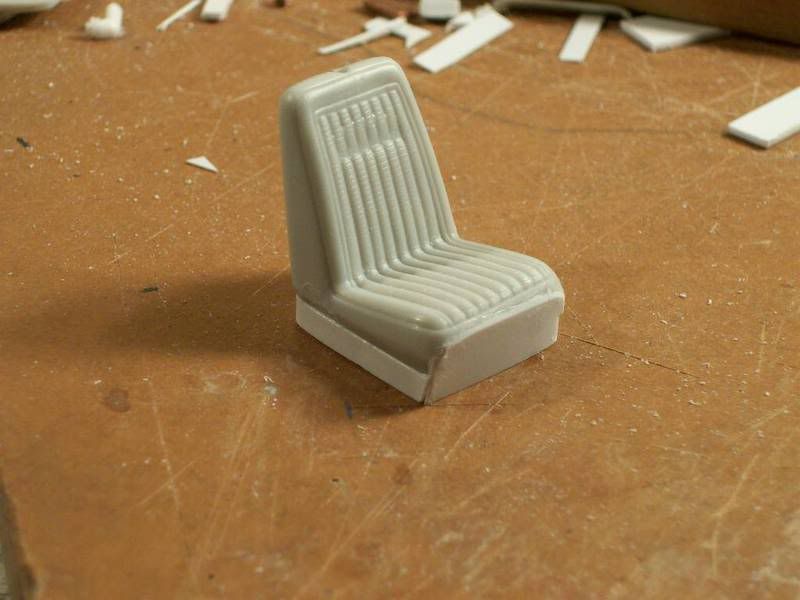 Here are the two seats done. I didn't do much as far as puttying and smoothing on the sides, because the seats are crammed so tight inside that you literally cannot see the sides even with the tub out of the car. 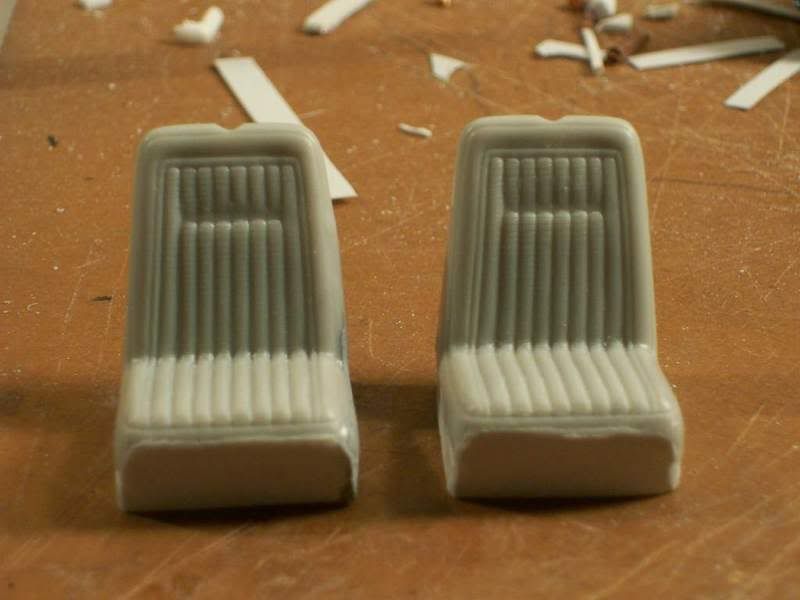 Here are the headrests. The one on the right shows the hole where the headrest mounting peg was supposed to go. It did not fit at all; thus, I cut off the pegs. 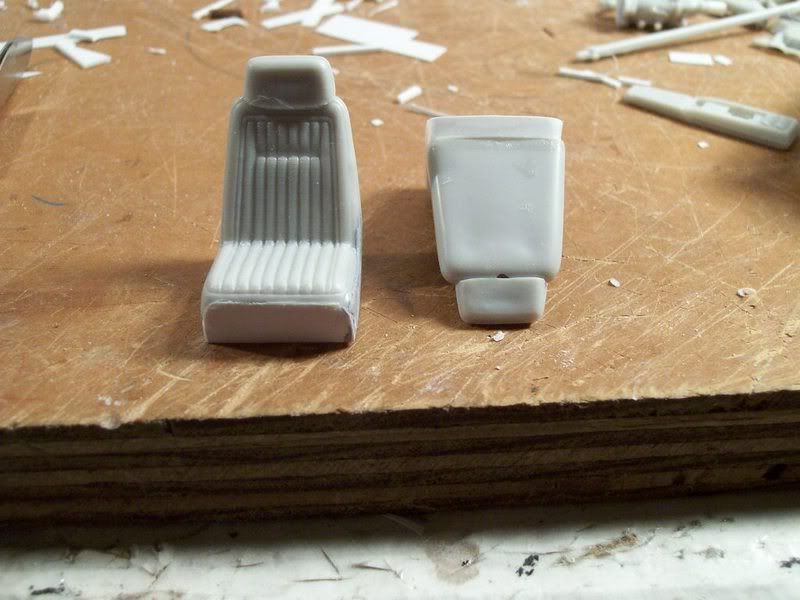 Here's the tub, painted and carpeted. I used the regular flocking technique for this, because of space restrictions. As usual, it's a little patchy, but almost everything you see here will be covered (by seats, console, and floor mats). 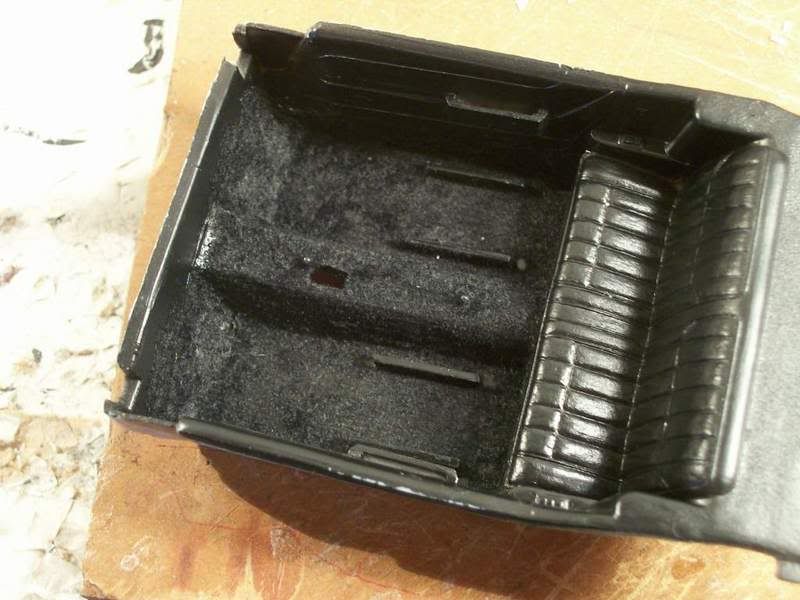 For the rear package tray, because it was open enough to be workable, I used the flocking technique that has been nicknamed "Klutz Karpet" in this forum. See this link if you aren't familiar: http://www.automotiveforums.com/vbul...d.php?t=554434 Basically, it involves using double-stick carpet tape as adhesive rather than glue. It worked quite well. You can also see my speakers here; I didn't actually make dish-shaped parts, but just used circles of styrene (for simplicity). The center parts are white glue; the rings are copper wire. 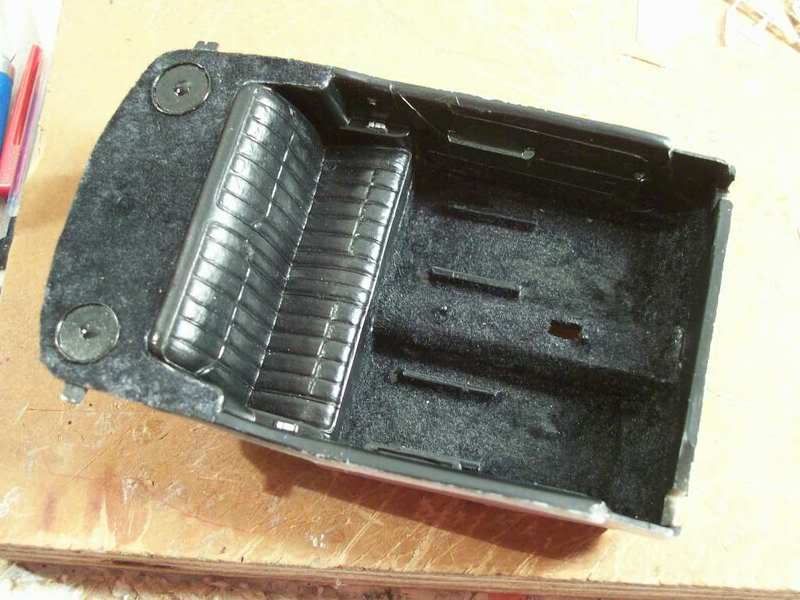 I used the same flocking technique to make floor mats. The Pontiac emblems (I didn't want to mess with "Firebird" lettering) were made by blocking the adhesive with emblem-shaped pieces of tape backing paper. I'm not sure how to make the floor mat edges like MPWR showed on his Ferrari; maybe someone could enlighten me so that my future convertibles will have good-looking mats! 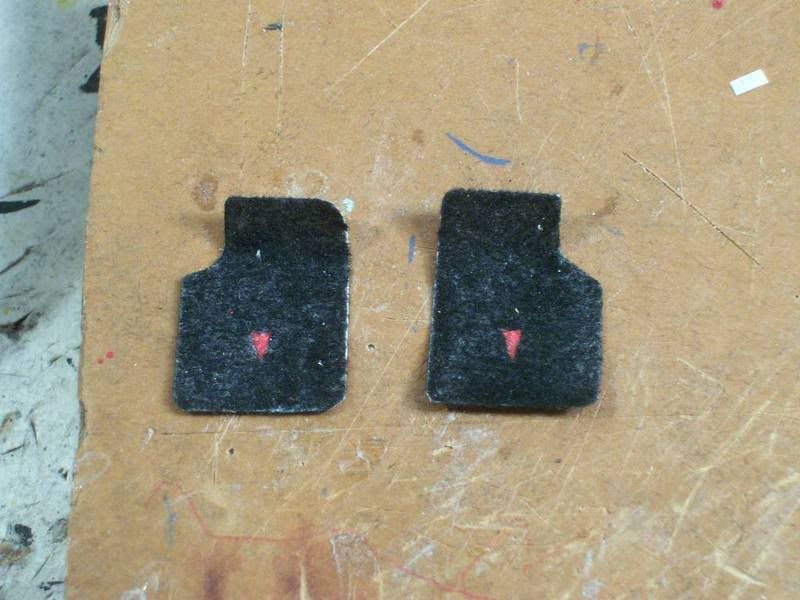 Here is the start of my pedal arrangement. All three pedals are from the Model Car Garage '68 Firebird photoetch kit. The arms on the brake and clutch are styrene; the gas will be mounted on a peg. I haven't built the parking brake pedal yet, but I also haven't forgotten about it. 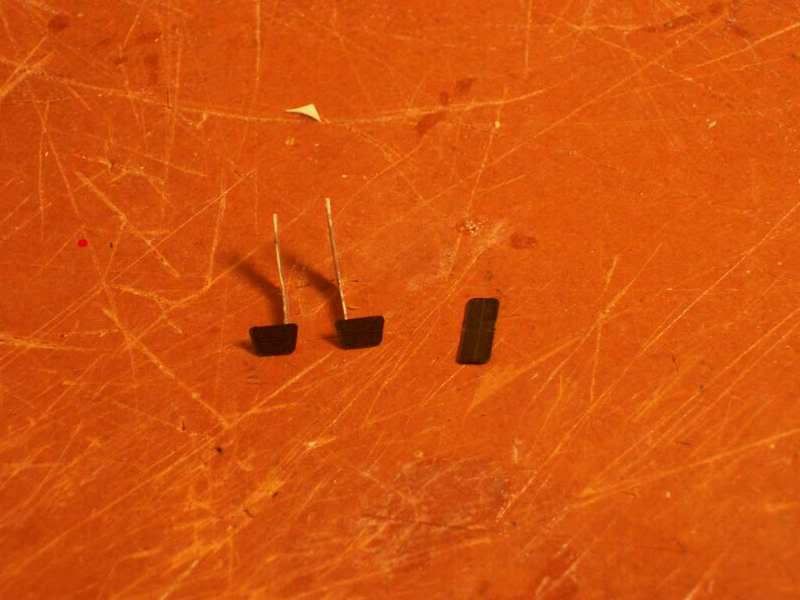 Here is the kit's steering wheel. It's accurate for the '68 (and maybe, just maybe, for the stock '69), but not accurate for the '69 in the interior photo I have. The steering wheel on said car might be custom, but I like it better than this. So, I decided to modify. The original:  I cut apart the column, removed the spokes, and cleaned up the wheel. Then, I made a new set of spokes from .01" styrene. 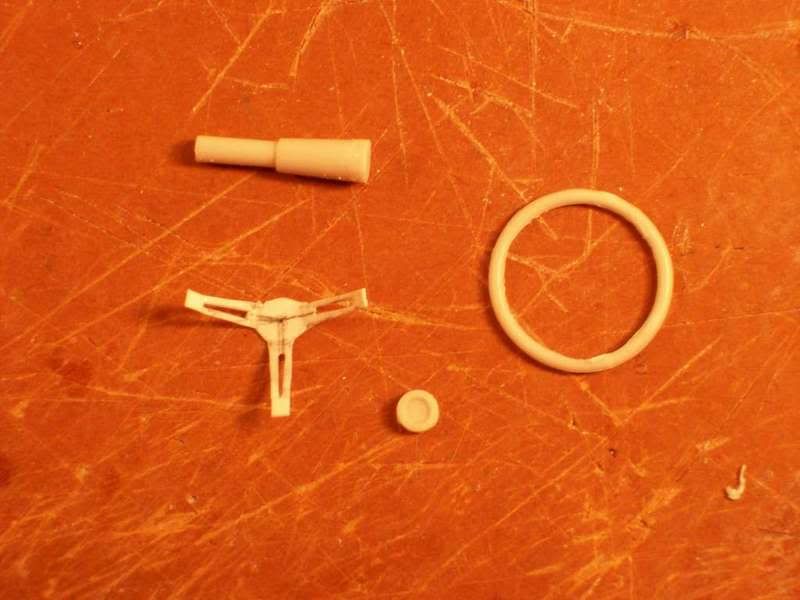 Assembled: 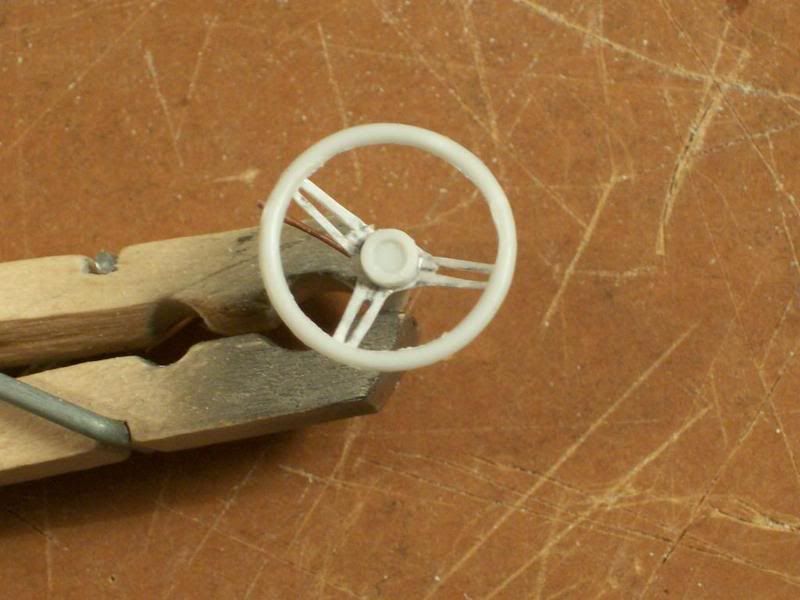 I added a blinker lever of copper wire with a knob of white glue. You can't really see the knob before paint. 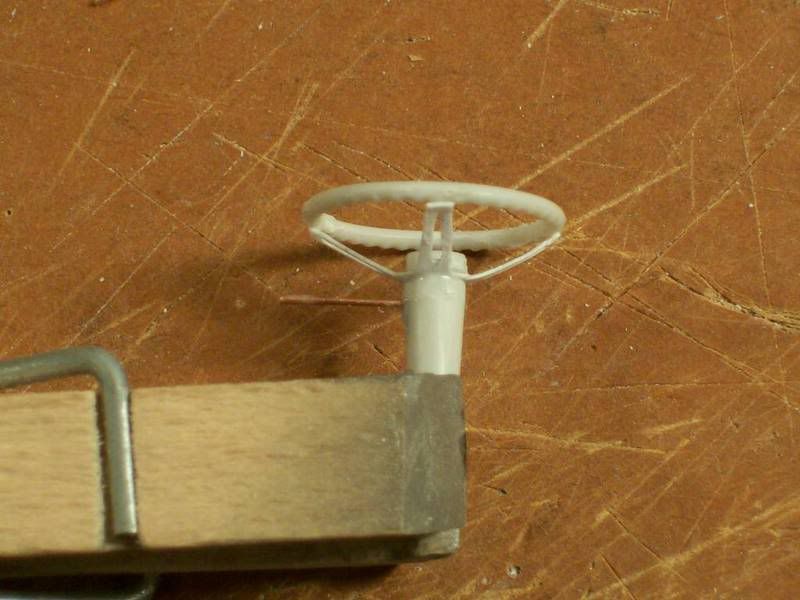 Here is the tiny set of keys from the photoetch kit. It had two Pontiac keyrings, so my '65 GTO is covered! Also, there's tons of extra GM keys, so I'll be able to adorn just about all of my muscle cars. 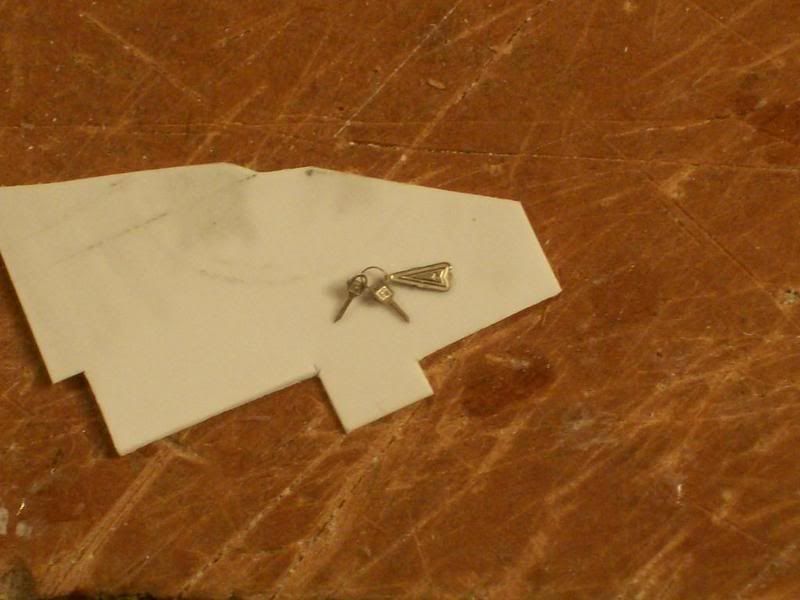 And, here's the final package: Steering wheel painted and assembled, with photoetched ignition switch and keys, and photoetch steering wheel center with Pontiac arrow emblem. I think it looks pretty good.  Here's the kit's dash. Not too spectacular, but decent gauges. 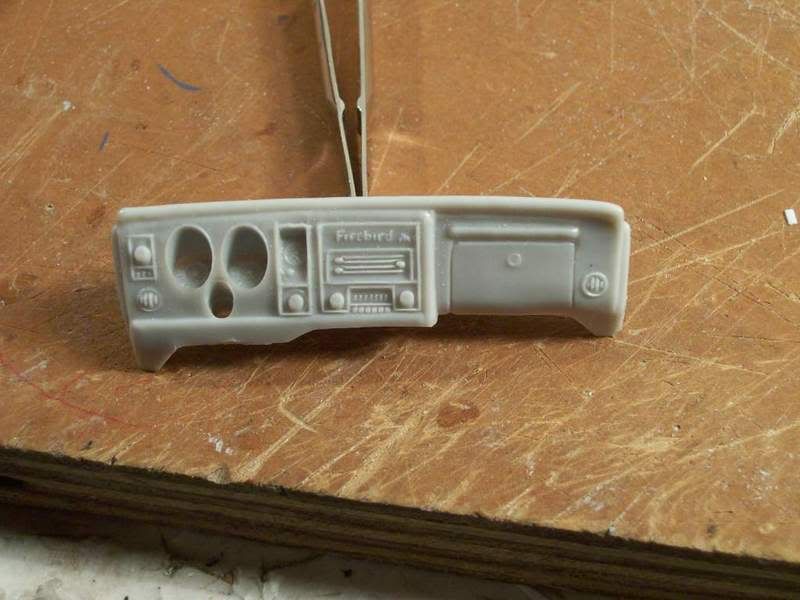 Here it is after some modifications. I drilled out and replaced the vents, fixed the switches under the headlight knob, added the photoetched climate control face, and added a handle above the glovebox. Oh, and I figured that with custom speakers, this car would probably have a custom stereo, too. I put a styrene faceplate there and plan to paint an Alpine CD player. I actually tried making a custom decal, but over the black paint on the dash (not shown yet, obviously), it was completely invisible.  I'll be basing the stereo off the one in our family car; it's a tasteful, restrained device that looks cool without gaudy displays, excess buttons, etc. I'm not fond of the trunk-filling speakers, either, so this car's sound system will be overall quite mild. I'll be basing the stereo off the one in our family car; it's a tasteful, restrained device that looks cool without gaudy displays, excess buttons, etc. I'm not fond of the trunk-filling speakers, either, so this car's sound system will be overall quite mild. 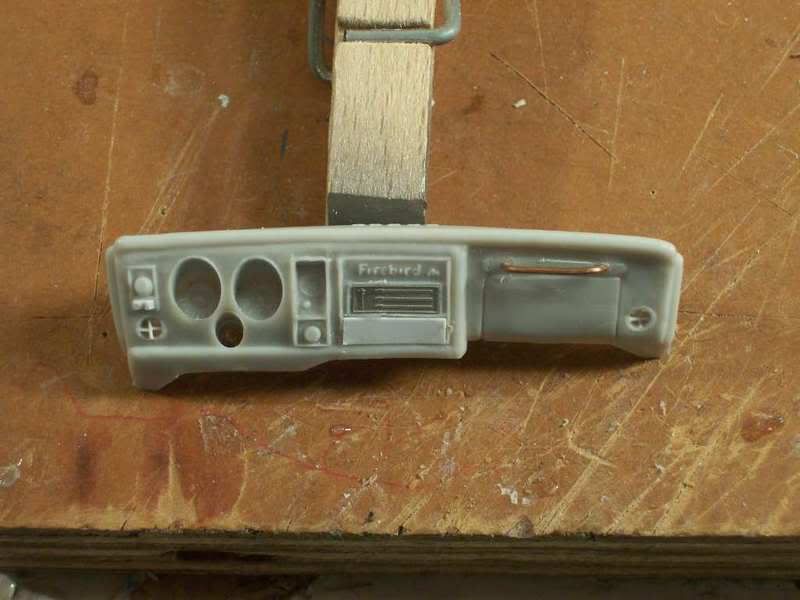 That's all so far on the interior, except for the stray picture at the end of the post that I took this morning. However, I also tinkered, just a little, with the engine. First, I built a simple fuel pump; since it's almost hidden, there was no need for extreme detail.  Here it is installed; sorry for the not-so-great picture. 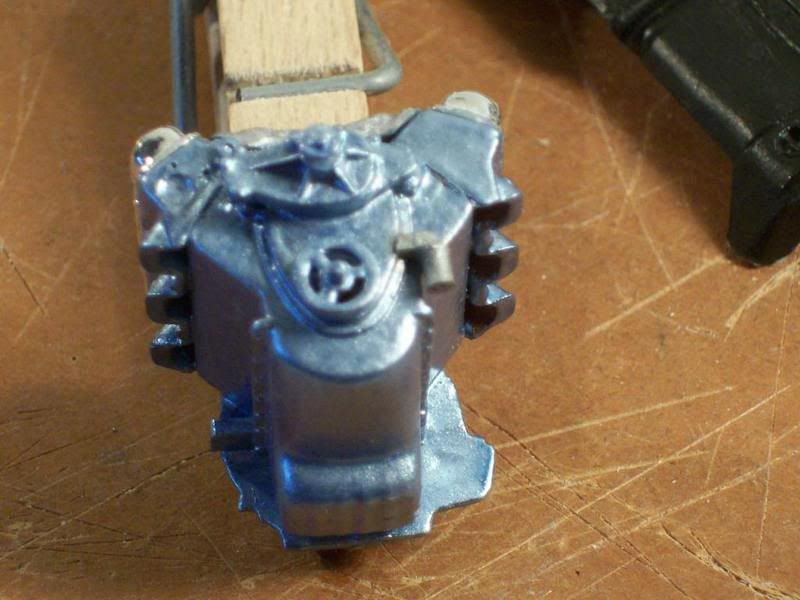 I also painted and installed the intake manifold. It looks pretty nice in Metalizer Aluminum. 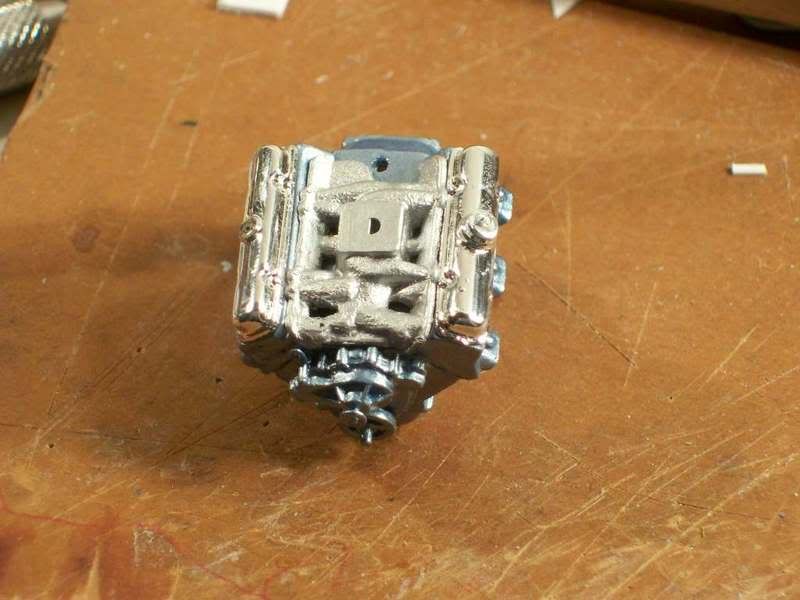 And, the stray picture: The interior tub, with first three pedals installed (still no parking brake) and doorhandles (look at the front of the arm rest). 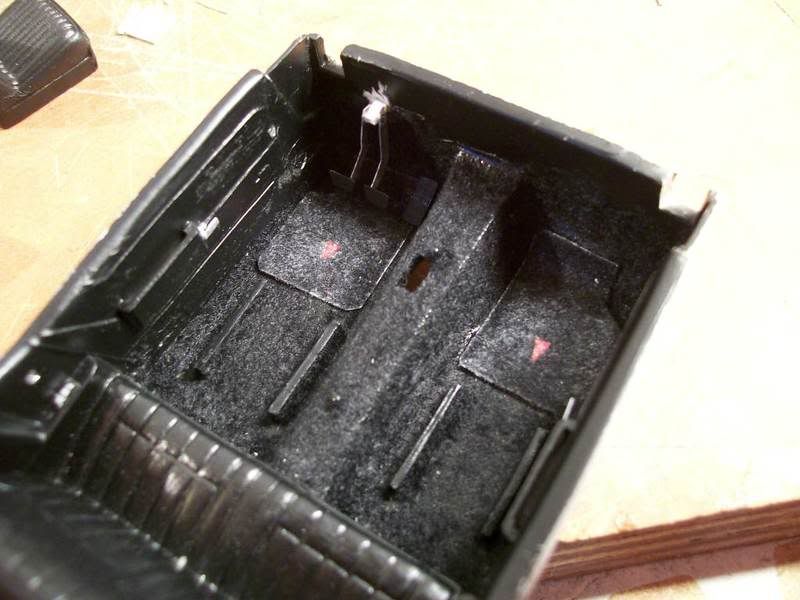 And, one more stray picture: The engine with that detailed carburetor and distributor on. 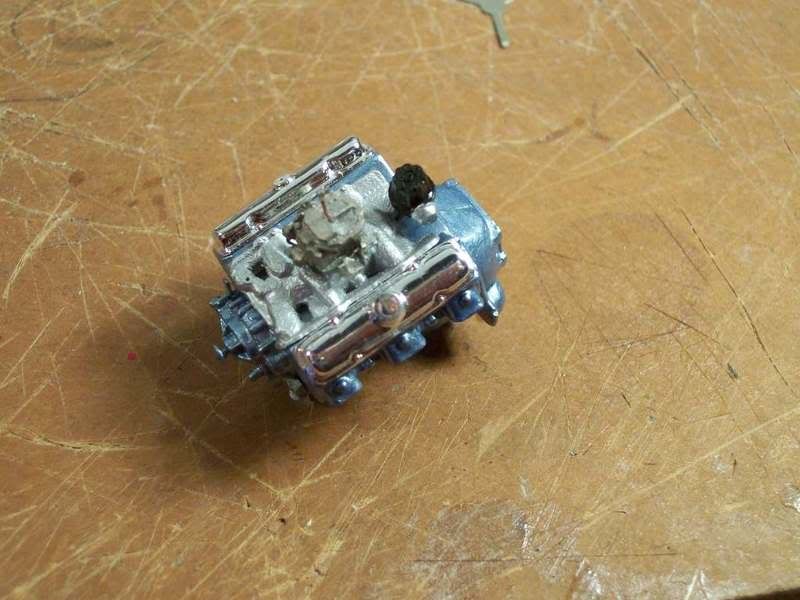 Next steps: parking brake, seatbelts, radio face, pump to carb fuel line and filter, coil and bracket, and vacuum/emissions hoses. That should be plenty to keep me busy! Here are three of my reference pictures. I have the same question about all three: Is the voltage regulator in the '69 Firebird on the firewall? I know that I was informed that the '67 and '68 had it on the radiator core support, but these pictures seem to suggest otherwise for the '69. Also part of my question is the location of the horn relay. Examine the pictures and give me your opinions/advice. I'll be doing this before long, so I hope to find out what's factory stock. Thanks! 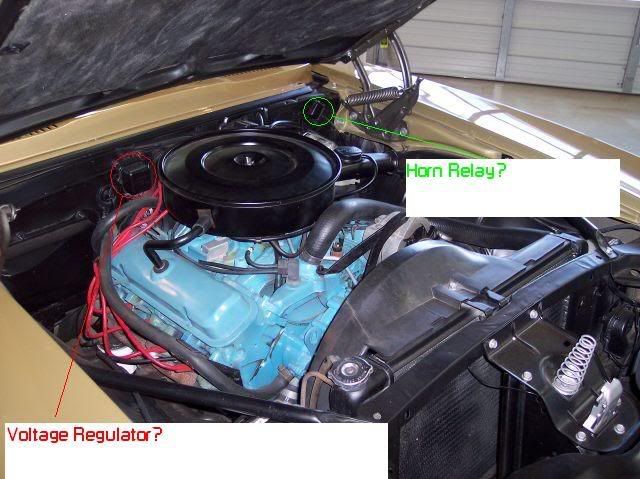 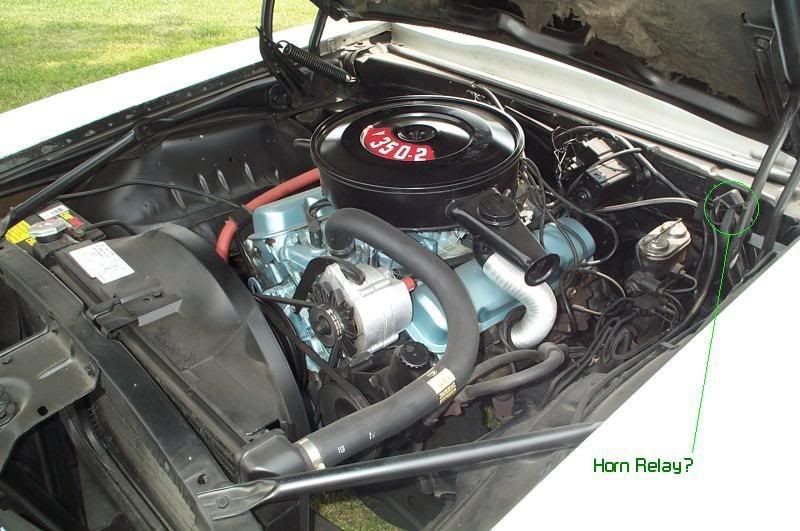 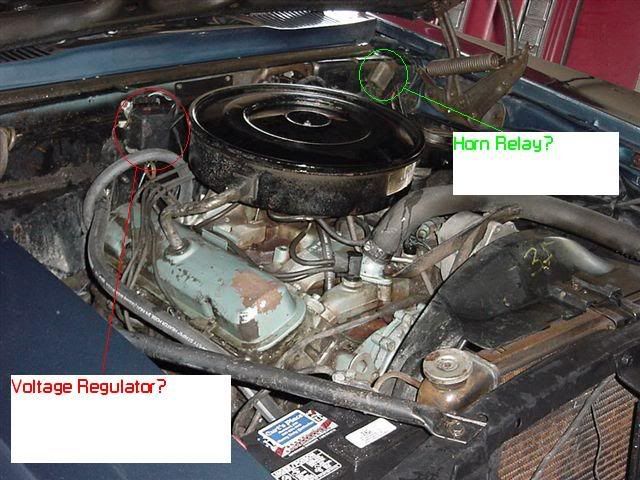 Thanks for all the help you guys have given so far. I hope to finish this kit soon; it's been a long and painstaking process! But I know it will be worth it in the end. Until my next update, enjoy! I hope you will be able to help me with my question. Thanks. Alex
__________________
|
|
|
|
|
|
03-24-2007, 08:42 PM
|
#48 | |
|
AF Enthusiast

Join Date: Nov 2005
Location: Gunma-ken
Posts: 560
Thanks: 0
Thanked 1 Time in 1 Post

|
Re: 1969 Firebird 'mild' custom--bringing new life to an absolutely lousy kit
You impress me everytime I see this thread...You use the "basic" styrene,and make some miracles with it! Stunning!!
__________________
 "Oh noez,it has more stickers than me! And a wing too!  
|
|
|
|
|
|
03-24-2007, 10:52 PM
|
#49 | |
|
AF Enthusiast
 Join Date: Jul 2005
Location: Cheshire, Connecticut
Posts: 872
Thanks: 0
Thanked 1 Time in 1 Post


|
Re: 1969 Firebird 'mild' custom--bringing new life to an absolutely lousy kit
This looks so amazing! It's crazy cool how much like the actual your engine color is.
__________________
 
|
|
|
|
|
|
03-25-2007, 12:25 PM
|
#50 | |
|
AF Regular
Join Date: Aug 2006
Location: Tucson, Arizona
Posts: 249
Thanks: 0
Thanked 0 Times in 0 Posts
|
Re: 1969 Firebird 'mild' custom--bringing new life to an absolutely lousy kit
That a hell of a nice job on the interior. I love the little arrowheads on your floor mats. Nice touch. The pictures you posted of the horn relay and voltage regulator look correct. The 68 regulator was on the core support, they must have moved it in 69. Keep us updated it's turning out awsome.
|
|
|
|
|
|
03-28-2007, 09:38 PM
|
#51 | |
|
AF Enthusiast
Thread starter
Join Date: Aug 2006
Location: Portland, Oregon
Posts: 633
Thanks: 2
Thanked 7 Times in 1 Post
|
Re: 1969 Firebird 'mild' custom--bringing new life to an absolutely lousy kit
Well, this time I managed to quickly get some work done. And with spring break coming up next week, I should be able to make some real progress
 Here is the wrap-up of the interior. First, the dash, detailed and painted: 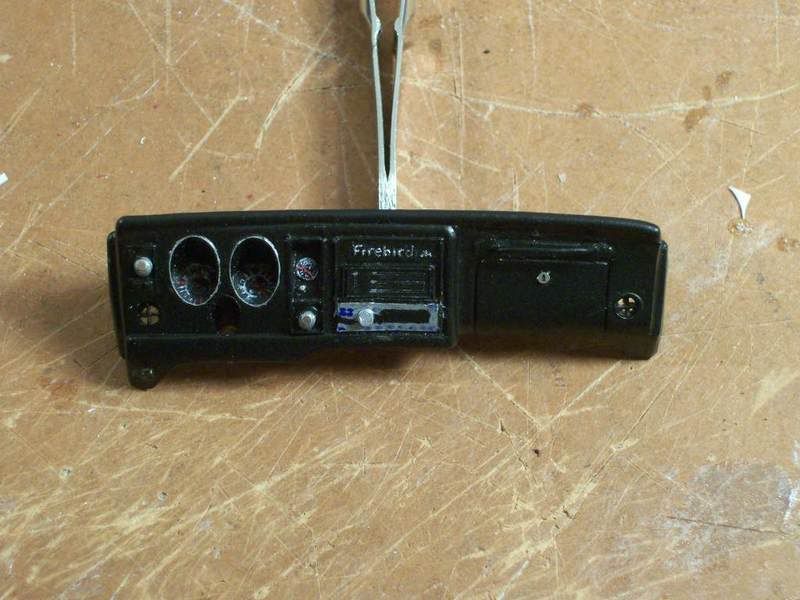 I later extended the black screen of the radio face all the way to the right edge after I realized that the real radio is that way. Here are the front seats with belts. Note that the male buckles seem to generally be retractable. I'm sure that was an option, but it was a popular one, so I saved out on a little work and two photoetched buckles. I really like the "GM" on the female buckles; these parts were from Model Car Garage. I painted the blue. 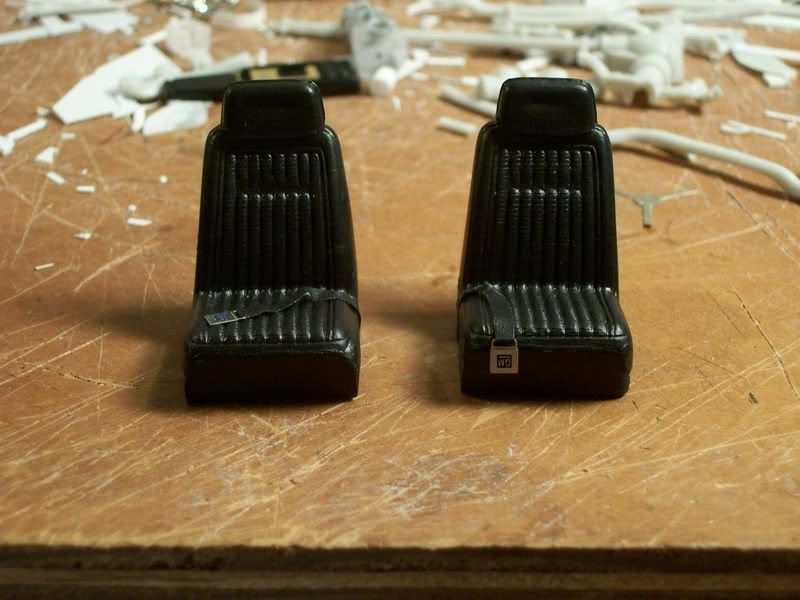 Here are the rear seatbelt buckles. If you look closely, you'll notice something odd--it's not an optical illusion. When creating their photoetched parts, Model Car Garage somehow accidentally flipped the "GM" instead of rotating it (to produce every other row of buckles that were "upside down" on the parts tree). So instead of an upside-down "GM" that corresponds with the upside-down buckles (I'm sorry if that's confusing), I have a backwards "GM." That's why I used them in the backseat (though I won't in a convertible!) The glimpse you'll be able to catch of them once the car is assembled won't be enough to notice a problem. 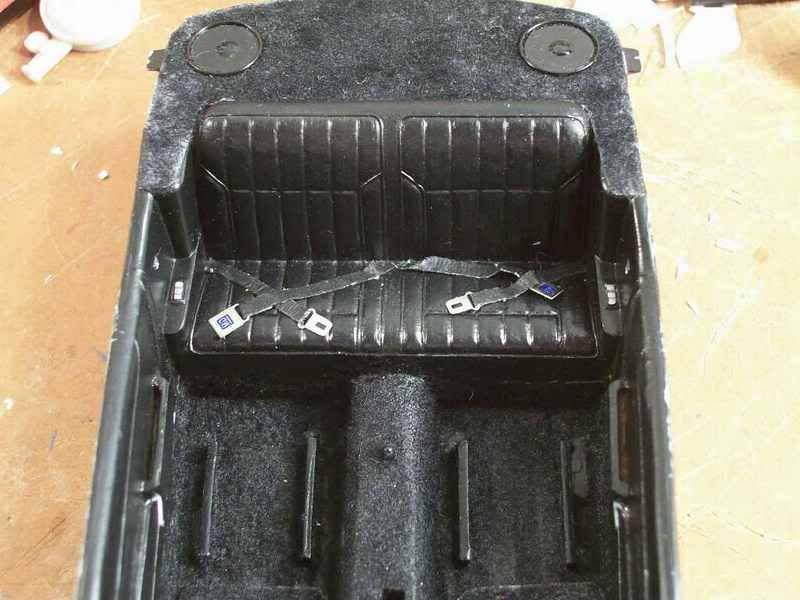 Here is the parking brake pedal. I realized that the pedal arms are supposed to be gloss black, not silver, so I did this one that way. The other two will by OK, as it's really dark down there once assembled. 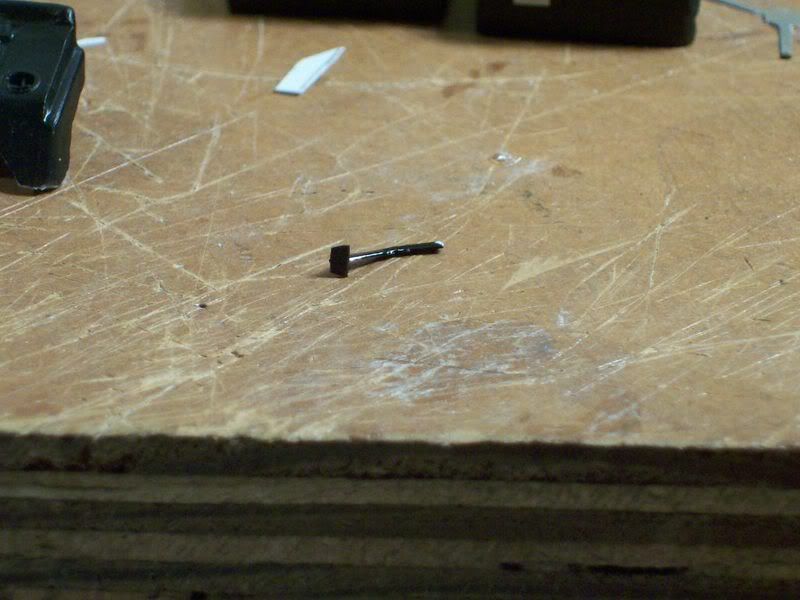 Here's the installed pedal (look closely!) and a view of the door panel emblem. I painted these (and the other Firebird emblems for the body) with dark red and black paint, then sanded the paint off of the raised edges. 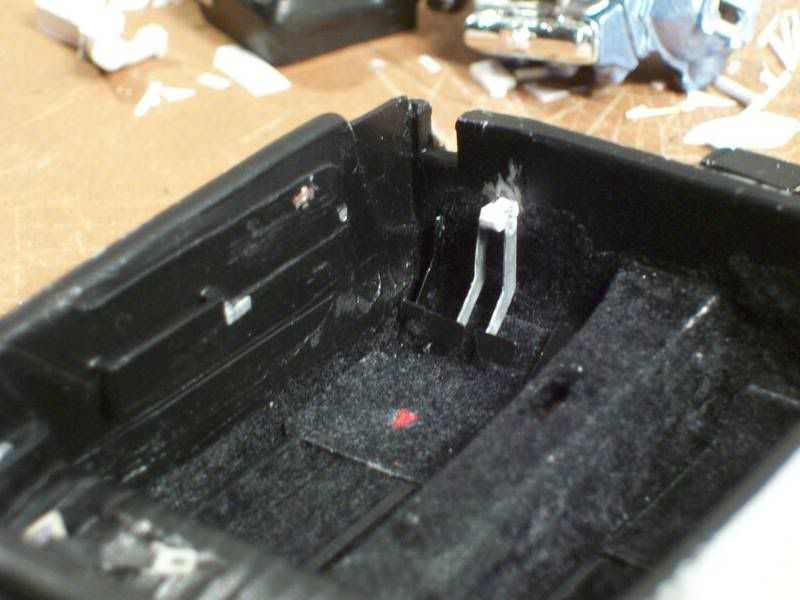 At last, all parts assembled (except the gearshift, which will mount to the transmission) and the interior done! Enjoy!  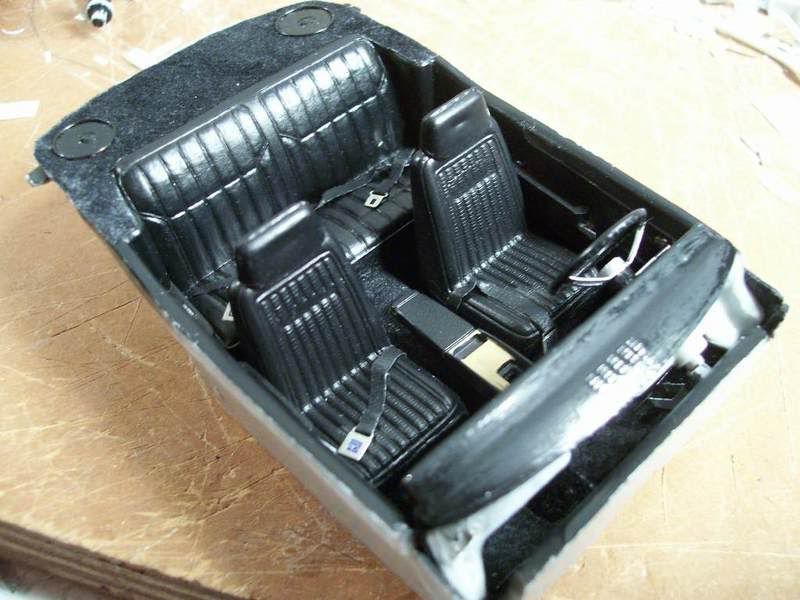  And, a little work on the drivetrain. I built a new shifter (from a straight pin) and knob (carved and filed from a piece of sprue) and mounted it to the shifter housing. (Made of little bits of styrene). Soon, this will attach to the tranny and shift linkage. 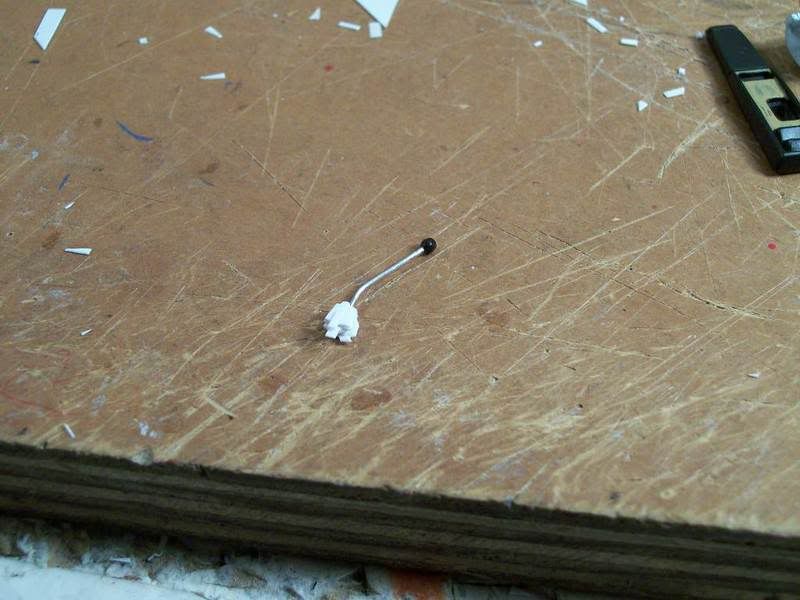 And, finally, I built the heat collector "stove" for the exhaust manifold. This will connect to the warm air tube, which connects to the thermactor valve on the air cleaner intake. Basically, in real life, these parts just slide over the manifold and snap into place. Note that I can't really see this part in any pictures, but am basing it off of Chevrolet. Sorry if it's not Pontiac-correct. 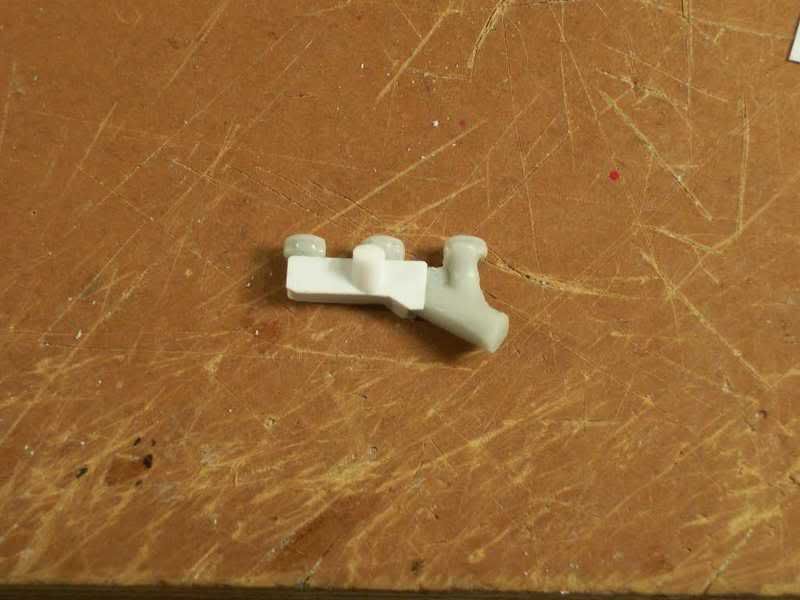 That's all for now; I'll be working heavily on the engine and chassis now that the interior is done. I also clear-coated the body and when it is dry, I will be able to polish and then add trim, windows, and soforth. Look for updates next week as I will have spring break to work. I'm also starting a custom 1970 Chevelle with a friend who is new to the hobby next week, so I'll probably start a thread on that, too. Thanks for all the help, kind comments, and criticism when needed! I can actually see an end to this project (unlike many of my other builds!) Alex
__________________
|
|
|
|
|
|
03-28-2007, 11:47 PM
|
#52 | |
|
Authorized Vendor
 
Join Date: May 2003
Location: London
Posts: 2,129
Thanks: 0
Thanked 0 Times in 0 Posts
|
Re: 1969 Firebird 'mild' custom--bringing new life to an absolutely lousy kit
Fantastic interior detail. I'll have to order a set of those photoetch seatbelts!
__________________
   
|
|
|
|
|
|
03-30-2007, 11:32 AM
|
#53 | |
|
AF Regular
Join Date: Jan 2007
Location: Boelus, Nebraska
Posts: 208
Thanks: 3
Thanked 0 Times in 0 Posts
|
Re: 1969 Firebird 'mild' custom--bringing new life to an absolutely lousy kit
This may seem a little dee dee dee but what is photoetch? everyone here is talkng about how great it is.
__________________
I stepped on a Cornflake, and now I am a cereal killer. 
|
|
|
|
|
|
03-30-2007, 11:51 AM
|
#54 | ||
|
AF Enthusiast
Thread starter
Join Date: Aug 2006
Location: Portland, Oregon
Posts: 633
Thanks: 2
Thanked 7 Times in 1 Post
|
Re: 1969 Firebird 'mild' custom--bringing new life to an absolutely lousy kit
Quote:
Photoetch parts are made from thin sheets of nickel, stainless steel, brass, or other metal. (.005" or thinner). Using an acid washing process, these metal sheets are "etched" to form dozens of tiny parts with exceptional detail, attached to the metal "sprue" like the plastic parts of a model kit. Some basic information about the general process is here: http://en.wikipedia.org/wiki/Photoetching; the process is used a lot in making electronics components. Often, photoetch "kits" are a single, 1.5" x 2.5" (or thereabouts) sheet of parts for a particular car. You can also get sheets of one type of part. For example, there is the set I used for this Firebird, which was designed for the '68 Firebird. Made by detail parts producer Model Car Garage, the set includes fine grilles for the front, taillight trim bezels, rearview mirror parts, doorlocks, glovebox lock, ignition switch, tiny keys and keyring, steering wheel spokes and center cap, wheel center caps, parking brake release handle, clutch, brake, and gas pedal faces, and, most importantly for exterior details, Firebird emblems and scripts. The Model Car Garage seatbelt buckle set is an example of a generic parts sheet. It features male and female "GM" style buckles only. You can also purchase sets of engine details, carburetor linkages, and other assorted things. These can be found at www.modelcargarage.com or www.scaledreams.com. Most of these sets are for American muscle cars. However, Model Car Garage is not the only maker of photoetch sheets. At www.scalemotorsport.com, you'll find very high-quality comprehensive sets for various race and sports cars. These are attached to a rubber backing so they don't have to be cut from any sprue. Acu.Stion also makes nice photoetch sets for various Tamiya and Fujimi models. Searching around on the Internet will get you various results. Basically, photoetch parts help bring your models to the next level of detail with fine, precisely detailed parts that would be nearly impossible to make from styrene plastic (especially emblems and scripts). And, the photoetch parts are durable, allowing sanding and buffing, superglue adhesion, etc. Hope that helps and perhaps you will begin to use photoetch too! It really is worth it if you care about tiny details. Alex
__________________
Last edited by 924_CarreraGTS; 08-16-2007 at 07:33 PM. |
||
|
|
|
|
03-30-2007, 10:56 PM
|
#55 | |
|
AF Regular
Join Date: Aug 2006
Location: Tucson, Arizona
Posts: 249
Thanks: 0
Thanked 0 Times in 0 Posts
|
Re: 1969 Firebird 'mild' custom--bringing new life to an absolutely lousy kit
The interior look great. You did an awsome job replicating the real thing with the little details. The painted door emblems are an excellent touch. I'm glad you went with them. Are those seat belts made from masking tape?
|
|
|
|
|
|
03-31-2007, 04:41 PM
|
#56 | |
|
AF Newbie
 
Join Date: Feb 2007
Location: Hell, Nevada
Posts: 30
Thanks: 0
Thanked 2 Times in 2 Posts
|
Re: 1969 Firebird 'mild' custom--bringing new life to an absolutely lousy kit
Talk about detail. This build is amazing so far.
|
|
|
|
|
|
03-31-2007, 08:29 PM
|
#57 | |
|
AF Newbie
Join Date: Sep 2005
Location: Dartmouth
Posts: 70
Thanks: 0
Thanked 0 Times in 0 Posts
|
Re: 1969 Firebird 'mild' custom--bringing new life to an absolutely lousy kit
wow thats awsome
__________________
Current Projects: 1969 Dodge Super Bee 1993 Honda Civic |
|
|
|
|
|
04-02-2007, 07:15 PM
|
#58 | ||
|
AF Enthusiast
Thread starter
Join Date: Aug 2006
Location: Portland, Oregon
Posts: 633
Thanks: 2
Thanked 7 Times in 1 Post
|
Re: 1969 Firebird 'mild' custom--bringing new life to an absolutely lousy kit
Quote:

__________________
|
||
|
|
|
|
04-02-2007, 07:36 PM
|
#59 | |
|
AF Enthusiast
Thread starter
Join Date: Aug 2006
Location: Portland, Oregon
Posts: 633
Thanks: 2
Thanked 7 Times in 1 Post
|
Re: 1969 Firebird 'mild' custom--bringing new life to an absolutely lousy kit
Alright, some more progress. Note that although I organized this post in a logical fashion, I don't actually work that way--I just do whatever I can at the moment, while other parts dry. But I put these pictures in order.
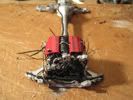
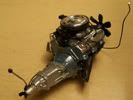
First, the chassis: I painted the frame rails and gas tank in semi-gloss black. 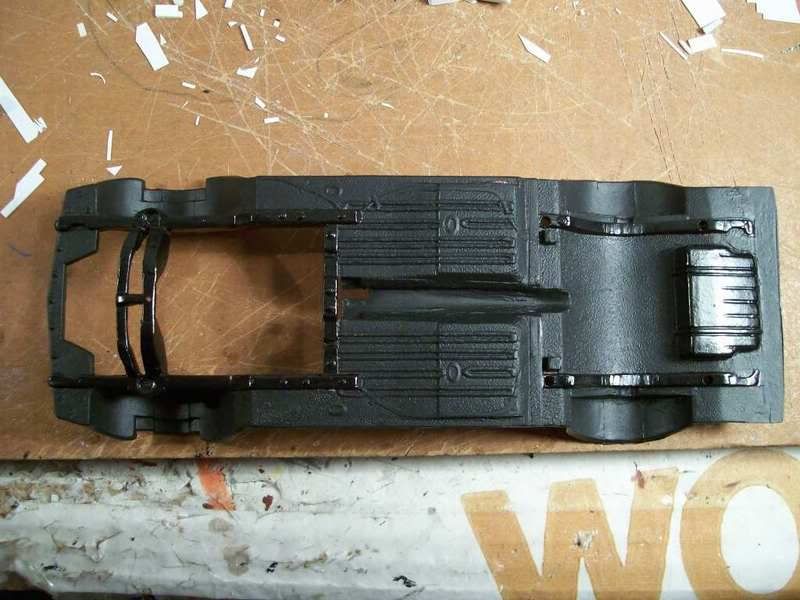 I chromed the exhaust tips with Bare-Metal Foil and painted them flat black inside. 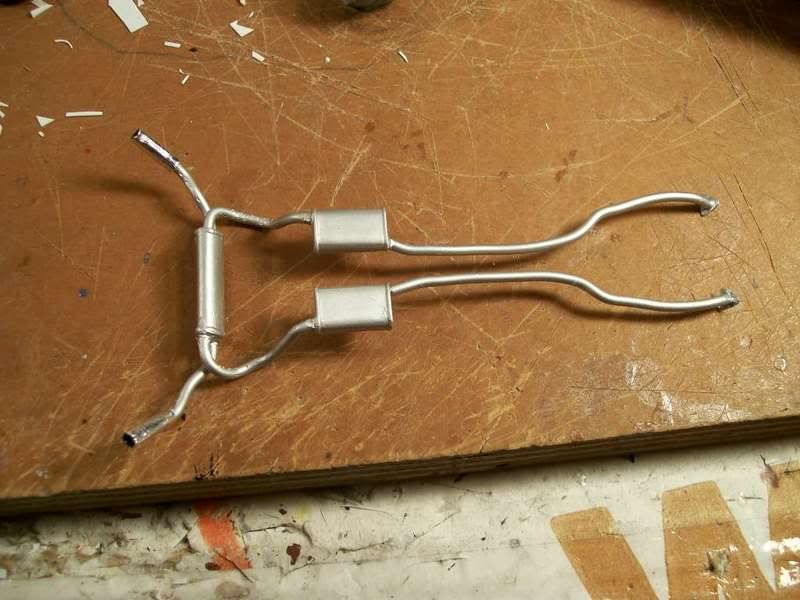 I glued the kit leaf springs (separated long ago from the lame axle/exhaust combo that came with the model) to the axle I scrounged from the spares box. 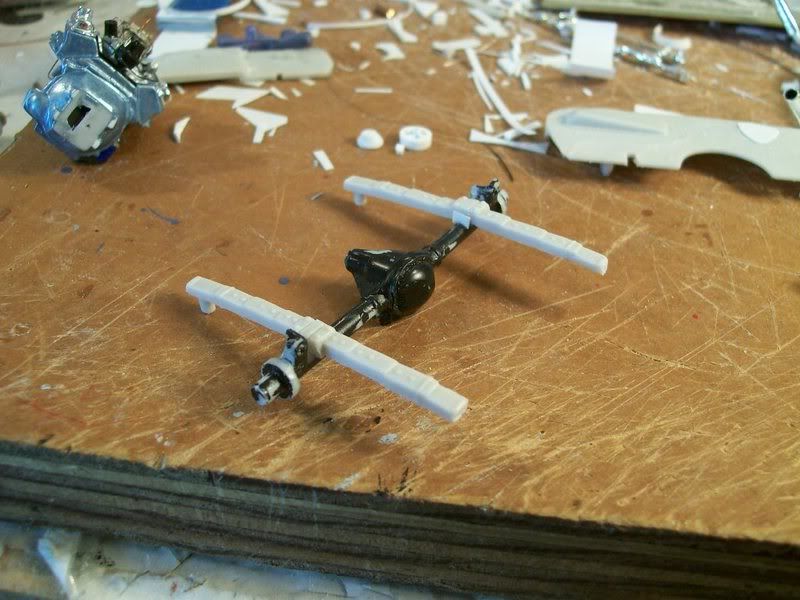 Next, the engine: I built an oil filter from sprue. This is another benefit of having an auto mechanic father: I just looked up in the parts catalog what aftermarket filter would be used on the '69 Firebird 400, and found that it would be the ACDelco PF24. So, I went to the parts shelf and measured a PF24, getting the exact dimensions. It makes for great accuracy!  Next, I built a coil and bracket, visible to the right of the distributor. This was actually a rather complex part, as the coil mounts at an odd angle and there is an extra bracket for the throttle return spring and linkage. 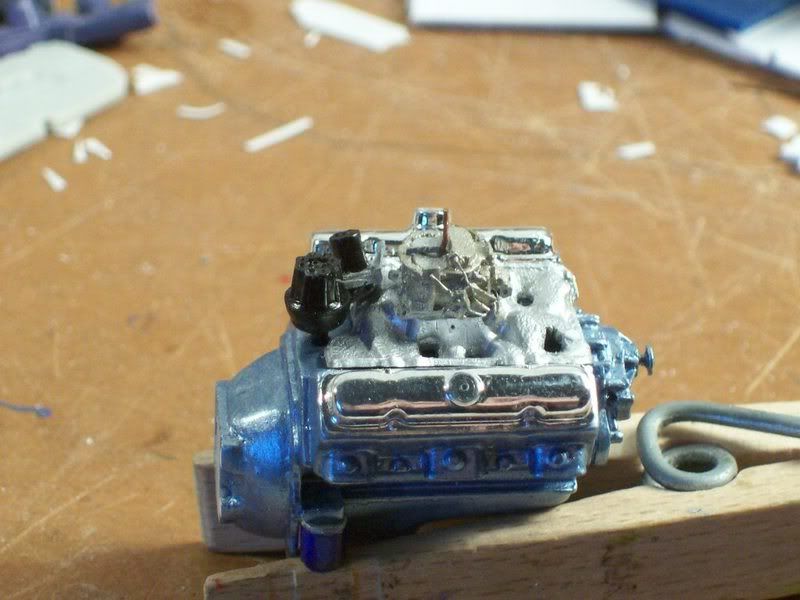 Here are the vacuum hoses, stemming from the coolant-activated vacuum switch (it's like a thermostat). The silver canister at the lower right is a vacuum amplifier, according to my Dad. (I used a Chilton diagram for all this). 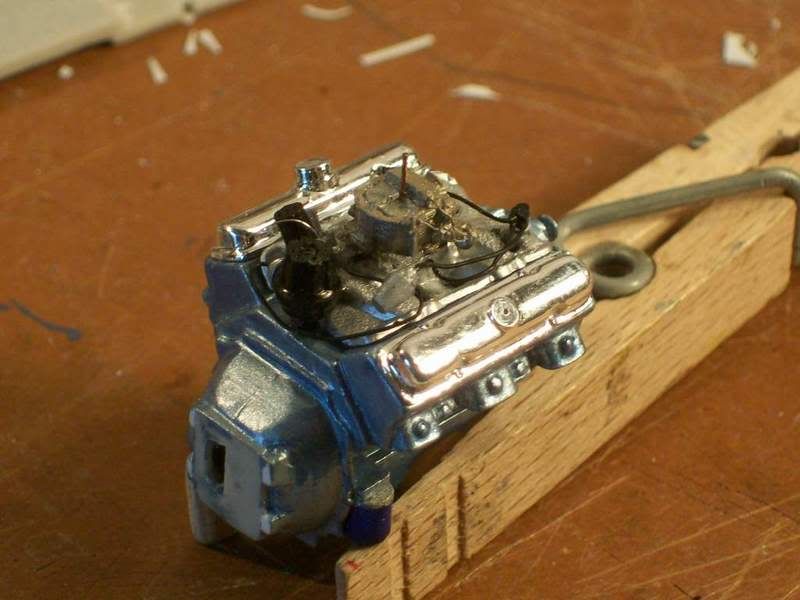 Here is the fuel line and filter. You can also see the other side of the coolant vacuum switch. 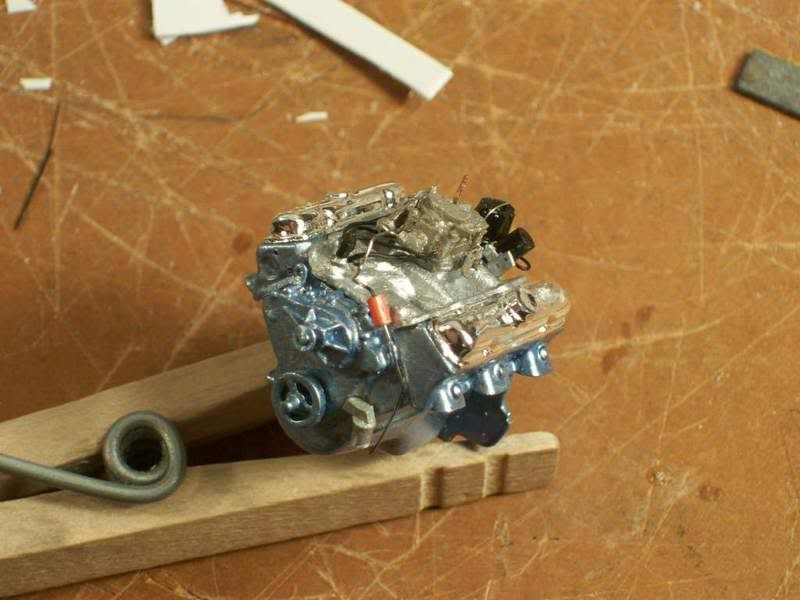 Now for the transmission. I painted the shifter case and glued it on.  Linkage in place, as per the Chilton repair manual (4-speed Muncie transmission). 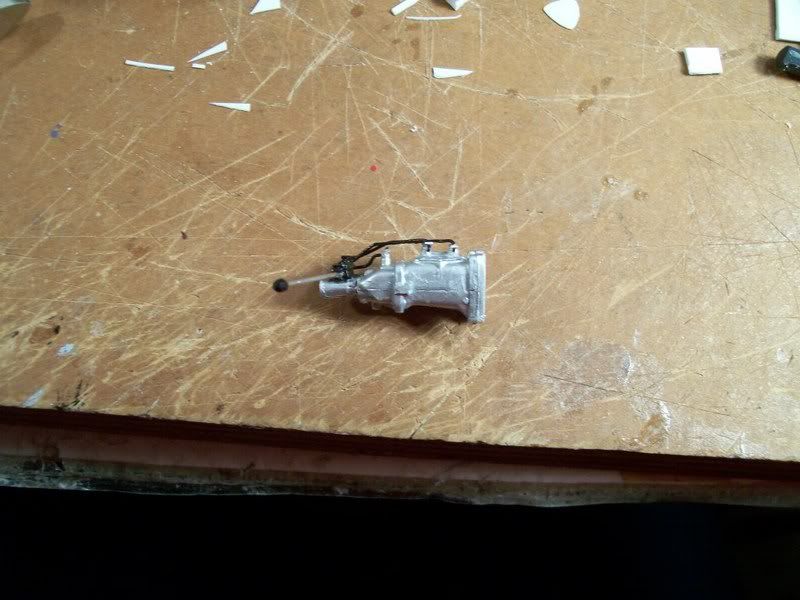 The tranny's done! And, finally, the engine bay area. After examining the kit radiator assembly, I decided it would be too hard to repair. The radiator itself was too small, and the core support was fragile. So, I just built a new support out of .04" styrene and found a radiator from the spares box. As I recall, it once belonged to the Monogram 1996 Corvette Gran Sport. It fit the Firebird perfectly! 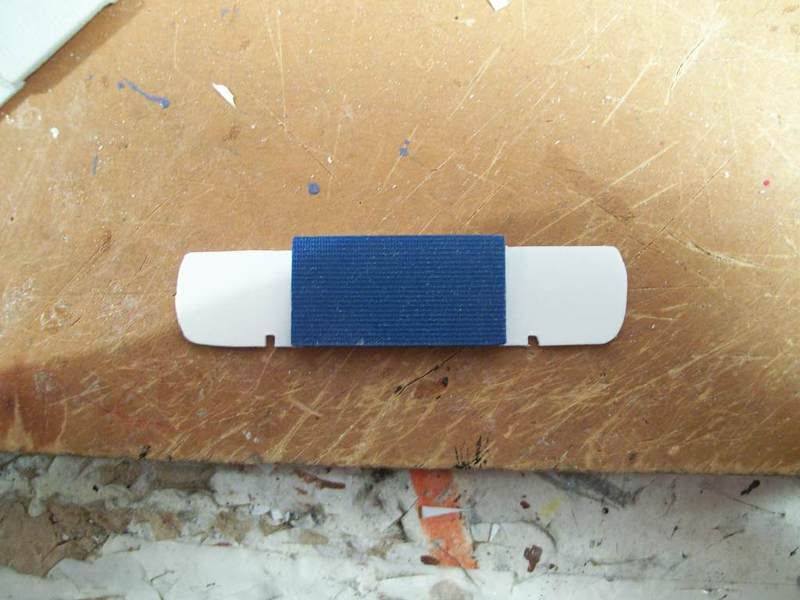 Here it is, puttied in place. I puttied over the texture on the edges to simulate the smooth metal end caps of a radiator. 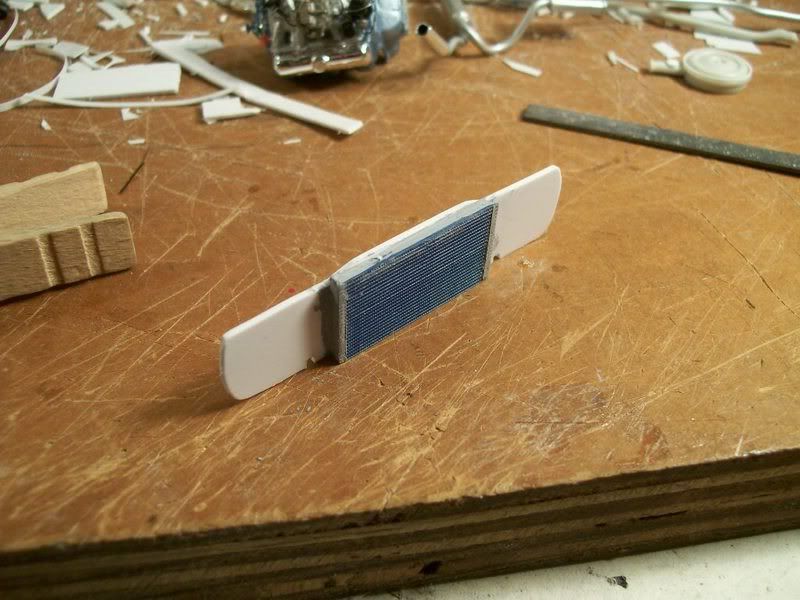 Here's the fan shroud. It seems awfully large to me, but I'm sure that they were full circles, and based on the width of the ones in my reference pictures, it must stick that far down as well. Still needs a radiator cap, and then I'll paint it. 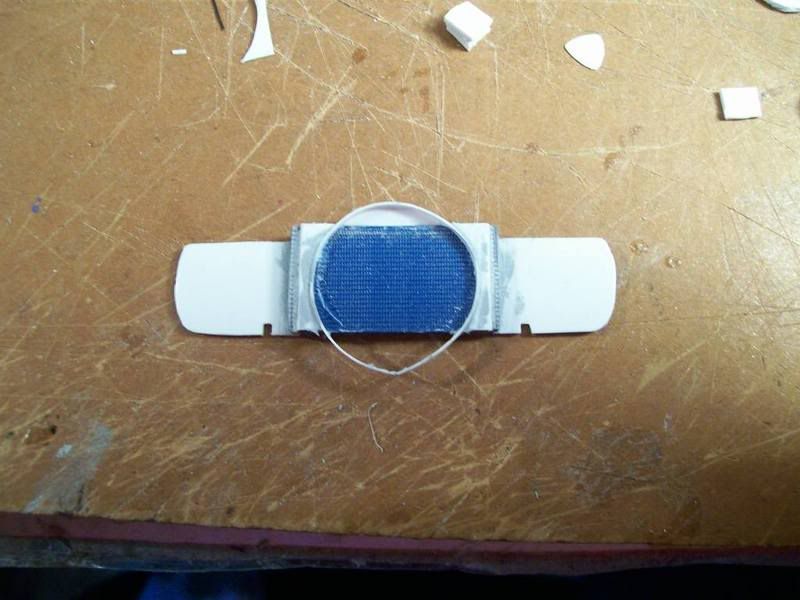 The firewall will get painted too, before I go any farther. Here is the base plate for the wiper motor. After I paint, I'll be able to install the various firewall components and wiring.  At left is the master cylinder that I scratchbuilt from styrene, wire, and putty. I based the measurements on a real one that I dug out of the junk pile at my Dad's shop (another benefit!) I think it turned out pretty good. At right is a spare parts box brake booster. I plan to build the factory option front disc brakes, and figured that adding vacuum assist to them would have been a logical choice for this powerful car. 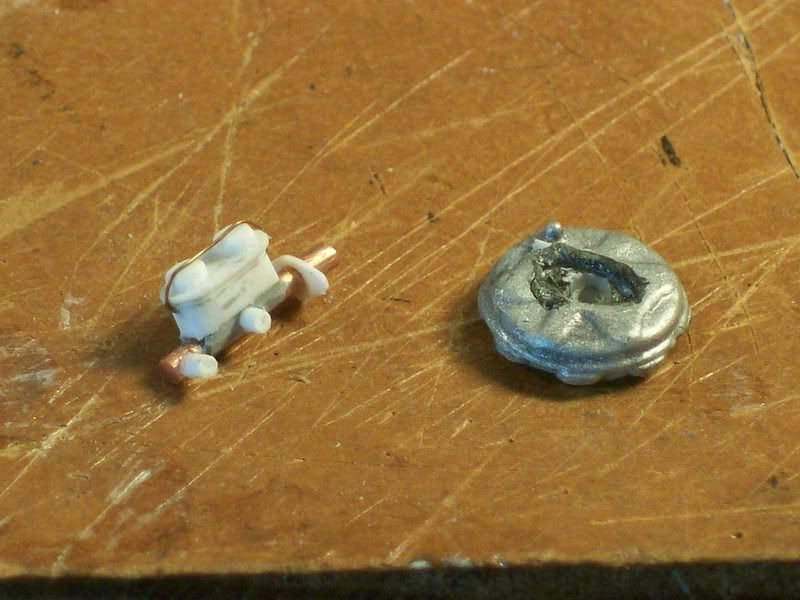 Finally, I built a couple electrical parts. At left is the voltage regulator on its oddly-shaped mouting plate. At right is the tiny horn relay. 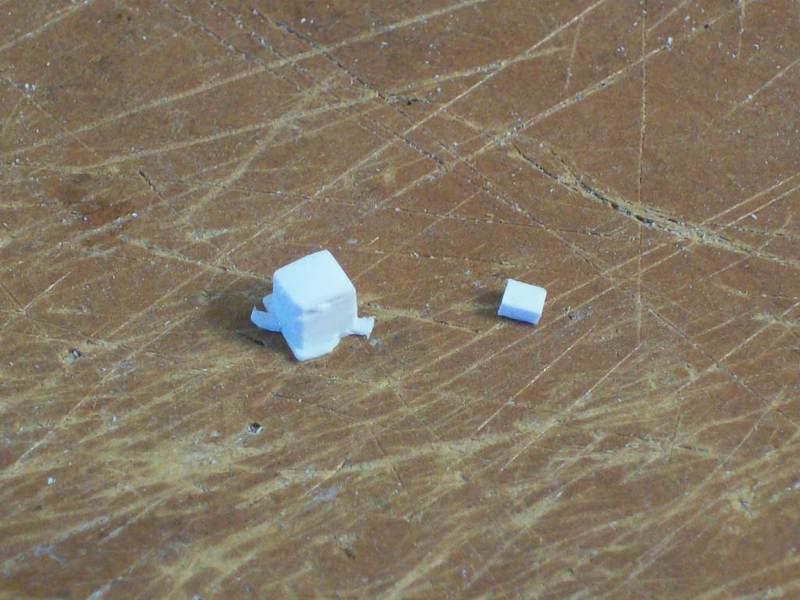 Spring break has already allowed me to accomplish this much, so I'm sure I'll be able to get a lot more work done. But first, ANOTHER QUESTION that will allow me to do some more work on the chassis. Where on the fuel tank does the fuel line come out? Is it on the front or the side? (the fuel line runs along the driver's side of the chassis). Hope you can answer so I can plumb the chassis and start the suspension assemblies. Thanks for looking and for your kind comments. I hope to finish this model within the month (but no guarantees!) Alex
__________________
|
|
|
|
|
|
04-02-2007, 07:44 PM
|
#60 | |
|
AF Enthusiast
Join Date: Jul 2005
Location: Cheshire, Connecticut
Posts: 872
Thanks: 0
Thanked 1 Time in 1 Post
|
Re: 1969 Firebird 'mild' custom--bringing new life to an absolutely lousy kit
I think I'm addicted to this thread. I love waiting for the updates!
__________________
|
|
|
|
|
|
|
POST REPLY TO THIS THREAD |
 |
|
|


