|
|
|

|
|
| Search | Car Forums | Gallery | Articles | Helper | AF 350Z | IgorSushko.com | Corporate |
|
| Latest | 0 Rplys |
|
|||||||
| WIP - Street Post topics for any "Works In Progress" street vehicles projects in this sub-forum. |
 |
 Show Printable Version | Show Printable Version |  Email this Page | Email this Page |  Subscribe to this Thread
|
|
|
Thread Tools |
 10-13-2006, 12:20 PM
|
#1 | |
|
AF Enthusiast

Join Date: Aug 2006
Location: Portland, Oregon
Posts: 633
Thanks: 2
Thanked 7 Times in 1 Post
|
Corvette Z06 gift project
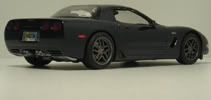
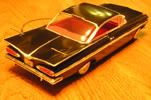
The Corvette is my 26 year old sister's favorite car. Since I am in high school, I can't exactly get her one, so I'm settling for a model. At first, I planned to get Revell's 2004 Z06 Le Mans Commemorative edition car, but then I looked up at my shelf and realized that, Hey! I have a 2001 Z06 right there, already built! Actually, though, it would have been better if it were not already built, because I had done a pretty terrible job the first time around. So I took it down, tore it apart, and began yet another restoration (something I'd promised myself I would never again do).
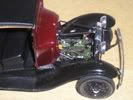
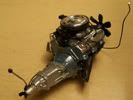
 I ordered a new wheel retainer, two mirror housings, a mirror, and decals from Revell, then put the body, hood, and wheels into a pan and sprayed them with oven cleaner. The chrome came off the wheels easily, but it took two sessions of soaking to get all the paint and primer off the body. Once it was clean, I removed the rear deck lid, filed it down to a more realistic thickness, and made some paper-clip hinges for it. Then, I sprayed the body, hood, trunk lid, and new mirror housings with Plasti-Kote auto body primer (which I've found to be much better than Testors). After a sanding with 2000 grit, I sprayed a few coats of dark blue. My sister doesn't like the regular blue color of the Corvette, but her favorite color is the dark navy blue. Testors' so-called "Dark blue" is almost the same as the regular blue, so I darkened it with gloss black. My first paint session was not so great--I wore through the paint when polishing. The second time around, I darkened the paint a little more, sprayed a good even coat, then, once it was dry, applied the emblem decals and covered it with 7 coats of GlossCote (clear). This polished out great--I only wore through on the left "Z06" emblem, chipping the "06" off. A little touch of silver paint was good enough to fix this. After polishing, I applied Bare-Metal Black Chrome foil to the trim, painted some semi-gloss black, and then put Bare-Metal chrome foil in all the light bezels. Here are the results: I ordered a new wheel retainer, two mirror housings, a mirror, and decals from Revell, then put the body, hood, and wheels into a pan and sprayed them with oven cleaner. The chrome came off the wheels easily, but it took two sessions of soaking to get all the paint and primer off the body. Once it was clean, I removed the rear deck lid, filed it down to a more realistic thickness, and made some paper-clip hinges for it. Then, I sprayed the body, hood, trunk lid, and new mirror housings with Plasti-Kote auto body primer (which I've found to be much better than Testors). After a sanding with 2000 grit, I sprayed a few coats of dark blue. My sister doesn't like the regular blue color of the Corvette, but her favorite color is the dark navy blue. Testors' so-called "Dark blue" is almost the same as the regular blue, so I darkened it with gloss black. My first paint session was not so great--I wore through the paint when polishing. The second time around, I darkened the paint a little more, sprayed a good even coat, then, once it was dry, applied the emblem decals and covered it with 7 coats of GlossCote (clear). This polished out great--I only wore through on the left "Z06" emblem, chipping the "06" off. A little touch of silver paint was good enough to fix this. After polishing, I applied Bare-Metal Black Chrome foil to the trim, painted some semi-gloss black, and then put Bare-Metal chrome foil in all the light bezels. Here are the results:  In the meantime, I started the engine. Sorry about hardly any progress pics--I wasn't thinking about posting when I started (this is my first WIP post). Here are some shots of the engine in its almost-completed state. Still to be added is a wiring harness, the fuel rail covers, and an oil cap.  It's hard to see in this picture (which darkened for some reason  ), but I added a completely new drive belt, made of masking tape. The kit part was about the size of a 2x4, so it had to be fixed. I also replaced the crank pulley with a handbuilt one, and built a bracket and new cap for the power steering fluid tank. You can also see the oil fill tube (at left) that will connect the oil cap (on top of the fuel rail cover) with the valve cover. ), but I added a completely new drive belt, made of masking tape. The kit part was about the size of a 2x4, so it had to be fixed. I also replaced the crank pulley with a handbuilt one, and built a bracket and new cap for the power steering fluid tank. You can also see the oil fill tube (at left) that will connect the oil cap (on top of the fuel rail cover) with the valve cover. You'll notice a pipe near the exhaust manifold in this picture. That is what I assume to be an air injection pipe. It took two different sizes of copper wire and numerous bits of carefully shaped sheet plastic to make the complicated valve assembly (again, hard to see).  This picture shows a good view of the tranny fluid cooler lines that I added. To fit together the two different sizes of wire replicating a pipe and a hose respectively, I used a piece of .04" sheet plastic, drilled a hole through it, superglued the two wires into either side of it, then ground it into a hex shape with my Dremel sanding wheel to make it look like a fitting. This technique works well for everything from power steering to A/C.  This picture shows a good view of the dipstick I made. I glued a drilled-out disk of .01" sheet plastic to the top of a wire, then painted it heavily with gloss yellow to make it look molded, like a real plastic dipstick handle. You can also see my fuel cross-over ( I filed the molded-on one off), and its valve (driver's side), plus my vacuum/emissions hoses to the throttle body. The big one around back is either EGR or AIR. I don't think it can be seen in any picture, but I added spark plug wires from the ignition modules to the plugs, as well. Now, for the wiring harness.  This shot illustrates my method of plotting a harness. Although I don't have much reference material, I guessed about the routing of the harness. Since most of the engine details are covered by the fuel rail covers, the wiring is simple--I only need connections to the PCM (which is under the battery, and not visible), alternator, idle air control valve (which I discovered after making my harness; I will just make a stub of wiring that disappears into the fuel rail cover), IAT sensor, MAF sensor, and TPS. The bottom of the page in the picture shows my "looping diagram;" since there are about six wire ends (two to the alternator, and the third will just be a stub), I need three loops. These loops of wire tie the harness together and make it easier to contruct. The top diagram on the paper is a 1:1 chart showing how long my wires need to be.  Here are my three loops, made of .13mm wire.  Here I've cut a strip of masking tape to wrap the harness with.  This picture shows the first two loops tied together with tape. The wire to the far left, already wrapped, goes to the the PCM. The T off of it goes to the TPS.  To replicate the convulted tubing used in modern harnesses, I've wrapped .13mm wire around a larger .29mm piece of copper wire. It does not work to wrap it directly around the core wire of the harness, because that wire is too small and bends too much. Besides, most convulted tubing is larger than the wires inside of it by quite a bit. For the even tinier tubing, I just paint the wires black.  Here I've slipped that tubing coil over the TPS wire. This really adds realism; while tape is fine for the entire harness in a muscle car, since they used electrical tape for harnesses back then, modern cars just don't look right with tape on the little wires. It's fine for big sections, though.  Here I've taped the rest of the way over to where the alternator wires T off. This is as far as the tape will be going on this harness. It's taking shape now.  Here I've added a tubing coil to the alternator wires and another to the main part of the harness. I stuck the main harness wire into the middle of the tube so that a section of tube is T'd off for the MAF sensor. I had planned to loop the MAF with the alternator, but discovered that two wires don't fit in this size of tube, so I just put stubs in the MAF and alternator tubes. With superglue to hold everything together, it works fine.  Here, the tubing is complete, all the way to the IAT sensor (on the air duct in front of the radiator). That big bump halfway down is the MAF sensor tubing; it's just a weird camera angle that hides it. You can see it in the previous picture.  Here I've added connectors. There is one tiny one for the alternator (the other two alternator wires have a boot and a screw-on terminal, respectively). I also added the TPS/connector, which I carved from sheet plastic.  Here, I've added another tape wrap to the main part of the harness to make it larger. Then, I painted the harness with semi-gloss black. The alternator connector is gray, and one of the wires is red. Although this harness is simple, the same process can be done to any harness. For example, a '99 Mustang Cobra that I am building has an engine harness with 17 wire loops and over 20 connectors/senders/sensors. It just takes patience and finesse. I just finished this harness last night, so I haven't yet installed it! Keep tuned for more updates to the engine. In the meantime... The interior:  This forum really darkened my pictures! This one was easy to see before. You might be able to see my seatbelts--they are masking tape, with sheet plastic and wire buckles and hangers.   I also added flocking; the color is done all with paint. The kit seat, dash, and door panel decals were too bright and obscured detail. I just masked and sprayed Insignia Red and semi-gloss black. Now, the brakes: I'm never content to leave kit parts the way they are. The Corvette has vented disc brakes, so I went ahead and made them. Here is a step by step procedure:  I drew 12 circles on .01" sheet plastic with a compass and cut them out. Six were 13mm (which is 13 inches in 1:1 scale), while six (the rear brake parts) were 12mm. Here are three of the 13mm parts.  Here I've divided one of the discs into 32nds with a pencil.  I cut out 32 little triangles, leaving 32 points, which are on the pencil marks.  This picture is blurry, but you can see that I am drilling out the centers of the discs with a pin vise to make the centers big enough for a straight pin.  This picture is also blurry, but you can see that I have glued the modified disc to one of the regular ones, aligning them with a pin. I used liquid cement for this because it doesn't melt the plastic like tube glue.  Another blurry shot. Here, I've glued the other regular disc in place, sandwiching the pointy disc between. Now, I'm boring out the center hole. If this picture were clearer, you could see the 32 little vents in the edge of the brake.  Here is a kit brake. I'm sawing off the hub part, which is used to mount the brakes.  Here's the hub removed...  ...and cleaned up.  Here, I've glued the hub to one of my new brakes.  Next, I removed the caliper from the kit part.  You can't see it, but the caliper is cleaned up and has a notch in the bottom for mounting.  Here is my new brake and the caliper ready for assembly--I've cut a bit of the brake off so that the caliper will fit.  And here it is assembled.  This brake is done (except for paint). I've finished cleaning out the center with a round file.  Here are all four brakes done. Next--Metalizer Aluminum! Stay posted, this model has to be done before Christmas! Alex
__________________
Last edited by 924_CarreraGTS; 10-24-2006 at 03:13 PM. |
|

|

|
|
10-13-2006, 12:42 PM
|
#2 | |
|
AF Enthusiast
 Join Date: Jan 2005
Location: Phoenix, Arizona
Posts: 516
Thanks: 0
Thanked 0 Times in 0 Posts
|
Re: Corvette Z06 gift project
What a gret idea! Good luck with it!
__________________
  Alice in Chains Rest in peace Layne. |
|
|
|
|
|
10-14-2006, 05:52 PM
|
#3 | |
|
Blarg! Wort Wort Wort!
Join Date: Mar 2006
Location: Quezon City
Posts: 2,120
Thanks: 64
Thanked 101 Times in 100 Posts
|
Re: Corvette Z06 gift project
nice! and your sister's lucky to get one really detailed kit.

__________________
olly olly oxen free |
|
|
|
|
|
10-23-2006, 10:14 AM
|
#4 | |
|
AF Enthusiast
Thread starter
Join Date: Aug 2006
Location: Portland, Oregon
Posts: 633
Thanks: 2
Thanked 7 Times in 1 Post
|
Re: Corvette Z06 gift project
Thanks. By now I've installed the harness, but I still need to take/post some pictures. Stay tuned for updates.
__________________
|
|
|
|
|
|
10-23-2006, 03:21 PM
|
#5 | |
|
AF Enthusiast
Thread starter
Join Date: Aug 2006
Location: Portland, Oregon
Posts: 633
Thanks: 2
Thanked 7 Times in 1 Post
|
Re: Corvette Z06 gift project
 Here is a picture of the installed harness.  As of this photo, I still needed to make the alternator wire boot (for the red wire) and touch up the red wire. I've got that done now; I'll show it when I finish the engine.  Here are the fuel rail covers. The kit's parts were designed for the original C5 Corvette, and were not accurate for the Z06. While the passenger side cover was fine as far as I could see (except for a notch for the fuel cross-over), the driver's side one had two unneccesary divets at the rear, which I filled in, and two fuel hoses instead of one. To remove these hoses, I had to remove the four little ribs along the lower part as well, so I used pieces of .13mm wire to replicate the ribs after I had removed the fuel lines and cut a new hole for the single line. I also had to make a notch for the fuel pressure regulator. In this picture, I've painted the Corvette lettering with black paint, but I'm not satisfied with the results. At this point in time, I've already stripped the paint from the letters and applied Bare-Metal Black Chrome foil over them. I then plan to seal the lettering with clear coat, airbrush another coat of gloss red, and carefully sand or otherwise remove the paint from the lettering, revealing the black foil. This should look massively better. I've also discovered that the torque tube and both bell housings should be aluminum, not black. More airbrushing... Alex
__________________
Last edited by 924_CarreraGTS; 10-24-2006 at 03:15 PM. |
|
|
|
|
|
10-23-2006, 07:23 PM
|
#6 | |
|
AF Newbie
 Join Date: May 2005
Location: Euless, Texas
Posts: 83
Thanks: 0
Thanked 0 Times in 0 Posts
|
Re: Corvette Z06 gift project
The proper term for the covers on top of the valve covers are FRC's.Fuel rail covers,sorry had to share that as Im an LS1 guy.
|
|
|
|
|
|
10-24-2006, 11:30 AM
|
#7 | |
|
AF Enthusiast

Join Date: Sep 2004
Location: Colorado Springs, Colorado
Posts: 1,221
Thanks: 0
Thanked 1 Time in 1 Post
|
Re: Corvette Z06 gift project
Great job on that harness, that was a lot of research it seems!
I hope your sis knows how much time you are putting into this!!! Awesome re-build |
|
|
|
|
|
10-24-2006, 03:19 PM
|
#8 | |
|
AF Enthusiast
Thread starter
Join Date: Aug 2006
Location: Portland, Oregon
Posts: 633
Thanks: 2
Thanked 7 Times in 1 Post
|
Re: Corvette Z06 gift project
Thanks, LS1Aaron; I made up that term because I didn't know what they were called. I went back through and replaced it in the previous posts. Oh, and for those of you who are thinking that my "darkened pictures" in the first post aren't really that dark, I realized that it was actually my monitor! Looking at this on another computer, the pictures were fine.
 I'll be working on this tonight--look for some more posts soon. Alex
__________________
|
|
|
|
|
|
10-24-2006, 03:52 PM
|
#9 | |
|
AF Enthusiast

Join Date: Mar 2006
Location: German Autobahn 7
Posts: 654
Thanks: 0
Thanked 0 Times in 0 Posts
|
Re: Corvette Z06 gift project
Nice project, I really like all the wiring and details on the engine!
 |
|
|
|
|
|
10-24-2006, 07:26 PM
|
#10 | |
|
AF Newbie
Join Date: May 2005
Location: Euless, Texas
Posts: 83
Thanks: 0
Thanked 0 Times in 0 Posts
|
Re: Corvette Z06 gift project
No problem.looking good,C5's are beautiful cars!
|
|
|
|
|
|
10-28-2006, 05:44 PM
|
#11 | |
|
AF Enthusiast
Thread starter
Join Date: Aug 2006
Location: Portland, Oregon
Posts: 633
Thanks: 2
Thanked 7 Times in 1 Post
|
Re: Corvette Z06 gift project
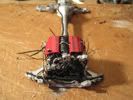
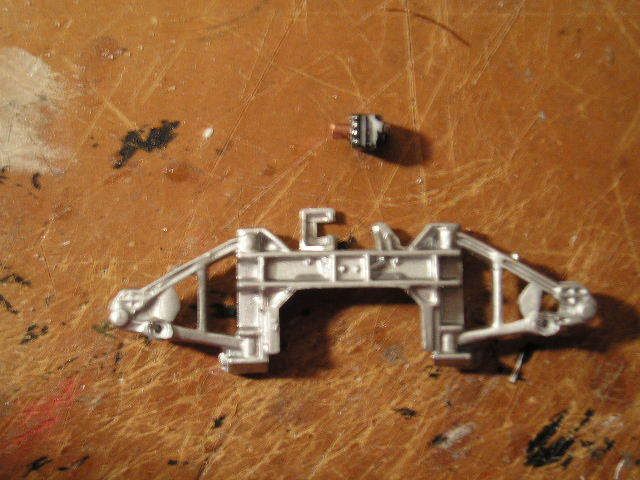
OK, my painting plans for the fuel rail covers didn't work so well. They're in oven cleaner right now; my plan is to once again use Bare-Metal black chrome foil, but with isopropyl alcohol to remove the paint, not sandpaper. They should be done in less than one week. In the meantime, I started on the braking system. I already built the brakes themselves; the next item is the ABS hydraulic unit, which is located just behind the rear supsension cradle. Two brake pipes run back to it from the master cylinder; two lines go to the rear wheels, while two more run back up to the front wheels, alongside those from the master cylinder. The kit had a decent ABS unit (actually two pieces), with molded-on fittings and electrical connectors, but the actual motor pack was molded to the bracket that holds the unit. I added the motor with 2mm copper wire, then cut out the molded-on motor. The real car has a cut-out in the bracket, so this is ready to go (with a little touch-up).
 I also worked on the wheels. No pictures to show, but the wheels got badly damaged inside when I tore the model apart. I spent a long time with a Dremel tool and then some plastic sprue making attachment parts to put my wheels on the hubs. Fortunately, this fairly rough work will be hidden by the brakes. Stay tuned--I'm doing my repaint on the torque tube and bell housings tonight, and working on some more wiring! Alex
__________________
|
|
|
|
|
|
11-02-2006, 07:12 PM
|
#12 | |
|
AF Enthusiast
Thread starter
Join Date: Aug 2006
Location: Portland, Oregon
Posts: 633
Thanks: 2
Thanked 7 Times in 1 Post
|
Re: Corvette Z06 gift project
At last, an update! I'm still working on the FRC's, but here is some more progress.
Engine with correct paint colors on torque tube and bell housings: 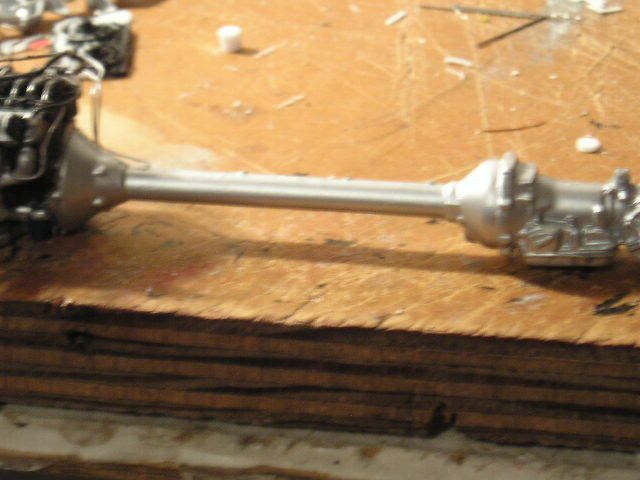 I'm also working on the forward lamp harness. The radiator had part of it molded on, but that didn't look very realistic. So, off it came, along with parts of the fan shroud. These will be rebuilt soon with sheet plastic. 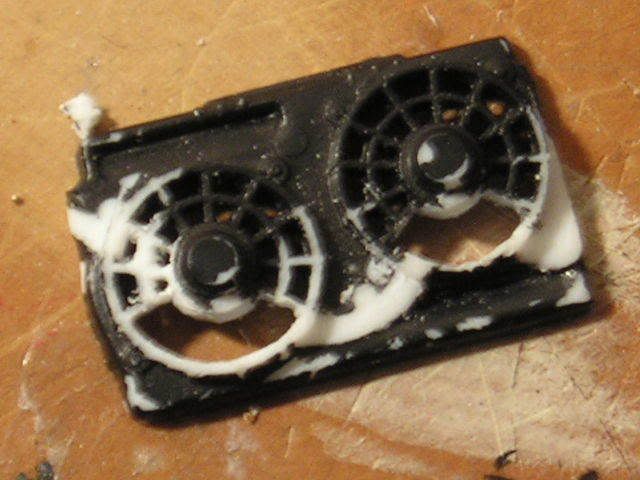 The brakes have aluminum paint on them now, so I just have to paint the calipers and then I will show them too. That's all for now! Thanks for looking. Alex
__________________
|
|
|
|
|
|
11-03-2006, 05:54 PM
|
#13 | |
|
AF Enthusiast
Thread starter
Join Date: Aug 2006
Location: Portland, Oregon
Posts: 633
Thanks: 2
Thanked 7 Times in 1 Post
|
Re: Corvette Z06 gift project
Another update:
I worked on the fan shrouds last night, and got one done. Here are the results: 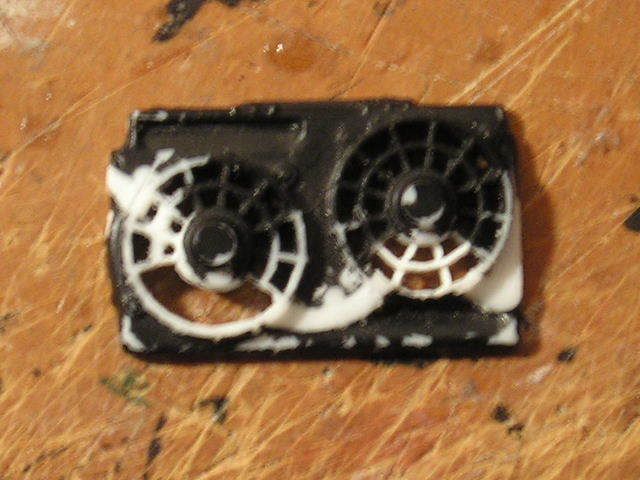 That is .01" Evergreen sheet plastic. That was tedious work, so I didn't feel like doing the other one right away--I'll probably finish it tonight. In the meantime, I painted the radiator: 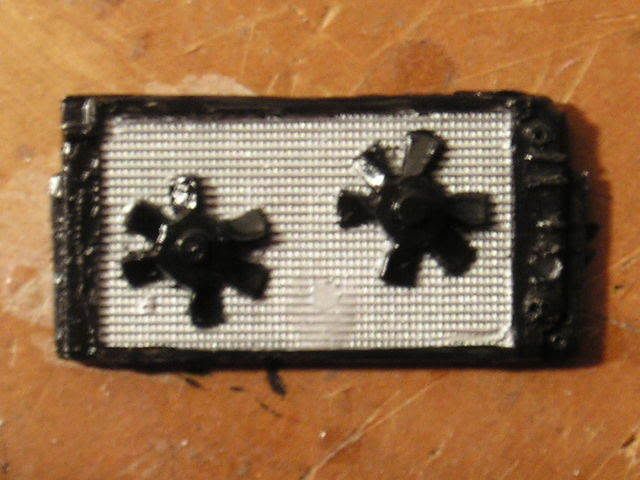 Model Master Metalizer aluminum, and Model Master acrylic semi-gloss black. The fans were molded on--with the shroud over them, there's no need for more detail. 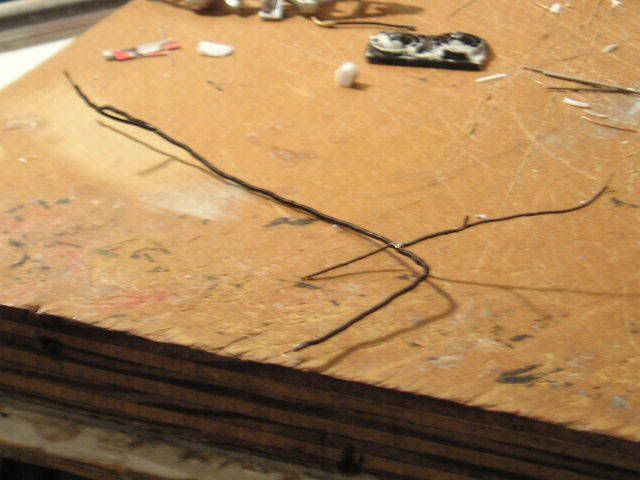 I also built the chassis wiring harness. This connects to the PCM and attaches to the O2 sensors, transmission, and ABS hydraulic unit. This is my first all-wire harness--there is no tape at all, just a big coil of wire around everything. Of course, that is the peak of realism--it looks just like a modern wiring harness. Close up: (sorry for bad picture) 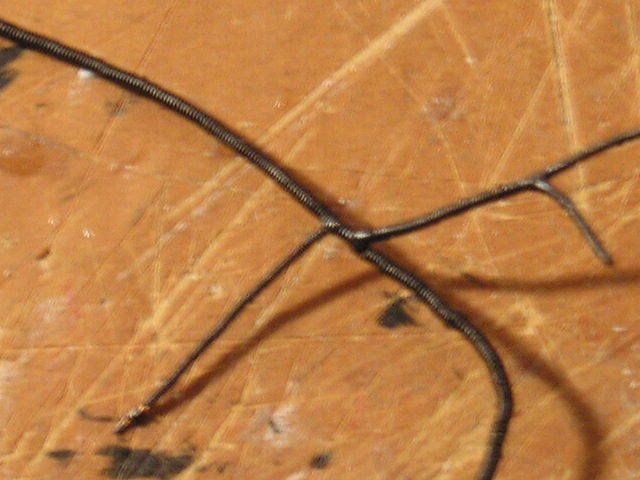 And, I hand-painted my brake calipers--my handbuilt brakes are now finished! 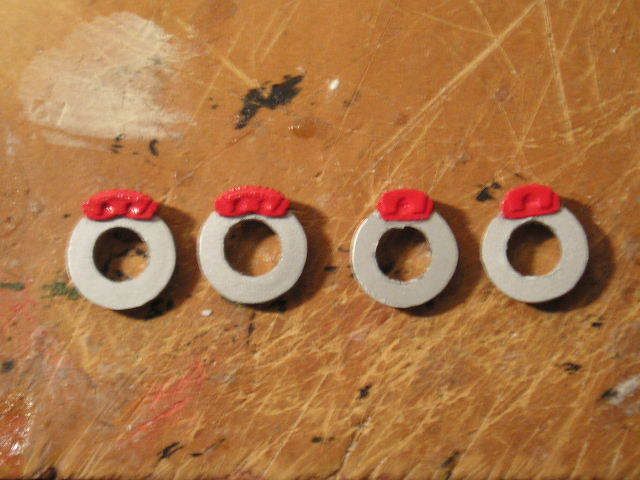 I don't mind criticism, by the way; in fact I hope to get some. Make comments! Out of almost 800 views, there are only 9 replies. I like feedback! Thanks for looking. Alex
__________________
|
|
|
|
|
|
11-03-2006, 08:06 PM
|
#14 | |
|
AF Enthusiast
Join Date: Feb 2005
Location: Farroupilha - RS
Posts: 1,131
Thanks: 0
Thanked 1 Time in 1 Post

|
Re: Corvette Z06 gift project
Very detailed.. I like this!!
keep us updated!!! Nice Work!
__________________
 http://www.minituner.com.br WIP: Project NoMother (Nomad '55)**UPDATED (09/02/2005) My Mustang Boss 429 (Completed) My Mercedes Benz CLK DTM 2000 Street (Completed) |
|
|
|
|
|
11-04-2006, 01:12 PM
|
#15 | |
|
AF Enthusiast
Thread starter
Join Date: Aug 2006
Location: Portland, Oregon
Posts: 633
Thanks: 2
Thanked 7 Times in 1 Post
|
Re: Corvette Z06 gift project
Last night's working session was a nightmare. I installed the brakes, then discovered that all four wheels don't touch the ground!!
 This is because the chassis is slightly warped, one of the rear hub mounts had broken off once and I re-built it not quite perfectly, and my wheels were a mess that required heavy modification to install. Using heat (a very messy, imprecise method This is because the chassis is slightly warped, one of the rear hub mounts had broken off once and I re-built it not quite perfectly, and my wheels were a mess that required heavy modification to install. Using heat (a very messy, imprecise method  ), I bent the upper control arms around a little, pretty much just warping them without doing much for the car. I finally got it to sit kind of flat (if the body is on), but they are still dicey. This had better work... ), I bent the upper control arms around a little, pretty much just warping them without doing much for the car. I finally got it to sit kind of flat (if the body is on), but they are still dicey. This had better work...
__________________
|
|
|
|
|
|
|
POST REPLY TO THIS THREAD |
 |
|
|


