

|
| Search | Car Forums | Gallery | Articles | Helper | Air Dried Fresh Beef Dog Food | IgorSushko.com | Corporate |
|
#31
 08-22-2012, 02:46 AM
|
|||
|
|||
|
Re: Rebuilding Dad's Panoz; LS1 swap
Quote:
1. Fit and torque flywheel and bellhousing, 2. Use magnetic based DTI and attach to flywheel inner circumference, 3. Set up DTI so that it is reaching back out through trans mounting hole in bellhousing onto trans mount face, 4. Zero DTI and then rotate engine 90 degs to check parallelism of back face of bellhousing to back face of block, repeat until you have readings every 90 degs (min), you should have prefereably only around .002" out and less than .005" max, 5. Set up DTI so that you can run it around the inside diameter of the trans location hole in the bellhousing, zero DTI, 6. Again rotate engine and get readings every 90 degs to check concentricity with crank centerline, same limits. If you are outside .005", parallelism can be adjusted by shimming or machining. Concentricity with offset dowel pins or remachining dowel holes. To give you an idea, my Ford Racing bellhousing is within .002" in parallelism and just inside .005" cocentricity. I check this everytime I have the engine out of the car prior to fitting the trans as it is really critical with likes of tripple plate clutches. Hope that helps, Kel.
__________________
Kel M Panoz GTRA #17 New Zealand 
|
| The Following 2 Users Say Thank You to NZGTRA17 For This Useful Post: | ||
Cobra4B (08-22-2012),
panozracing (08-22-2012)
| ||
|
#32
08-22-2012, 08:46 AM
|
||||
|
||||
|
Re: Rebuilding Dad's Panoz; LS1 swap
Makes complete sense... looks like I have a new tool to buy
 I found a pretty good write-up online as well. I found a pretty good write-up online as well.
__________________
Brian B. Panoz GTRA - LS1 swap in progress #4 Z06 - NASA ST3/TT3
|
|
#33
08-23-2012, 09:09 AM
|
||||
|
||||
|
Re: Rebuilding Dad's Panoz; LS1 swap
Started learning how to weld... filling up all the holes in the thing. Using a Hobart 187 mig borrowed from a buddy. Hope to have it all ready for powdercoat in the next couple of weeks.
 
__________________
Brian B. Panoz GTRA - LS1 swap in progress #4 Z06 - NASA ST3/TT3
|
|
#34
08-30-2012, 08:31 AM
|
||||
|
||||
|
Re: Rebuilding Dad's Panoz; LS1 swap
Been doing lots of welding getting it ready for powdercoat. Lots of old rivet holes... about 2/3rds done. Plus more parts have come in.
  Fortes plugs for the speedometer sensors. The driver's side is the mechanical gauge port and the passenger side is for electronic (If you haven't figured it out... not running a speedometer).   Powermaster 1-wire mini racing alternator with mount kit for a Ford 9"... still have to work on pulley alignment.  Kevko trap-door road race pan  
__________________
Brian B. Panoz GTRA - LS1 swap in progress #4 Z06 - NASA ST3/TT3 Last edited by Cobra4B; 08-31-2012 at 08:46 AM.
|
|
#35
08-31-2012, 08:46 AM
|
||||
|
||||
|
Re: Rebuilding Dad's Panoz; LS1 swap
Replaced the LS1 springs with GMPP LS6/2/3 springs and installed Smith Brothers restricted flow pushrods... shiny new stuff...
 
__________________
Brian B. Panoz GTRA - LS1 swap in progress #4 Z06 - NASA ST3/TT3
|
|
#36
08-31-2012, 08:53 PM
|
|||
|
|||
|
Re: Rebuilding Dad's Panoz; LS1 swap
Looking good! Get those motor mounts yet?
__________________
Eric H (in case you couldn't guess) GT-WC #22 (now #62 and Blue)
|
| The Following User Says Thank You to eric1h For This Useful Post: | ||
Cobra4B (08-31-2012)
| ||
|
#37
08-31-2012, 08:59 PM
|
||||
|
||||
|
Re: Rebuilding Dad's Panoz; LS1 swap
Yup... also ordered some Prothane 4.6 mounts as well. I'll have to move them about 1" forward relative to the "standard" spot they go in on the LS1 block to make it all work using the stock trans mount location. Your chassis has the engine mount pedestals farther back than mine... yours are just behind the lower square tube cross-bar thing vs. ours that come directly up off of it.
__________________
Brian B. Panoz GTRA - LS1 swap in progress #4 Z06 - NASA ST3/TT3
|
|
#38
09-03-2012, 09:05 PM
|
||||
|
||||
|
Re: Rebuilding Dad's Panoz; LS1 swap
Took a break from welding and got a fair amount done on the engine. Time to take a break and tear into the Z06 to replace the cam/lifters in prep for October's VIR event.
Horsefly that flew into one of the oil returns in the head when doing the springs. Found dead on top of the windage tray.  Later LS1 blocks are apparently drilled for LS2 chain dampers. Amazingly the local Chevy dealer had one in stock so I could move forward putting stuff back together.  Custom pickup that comes with the new pan hooked up to a LS4 high volume oil pump.  Kevko pan installed.  Timing cover and ATI damper hub installed.  Hub pinned.  Water pump heater core/pressure tank ports threaded and plugged.  Drilled and tapped the Edelbrock valley cover for another crankcase vent port (comes with a boss for doing this). Still have to get a 1/4 NPT to 3/8 hose barb to thread into the elbow.  Starting to look like an engine again. 
__________________
Brian B. Panoz GTRA - LS1 swap in progress #4 Z06 - NASA ST3/TT3
|
| The Following User Says Thank You to Cobra4B For This Useful Post: | ||
PanozDuke (09-05-2012)
| ||
|
#39
09-26-2012, 09:57 PM
|
||||
|
||||
|
Re: Rebuilding Dad's Panoz; LS1 swap
Dug into my Z06 to deal with the failed lifters and found out just how much metal went through the motor. Pulled the motor for rebuild and am now back to work on the Panoz.
    Katech manual tensioner added. Not much to the front end of the motor.... KISS  Coilpacks bolted up and C5 shorty header being test fit.  New 22 gallon ATL cell 
__________________
Brian B. Panoz GTRA - LS1 swap in progress #4 Z06 - NASA ST3/TT3
|
|
#40
09-27-2012, 10:22 PM
|
|||
|
|||
|
Re: Rebuilding Dad's Panoz; LS1 swap
Quote:
I treat lifters and springs as the 2 shortest life components in the engine. Approx 15 - 25 hours for solid roller lifters (25+ if they are pressure oiled roller pin style) and around 10 - 15 hours for valve springs (check these with a Moroso spring tester after race during lashing). Kel.
__________________
Kel M Panoz GTRA #17 New Zealand
|
|
#41
09-28-2012, 08:44 AM
|
||||
|
||||
|
Re: Rebuilding Dad's Panoz; LS1 swap
Quote:
Cam  Bits of metal fused to the bottom 1/2 of the oil pan  Nicks on the crank from bits of lifter falling onto it at RPM. Now that I have the engine out and pan off I can see where the bottom of the two rear pisons have nicks in them too. 
__________________
Brian B. Panoz GTRA - LS1 swap in progress #4 Z06 - NASA ST3/TT3
|
|
#42
09-30-2012, 09:56 PM
|
||||
|
||||
|
Re: Rebuilding Dad's Panoz; LS1 swap
The tedious hole filling and steet metal repair is done. Anything shiny is filled hole. Getting it back to a clean slate before powdercoat.
     
__________________
Brian B. Panoz GTRA - LS1 swap in progress #4 Z06 - NASA ST3/TT3
|
|
#43
10-14-2012, 06:55 PM
|
||||
|
||||
|
Re: Rebuilding Dad's Panoz; LS1 swap
Putting my broken LS6 to good use test fitting the engine/trans.
 Need to fab mounts. Going make an adapter plate and use a Jeep CJ7 poly mount.  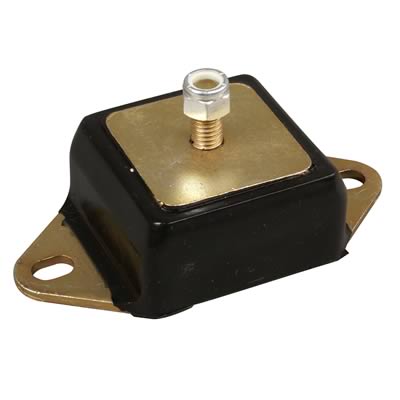 Removed the old riveted heat shielding from the trans tunnel and welded all the holes up.  
__________________
Brian B. Panoz GTRA - LS1 swap in progress #4 Z06 - NASA ST3/TT3
|
|
#44
10-15-2012, 01:06 AM
|
|||
|
|||
|
Re: Rebuilding Dad's Panoz; LS1 swap
Quote:
Kel.
__________________
Kel M Panoz GTRA #17 New Zealand
|
|
#45
10-15-2012, 08:43 AM
|
||||
|
||||
|
Re: Rebuilding Dad's Panoz; LS1 swap
Quote:
__________________
Brian B. Panoz GTRA - LS1 swap in progress #4 Z06 - NASA ST3/TT3 Last edited by Cobra4B; 10-16-2012 at 08:15 AM.
|
| ||||||||||||||||||||||||||||||||||||||
 |
POST REPLY TO THIS THREAD |
 |
|
|


