|
|
| Search | Car Forums | Gallery | Articles | Helper | Air Dried Fresh Beef Dog Food | IgorSushko.com | Corporate |
|
|||||||
| WIP - Street Post topics for any "Works In Progress" street vehicles projects in this sub-forum. |
 |
 Show Printable Version | Show Printable Version |  Subscribe to this Thread
|
|
|
Thread Tools |
|
#1
 07-17-2003, 10:04 AM
|
||||
|
||||
|
lotus 7 progress
PLEASE CRITISISE AS MUCH AS YOU CAN. its the only way i will learn
sorry for those who always read peoples posts, the massive red writing is for those who never seem to read. anyway, lets get down to business... after over 400 posts in this forum i finally start my first 1:24 plastic kit...  as some of you know i bought this kit a while ago during my exams, so obviously i couldnt start it. i used my alfa 8c as a practice with my new tools (this lotus will be my first model, except hat one i did when i was 12, but you know how they turn out). i now think i am skilled enough with sanding, puttying, drilling and airbrushing that i can start my lotus without ruining it. i have big plans for this little kit...many of which i may decide are a bit too advanced later. oh, and as i said at the top of this thread, i need critical advise so that i can learn. its going to be steep learning curve, but im sure going to make sure i do the best i can and i need the advise of all you experienced modelers to help me. here are a few pictures so far. box:  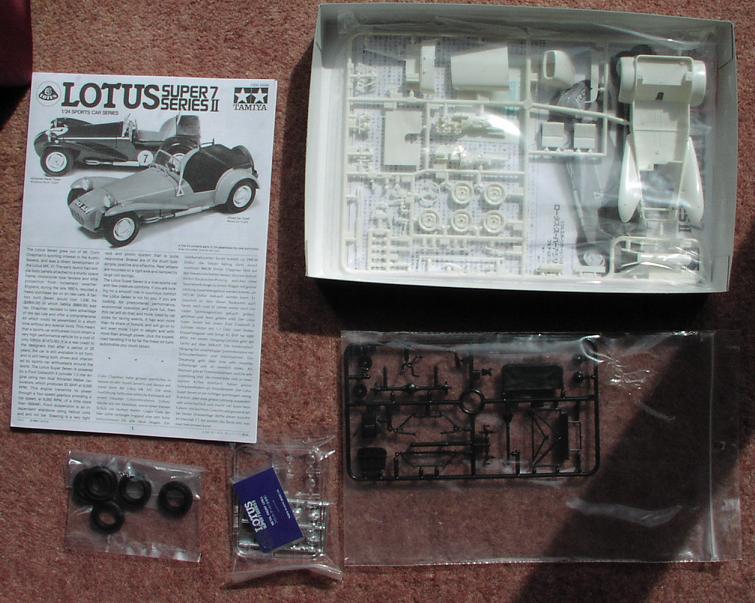 a prototype chrome stone chip guard...the ''production version'' will be better quality 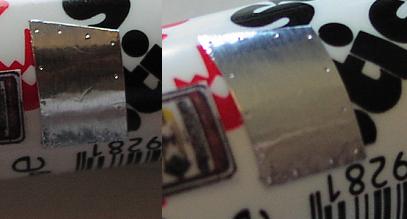 the steering wheel was well detailed, except for the slats that were just slight depressions, which i would imagine was due to moulding constraints. so i decided to cut the slats out my self. using my trusty pin vise with a 0.5 mm drill (and a knife for removing the plastic swarf and a magnifying glass) i cut them out. the top pic is before, the second is to show scale, the third is the final job. a little sanding is still needed, but it seems ok  comments please 
__________________
Simon ---------------------------------------------------------------   
|
|
#3
07-17-2003, 10:19 AM
|
||||
|
||||
|
Looking all right from what I see (not much? )
The key with such a car is to get the interior as crisp and clean as you can. You should try to carpet it, as that is not that hard. As for the stone guard, it looks very nice too. Maybe it would be easier to give comments IF we knew what your plans are for this beauty? My suggestions; Wired engine Flocked interior Change the exhaist pipe to something more "substancial" , if you knwo what I mean, by just easily try to buy some sturene tubing, drill regular holes in it, chrome it, and blackwash it ... and if you really want to go beserk, change the rims to some nice but not over the top rims, put cycle fenders, do a disc brake conversion, pt headrests, lower it and turn it into a westfield! Olivier
|
|
#4
07-17-2003, 10:35 AM
|
||||
|
||||
|
oliver, the wired engine, the wheels and the disc brake conversion are on the list...i think i will try the exhaust thingy...i already have some styrene tubing so that should be easy enough.
as far as the seats go, well im chucking the half bench seats in favour of scratch built ones  ...yes, i am insane. ...yes, i am insane. im not going to change the fenders, i like this style. and i certainly will not turn it into a westfield, i will turn it into a caterham (the company that took over the production rights of the 7 when lotus decided to stop making it. caterham still make the car, but with much higher spec's and engines. i like the idea of carpeting it, but i have to find out weather my (not so local) model shop stocks the flocking material. other things i plan to do are: roll over bar brake lines various detail bolts new, more realistic fuel tank toggle switches on dash tyre valves and the hardest and stupidest thing...a removeable soft top there are other little things, but the list would get veeeery long then
__________________
Simon ---------------------------------------------------------------
|
|
#5
07-17-2003, 10:40 AM
|
||||
|
||||
|
Very nice ideas!
They seem quite do-able, except for the soft top that is . Of, and the roll-bar , will it be a racing-spec rollbar, like tha caterham racing cars? And, another thing, have you thought abot changing the rims? Ond, if you want to valve your whells, I can deerly recommend it, I ve just tried it some days ago, and boy, it IS worth it big time . Keep on modeling ! OlivIer
|
|
#6
07-17-2003, 10:48 AM
|
||||
|
||||
|
olivier, it will not be a full racing spec roll cage...more of a semi racing one ...like this, but probably not with the diagonal cross member
 the rims will be changed, but its going to be hard finding aftermarket ones that will actually fit. 18inch wheels will make it look like an off-roader...i need like 16 or at the very most 17 inch wheels...oh and they need to be fairly narrow so they can fit in the rear arches. thanx for the advise 
__________________
Simon ---------------------------------------------------------------
|
|
#8
07-17-2003, 10:53 AM
|
||||
|
||||
|
Quote:
__________________
Simon ---------------------------------------------------------------
|
|
#9
07-17-2003, 11:50 AM
|
||||
|
||||
|
Hope to see more progress pics soon.

|
|
#10
07-17-2003, 03:38 PM
|
||||
|
||||
|
Nice start Simon!
I think I would update the seats and swap in a modern engine. 
__________________
SCCA 7, The lost Z Contest entry thread: Mystery? Beetle + Boxster = Bugster, P.T. Panel:click here Diablo Roadster: click here, & Porsche C2 Cab
|
|
#11
07-17-2003, 04:25 PM
|
||||
|
||||
|
Quote:
seats are already in progress...but replacing the engine would cost me a little bit more than i want to spend unfortunately
__________________
Simon ---------------------------------------------------------------
|
|
#12
07-17-2003, 05:58 PM
|
|||
|
|||
|
Looks good to me!
 I have this kit as well in my stock. I having plans for converting it into a Caterham Super 7. Needs a complete new nose, front and rear fenders... well, maybe I'll start it in a year or 10...  Anyways, good luck with yours. Keep us updated
|
|
#13
07-18-2003, 05:02 PM
|
||||
|
||||
|
thankyou all for the kind coments so far
a little up date for you. i started the scratch built replacement seat a few days ago..progress has been slow because of the rain (i like to do sanding out side so i dont leave fine dust around the house) so here are a few progress pics. i will briefly explain each one... first, this is the seat that i was using for inspiration. a Cobra roadster 7 seat. it is specifically designed for the lotus 7 and similar cars, so it made sense to use it  here is the roughly hacked pieces of stryrene placed to check scale and shape. the wings are glued to the back and the wings on the base are glued...but nothing else is glued together  this is the underside of the bottom of the seat. it has been fitted with a simplified mounting frame. this was partly because i noticed in the trial fit that the lower part of the seat was too low, so needed to be raised. worked out for the best though 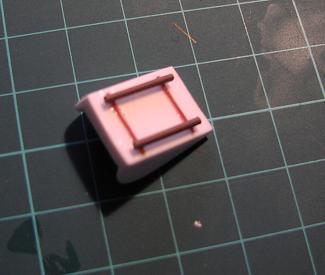 and finally, this is where i am up to so far. every part has been sanded to shape to match the real seat (except the lower wings...i like them the way iv left it. all edges are beveled, and some areas are curved slightly. the top has been puttied to blend in the wings...but there are a few pin holes that need sorting before i move on. i need to add harness holes and some texture later. oh, on the passenger side is the lower part of the original seat...just for comparison  sorry if im going into too much detail...if i am, just tell me and i wont post as many pictures or info.. any comments, help, or advise will be greatly apreciated...especially on how to do the ''pleats'' on the seat...
__________________
Simon ---------------------------------------------------------------
|
|
#14
07-19-2003, 04:12 AM
|
||||
|
||||
|
For the pleats, I'd draw the lines on the seat & after I'd use this (I hope you have a Dremel):
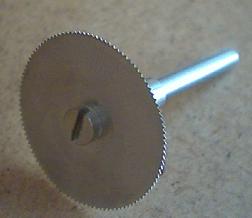 With this disk, I think you can easily make the pleats (not too deep !!) Last edited by Towelboy80; 07-19-2003 at 11:34 AM.
|
|
#15
07-22-2003, 04:27 AM
|
||||
|
||||
|
Quote:
sorry to anyone who was following this. progress will be very slow this week because i am very busy. hopefully i can start painting stuff next week
__________________
Simon ---------------------------------------------------------------
|
| |||||||||||||||||||||||||||||||||
|
POST REPLY TO THIS THREAD |
 |
|
|


