|
|
| Search | Car Forums | Gallery | Articles | Helper | Air Dried Fresh Beef Dog Food | IgorSushko.com | Corporate |
|
|||||||
| Car Modeling Share your passion for car modeling here! Includes sub-forum for "in progress" and "completed" vehicles. |
 |
 Show Printable Version | Show Printable Version |  Subscribe to this Thread
|
|
|
Thread Tools |
|
#1
 05-18-2003, 09:48 AM
|
||||
|
||||
|
Painting the chassis (I'm going mad...)
I am brush painting the chassis of my Tamiya VW New Beetle. The truth is, it is rather frustrating. I mean, looking at the user manual, it just looks so "easy", X-18 arrow here, X-?? arrow there. Damned!
 Mine is so full of flaws, even with lots of patience and fine-tip brushes at my side. I spent 5 hours just trying to get the chrome silver area painted right, the trouble is their edges along the semi-gloss black, spills over here and there! See ugliness below. Mine is so full of flaws, even with lots of patience and fine-tip brushes at my side. I spent 5 hours just trying to get the chrome silver area painted right, the trouble is their edges along the semi-gloss black, spills over here and there! See ugliness below. In the end, I have to patch spilled areas with semi-gloss black, only to have the patched areas spilling over to the chrome silver areas, and repeat all over again. I must be totally suck or there is something wrong with what I am doing. Perhaps it is simple --> my patience is not enough! How the hell do the experts do it? Do they mask them and airbrush the specific areas? How do the experts achieve perfection? (looking at the catalog photos...) Tamiya sell tons of kits, RCs, tools, paints and etc. related to scale modelling. The really weird thing to me is, what don't they come out with some series of scale modelling "best practices" or "recommended techniques" books? They have lacquer, enamel, acrylic paints and etc., yet there are no official explanations to which or why they have these varieties. I checked the Tamiya catalog but found nothing of these sort of information. I know, I guessed yes there are, only in Japanese language and published only in Japan! Wth sincere Thanks to everyone here in AF, I managed to pick up some valuable tips and techniques. And I learnt the most of scale modelling over here at AF. Really, I have never ever learnt so much than at AF. Sorry for the ramble 

|
|
#2
05-18-2003, 10:11 AM
|
||||
|
||||
|
I think that you are having problems because you are trying to brush paint such a large area. You would get a much better (and quicker) result if you mask all the areas using Tamiya masking tape and spray a few light coats of paint over the chassis. Spray a few light coats of primer before you start and you should get a good result. I try to avoid brush painting whenever I can because it just doesnt look right. Hope this helps.
__________________
 
|
|
#3
05-18-2003, 10:17 AM
|
||||
|
||||
|
i wouldn't worry to much about it, unless your going to have the car turned over or on its side when being displayed. Anyways thats looking good so far.

__________________
Remember....if it has to do with Woman,Wings,or Wheels...theres bound to be trouble. 
|
|
#4
05-18-2003, 10:17 AM
|
|||
|
|||
|
use low tack masking tape(tamiya) make sure the colour you apply the tape to is well cured(dried)or you will remove the paint when you remove the tape, you can cut the tape with a sharp blade to go around odd shapes
i also use magic tape as it leaves crisp edges or electrical tape as it can stretch around curves use a airbrush if you have one always remove masking tapes as soon as possible the longer you leave them on the stronger the bond will become
__________________

|
|
#5
05-18-2003, 10:52 AM
|
||||
|
||||
|
You can use a fine tip pen for a job like this.
Spray or brush paint silver. Then, use a pen and paint the boundary groove and edge where two colors meet. Use small brush, and carefully widen the boundary line. Use wide brush to paint the rest. This works on black window trim, as well as black shade inside the windshield.
|
|
#6
05-18-2003, 11:45 AM
|
|||
|
|||
|
Tamiya did publish some "recommended techinqies" on their website.
 It's old news. http://www.tamiya.com/english/howto/car1/howto_car1.htm Well, who cares about the underside?
|
|
#7
05-18-2003, 12:21 PM
|
||||
|
||||
|
Quote:
I bought a copy of Fine Scale Modeler magazine but they talk more about planes and armour. And the photos are not sharp. I don't think I will pick up another copy again. I know there is a Scale Auto Magazine from the same publisher, but I cannot locate a copy in Singapore and I suspect the photo quality will be same as FSM. How about Tamiya magazine (English)? Any comments on this magazine which I thought I have seen somewhere?
|
|
#8
05-18-2003, 04:02 PM
|
|||
|
|||
|
What I've settled on lately for chassis:
1. spray w/ Tamiya TS lacquers the base color (or whatever color covers the most area.) 2. use Tamiya Paint Marker (enamels) to hit big contrasting areas. (These are pretty cool. Try and find Black, Flat Black, Chrome Silver and Metallic Gray.) 3. use Tamiya acrylics on a paintbrush or toothpick to get the little details.
|
|
#9
05-18-2003, 05:16 PM
|
||||
|
||||
|
Spray the main colour first and allow to dry.
Then you can do two things...either mask or use a paint pen. I mostly use a paint marker to go around the outside area first. When the line is wide enough you can then paint up to the line. Use tamiya masking when masking as this will not bleed paint if you stick it done well enough. In the pic posted.....most of the black is first outlined with a pen then painted. The larger areas you can mask and spray. 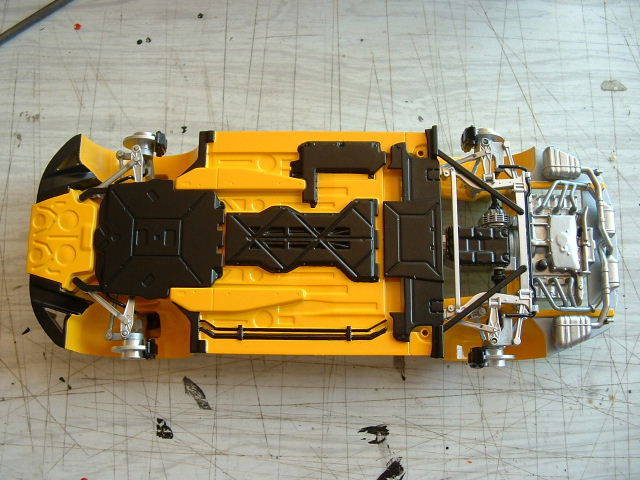
__________________
Current Build.....1/12 Scale Camaro......Almost finished!!!    View All My Models Here.
|
|
#10
05-18-2003, 09:25 PM
|
||||
|
||||
|
Oh my! Look at your chassis paint job!

|
|
#11
05-24-2003, 12:58 PM
|
||||
|
||||
 And so I decided to re-do the painting of the chassis using the advice gathered. There I go. An act of "newbie-ism" and I experimented soaking the chassis in concentrated citrus degreaser (from pile of cleaners used for maintaing my mt. bike) without even pre-testing with junk parts, since I could not locate CSC. Initially was happy that the paint was stripped within 5 minutes. Then came uhappiness as I noticed the chassis began to melt. :o  Perhaps I should have diluted the degreaser with water. Perhaps I should use another brand of degreaser. Perhaps, perhaps.  The damage has been done but I don't feel too bad about it. The chassis was disposed. I know it is really stupid but at least I learnt something. ---> use Castrol Super Clean as advised!Now, should I just use the motorized chassis from another Tamiya motorized beetle kit or should I order chassis replacement part from my local dealer? Thus I will ponder. :o
|
|
#12
05-24-2003, 04:04 PM
|
|||
|
|||
|
:o Another lesson learnt the hard way!
 Sorry! Sorry! Time to repeat the addage, "Test on scrap plastic first, always, always, always!!!" Better luck next time! :o
|
|
#13
05-27-2003, 12:06 PM
|
|||
|
|||
|
Take a look, same chassis as yours, on a Golf V5
 Patience and Pratice is the key. If you get pissed off so easily, you still got a long way to go. I have been making ugly models for several years before I can accomplish this. I used Acrylic X18 for the black and spray on with airbrush. Then use Tamiya enamel paint XF16 for the silver part and hand brush on it. Enamel paints drys much slower and therefore minimize the brush marks. Take your time, it will tell.
|
|
#14
08-02-2003, 06:15 PM
|
||||
|
||||
|
Finally! After ordering a new chassis replacement part for my melted and failed paint work, this time I really took a lot of patience and time (Thanks to all your advices and encouragements). I also bought an airbrush during this period of time.
See my Tamiya VW New Beetle Progress pics for more updates and photos. Here is the chassis with completed painting. The whole chassis was airbrushed using Tamiya Acrylic Semi-gloss Black, followed by masking to airbrush Tamiya Enamel Chrome Silver. Edges with paint oversprays are touched/cleaned up using a fine paint brush dipped in Tamiya Enamel thinner. 
|
|
#15
08-02-2003, 07:35 PM
|
||||
|
||||
|
Oh my! Look at your chassis paint job!
 That looks really awsome! all you need to do now is to detail paint those little screws That looks really awsome! all you need to do now is to detail paint those little screws
|
| ||||||||||||||||||||||||||||||||||||||
|
POST REPLY TO THIS THREAD |
 |
|
|