|
|
| Search | Car Forums | Gallery | Articles | Helper | Air Dried Fresh Beef Dog Food | IgorSushko.com | Corporate |
|
|||||||
| Car Modeling Share your passion for car modeling here! Includes sub-forum for "in progress" and "completed" vehicles. |
 |
 Show Printable Version | Show Printable Version |  Subscribe to this Thread
|
|
|
Thread Tools |
|
#16
 03-24-2003, 06:17 AM
|
||||
|
||||
|
Nice idea with the straws!
If you are planning to sand the seams off the tyres I've noticed sanding much easier if you give the seam a light coat of superglue. It makes the rubber hard and much easier to sand off. But try it first at some scrap part to know how it works and to avoid ruining your model. -Mikko 
|
|
#17
03-24-2003, 09:13 PM
|
||||
|
||||
|
Quote:
I'll keep a look out for your thread and hey take yur time willya!  Quote:
Thanks all for the input. Anyways, here are the pics for the rollcage and interiors: 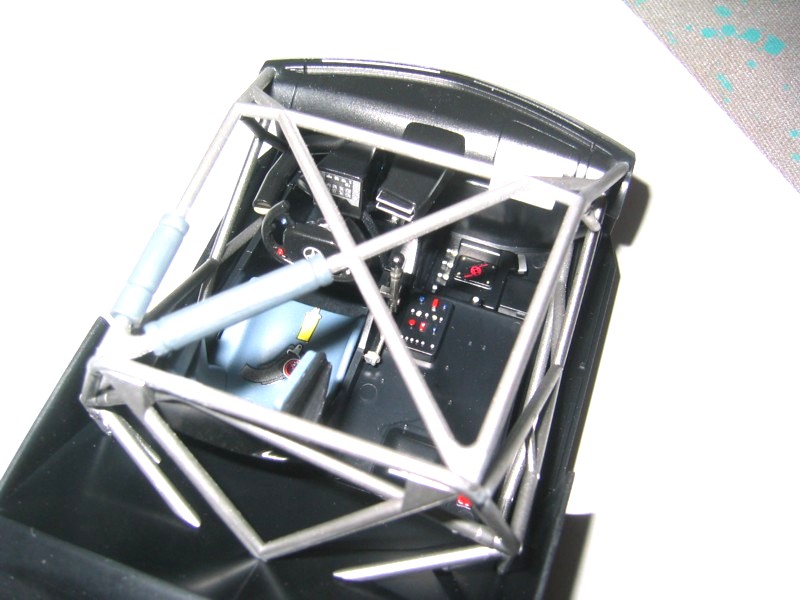  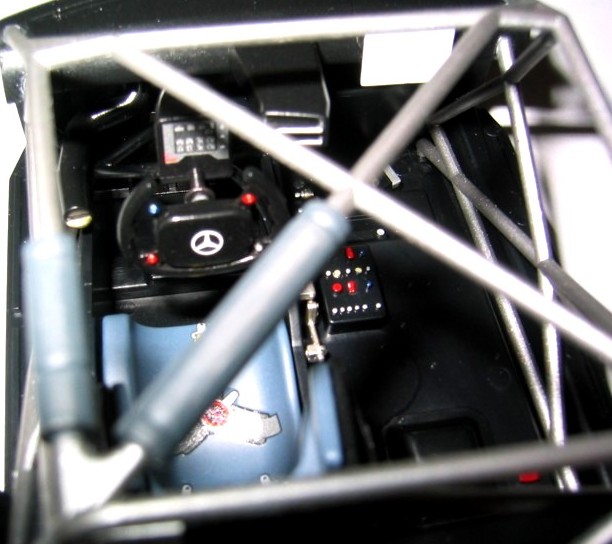 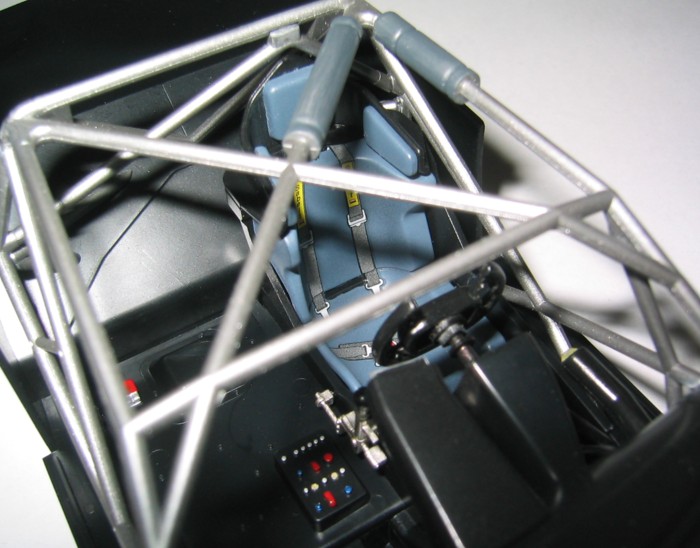    Alot of the merc's consisted of flat black, semi gloss black, so I got sick of the monotony of using black and added intermediate blue to the seats. Also, tiny buttons in the interior didnt require other colours like titangold. Just felt that according to the instruction manual, the colour variety would make this merc look boring. Any comments you've got, I luv to hear it.
__________________
To each his own! Read the FAQ you faqer  Evo Meet....coming to a forum near you!  Completed!-Click on Pic:  Projects done and posted: Subaru WRC2001 RGB-My first project in AF  Click Here Click HereIn stocks: Ferrari F1 2001 Tyrrell P34 CLK Warsteiner Ford Performance Blue Ferrari Enzo Opel Team Holzer Williams FW24 Last edited by Chain; 03-27-2003 at 03:26 AM.
|
|
#20
03-25-2003, 12:50 PM
|
||||
|
||||
|
That is hot...great job keep it up

__________________
-Andrew- 
|
|
#21
03-25-2003, 05:25 PM
|
|||
|
|||
|
wow this is really cool and a lot of details..nice work
__________________
My projects: Revell Golf GTI: 100% (done) Revell 99 mustang cobra: 100% (done) tamya honda s2000: 0% (I'm starting it) fujimi honda civic: 0% 
|
|
#23
03-27-2003, 03:20 AM
|
|||
|
|||
|
Quote:
|
|
#24
03-29-2003, 10:16 PM
|
||||
|
||||
|
grrr, that metal mercedes emblem is so hard to put on. Having no luck and after the 7th try I am taking a short break.
Anyone knows where the other piece of the metal with numbers goes to? It doesnt say anywhere in the manual where to put it. If its not pose to be on/in the car, where do U guys put it on?
__________________
To each his own! Read the FAQ you faqer Evo Meet....coming to a forum near you! Completed!-Click on Pic: Projects done and posted: Subaru WRC2001 RGB-My first project in AF Click HereIn stocks: Ferrari F1 2001 Tyrrell P34 CLK Warsteiner Ford Performance Blue Ferrari Enzo Opel Team Holzer Williams FW24
|
|
#26
03-29-2003, 11:46 PM
|
||||
|
||||
|
Busy and another modification to merc
Phew! managed to put the emblem on.
Been very busy lately and I dont think I can do it with these few days also becos I added in 1 other modification: Here is a sneak preview : 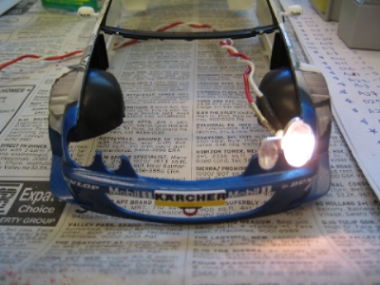
__________________
To each his own! Read the FAQ you faqer Evo Meet....coming to a forum near you! Completed!-Click on Pic: Projects done and posted: Subaru WRC2001 RGB-My first project in AF Click HereIn stocks: Ferrari F1 2001 Tyrrell P34 CLK Warsteiner Ford Performance Blue Ferrari Enzo Opel Team Holzer Williams FW24
|
|
#28
03-30-2003, 12:11 AM
|
||||
|
||||
|
Quote:
This is the one that I am using, you can buy it from the DIY shop at Tiong Bahru 2nd floor. Sorry cant remember the name of the shop I think its Shelf-fix or something but there's only 1 DIY shop so you cant miss it. Its bright cos its for using with a flashlight. Using only 1 AAA battery. Although it says 1.2v/0.3A and a normal AAA is 1.5v, it doesnt matter. I have a little problem with finding a place to put the batt though in my 1st project, the SUB so I skipped that n decided to put it in my merc. This merc has ample space for a AAA casing but I realised that since the merc's engine was in front, there's no hiding the wirings. But I went ahead anyways. Here's the pic of the bulb: 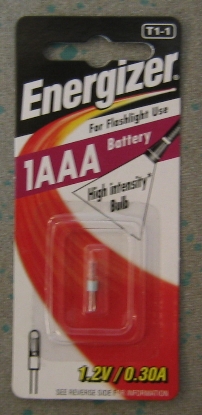
__________________
To each his own! Read the FAQ you faqer Evo Meet....coming to a forum near you! Completed!-Click on Pic: Projects done and posted: Subaru WRC2001 RGB-My first project in AF Click HereIn stocks: Ferrari F1 2001 Tyrrell P34 CLK Warsteiner Ford Performance Blue Ferrari Enzo Opel Team Holzer Williams FW24
|
|
#30
03-30-2003, 10:28 AM
|
|||
|
|||
|
As I said, from one surprise into the other!
Maybe you can try using a bit smaller wiring and then bring them to the back, between body and door panels. The back should be big enough for the batteries. The only downside is that you probably will see the wiring under the hood. But of you paint them black, the visibility will be minimal. But you'll have to use smaller wires then. Just an idea.
|
| ||||||||||||||||||||||||||||||||||||||
|
POST REPLY TO THIS THREAD |
 |
|
|