|
|
| Search | Car Forums | Gallery | Articles | Helper | Air Dried Beef Dog Food | IgorSushko.com | Corporate |
|
|||||||
| Register | FAQ | Social Groups | ||||||||||||||||||||||||||||||||||||||||||||||||||||||||||||||||||||||||||||||||||||||||||||||||||||||||||||||||||||||||||
| WIP - Motorsports Post topics for any "Work In Process" motorsports vehicles in this sub-forum. |
 |
 Show Printable Version | Show Printable Version |  Subscribe to this Thread
|
|
|
Thread Tools |
|
#107
 01-10-2011, 03:21 PM
|
||||
|
||||
|
Re: ARTA NSX 2005 - Tamiya - 1/24
Thank you again Gentleman! I felt my eyes wet
  As I said before all those comments make my motivation going higher up and give me lots and lots of modeling fun. There will be some more surprises so stay tuned. Last edited by Macio4ever; 01-10-2011 at 05:15 PM. 
|
|
#108
01-12-2011, 05:57 PM
|
||||
|
||||
|
Re: ARTA NSX 2005 - Tamiya - 1/24
Still trying to print better decals... In the meantime I decided to add driver cooling duct. I saw Alex Kustov method with teflon tape but decided to try differnet route. I used heat shrinking tubes. I used screws and my own cable threaded needle. Partialy succesful
 Test 1 - on screw and painted with Tamiya TS paint  Test 2 - on needle  Test 2 looks better but not best - a bit out of scale. I will look for smaller screw and will see if manage to get better air duct.
|
|
#110
01-15-2011, 09:59 AM
|
||||
|
||||
|
Re: ARTA NSX 2005 - Tamiya - 1/24
Panel decals are ready. I yhink they looks OK for the first time I made so small decals. One tag is about 0.4mm high
   I have created additiona decals for the dash: LCD monitor with Panasonic logo and two decals on the top of the carbon panel. 
Last edited by Macio4ever; 01-15-2011 at 10:44 AM. Reason: Picture added
|
|
#111
01-15-2011, 02:48 PM
|
||||
|
||||
|
Re: ARTA NSX 2005 - Tamiya - 1/24
Steering wheel decaled. Just belive me - it is readable
 Not as neat as Tamiya decals. I hope that I will get macro lens soon so there will be more details to watch. Not as neat as Tamiya decals. I hope that I will get macro lens soon so there will be more details to watch. I think that without lettering it would look still ok so I am not sure if the current effect was worth an effort I have put. On this pic lettering is seen better. Still not convincig and carbon decal looks completely not as in real.
Last edited by Macio4ever; 01-16-2011 at 01:10 PM. Reason: Picture added
|
|
#112
01-17-2011, 05:42 PM
|
|||
|
|||
|
Re: ARTA NSX 2005 - Tamiya - 1/24
wow, i think the decals look good. the lettering in 1/24 is way to small for the average inkjet.
that dash is just insane with all the switches and buttons. keep it up man, i get a bit excited when i see an updated in my email..lol
|
|
#113
01-22-2011, 11:01 AM
|
||||
|
||||
|
Re: ARTA NSX 2005 - Tamiya - 1/24
Quote:
The only interior things left are: cooling air pipe and small tag with Autobacs logo. Step 5. (Steering wheel). Painted with semi gloss clear than switches added (Hobby design and 0,45mm plastic rod) and painted. Steering wheel is glued in place, communication cable added (0,15mm copper wire). I am not sure that all mods to wheel were worth an effort I put. A bit overkill I supose. If I put carbon and paint switches it would look still very good. Some new pics.    
|
|
#114
01-22-2011, 01:16 PM
|
||||
|
||||
|
Re: ARTA NSX 2005 - Tamiya - 1/24
Time to start body preparation. I have few ideas to improve body finish.
Reference pics: 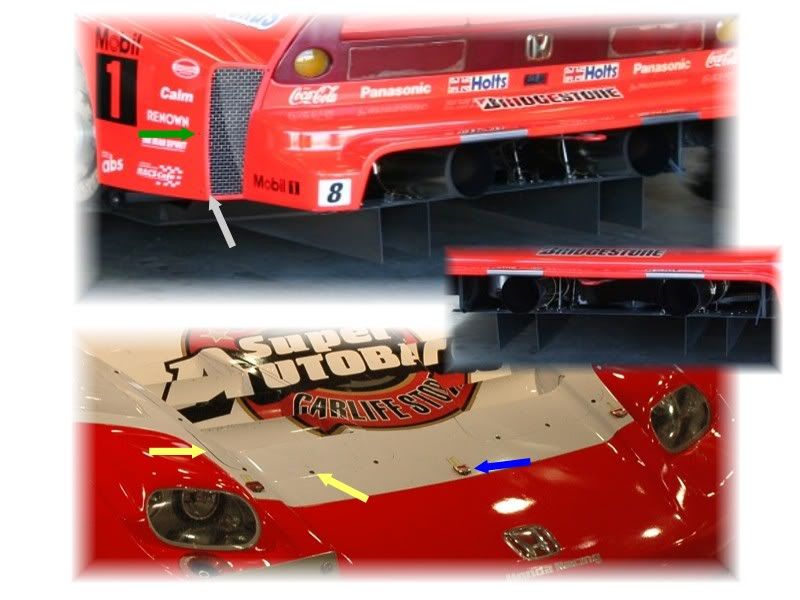  There are some details I want to take into account in detailing my nsx - Screws on the rear fender - green arrow /I will use PE screws/ - Rear mesh is mounted in different way than Tamiya suggest as well as painting scheme - grey arrow - Exhaust mounting points and auxiliaries - Air intakes - just to make sure that screws are like in real - yellow arrows - Hood pins different on rear and front hood - blue arrow I will putty front fenders but later on as they are extremely fragile and I might break them while sanding. I will start with basic surface preparation. I will change my usual method in two ways. First I will use regular Tamiya grey acrylic paint to revise how surface is sanded. I will strip off grey, use 1 layer of white primer and then I will start painting white and red. I want to reduce number of layers to avoid flooding delicate details. Second - I will paint body underneath with silver then black for 2 purposes: light reflection and make body fully opaque to preserve color tone. Removing ejector pin marks with my new sanding tool (toy.)  I remove plastic screws (red arrow) and make holes for PE parts. Panel lines got some treatment.  Side mirrors - they need to be mounted in completely different way than Tamiya offered.  Modified rear fender mesh support - left Tamiya 
Last edited by Macio4ever; 01-23-2011 at 07:58 AM. Reason: Added picture of rear fender
|
|
#115
01-23-2011, 10:42 AM
|
||||
|
||||
|
Re: ARTA NSX 2005 - Tamiya - 1/24
Rear meshes support glued and puttied.
 I also decided to modify rear wing support. Tamiya version has right shape but is thick as hell (1mm). I built my own from 0,5mm styrene sheet /left, dry fitted/. I will use metal screws to mount it together an some glue. Leaving moving parts would complicate assembly without any additional gains. 
|
|
#116
01-23-2011, 10:52 AM
|
||||
|
||||
|
Re: ARTA NSX 2005 - Tamiya - 1/24
I am excited to see your talents applied to the body work. I like the thinned out rear mesh supports and the wing uprights. Keep up the great work mate!
__________________
-Mike AF Director of Media / Photographer  [email protected] | AutomotiveForums.com | Flickr Gallery
|
|
#119
01-24-2011, 04:06 PM
|
||||
|
||||
|
Re: ARTA NSX 2005 - Tamiya - 1/24
Great that you like my work!
Short update. I have modified rear wing to accomodate new uprights. I used a piece of styrene to build thin and even gaps and light curing putty to fill the rest of the hole.  New wing uprigts just glued  Drilled front air intakes. I drill holes for two reasons: it is easier to paint and polish, second - in original car screw heads are not over body surface. 
|
|
#120
01-25-2011, 03:54 PM
|
||||
|
||||
|
Re: ARTA NSX 2005 - Tamiya - 1/24
Rear wing dry fitted. I will have to correct uprights mounting points on the hood. Small change, lots of work.
 Analyzing picture I have concluded that vertical parts of the wing are far to thick and have to be corrected. Right one before diet, left - skimmed down.  Milled down from 1,06mm to 0,65mm Last edited by Macio4ever; 01-25-2011 at 05:55 PM.
|
| ||||||||||||||||||||||||||||||||||||||
|
POST REPLY TO THIS THREAD |
 |
| Thread Tools | |
|
|


 fantastic work!


