|
|
|

|
|
| Search | Car Forums | Gallery | Articles | Helper | Air Dried Beef Dog Food | IgorSushko.com | Corporate |
|
| Latest | 0 Rplys |
|
|||||||
| WIP - Motorsports Post topics for any "Work In Process" motorsports vehicles in this sub-forum. |
 |
 Show Printable Version | Show Printable Version |  Email this Page | Email this Page |  Subscribe to this Thread
|
|
|
Thread Tools |
 10-01-2011, 08:47 PM
|
#1 | |
|
AF Enthusiast
Join Date: Aug 2005
Location: where "sky grey" is a colour
Posts: 823
Thanks: 3
Thanked 32 Times in 29 Posts
|
Leyton House CG901B
Hi everyone, heres the start of a new WIP. I have been playing around with several projects since finishing my Jordan 191 and now i finally have something to show.
This is the 1:20 scale Leyton House March CG901B by Tamiya that most of you will know or even have. 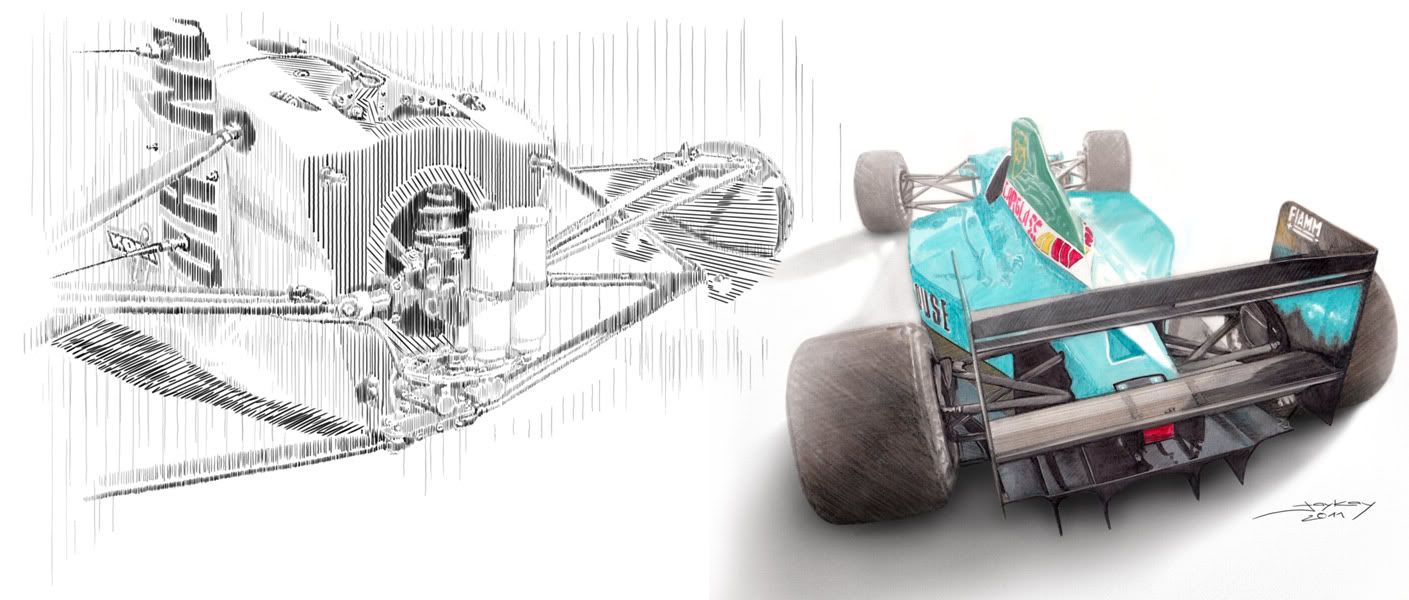 For a long time i wasnt really interested in this kit because the car wasnt that successful ( well, compared to the Ferraris, McLarens and Williams of the time ) and the kit has been OOP for quite a while and has become a collectible of sorts. My indifference was changed in 2009 however, when i saw the real thing at Goodwood, freshly after being restored by http://www.dtperformanceltd.co.uk Compared to other cars of the time this one looks even more delicate and sleek ( and I really like some of those other cars for their looks ) There are various small bits and pieces on the CG901B that look more sophisticated than the competition. Its a bit like looking at Bugattis or Millers compared to their contemporaries. Granted, that didnt make the 901B a winner but i think you can almost see its a Newey car. You can read more about the real thing in Gurneyflaps focus here: http://www.gurneyflap.com/leytonhousecg901.html The kit is a typical Tamiya effort of the time. Not sensational compared to current kits but a good base to start with. In many ways its the Jordan all over again. Originally i wanted to build something different after the Jordan but i changed my mind. I wanted to try out some new techniques and the Leyton House ( and many of its afforementioned sophisticated bits ) are a very good test bed for it. I will get to that a little later :-) At Goodwood i managed to get a good bunch of pictures of the beautifully restored car that i will use for reference and show here along with the build pictures. Despite all my picture taking i later found out that i had missed some details ( as always...). But Patrick Morgan, the owner of dtperformance, kindly helped me out with some additional pictures, so my special thanks go to him! I started the build like i did with the Jordan. I sketch glued most of the parts together to make a jig for the suspension setup and to see which parts would need modifications and what would need to be replaced or scratchbuilt because it was missing entirely. 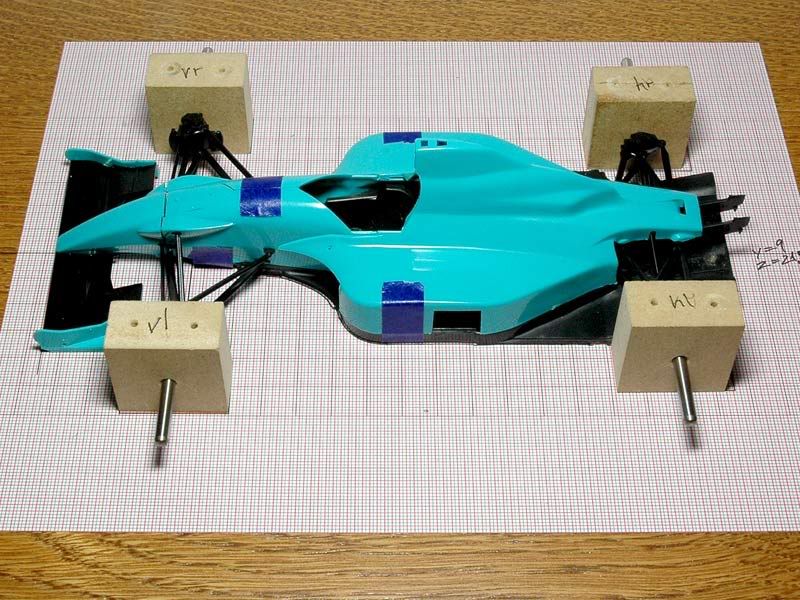 When the nosecone and top hatch are removed they reveal.....nothing :-) Same thing as with the Jordan. There will be some scratch building necessary. 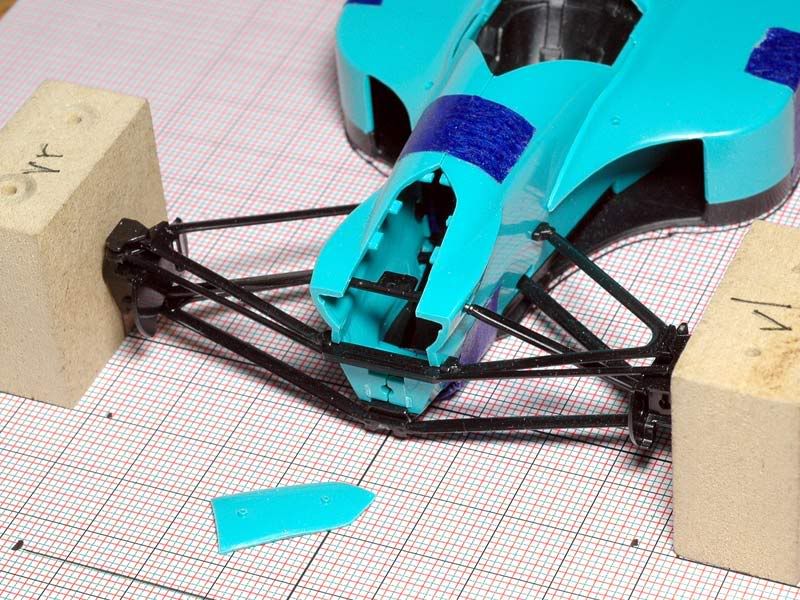 The engine bay will aslo need a lot of work. Many parts have been simplified or arent in the kit at all. 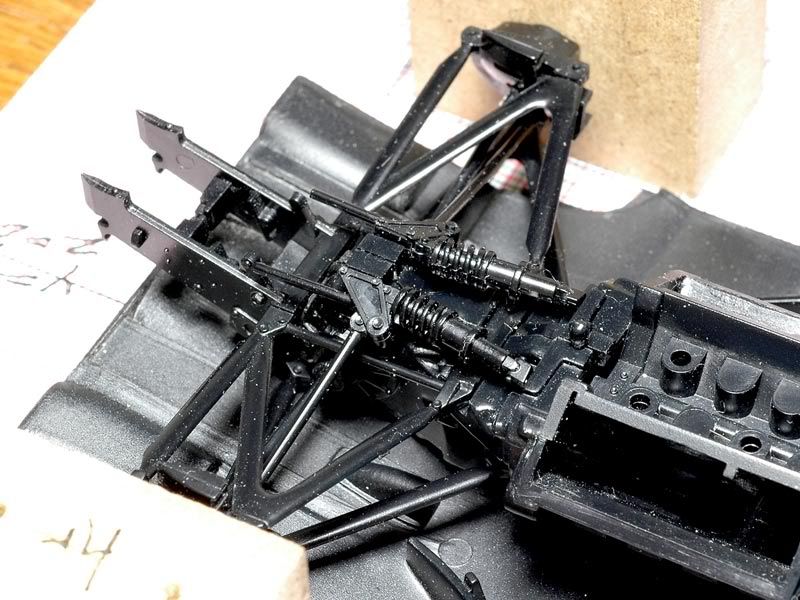 Theres one big oddity with the kit. When the engin cowling is mounted it overlaps the drivers seat massively. In reality this would literally break his neck. It looks like Tamiya was rather generous with that gap to make sure the cowling would fit on the finished build. Ill have to change that. 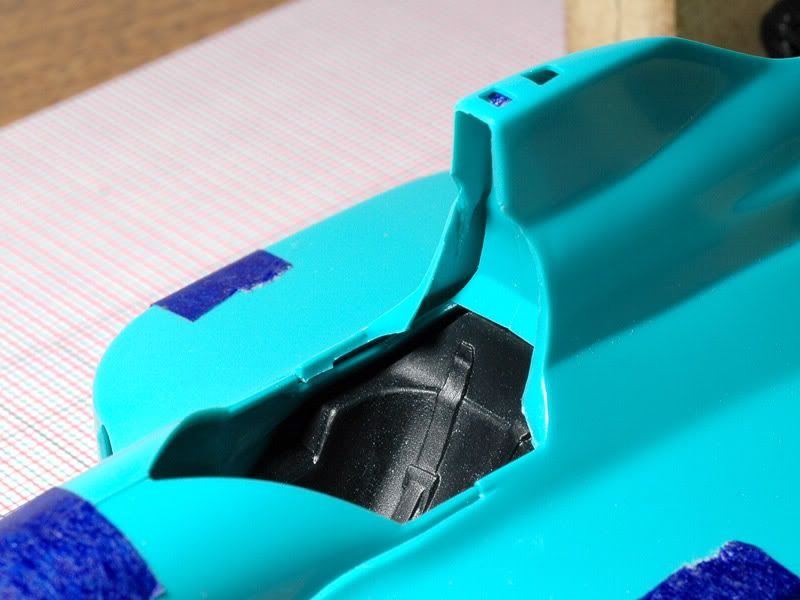 I got started with the monocoque. Before putting the halves together there are some things to do. The molded in fuel filler is a bit of a joke. 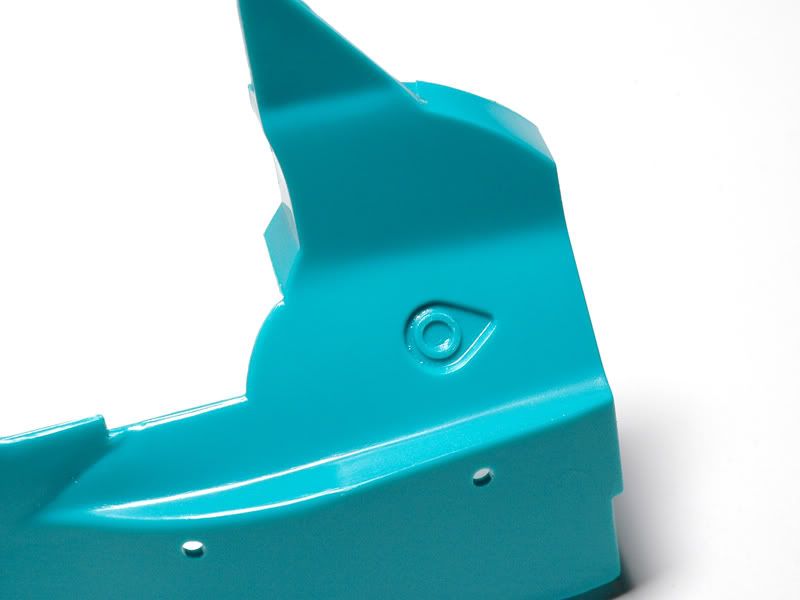 The real one is slightly more detailed :-) 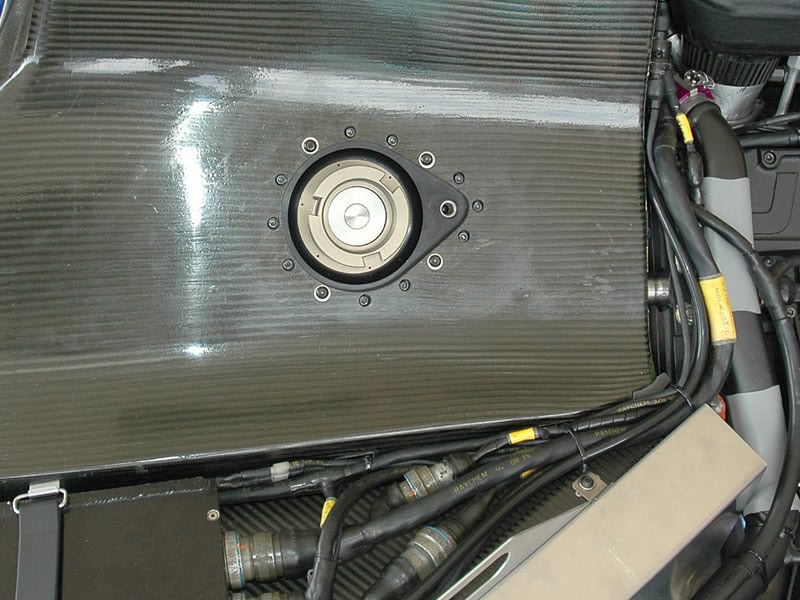 To replicate that i filed a hole in the monocoque and drilled 0,3mm holes for the surrounding bolts using a template i photoetched. 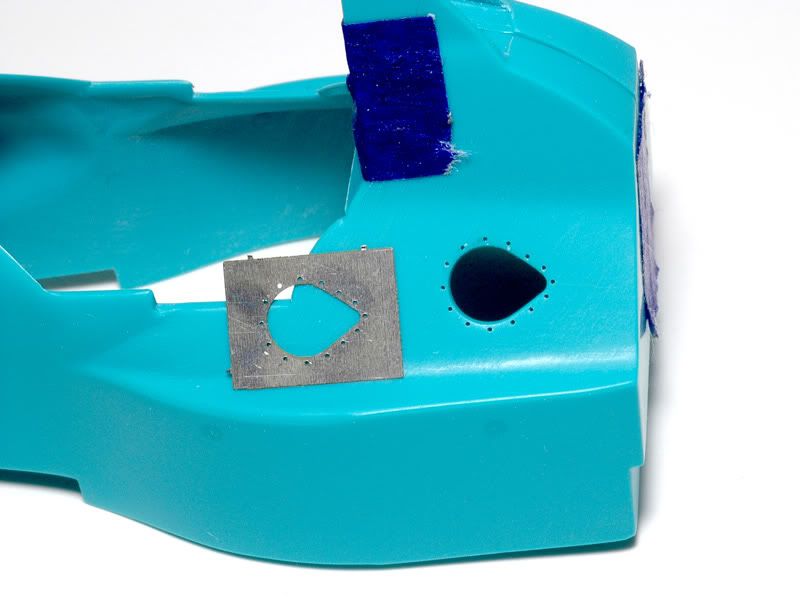 I also closed various holes for locator pins and the front suspension. Some of these wont be needed or they should be smaller or shaped differently. 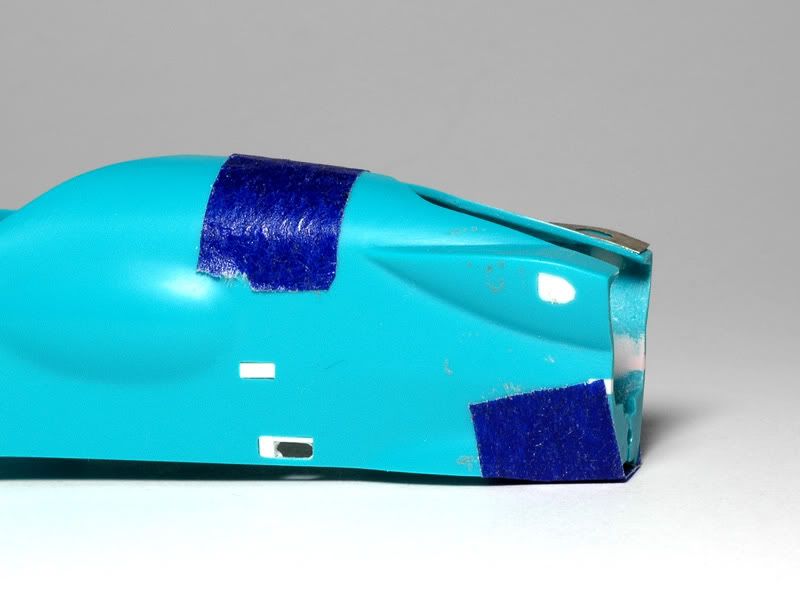 So, these are the first steps. Im slowly but surely getting into this build. Progress will be slow as always but im aiming to make it at least steady :-) Thanks for watching! |
|

|

|
|
10-02-2011, 12:03 AM
|
#2 | |
|
AF Newbie

Join Date: Sep 2011
Location: .
Posts: 27
Thanks: 0
Thanked 1 Time in 1 Post
|
Re: Leyton House CG901B
I already posted a comment over at F1M, but I'm still very excited to see your progress, good luck!
 |
|
|
|
|
|
10-02-2011, 07:15 AM
|
#3 | |
|
AF Enthusiast

Join Date: Aug 2005
Location: Chengdu. CHN
Posts: 1,269
Thanks: 20
Thanked 36 Times in 19 Posts
|
Re: Leyton House CG901B
When you see the author name you know it's party time again, just sit tight and waiting to be shocked again.
 |
|
|
|
|
|
10-02-2011, 07:37 PM
|
#4 | |
|
Captain Over Engineer
 Join Date: Feb 2003
Location: New York, New York
Posts: 6,711
Thanks: 27
Thanked 29 Times in 23 Posts


|
Re: Leyton House CG901B
I cant wait to follow this one Joachim! Your sketch is fantastic!
__________________
-Mike AF Director of Media / Photographer  [email protected] | AutomotiveForums.com | Flickr Gallery |
|
|
|
|
|
10-03-2011, 12:24 AM
|
#5 | |
|
AF Enthusiast

Join Date: Jun 2008
Location: Kuala Lumpur
Posts: 505
Thanks: 2
Thanked 6 Times in 6 Posts
|
Re: Leyton House CG901B
definitely will be watching this one, superb sketch..i thought it was some artist's sketch, until Mike mention it only i realize your signature is in the sketch
 |
|
|
|
|
|
10-03-2011, 06:53 AM
|
#6 | |
|
AF Regular
Join Date: Mar 2006
Location: Bilzen
Posts: 186
Thanks: 0
Thanked 9 Times in 4 Posts
|
Re: Leyton House CG901B
Straight into my favorites!!!!!
__________________
Superdetailling is not a crime! |
|
|
|
|
|
10-03-2011, 08:22 AM
|
#7 | ||
|
AF Enthusiast

Join Date: Oct 2005
Location: Monza
Posts: 1,150
Thanks: 21
Thanked 56 Times in 38 Posts
|
Re: Leyton House CG901B
Quote:
 |
||
|
|
|
|
10-03-2011, 01:47 PM
|
#8 | |
|
Captain Over Engineer
Join Date: Feb 2003
Location: New York, New York
Posts: 6,711
Thanks: 27
Thanked 29 Times in 23 Posts
|
Re: Leyton House CG901B
I am ready for another update now! Hurry up, Joachim!
__________________
-Mike AF Director of Media / Photographer [email protected] | AutomotiveForums.com | Flickr Gallery |
|
|
|
|
|
10-03-2011, 03:03 PM
|
#9 | |
|
Banned
Join Date: Apr 2003
Location: Ma$$h0le
Posts: 306
Thanks: 27
Thanked 10 Times in 8 Posts
|
Re: Leyton House CG901B
JK, congrats on your Icon online contest win!
Looking forward to this build, as I don't thinkI've ever seen a detailed 901B out there. There is a CG901B near me if you need a specific part photographed....let me know. |
|
|
|
|
|
10-03-2011, 07:20 PM
|
#10 | |
|
AF Enthusiast

Join Date: Oct 2008
Location: Auckland
Posts: 2,761
Thanks: 51
Thanked 136 Times in 134 Posts
|
Re: Leyton House CG901B
Awesome, Your Jordon Build was jaw dropping, cant wait to see what you do with this one!!
__________________
 It's Not wheather you Win or Lose, its how you look while you play the Game |
|
|
|
|
|
10-03-2011, 07:54 PM
|
#11 | |
|
AF Regular

Join Date: Oct 2008
Location: Berkeley, California
Posts: 284
Thanks: 3
Thanked 13 Times in 13 Posts
|
Re: Leyton House CG901B
Ah, the start of another master build. I can't wait to see you "new techniques". Very nice sketch too. I'm always curious about what you do professionally. An F1 engineer?
__________________
     
|
|
|
|
|
|
10-04-2011, 07:10 PM
|
#12 | ||||
|
AF Enthusiast
Thread starter
Join Date: Aug 2005
Location: where "sky grey" is a colour
Posts: 823
Thanks: 3
Thanked 32 Times in 29 Posts
|
Re: Leyton House CG901B
Quote:
Quote:
Quote:
Since weve had a long weekend in Germany i was able to make some progress and heres another update already just dont get used to it :-) The next step was, to open the holes for the front pushrods in the monocoque. Tamiya didnt bother to do the ones in the top surfaces, because that would have made the injection mold too complicated. I etched another template, fixed it with a drop of superglue and then opened the holes one after another. 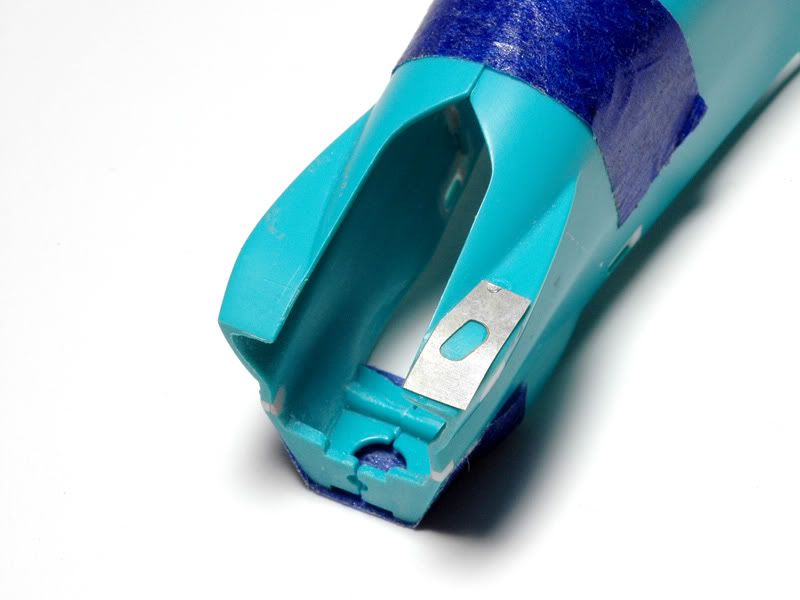 Heres a picture of the real car for comparison. Unfortunately one of my holes turned out a bit big. Ill have to fix that later.  I cleaned the surface areas on the insides of the monocoque halves that will be visible after assembly and added a styrene ring around the big bulge for the shifting hand in the right hand side like on the real car. 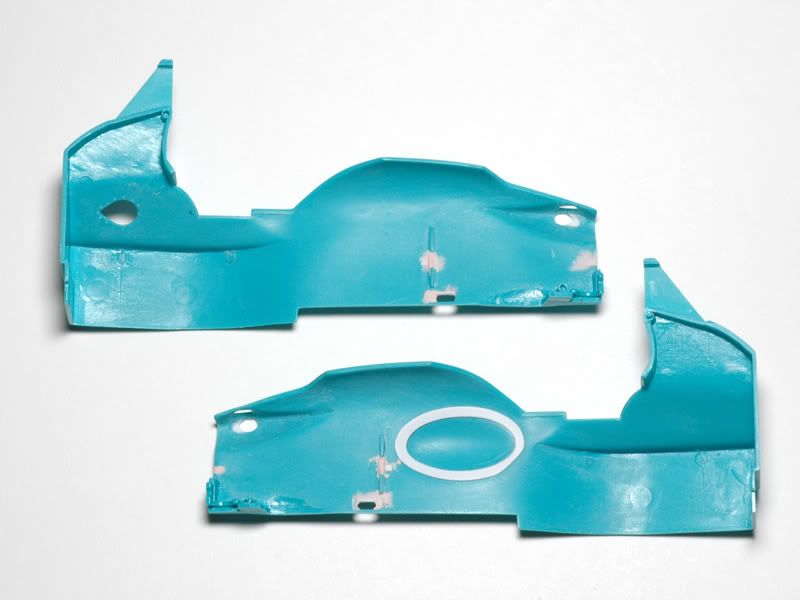 Then i finally glued the parts together and started cleaning the seams up. The surfaces needed some thorough filing and sanding to straighten them out. You can see what i mean in the next picture... its an old mold :-) 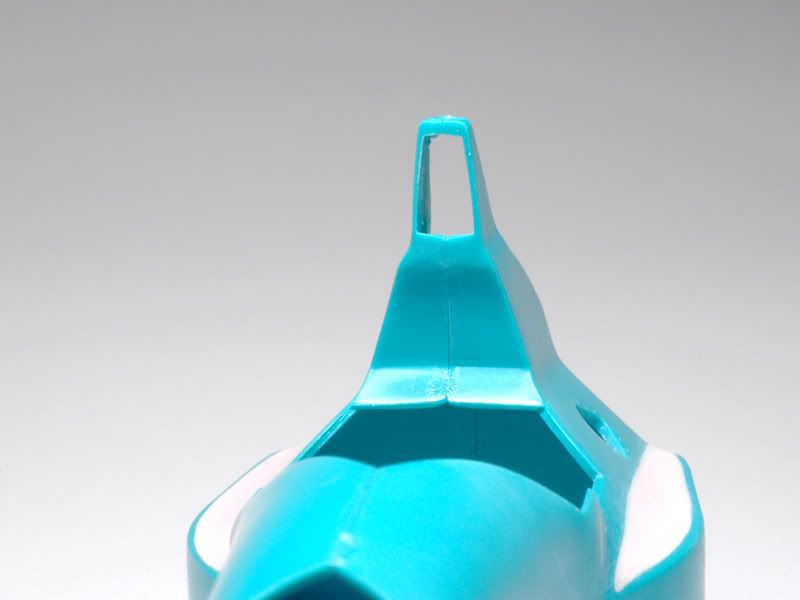 On top of the sidepods i added some body filler to correct the shape. 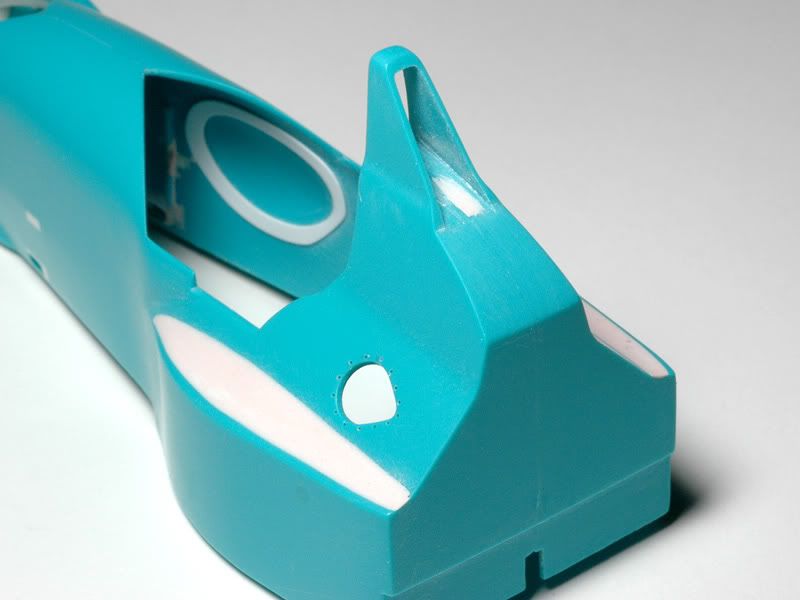 At this point its time to get to one of the new techniques i mentioned in the first post. For a long time ive been wanting to try out doing parts for models in CAD. The problem was, i had to learn the software first. Id been meaning to do that for years, because i kinda need it for my job as well :-) Earlier this year i finally sat down and started learning. To motivate myself i built parts for modeling projects to practice. Hence i spent my modeling time at work in the evenings and didnt have much to show for a WIP thread until now. A couple of weeks ago i finally got my first batch of parts for the Leyton House and could get started with building ( the other projects i worked on will follow later ). 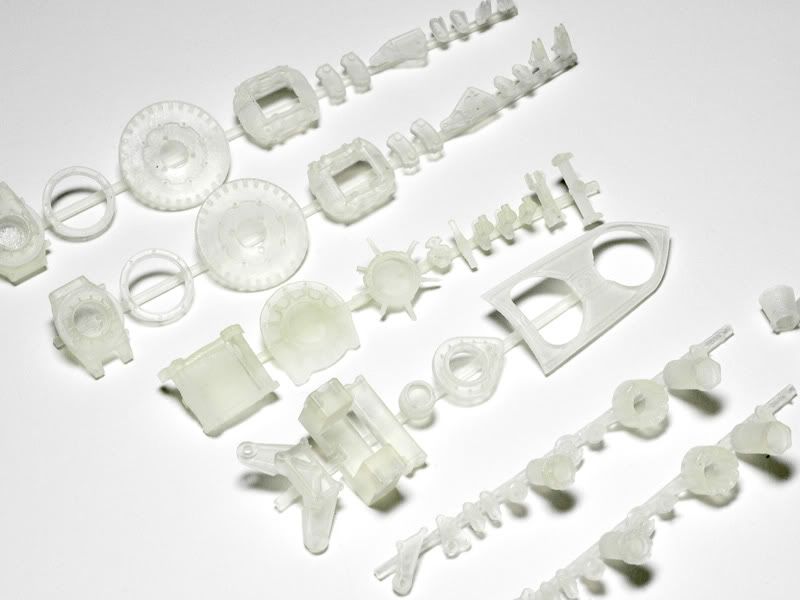 I got these parts done by shapeways.com in their frosted ultra detail material. They introduced it earlier this year and its about o.k. for the tiny details i wanna do. From looking at the surface quality id say its better than what Hiros machine can do :-) The technology could do even finer stuff afaik but that would increase production time and the price. For what you get, the price is reasonable and it means, its not necessary to buy your own CNC mill ( unless you want to make metal parts that is :-) Anyway, i designed a variety of parts to test whats feasible to produce and pushed the limits in terms of detail and material thicknesses. In some cases the parts look very good, in others i was too ambitious. The technology opens a whole new can of worms though and helps to build really nerdy stuff that would be very difficult or even impossible to do by hand or with manual machines. The first part to go on the model was the top insert in the front end of the monocoque. I had to shorten the part a bit to make it fit, but overall it came out pretty well. I sanded the surfaces slightly to remove the typical stepping in the surfaces, which worked fine with that material. 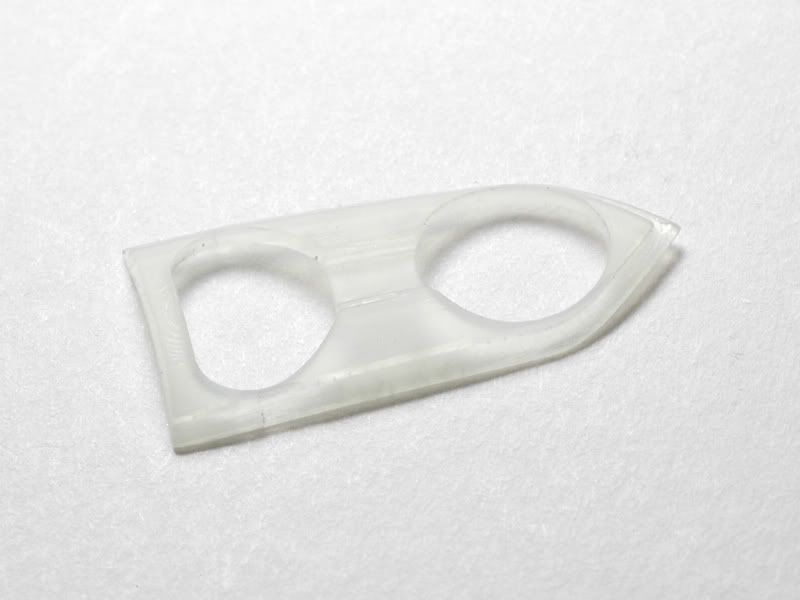 In the next picture the part is in its place and you can also see the left hand side holes i made for the front pushrod. The one in the side had to be repositioned because Tamiya put it a bit off its real place due to the material thickness of the injection molded piece. 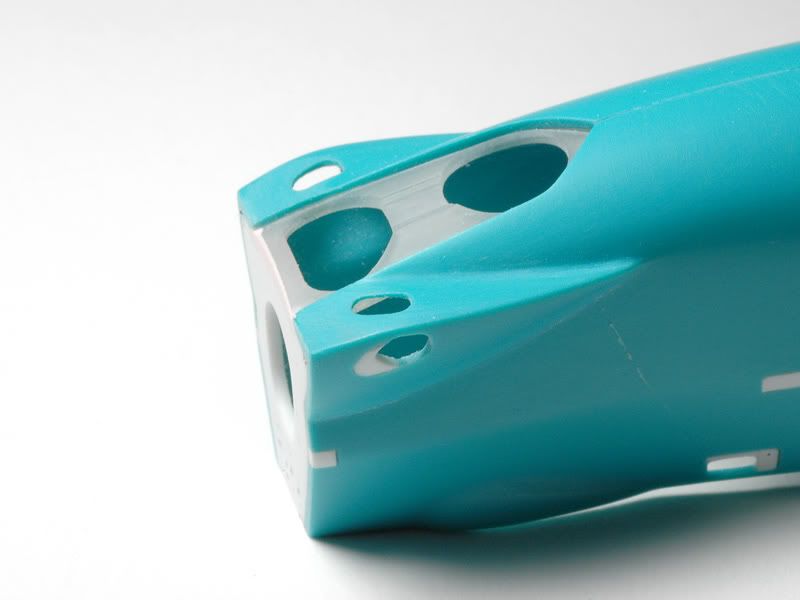 For the front bulkead i used 1mm styrene sheet and drilled the holes using another etched template. Doing that part in CAD and getting it printed wouldnt have worked well, because the inner surfaces of the kit parts were asymmetric and it would have been tricky to get the bulkhead sit right. 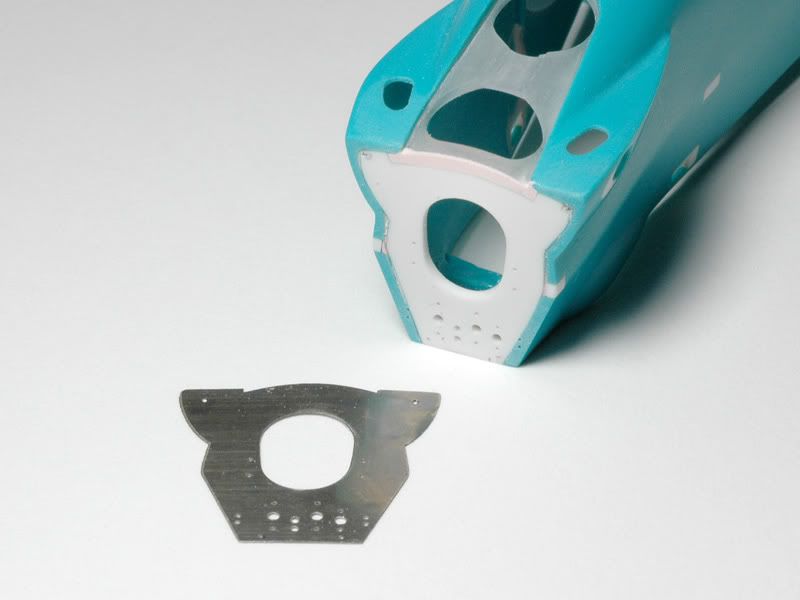 Finally, heres a picture of the whole monocoque as it is right now. 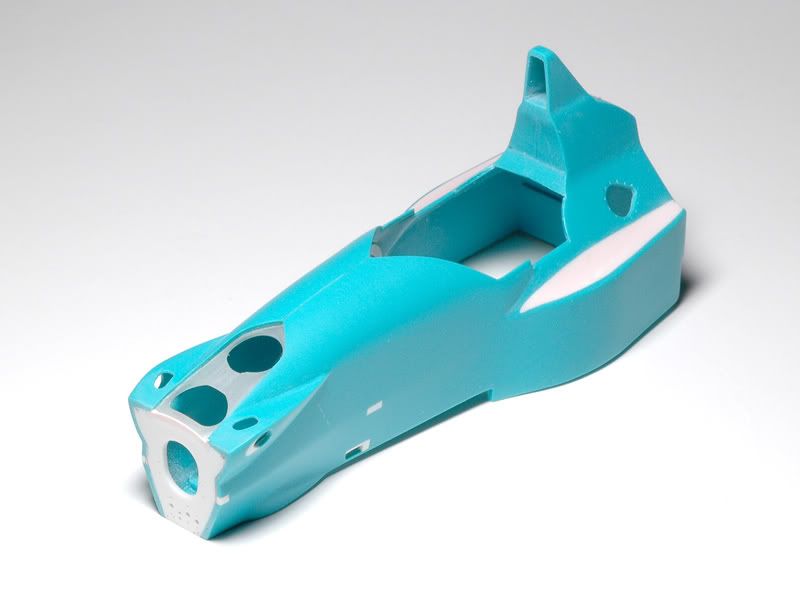 Theres more to do on it, but that update will take longer :-) |
||||
|
|
|
|
10-05-2011, 02:46 AM
|
#13 | |
|
Authorized Vendor

Join Date: Oct 2005
Location: Vicenza - veneto de rassa
Posts: 3,910
Thanks: 6
Thanked 47 Times in 41 Posts
|
Re: Leyton House CG901B
Mmmm fantastic like ever, one step forward .... 100% Jayjuice... (maybe I spent this gag yet? maybe..
)first: amazing, the etched template to drill/cut is simply amazing, great idea, genius... second: great to see others on the "custom modeling" with better result, perhaps... I recorded your supply service for prototypes, looks like it is much cheaper than mine, but I have to do right calculation... I browsed the price list and looks like they may do metal protypes? I must try them and do a comparo with my usual source.... In one word... Jay: can you use parts without light sand 'em? ciao super gio
__________________
 gio gio
|
|
|
|
|
|
10-05-2011, 04:52 AM
|
#14 | |
|
AF Enthusiast
Thread starter
Join Date: Aug 2005
Location: where "sky grey" is a colour
Posts: 823
Thanks: 3
Thanked 32 Times in 29 Posts
|
Re: Leyton House CG901B
Yes they do metal parts. They look nice but i don't think they are fine enough for parts in this scale.
You could probably use the "frosted ultra detail ( or FUD )" parts without sanding and just prime and paint them but with some sanding the result should be better. I haven't tried yet but it depends on how much paint you put on top. Parts that will be painted with several layers or covered with CF decals won't need sanding i think. Tiny detail parts that will get a metal paint shade are a different story. That's where i need to experiment and see if 3D-printing is the right solution ( yet ). |
|
|
|
|
|
10-05-2011, 09:33 AM
|
#15 | |
|
AF Enthusiast

Join Date: Mar 2007
Location: Lisle, Illinois
Posts: 809
Thanks: 0
Thanked 2 Times in 2 Posts
|
Re: Leyton House CG901B
oh boy, here we go again, wheres the popcorn

__________________
Steve |
|
|
|
|
| ||||||||||||||||||||||||||||||||||||||
|
POST REPLY TO THIS THREAD |
 |
|
|


