|
|
| Search | Car Forums | Gallery | Articles | Helper | Air Dried Fresh Beef Dog Food | IgorSushko.com | Corporate |
|
|||||||
 |
 Show Printable Version | Show Printable Version |  Subscribe to this Thread
|
|
|
Thread Tools |
|
#1
 03-16-2006, 10:38 AM
|
||||
|
||||
|
1996 Dodge Grand Caravan LE EGR, Solenoid and Transducer Problems 101
Last updated 20-March-2006 (See Document Revision History)
Introduction... Although these procedures were originally written specifically for the 1996 Dodge Grand Caravan LE, they also apply to all 1996, 1997 and 1998 Dodge Caravan, Plymouth Voyager and Chrysler Town & Country Mini-vans with the 3.8L engine. These procedures may apply to other years as well. Procedures apply to Diagnostic Trouble Code (DTC) 32 and OBD II "P" Codes P0401 and P0403. Before you get started, you should run your VIN through Dodge's Recall Check Procedure. The results of this check may (or may not) have some bearing on your current problem and your Dealer may have to fix it FREE by law. To find out if your vehicle has any current unperformed or incomplete recalls or customer satisfaction notifications, get the last 8 characters of your VIN and go here to make sure that your vehicle has had ALL of its recall work done: http://www-5.dodge.com/webselfservice/dodg...rm%28%27R%27%29 As an aside, here is a compiled list of helpful information sources which can be found in forums of various web sites and user communities (including this one): http://www.allpar.com/forums/index.php?showforum=16 http://www.autobanter.com/forumdisplay.php?f=23 http://www.dodgetalk.com/forums/forumdisplay.php?f=47 http://www.automotiveforums.com/vbulletin/...splay.php?f=139 http://www.dodgeforum.com/forumid_30/tt.htm And lastly, please read through this entire document to familiarize yourself with what it covers and what it does not cover. Your job will be a whole lot easier if you do... really. Document Revision History... placed at the end of this document. If you find/found this document useful, please say so, even if you have to create a login ID to do so!... friends, that ALSO means that if you have information for model years or part numbers not mentioned in this document, please show your appreciation and post it so WE can make this document better than it already is! EGR Assembly - Valve, Solenoid and Backpressure Transducer – 1 Unit While your Haynes repair manual and possibly other repair manuals accurately describe the EGR Valve Assembly as three distinct items (valve, solenoid and transducer), all three items are usually sold together as a single, fully preassembled kit. This kit includes the EGR Valve Assembly, two new bolts and a new gasket. A brand new EGR Valve Assembly looks like this... 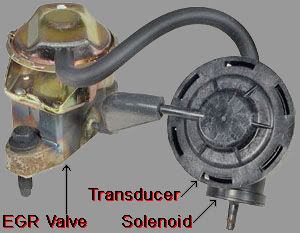 The EGR Valve Assembly works in tandem with the Power Control Module (PCM) under the hood to intercept exhaust gases from the exhaust manifold via the EGR tube (located in the back of the engine compartment near the firewall) and re-circulate these gases through the Throttle Body to reduce various Nitrous (NxO) emissions into the atmosphere. Over time, this valve can become clogged with carbon deposits and/or the diaphragm can harden from heat and stop responding to vacuum to open and close the valve. When this happens, your Check Engine light illuminates and will stay illuminated every time you start your mini van. Your old EGR Valve Assembly will look something like this (notice the carbon deposits in the inlet and outlet ports)... 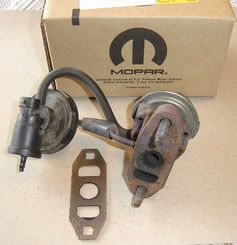 Aside from the annoying Check Engine light on all the time, your engine may also run a bit rough, particularly noticeable at idle, in Drive, at a stop light. You may notice over time a reduction in gas mileage efficiency. From what I have read elsewhere, there is no danger of damaging your engine by operating your vehicle with an EGR Valve Assembly that is not working properly… it is just costly to do so… and you will fail your emissions test (at least in Connecticut you will). Looking for Diagnostic Trouble Codes (DTCs) and Scan Tool “P” Codes Looking for trouble in all the right places is the key to success. Generally, it is a good idea to get BOTH of these codes because different combinations of DTC and “P” codes can indicate multiple specific problems. For example, a DTC32 and P0403 together indicate a problem with the EGR Solenoid (An open or shorted condition detected in the EGR transducer solenoid circuit) while the same DTC32 along with P0401 indicates a general EGR System Failure (Required change in air/fuel ration not detected during diagnostic test). In this case, however, replacing the EGR Valve Assembly “can” resolve both combinations of DTC and “P” codes. I say “can” because (as an aside) another component of the EGR System is the EGR Tube, the device through which gases from the exhaust manifold pass to the EGR Valve and ultimately into the Throttle Body. It is possible that this tube may need to be replaced because it has become clogged with carbon deposits (although in my case, replacement was not necessary). My guess is that it is far more likely that the EGR Valve will get clogged before the EGR tube. My Haynes manual implied that I should replace this tube, but I did not… simply replacing the EGR Valve Assembly did resolve my problem (at least for now, anyway). I chose this route because removing the EGR Tube is a PITA… it is located behind the engine next to the firewall and I wouldn’t even think about doing this without first removing the windshield wiper cowling (another PITA). I’ll tackle the EGR Tube issue when I change plugs or have some other reason to remove the windshield wiper cowling. ANYWAY… to get the DTC(s), simply insert your key and turn ON-OFF-ON-OFF-ON… careful not to start your vehicle, simply ON each time enough to illuminate the dashboard idiot lights. Your Check Engine Light will flash once, pause, then twice (DTC12) to let you know that your Onboard Diagnostics (OBD II) system is working. Then it will flash three times, pause, then twice (DTC32) to indicate the specific EGR error code for “Insufficient flow.” And finally, the Check Engine light will flash five times, pause, and five times again (DTC55) to indicate the end of DTC codes… 12-32-55… 12 (start) – 32 (THE error code, there may be more than one) – 55 (end). If you take your vehicle down to Auto Zone or Advance Auto and ask them to check your OBD II codes (which they will do for free), they will, in all likelihood provide you with one or more “P” error codes… in my case it was P0401. You may get a P0403. In short, if you got a DTC32 with the on-off-on-off-on test, you will most likely also get a P0401 or a P0403 with a handheld scanner attached to the OBD II port located under the driver’s side dashboard. If you do, warm up your checkbook and make tracks to your nearest dealer (or elsewhere), confident in the knowledge that you are about to beat this bad boy, save yourself a hundred bucks or so in mechanic labor charges, take your significant other out to dinner tonight and discuss (among other things) your supreme automotive prowess  . .* * * * * * * * * * * * * * * * * * * * * * * * * * * * * * * * * * PART NUMBERS, MANUFACTURERS & POINT of PURCHASE EGR Valve (Assembly): From a Dealer Part # 04287189 ($61.48 [with 6% sales tax]); STANDARD MOTOR PRODUCTS Part # EGV596 ($50.89+Shipping at RockAuto.Com); AIRTEX Part # 4F1190 ($81.79+Shipping at RockAuto.Com). * * * * * * * * * * * * * * * * * * * * * * * * * * * * * * * * * * COST COMPARISON DATA: My Dealer Does the Work / I Do the Work My Dealer's Estimate EGR Valve (Assembly) - $58 CT State Sales Tax on Parts - $3.48 Labor (1.25 hours @ $85/hour) - $106.25 TOTAL Dealer Price - $167.73 My Actual Costs EGR Valve (Assembly) - $58 CT State Sales Tax on Parts - $3.48 Labor (1.25 hours @$0/hour) - $0 My TOTAL Actual Cost - $61.48 TOTAL Savings - $106.25 - I reduced my repair bill over 63% * * * * * * * * * * * * * * * * * * * * * * * * * * * * * * * * * * Git’er DONE… Step #1.) - DISCONNECT the NEGATIVE Battery Cable from the battery. If you FAIL to do this, you risk shorting out a number of components that are EXPENSIVE to replace. You might also accidentally deploy either or both of your AIRBAGs which are HIDEOUSLY expensive to replace - not to mention extremely DANGEROUS should you be anywhere near these explosive devices when they go off! This also removes all error codes contained in computer memory and prepares your vehicle’s Power Control Module (PCM) to accept a newly installed, electronically controlled, EGR Valve Assembly. 2.) Take a close look at the new EGR Valve Assembly in your hands to get an idea of where the bolts are located on the old unit you are about to remove. As usual, Chrysler engineers put the bolts in a place difficult to see, but in this case, thankfully, not impossible to get to. Standing in front of your mini van, the EGR Valve Assembly is bolted onto the Throttle Bottle toward the back near the firewall in this area... 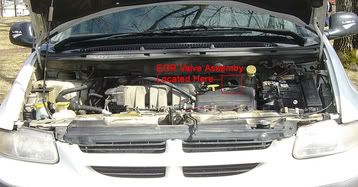 3.) Move wires and vacuum lines out of the way to gain access to the bolts that hold the old EGR Valve Assembly to the Throttle Body. You may have to disconnect a few vacuum lines and unplug a few things to gain good access to these bolts as I did. I did not need to unbolt anything other than the EGR Valve Assemby. Here's a closer look (notice that the solenoid has an electrical connection in front on one end and a vacuum connection on the other end)... 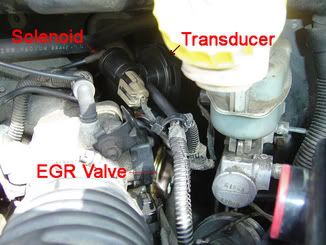 4.) Remove the vacuum line and disconnect the PCM plug from the old EGR Solenoid; move them safely out of the way. I used PB Blaster to loosen up the bolts, but I probably did not need to do so as these bolts were not on very tightly. 5.) Get a 10mm long socket and a 1/4" or 3/8” ratchet. I found it easier to put the socket onto the bolt heads first and then attach the ratchet to the socket. You can locate both bolt heads with your left hand by reaching underneath the Throttle Body snorkel and then place the socket onto the bolt heads with your right hand. This may require a Houdini-like maneuver of the hands to pull this off, but it can be done. 6.) Be patient… it’ll take a little while to get these bolts out, but they should not be difficult to turn… afterward, carefully remove the old EGR Valve Assembly… there is room to remove it over the top of the Throttle Body inlet and snorkel. Happily, the gasket should come off completely with no breakage. 7.) This is a little tricky... Make sure the bolts on the new EGR Valve Assembly are in the holes and through the gasket. It may take a little finesse to hold and thread the new bolts into the Throttle Body. I got the threads started by placing just the 10mm socket over the new bolt heads and turning them by hand to get them started. 8.) Move back and forth between the two new bolt heads to tighten them down with a ratchet. This ensures that the new EGR Valve Assembly goes down evenly. I torqued these puppies down to about 15ft.lbs. (equal to 180in.lbs.). 9.) Re-attach and properly re-route all vacuum lines and electrical connections to their original positions... these are the ones you may have disconnected to gain access to the old EGR Valve Assembly bolts AND the ones you disconnected from the old EGR Valve Assembly prior to its removal. 10.) Reconnect the negative cable to the battery, fire it up and take it for a spin. Notice with great satisfaction that your Check Engine light no longer illuminates.  You’re done! NOTE: If your Check Engine light DOES illuminate AND your DTC and "P" codes are the same as before, FIRST take your vehicle to Advance Auto or Auto Zone and have them clear all codes (although they should have been cleared when you removed the negative cable from the battery). If that doesn't work, your only remaining option is to remove the EGR Tube from behind the engine next to the firewall and clean or replace it. Cross your fingers that you don't need to do this. It's a PITA. DOCUMENT REVISION HISTORY 16-MAR-2006: Published 20-MAR-2006: Pictures Added 20-APR-2006: Minor editorial changes Last edited by HeadlessHorseman; 04-20-2006 at 10:28 PM. 
|
|
#2
02-02-2008, 10:25 PM
|
|||
|
|||
|
Re: 1996 Dodge Grand Caravan LE EGR, Solenoid and Transducer Problems 101
headlesshorseman - This is an absolutely great article. After getting P00401 and P00403 codes on my Washington state emissions test for a 97 Dodge Grand Caravan, I took my car into the local Shell station and was told that it would be $150 for a new EGR valve, $180 for labor, $45 for new vacuum tubes, for a grand total of $375. After reading your great how-to, I built the courage to try it myself. For $75, I was able to replace the old EGR assembly with a new one, in about an hour. Everything worked as advertised. Thanks!
One interesting note, I immedately took the van back to the emissions testing center, and was told that the diagnostic system will actually show as "not ready" until the car is stopped and started several times. They recommended I come back in a couple days, which I did, and had no problems.
|
|
#3
02-19-2008, 04:01 PM
|
|||
|
|||
|
Re: 1996 Dodge Grand Caravan LE EGR, Solenoid and Transducer Problems 101
Quote:
|
|
#4
02-20-2008, 11:14 PM
|
|||
|
|||
|
Re: 1996 Dodge Grand Caravan LE EGR, Solenoid and Transducer Problems 101
Good post. 1 thing I would like to add. After a repair is made to an OBD2 vechile to not erase the code but drive the vehicle. The computer turns the light on when there is aproblem; and is smart enough to turn it off when it is fixed.
|
|
#5
02-26-2008, 11:06 AM
|
|||
|
|||
|
Re: 1996 Dodge Grand Caravan LE EGR, Solenoid and Transducer Problems 101
Quote:
As far as I know, it is impossible to save the codes before or after the battery cable is removed and I've never heard or read that it is a good idea to NOT erase them by disconnecting the battery cable. Besides, leaving the battery connected can be dangerous (a la airbags).
|
|
#6
02-26-2008, 12:14 PM
|
|||
|
|||
|
Re: 1996 Dodge Grand Caravan LE EGR, Solenoid and Transducer Problems 101
If you want to disconnect the battery while all you are doing is an RGR valve replacement; then go ahead. I am merely trying to say that the proper way to repair an OBD2 compliant vehicle is to relace the defective component (if that is the cause for the code) and then drive the vehicle.
|
|
#7
02-26-2008, 01:07 PM
|
|||
|
|||
|
Re: 1996 Dodge Grand Caravan LE EGR, Solenoid and Transducer Problems 101
Quote:
It is possible to short circuit the airbag deployment system and blow the bags without bringing the impact sensors into play... this fact alone is reason enough to disconnect the battery for every repair, but especially for repairs that involve electrical connections of any kind and any repair done by an average Joe SixPack, like me... Call it overkill, if you like. Moreover... Inserting the key and putting the ignition switch into the pre-start position will turn on all of the idiot lights, including the airbag light. After 5 seconds or so, the airbag light goes out, arming airbags and impact sensors without starting the engine. If the key is left in this position (and you can be sure that at least one DIYer has done it) this presents a particularly dangerous situation. If someone backs into the front of your Caravan or your vehicle rolls forward into the garage wall, your bags can blow. And lastly... There is always the risk that any one of a half-dozen or more on-board computer systems (BCM, ECM, PCM, etc.) can be damaged through accidental short-circuiting and improper disconnection or removal. It's better to be safe and possibly irrelevant than sorry.
|
|
#8
02-26-2008, 02:01 PM
|
|||
|
|||
|
Re: 1996 Dodge Grand Caravan LE EGR, Solenoid and Transducer Problems 101
I'm not here to argue with you. Yes I fully understand what can happen if someone is not careful. I know what airbags can do. I am merely stating the way an OBD2 vehicle repair should be verified.
|
|
#9
02-26-2008, 02:35 PM
|
|||
|
|||
|
Re: 1996 Dodge Grand Caravan LE EGR, Solenoid and Transducer Problems 101
jpb53... I am not arguing... I am making it clear to all DIYers that the safest way and, ultimately, the least expensive way to do a repair is to disconnect the negative battery cable before anything else is done... end of story, as far as I'm concerned.
|
|
#10
11-24-2008, 01:00 AM
|
|||
|
|||
|
Re: 1996 Dodge Grand Caravan LE EGR, Solenoid and Transducer Problems 101
I had a P0401 code on a '97 Caravan, and replaced the EGR Valve Assembly per the instructions in the first post.
After completion, I took it for a test drive, stopping and restarting several times to allow the computer to check it out. At the end of the test drive, the CEL light DID come back on, but this time with a different code, P1294, "Target idle not reached". At the beginning of the test drive, It idled very high while in park 1500 climbing to 2000rpm, & had higher than normal RPMs while accelerating, & shifted late. After a little while accelerating, driving RPMs & shifting all seemed to return to normal. While idle in Drive was still high with a more respectable 1100 RPMs, idle in Park continued to hold at 2000. Will this fix itself as the computer adjusts for the new EGR Valve Assembly? My knowledgeable neighbor's thought was to put back on the old Transducer/Solenoid, onto the new Valve. Any advice will be greatly appreciated. Thanks!
|
|
#11
11-24-2008, 10:56 AM
|
|||
|
|||
|
Re: 1996 Dodge Grand Caravan LE EGR, Solenoid and Transducer Problems 101
Update. I rechecked the connections this morning & there was one of the electrical connections that wasn't plugged in all the way. After fully installing it, the van is now idling at normal levels in both Park & Drive.
|
|
#13
05-03-2009, 09:53 PM
|
|||
|
|||
|
Many thanks for your time and effort in authoring this posting. I removed, cleaned (I had read on other sites to try cleaning in carb fluid first & blow thru the lines to check for blockages) and reinstalled my egr.
I noticed the difference at first start up. Before, apart from the obvious "check engine" light being on the van would run rough at startup and even under acceleration - I did not expect such a big difference -and of course no dash lamp makes me a happy camper. Thanks again for your article  . .Mon
|
|
#14
03-04-2010, 12:48 PM
|
|||
|
|||
|
Re: 1996 Dodge Grand Caravan LE EGR, Solenoid and Transducer Problems 101
In my case, only the transducer was bad. The valve itself functions OK. If you want to try to save yourself from replacing the entire thing you can try swapping just the transducer. Best of all no tools are required for that! Unfortunately you still have to buy both as an assembly, but at least you can hold on to the valve as a spare.
Secondly, I noticed that the vacuum line from the intake was very brittle. I would check that before shelling out $80 plus dollars for a new vavle assembly. The vacuum line may be the only problem. Hope this helps someone!
|
|
#15
04-14-2010, 06:49 AM
|
|||
|
|||
|
Re: 1996 Dodge Grand Caravan LE EGR, Solenoid and Transducer Problems 101
Quote:
|
|
|
POST REPLY TO THIS THREAD |
 |
|
|


