|
|
| Search | Car Forums | Gallery | Articles | Helper | Air Dried Fresh Beef Dog Food | IgorSushko.com | Corporate |
|
|||||||
| Car Modeling Share your passion for car modeling here! Includes sub-forum for "in progress" and "completed" vehicles. |
 |
 Show Printable Version | Show Printable Version |  Subscribe to this Thread
|
|
|
Thread Tools |
|
#1
 10-18-2004, 01:45 AM
|
|||
|
|||
|
How to: Basic styrene methods, with exercise.
It recently came to my attention that maybe simple plastic techniques aren't common knowledge. While many people use styrene plastic extensively, perhaps the proper technique isn't used. Also, if you're new to plastic, you might find this informative. I don't claim to be a master, but I feel this simple How-to will fill a void in the explanations of construction techniques.
This How-to will be in the form of a simple construction exercise. If you are brand new to using plastic, you may reap the most benefit from this How-to by performing the exercise yourself, or if you just want to do something fun and quick in and afternoon you can do this. Box building exercise: We will build a cube. First, and most importantly, you have to assemble the right tools. Below are the tools I use extensively. I wouldn't be able to survive the week without these tools. Seriously, I'd die. 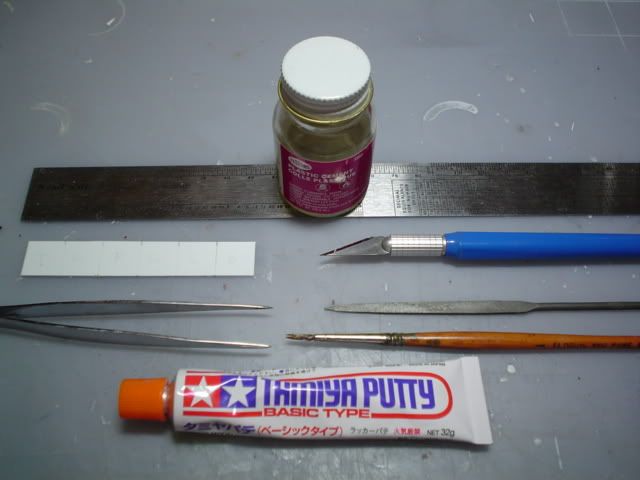 From the top: - Plastic Cement. There are several types out there: Testors, Tenax, and... um... others. Also, note that Testors makes cement in a tube (like a gel) and the type in the bottle (thin, like water). The gel stuff is, in my opinion, useless. The bottle stuff is the way to go. It's also important to use plastic cement instead of CA (superglue). CA just makes the plastic stick together, while the plastic cement is a solvent that actually melts the two plastic surfaces together, in a process very similar to welding metal together. This bond won't be as instant as CA, but it will be far stronger, in fact, it is often impossible to separate two plastic pieces cemented together. - Ruler/straight edge. This is my straight edge, it is metal and I use it to cut in a straight line. It happens to also be a ruler, though I have several other architectural scales; these facilitate measureing things in scale. - Plastic (left) sheet. This is already cut into a strip the right width, and has 6 squares marked out on it. - Hobby knife (right) I use an X-acto knife with their no. 11 blades. I think no. 11 indicates an 11 degree angle on the blade, though I may be mistaken. You don't have to use this exact knife, of course, but you need something suitably sharp. - Tweezers (left). For manipulating little parts delicately. I recently got self closing tweezers - brilliant!! - File (right, above) for filing. One file will take you a long way. - Brush (right, below) I use the brush to apply my cement. I have two brush sizes, the one shown is my larger one. The brush is sable (a natural material, horse hair I beleive), I've not used a plastic brush for this, but I would be afraid of it suffering ill effects from all the cement. I reuse this brush for every model, and I don't clean it. The plastic cement causes it to get a little crusty when not in use, but once you dip it back in the cement, it gets nice and soft again. It's not ever going to be able to paint again, but it will remain fine for cementing parts for a long time. This is a good way to retire old worn paint brushes. - Putty. I hate putty, but it's indespensible. There are several types of this. I've use Testors, Squadron, and this Tamiya putty. They are all very similar, and you need to find one that you like best. I prefer the Tamiya putty, it dries as the right speed and keeps from getting crumbly while working it. It also dries extremely fast, and sands smooth. Shut up, willimo, I got that stuff already! Let me at that box!  1. Use your straight edge (you said you had one!) to cut the squares out. Here's a tip to keep them all truly square: to cut the squares, measure their size along both the top and bottom edge of the strip of plastic, and connect the marks with a cut. This works if the original piece is in fact, square, which I make sure of with a 90degree corner of a triangle. From there I measure everything twice to keep everything in square, so that I only use one tool instead of switching back and forth from a straight edge to a triangle. Also, note that marking on plastic with pencil can leave a slight scoring mark. I like to rough the plastic up with sand paper before marking it, so that it will take the pencil lines with less effort, and without the scoring. 2. Use your file to file the edges of the squares at something like a 45degree angle (a chamfer, I think). Since all the squares are identical, I want the edges to mesh exactly edge to edge, instead of them butting up against each other, that's why I do this. Yes, my right hand is in fact holding the file. It's invisible. 3. Assembly. The first application of the cement will make the plastic edge sticky, so the parts will stick together a little bit right from the start. Here, I cemented the left side to the bottom quickly, and while it started to lean toward the center, I cemented the back side to both. This held everything in place. For the initial bonding, I apply the cement to the edges, then put them in place. While the stickiness holds it in place, I go back with my brush and touch the corner (as shown), and let capillary action draw the cement into the joint. The bond will soon be permanant. I did this for all four sides, and for the top, I had to use my brush to apply cement to the outside of the corners. This is fine, but will require sanding later. 4. Once all six sides are glued in place, I run a bit of putty along all of the 12 edges to fill in any gaps that may have come from poor filing, cutting and glueing. I use the lumpy end of the toothpick to apply small bits of putty, and the smoother end to smooth it out. 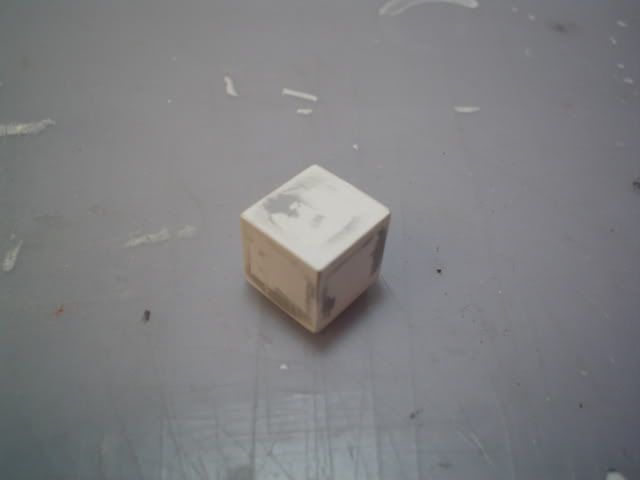 Once the glue has set solidly (overnight for this one, since the plastic sheet I used was so thin), I lay a peice of fine sand paper on my desk, so that it is flat, and sand each side of the box until the putty is smooth with the plastic. Now your box is ready for priming and painting! Hooray! Now you have a completely useless bit of plastic to sit on your desk. It looks so nice, you want to do something with it, but what? I have no idea! HAHA! My plan to get you to make something useless worked! I win I win! Just kidding. Really, I just built this so I could exhibit some of the basic processes of working with plastic, namely cutting, shaping, cementing and smoothing. Indeed, it is good practice and a soothing little task. Hope this helps someone! And don't worry, no matter what you do, its only plastic.
__________________
It ain't cool 'till your wife hates it. Imagine a world without Alabama Recent builds: Rocket Bunny FR-S and stock BRZ Toyota bB Bro-style Civic K20 powered SiR converted EK WIP I build slowly and poorly. 
Last edited by willimo; 10-18-2004 at 09:52 PM. 
|
|
#2
10-18-2004, 03:55 AM
|
||||
|
||||
|
Re: How to: Basic styrene methods, with exercise.
Hey cool tutorial Willimo. What colour and rims you going to use on the cube?

|
|
#4
10-18-2004, 08:28 AM
|
||||
|
||||
|
Re: How to: Basic styrene methods, with exercise.
Finally, newbee will have something to understand... they won'T read it and continue to post srupid thread, but at least we will be able to send them to the how to section

__________________
 CarsModeling.com. My Scale Model Cars blog.
|
|
#5
10-18-2004, 08:39 AM
|
|||
|
|||
|
Re: Re: How to: Basic styrene methods, with exercise.
Quote:
 Thanks for writing this one Willimo.
__________________
|
|
#6
10-18-2004, 09:16 AM
|
||||
|
||||
|
I am trying to make a rear diffuser with styrene and this tutorial helps a lot. Thanks!
|
|
#7
10-18-2004, 12:24 PM
|
||||
|
||||
|
Re: How to: Basic styrene methods, with exercise.
Will you do a tutorial on making a scratch-built sphere from a flat sheet?
|
|
#8
10-18-2004, 12:33 PM
|
||||
|
||||
|
Re: How to: Basic styrene methods, with exercise.
Building a cube is one thing but building a body kit? How'd you do that? This is like teaching somebody one chord on the guitar and then expecting them to write a hit tune.
__________________

|
|
#9
10-18-2004, 12:46 PM
|
||||
|
||||
|
Re: Re: How to: Basic styrene methods, with exercise.
Quote:
__________________
CarsModeling.com. My Scale Model Cars blog.
|
|
#10
10-18-2004, 01:02 PM
|
||||
|
||||
|
Re: How to: Basic styrene methods, with exercise.
AF should create a litterature section just for you! That's such a pleasure being able to read english, understand it and enjoying it!
 That's the best dice tutorial ever! Just missing the dots part.... Here are hi-res reference pics to help you for the detailing job, just in case... (the last one is from a different version, maybe you'll make a racing version so I thought it could be usefull..)     (edit: just to be sure I won't be misunderstood: I found it a really great tutorial! (edit: just to be sure I won't be misunderstood: I found it a really great tutorial!  ) )
__________________
Back to life soon... 
Last edited by labandabonnot; 10-18-2004 at 02:26 PM.
|
|
#11
10-18-2004, 03:36 PM
|
||||
|
||||
|
Re: Re: How to: Basic styrene methods, with exercise.
Quote:
 Great tut Willy Wonka
__________________
-Mike AF Director of Media / Photographer  [email protected] | AutomotiveForums.com | Flickr Gallery
|
|
#12
10-18-2004, 05:48 PM
|
||||
|
||||
|
Re: How to: Basic styrene methods, with exercise.
Nice Tutorial. Im sure many can benefit from this.
JeFF
__________________
Team Hybrid Finished: Fujimi RX-8 on 19" Scara's, Light Gun Metal, some PE parts, ETC... 
|
|
#13
10-18-2004, 05:54 PM
|
||||
|
||||
|
Re: Re: How to: Basic styrene methods, with exercise.
Quote:
 Nice "How-To" Will 
|
|
#14
10-18-2004, 05:55 PM
|
||||
|
||||
|
Re: Re: How to: Basic styrene methods, with exercise.
Quote:
 Nice tut Willimo!
|
|
#15
10-18-2004, 07:10 PM
|
|||
|
|||
|
Re: Re: How to: Basic styrene methods, with exercise.
Quote:
 Unfortunately, car modelling is one of those hobbies where actual experience counts for a lot more than simply being shown a technique, sitting at your work table and practicing is the only way to learn and improve. Funnily, you will find that as you learn, you will develop any technique we can show you beyond what we've shown you simply through experience.
__________________
|
|
|
POST REPLY TO THIS THREAD |
 |
|
|


![WeaPoN [X]'s Avatar](image.php?u=96853&dateline=1105755516)