|
| Search | Car Forums | Gallery | Articles | Helper | Air Dried Fresh Beef Dog Food | IgorSushko.com | Corporate |
|
|||||||
| WIP - Motorsports Post topics for any "Work In Process" motorsports vehicles in this sub-forum. |
 |
 Show Printable Version | Show Printable Version |  Subscribe to this Thread
|
|
|
Thread Tools |
|
#16
 11-10-2007, 06:24 PM
|
||||
|
||||
|
Re: LeMans Porsche 911GT1 '98 BBR 1:43
Jaykay, looking really good so far - does the body filler take well to the resin? That detailing would be far too small for my tired old eyes!
Sorry, I didn't get your PM as I can't seem to recieve or send PM's here, even though I've fiddled with all the settings - I'll have another tweak. 

|
|
#17
11-10-2007, 07:26 PM
|
||||
|
||||
|
Re: LeMans Porsche 911GT1 '98 BBR 1:43
Excellent work really like what you did with the diffusor also I see you epoxied in the shafts for the wheels very cool idea.
__________________
Regards, Dave
|
|
#18
11-17-2007, 08:32 AM
|
|||
|
|||
|
Re: LeMans Porsche 911GT1 '98 BBR 1:43
Hi everybody. Here we go with some more progress.
After finishing the major body stuff I focused on the details. First up were the windows. Here’s a picture of the vac-form piece that comes in the kit. 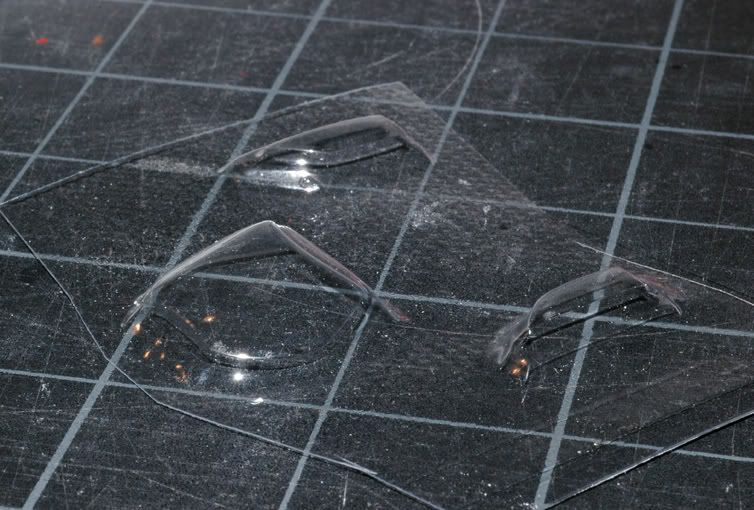 After my modifications to the window frames on the car’s greenhouse they weren’t gonna fit anymore because they now were too small. For the headlight covers it was the same thing. BBR came up with an even wilder solution. They added a flat sheet of clear plastic with the glass pieces pre-stamped. I have no idea in which parallel universe that was supposed to work. On the real car the headlights follow a complex shape that can’t be replicated with a flat sheet. So I had to make a full set of transparent vac-form pieces. Since the shapes of those parts are still not too complex a vac-form machine ( which I of course don’t have ) wasn’t necessary. A hot air gun and some fiddling did it as well. I started by pouring some resin straight into the BBR glass piece. These pieces were then extended around the edges with some body filler and I sanded the surfaces smooth. 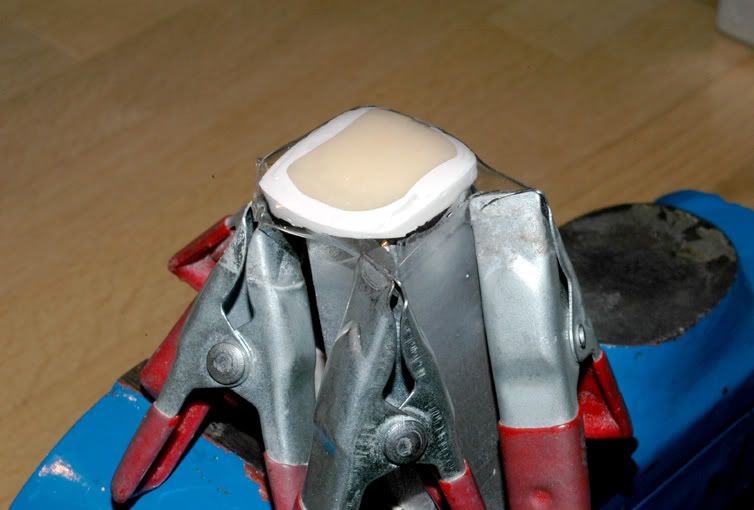 Here you can see the piece for the windscreen already “at work”. I used some wrapping material from a blister package, added some “weights” and then heated the material up with the hot air gun. The material was pretty easy to handle and it was no problem to reheat in smaller areas to get it conform to the master. The preliminary result looked like this: 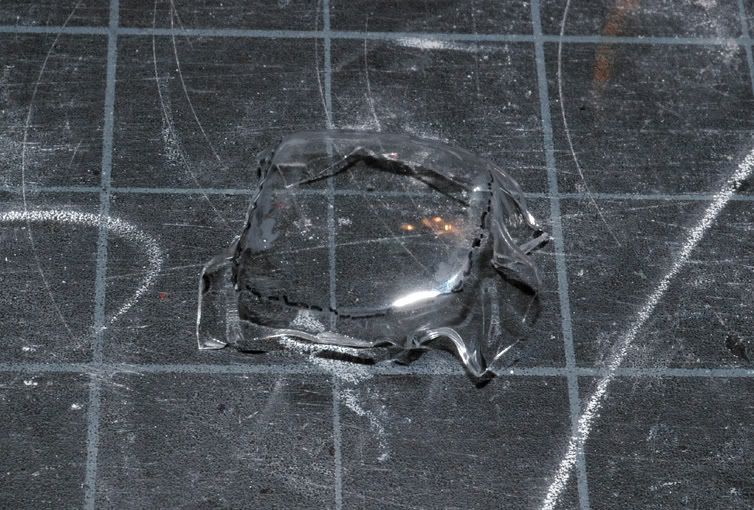 That looks a bit wild but after a bit of cutting it’s already getting closer: 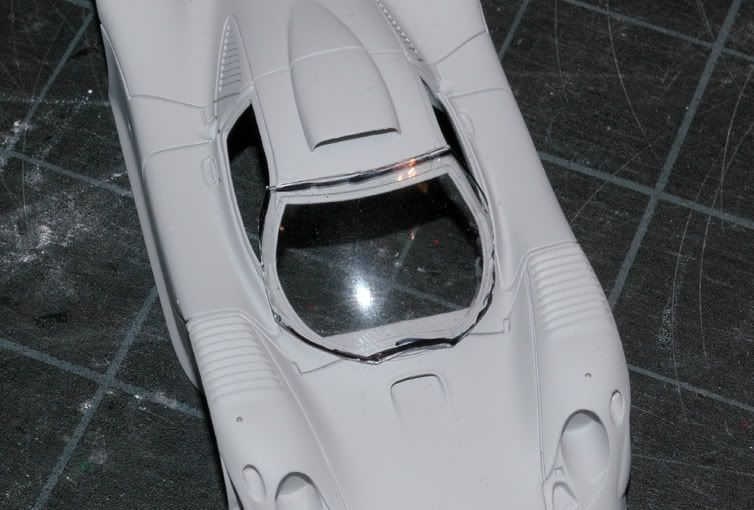 From here on it got somewhat trickier to trim all the edges because I had to be very careful not to cut off too much because that would have meant to start all over again. ( Klutz can tell from his Aston :-) So far everything was fine and my first shot at the windscreen worked out nicely already…..only just there was one little problem! The material was a bit thick ( 0,5mm ). When putting it in place on the body it was almost sticking out beyond the height of my window frames and it was clear that with several layers of paint added it could only get worse! So I went on a hunt to find thinner material in my home and finally hit it in the fridge :-) A sandwich spread had a thin clear lid. That stuff had a very rough surface though. I tried it anyway to see how it reacted and it turned out the surface became nice and even once the material was heated up. In fact it worked as an indicator to show the material was ready for shaping :-) So I did a new windscreen with the thinner material ( about 0,25mm ). Next up were the headlights. For them I couldn’t make a positive for forming from the BBR glass piece. So i cast the whole front end of the model. In the resin piece I filled the headlight openings with body filler and sanded everything smooth again. 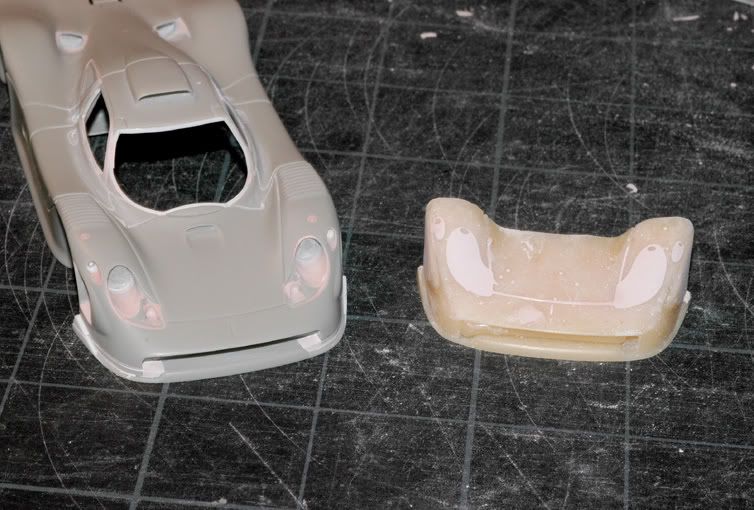 Since I was at it I gave the piece a layer of 2K-primer and wet sanded it before doing the glass piece but I think that wasn’t really necessary. To improve my tools for forming I made a frame from MDF to fix the sandwich spread lids. Here you can see it at work. It’s now kind of “gravity-forming” instead of vac-forming:-) 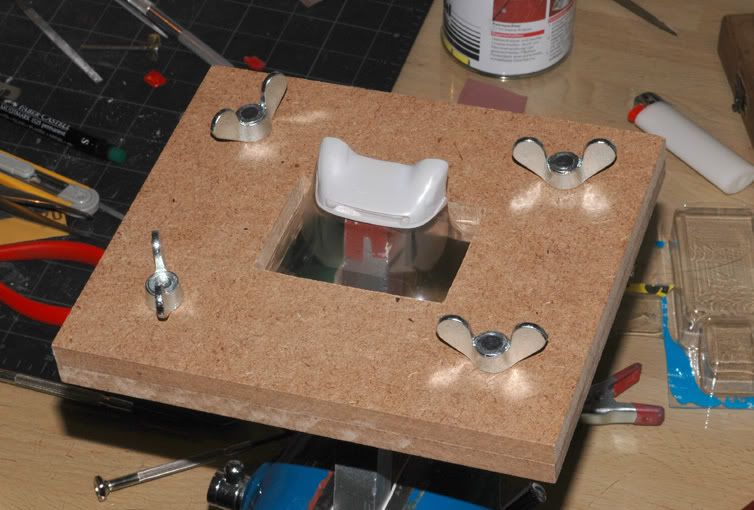 Next up you see the piece I made, placed over the model’s nose and the outlines of the headlights roughly marked for trimming. 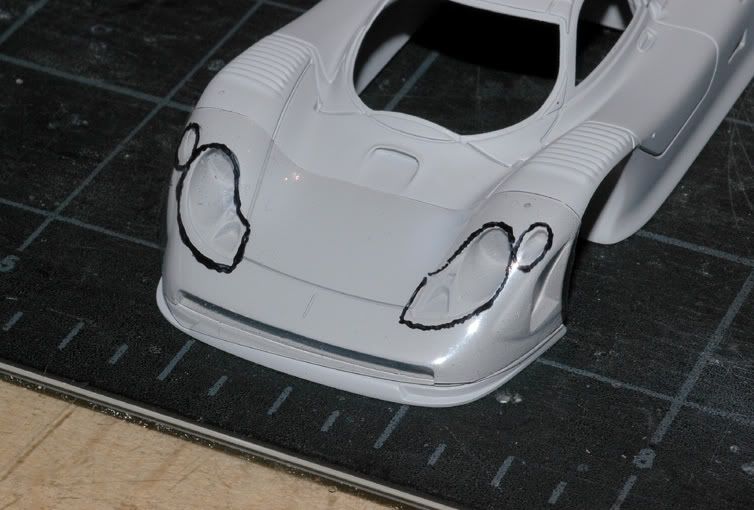 This took a whole lot of time for all the pieces. I wanted to get them to sit as nicely as possible so I would be able to fix them with as little glue as possible ( that was going to be especially interesting for the headlights.) In the next picture you can see all pieces dry fitted on the body. 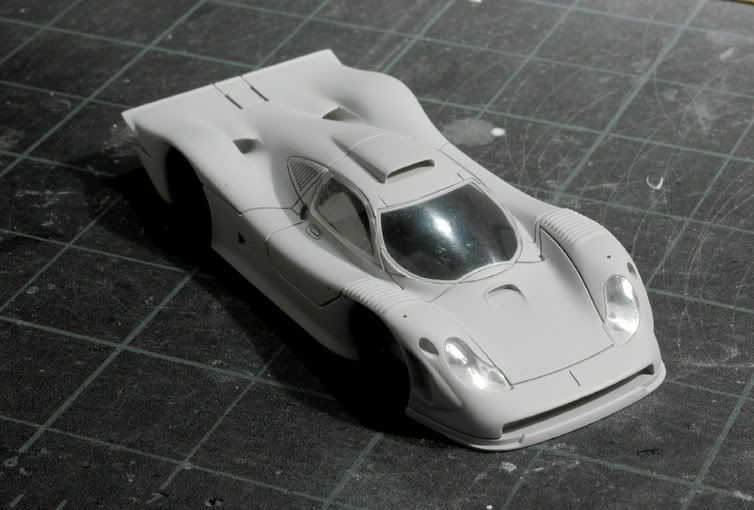 A final test fit will be necessary after all the paint is on the body and then I will sand and polish the pieces. I did some tests with dipping the pieces in Future as I had read it worked very good but couldn’t get it to work for me. More to come. That’s it for the moment!
|
|
#19
11-17-2007, 08:52 AM
|
||||
|
||||
|
Re: LeMans Porsche 911GT1 '98 BBR 1:43
Quite simply brilliant!
 I feel bad about bitching about my Aston now  If you ever have internet problems again, I'll personally cover the costs of fixing it just to keep you on line! 
__________________
Guideline for happy modeling: Practice on scrap. Always try something new. Less is more. "I have a plan so cunning, you could put a tail on it and call it a weasel" - Edmund Blackadder
|
|
#22
11-20-2007, 01:28 PM
|
|||
|
|||
|
Re: LeMans Porsche 911GT1 '98 BBR 1:43
More progress…this time on the interior.
Originally I only wanted to do same basics since most of it will probably not be visible after the car is put together…but then I couldn’t keep myself from adding stuff. Here’s an outside view of the real car: 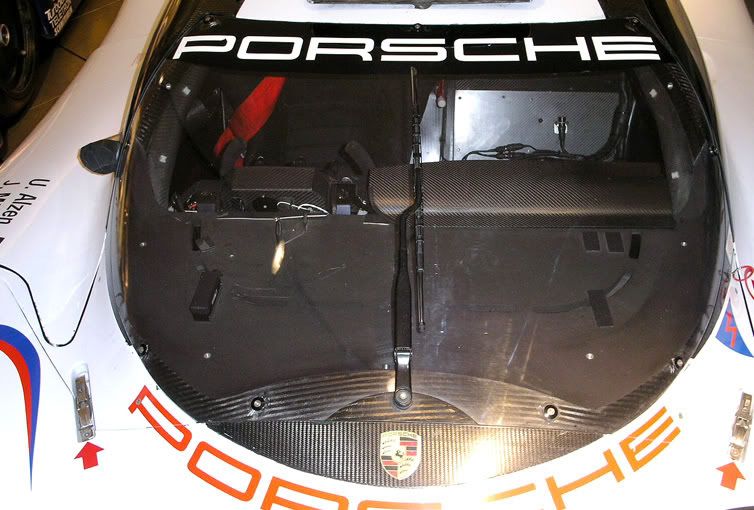 BBR supplies a massive blob of resin with a solid block for the dashboard. Seat and steering wheel are white metal pieces. First I opened a hole under the dashboard for an imaginary 1:43 driver to put his legs :-) If you look very closely you can probably see that in the finished model. I just couldn’t leave it. Here are two pictures from the real cockpit: 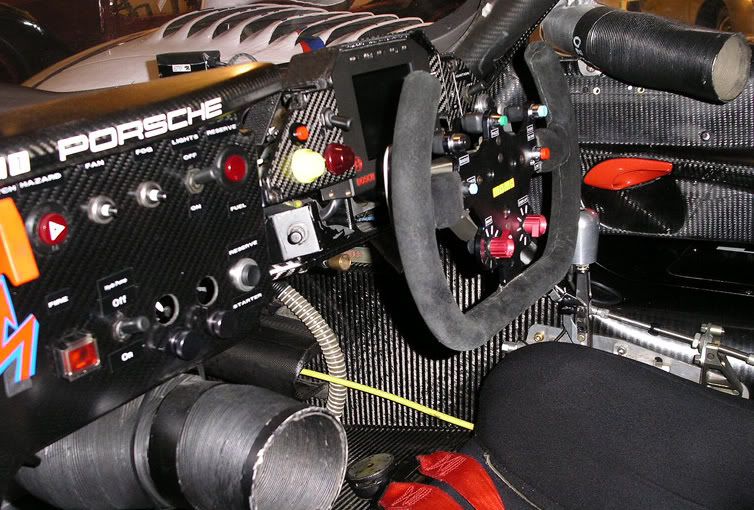 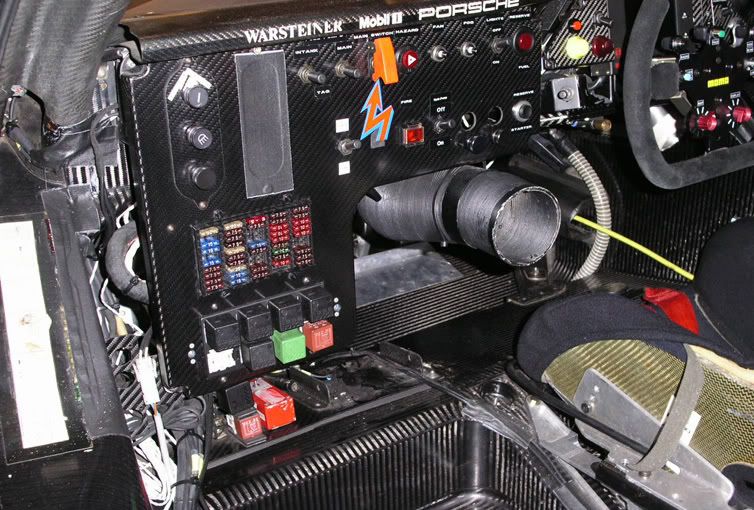 I cut off some moulded in details and the filled up the gaps in between the interior piece and the inside of the car’s body ( they were pretty big…). I cleaned up the steering wheel flattened it at the bottom. To fit it in the dash I mounted a brass tube to later stick it in. It’s not super accurate but good enough. I also did pieces for the dash and binnacle hood from styrene. 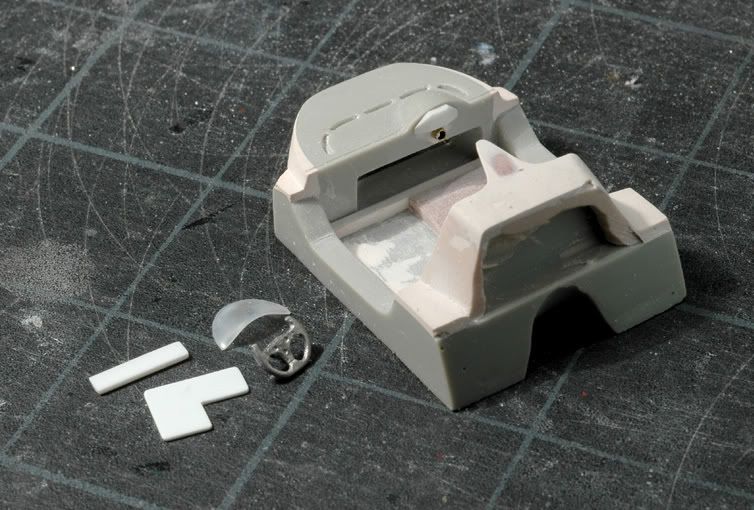 Getting on to the fire wall I made more accurate replacements for the electronic boxes. In this museum pictures there are less than in the race: 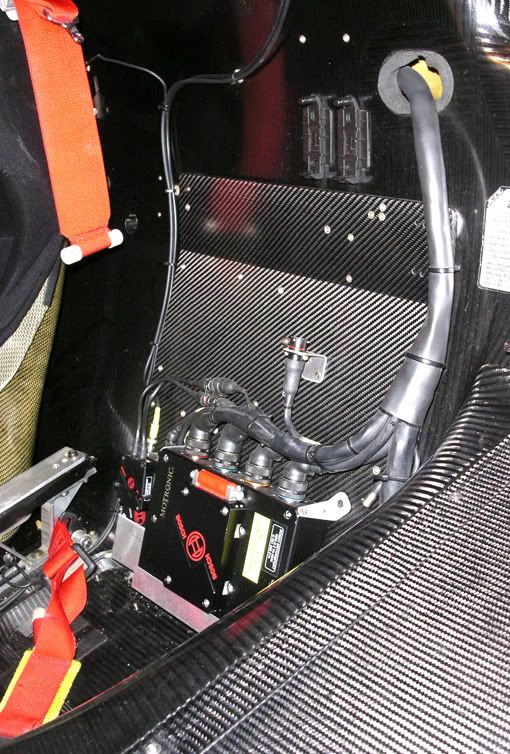 Here you see them and a piece for the floor. 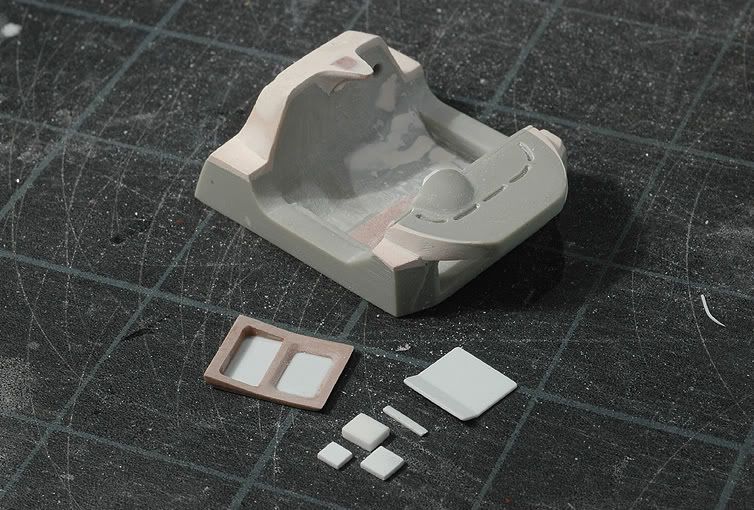 I rather have more individual pieces because it’s then easier to paint and finish them differently. You can also see this “spike” at the top of the rear wall that I added. That’s channelling air from the roof intake to the engine. 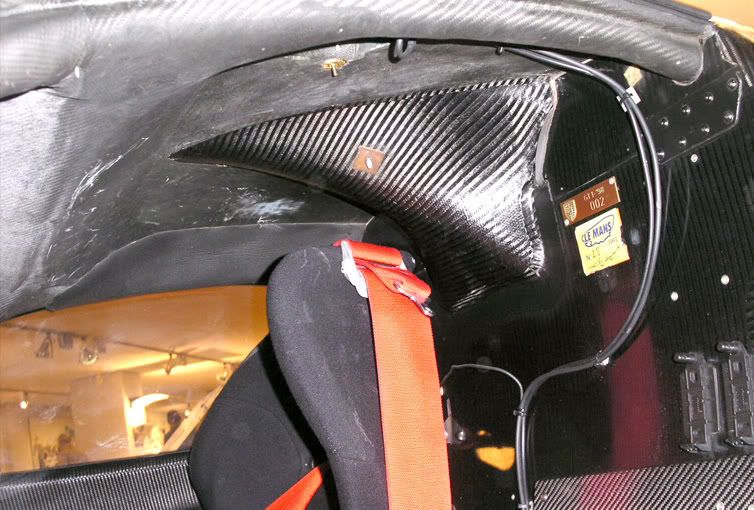 Still missing is the seat. That’s gonna follow soon:-) Back to the “outside world” I took care of the rear view mirrors. In the kit there come two little lumps of white metal: 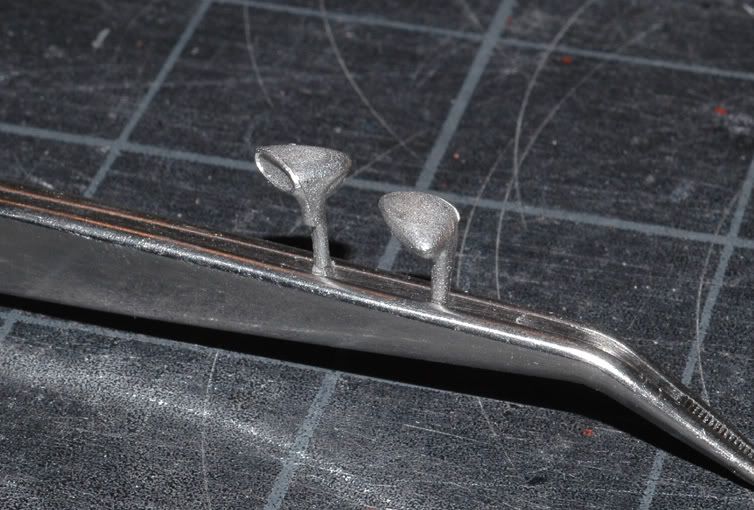 They are not completely wrong …but not really right either. For comparison here’s a picture of a real one: 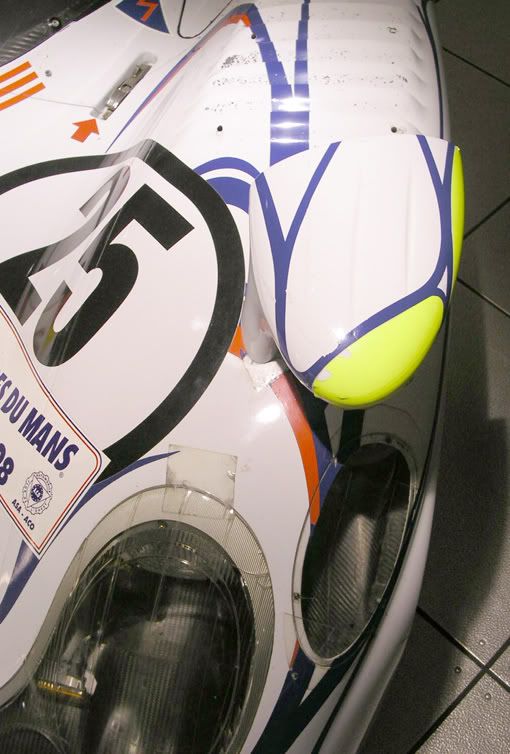 I should probably have cast them in resin and reworked those pieces since I’m not a big fan of white metal bits anyway but I decided to give them a try. To have a chance to hold them I drilled holes in their arms and superglued them to brass rods. Then I generously added material with the soldering iron and reshaped them using the Dremel, files and sand paper. After quite a bit of work they looked like this: 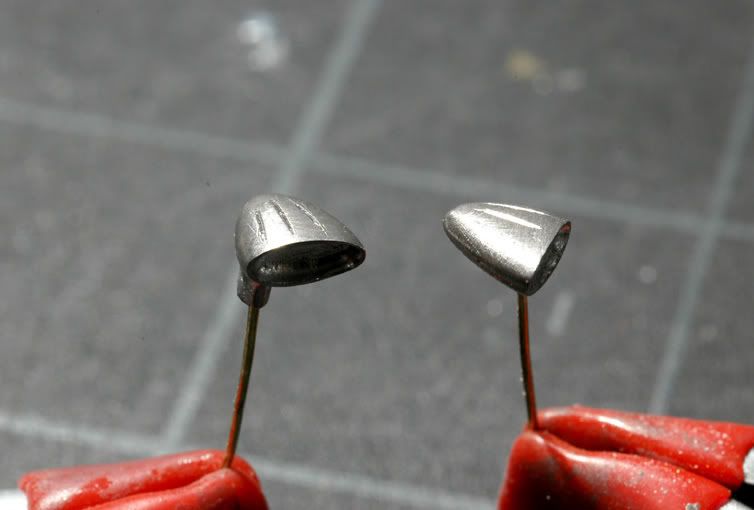 I also deepened the holes at the rear ends to later glue in the mirror faces. See you for the next one! Thanks for looking! P.S. Klutz....i'll take your word on the internet thing... lol!
|
|
#23
11-20-2007, 01:36 PM
|
||||
|
||||
|
Re: LeMans Porsche 911GT1 '98 BBR 1:43
it might be a bit beside the point now but I have a few sets of the 996 headlights and covers laying around not doing anything.
__________________
AF's Guidelines Read them. __________________  Currently in the process of re-hosting my photos. If any go missing, drop me a PM.
|
|
#24
11-20-2007, 02:22 PM
|
||||
|
||||
|
Re: LeMans Porsche 911GT1 '98 BBR 1:43
White metal casting! - that's a first on AF
 Really great work JayKay - especially on those mirrors. Very impressive. P.S. Does your ISP accept PayPal?
__________________
Guideline for happy modeling: Practice on scrap. Always try something new. Less is more. "I have a plan so cunning, you could put a tail on it and call it a weasel" - Edmund Blackadder
|
|
#25
11-20-2007, 02:58 PM
|
|||
|
|||
|
Re: LeMans Porsche 911GT1 '98 BBR 1:43
I didn't cast them.....just remodel them using solder :-)
I'll ask the ISP...lol @drunken monkey: Well thanks...but check the scale again:-) I guess yours are Tamiyas, right?
|
|
#26
11-20-2007, 03:29 PM
|
||||
|
||||
|
Re: LeMans Porsche 911GT1 '98 BBR 1:43
ahhh....
right. i was wondering why them clips are so big......
__________________
AF's Guidelines Read them. __________________ Currently in the process of re-hosting my photos. If any go missing, drop me a PM.
|
|
#27
11-24-2007, 04:17 AM
|
||||
|
||||
|
Re: LeMans Porsche 911GT1 '98 BBR 1:43
JK,
I have been chuckling away and shaking my head reading your last updates. they are just so good and I forget that this stuff is 1/43. Just brilliant and really inspiring to follow as always!
__________________
Sean _______________________________ http://www.scalereproductions.co.uk _______________________________ WIP: Ferrari F40
|
|
#28
11-24-2007, 06:52 AM
|
|||
|
|||
|
Re: LeMans Porsche 911GT1 '98 BBR 1:43
Here’s another update.
After the mirrors I went to the rear end of the car. To simulate some kind of relation of the GT1 racer to the production 996, Porsche used it’s rearlight covers ( just as at the front ) and built new housings for them from CF. 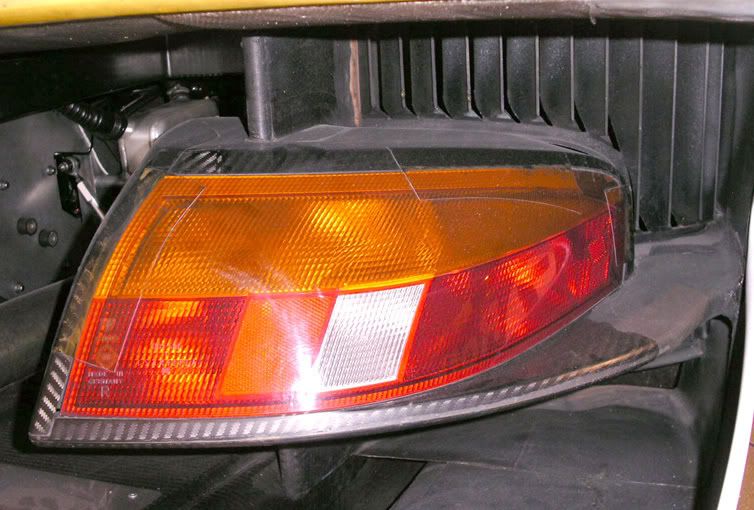 BBR’s interpretation looked like this: 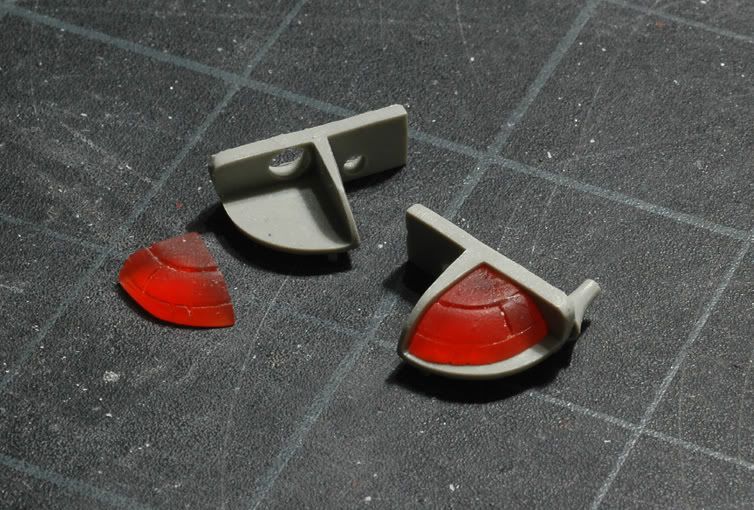 All right!???? Looks rather like pudding to me! The pieces were wrongly shaped and too small on top so they couldn’t be saved. I decided to make new ones from acrylic glass. My reference were the pieces from a Tamiya 996 GT3 kit. In the next picture you can see one finished piece, an unshaped block of acrylic glass, the Tamiya piece and the BBR one. 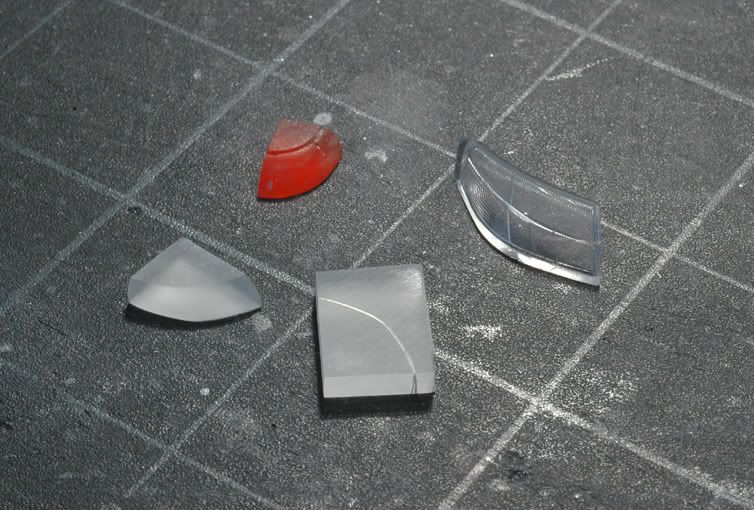 Around those two glass pieces I built the housings from sheet styrene and a bit of body filler. 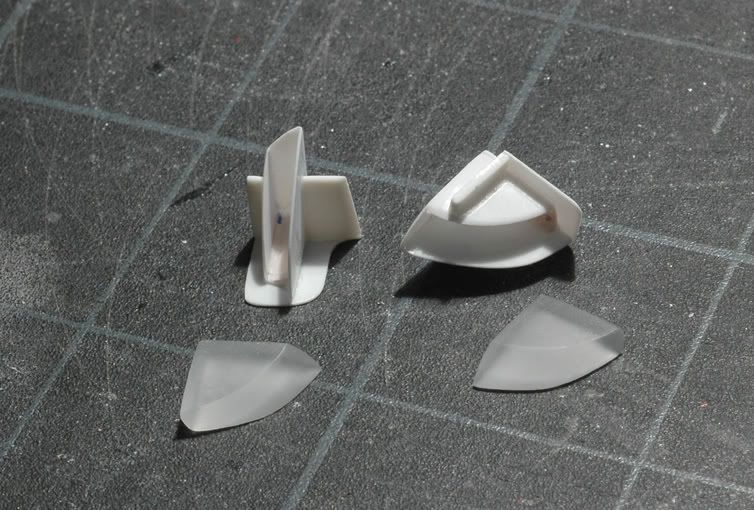 On to the wheels. The GT1 runs on 18” BBS wheels. Here’s an original: 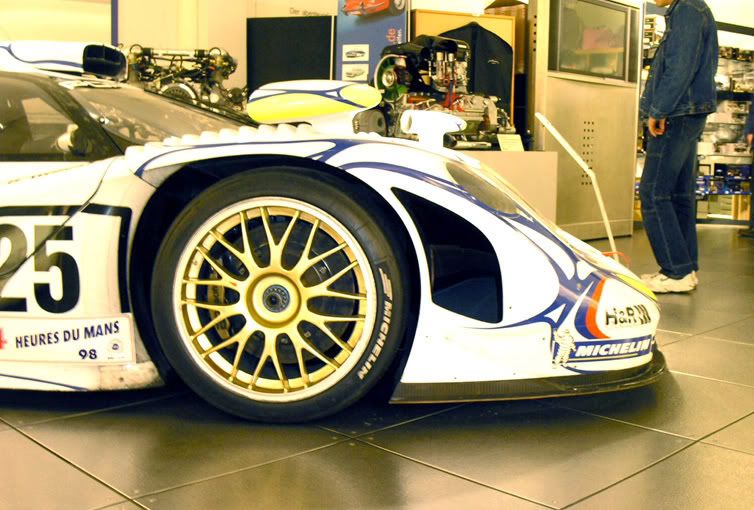 In the kit you get turned aluminium rims and photoetched spokes plus rubber tires. In general they look quite nice. The spokes have the standard problem of all 1/43 kits with that type of spokes…they’re not deep enough, but I decided to leave them like that. Another thing did bother me though. The wheels were too small for the car: 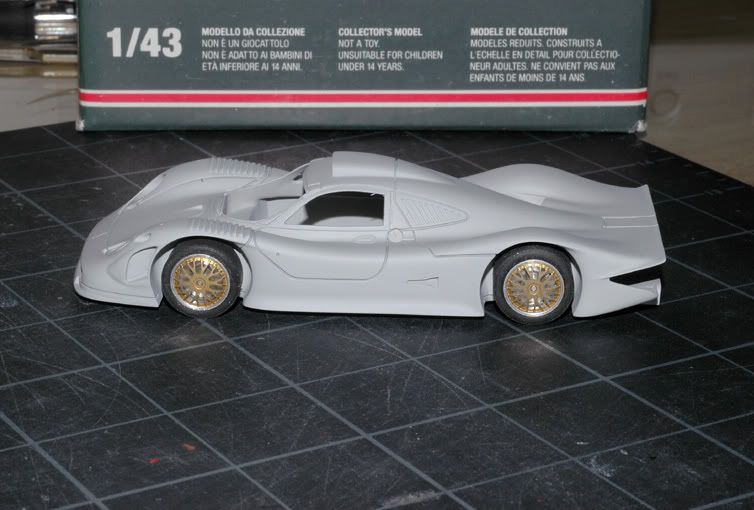 The effect is exaggerated by the bright wheelhouses but there was no doubt they needed changing. So I decided to turn new rims that were 1mm bigger in diameter but would still fit the spokes ( and not overstretch the rubbers ). These look like this: 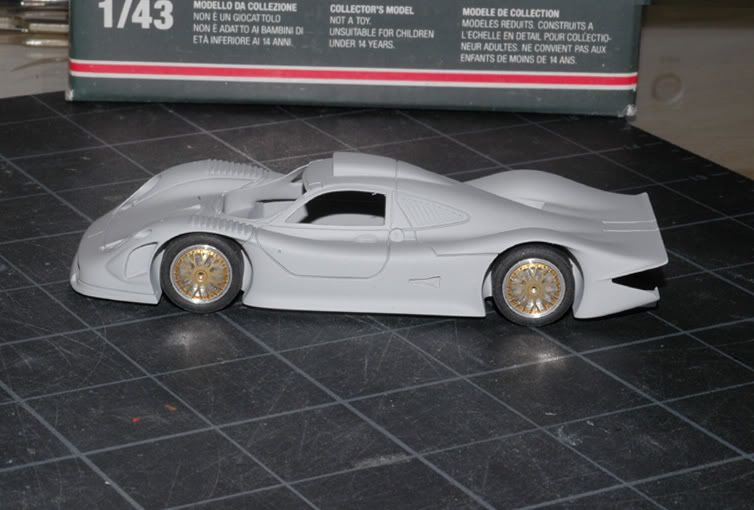 Some may argue they could still be bigger but in the end that will be o.k. This is not Pimp my Ride after all :-) Since I was at it I also turned some wheel centres. Normally on these kits you glue the brake discs inside the rims, add the spokes and then stick them on an axle that runs through to the opposing wheel. That means though, that if you turn the wheel later, the brake calliper is also turning….not nice! Also when adding the spoke piece over the brake disc in the rim, there was a big gap that was plain wrong. So I turned these pieces with the conical head in the next picture: 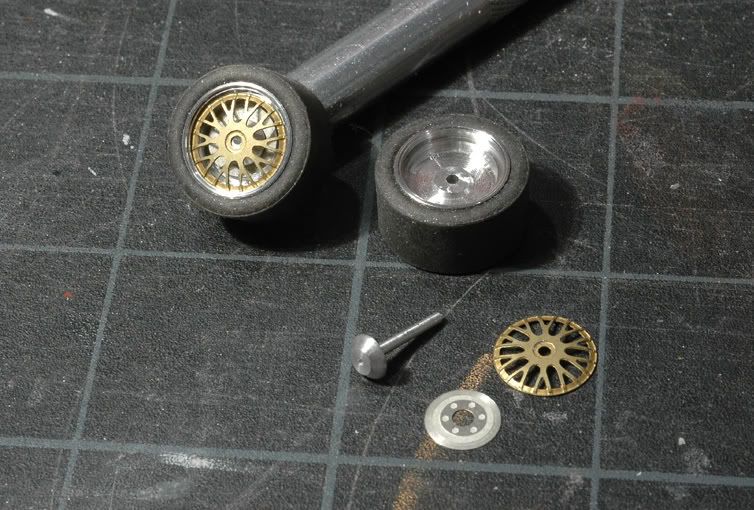 They will hold the brake discs ( glued on from the back ) and fix the wheel. At the front I made a little hole to later glue a central locking wheel nut. That solution is still not “right” but at least the brake callipers stay where they belong :-) When working on the interior I left out the seat…here it comes: First up two pictures of the original seat: 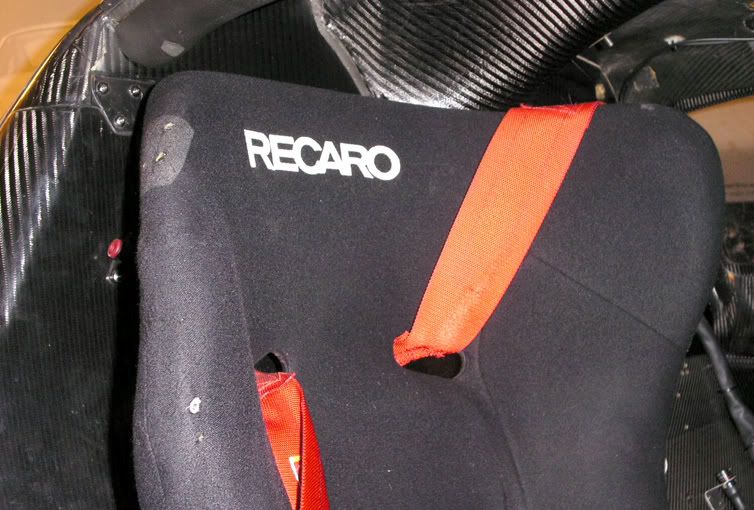 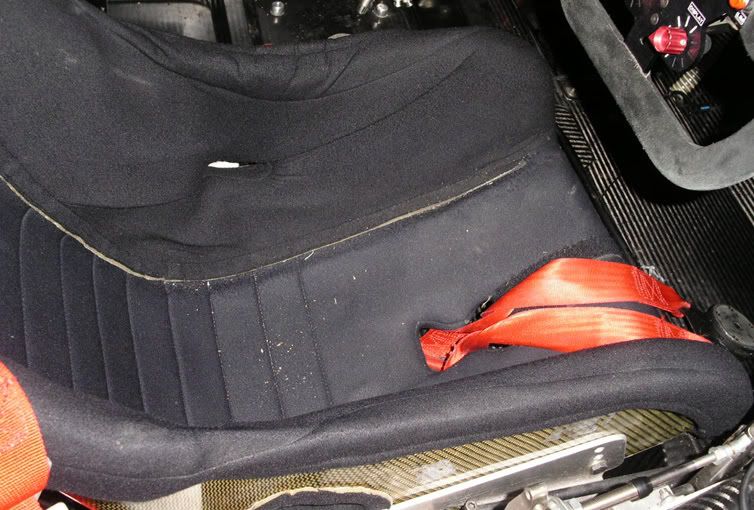 In the kit came a white metal seat that needed modifications. Since I wasn’t very keen on doing them in metal I cast the seat from resin adding some material in places where needed. The cast piece was then modified using the usual tools and body filler to better resemble the original. In the next picture you can see the evolution : 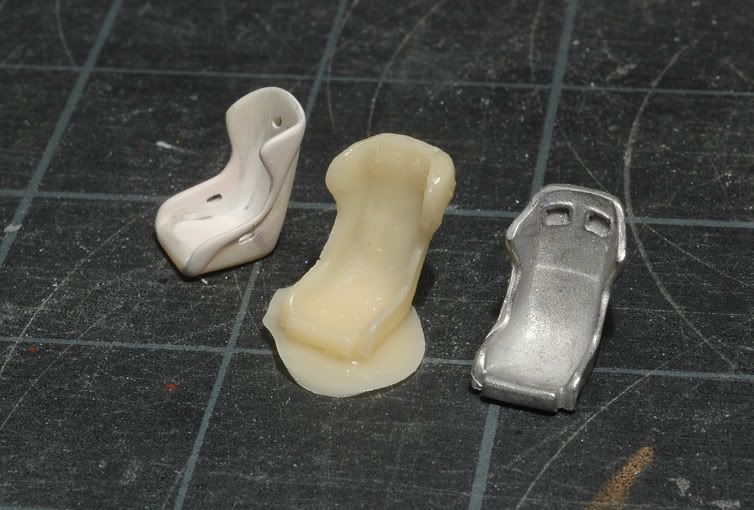 That’s it again for now. Hope you liked it :-)
|
|
#29
11-24-2007, 07:14 AM
|
||||
|
||||
|
Re: LeMans Porsche 911GT1 '98 BBR 1:43
Quote:
 Quote:

__________________
Guideline for happy modeling: Practice on scrap. Always try something new. Less is more. "I have a plan so cunning, you could put a tail on it and call it a weasel" - Edmund Blackadder
|
|
|
POST REPLY TO THIS THREAD |
 |
|
|