|
|
| Search | Car Forums | Gallery | Articles | Helper | Air Dried Fresh Beef Dog Food | IgorSushko.com | Corporate |
|
|||||||
| WIP - Street Post topics for any "Works In Progress" street vehicles projects in this sub-forum. |
 |
 Show Printable Version | Show Printable Version |  Subscribe to this Thread
|
|
|
Thread Tools |
|
#1
 11-24-2011, 03:20 PM
|
||||
|
||||
|
Toyota Land Cruiser 80
This is one of those old Tamiya SUV kits with working suspensions and engine details. This one came with the sport options, which I will most likely use all the parts except a little torn on whether I should put on running boards or not. I apologize for the lack of details shown in this progress but since I am a slow builder saving up the photos and posting them all in one time will make it seem like I am building at a normal pace to you all.
If blubaja sees this, hopefully this kind of subject will help you progress with your Delica! Engine - Being a kit with full working suspension, the engine was a little bit sparse. Starter and fuel injector pump was missing. I scratchbuilt these two items. I also scratchbuilt the injectors, fuel rail, fuel filter, AC pump, pulleys and belts, and lower/upper radiator hoses. The lines and wires that connect to most of these items are also made. I made an alternator with styrene, it is then used as a master to cast a resin piece, which is what you see here. 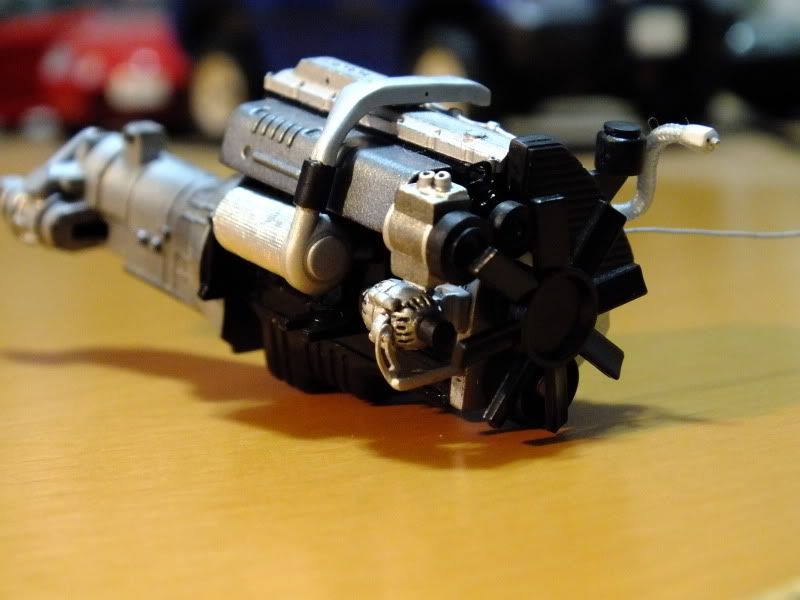 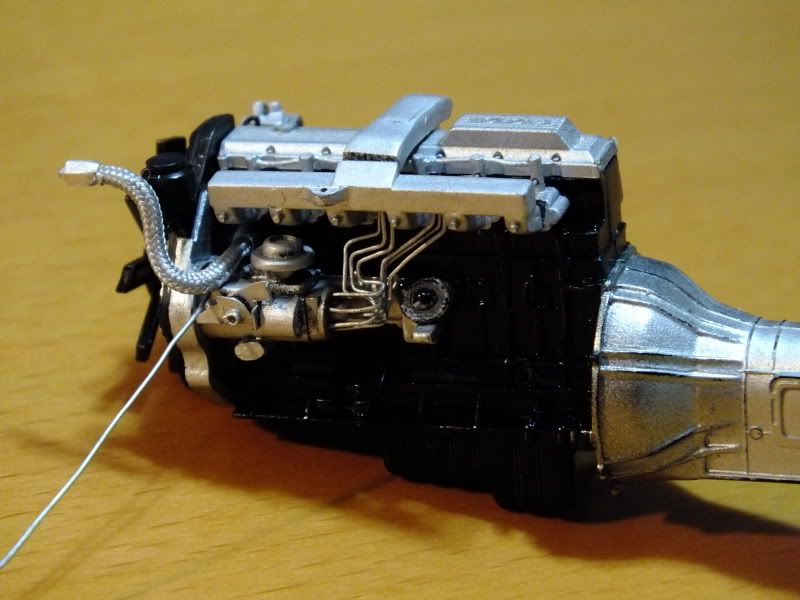 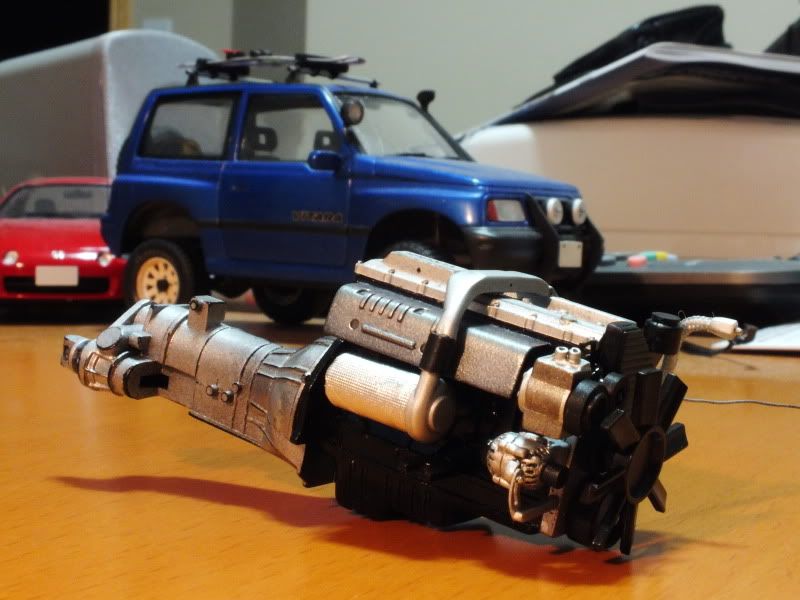 Wire harness are also scratchbuilt, thanks to the wire harness tutorial made by a member of this forum. AC and brake lines are also made, these parts are a major PITA. Each complete piece took about 100 test fits with all the bends accounted for. 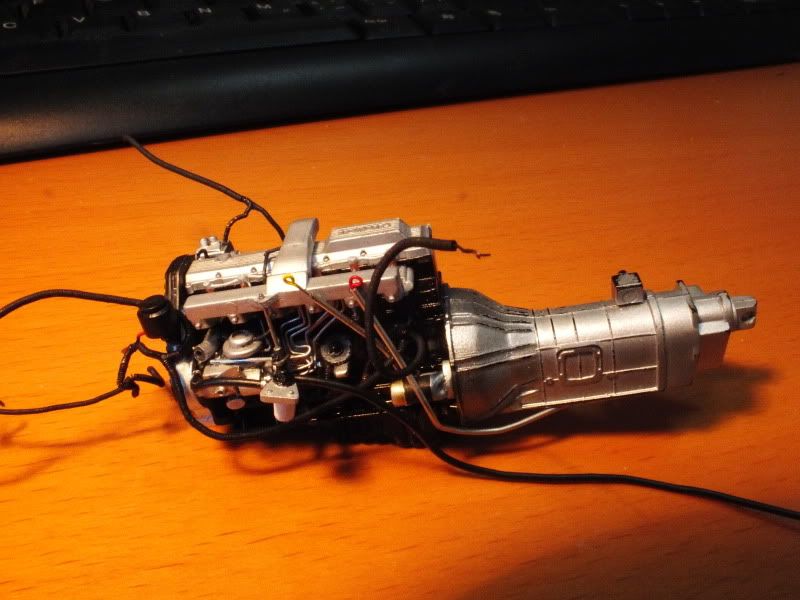  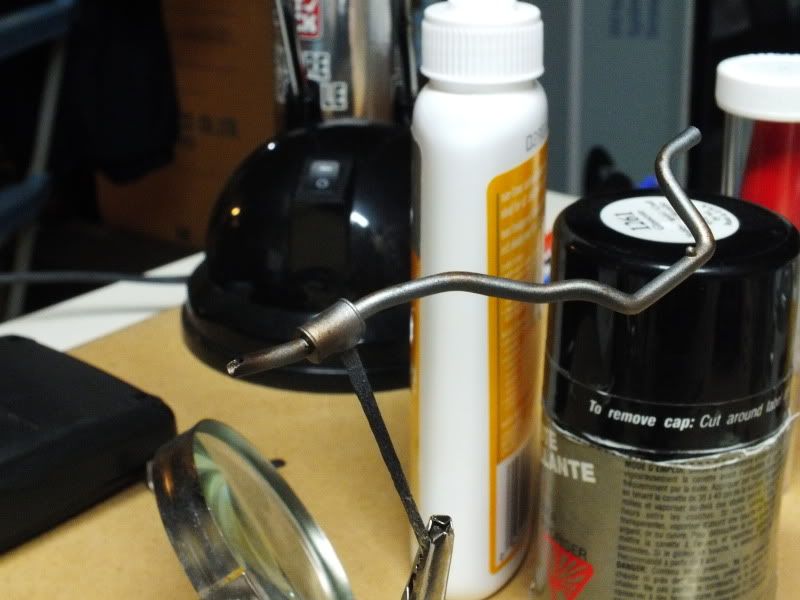 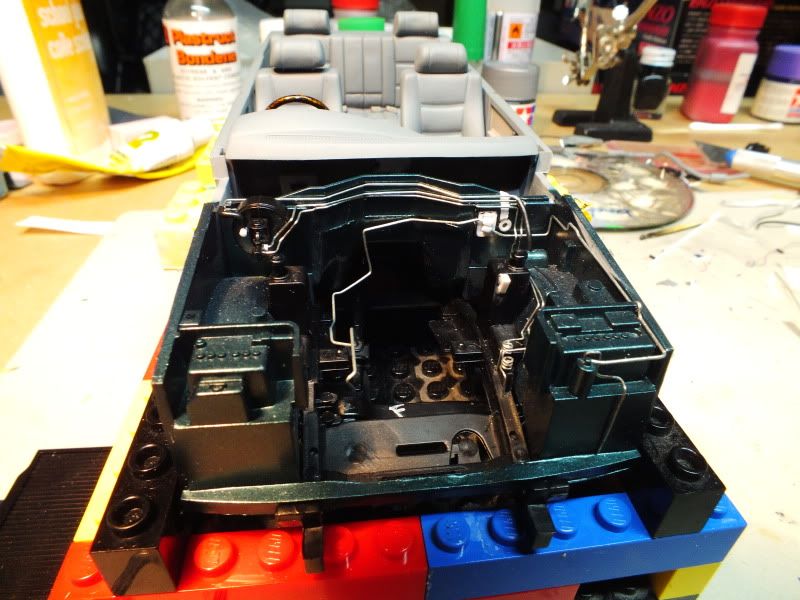 Color is Toyota 6N1 (Sierra Green Met.) With Tamiya TS30 Silver Leaf, covered with 2K clear. The sea wave decals are from a AMT FnF eclipse. Interior had the door panels thickened with 1mm styrene, and had wood grain details painted. The original radio was replaced with an Alpine deck and a CB radio unit. Carpets are dried up baby wipes painted. 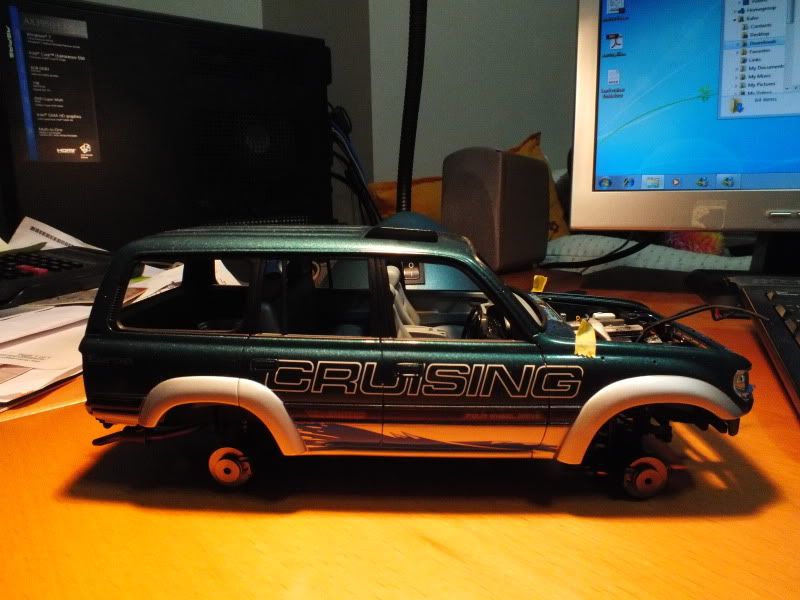 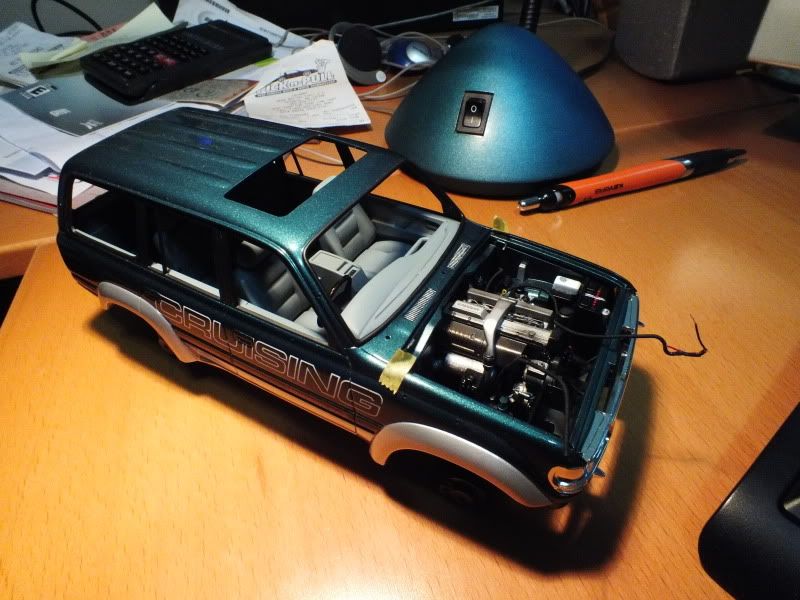 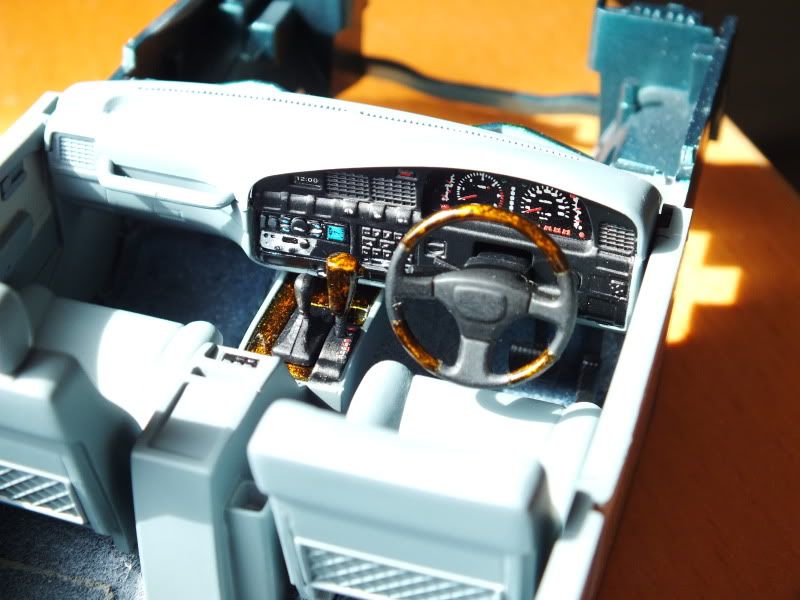 No modifications were done to the ladder frame. I kind of wanted to see how well the box stock suspension system works. The rear didn't work as well as it should. The kit includes two screws that go through the axle ends and bolts onto the ladder frame in order to prevent the axle and springs from falling out when you pick up the car. The unused threads of the screw catches on to the axle thus interfering axle movement. To improve the suspension movement I shaved off all the threads on those screws except the first 3mm from the tip of the screw. Sorry for the lack of pictures. 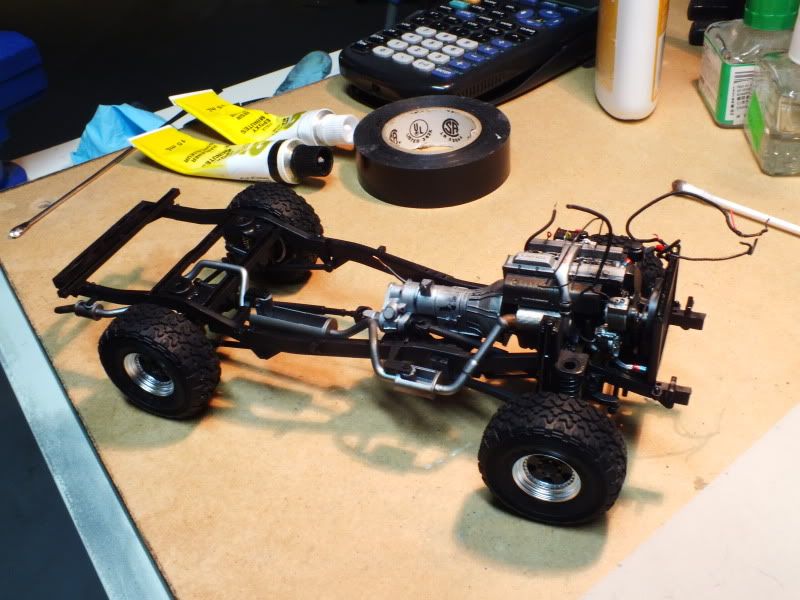 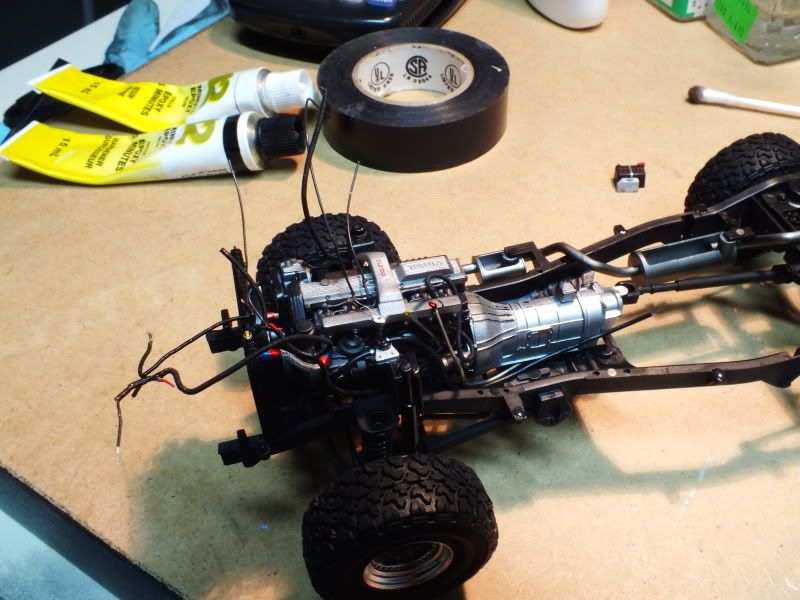 

|
|
#3
11-24-2011, 10:29 PM
|
|||
|
|||
|
Re: Toyota Land Cruiser 80
I love these trucks! I can't wait to see how this ends, your builds are always stunning. That interior is amazing. How did you do the marks on the buttons?
__________________
It ain't cool 'till your wife hates it. Imagine a world without Alabama Recent builds: Rocket Bunny FR-S and stock BRZ Toyota bB Bro-style Civic K20 powered SiR converted EK WIP I build slowly and poorly. 
|
| The Following User Says Thank You to willimo For This Useful Post: | ||
kaho (11-26-2011)
| ||
|
#4
11-25-2011, 02:04 AM
|
||||
|
||||
|
Re: Toyota Land Cruiser 80
Quote:
__________________
Micha       
|
| The Following User Says Thank You to sportracer02 For This Useful Post: | ||
kaho (11-26-2011)
| ||
|
#5
11-25-2011, 06:54 AM
|
||||
|
||||
|
Re: Toyota Land Cruiser 80
love these subjects that you don't see built often. You sir are insane at detailing! engine and interior look very convincing
|
| The Following User Says Thank You to euro_z For This Useful Post: | ||
kaho (11-26-2011)
| ||
|
#6
11-26-2011, 04:13 AM
|
||||
|
||||
|
Re: Toyota Land Cruiser 80
Willimo: The marks on the buttons are dipped with a fine brush with its tip dipped into Tamiya XF2. It helps to dip a bit more of the brush into the paint so that the bristles stick together, but only the very tip actually touch the button.
Engine detailing complete. 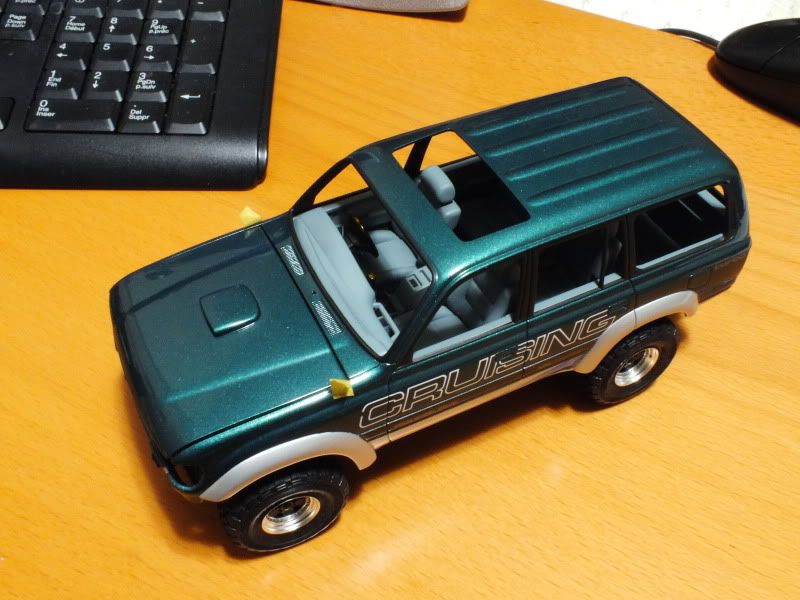 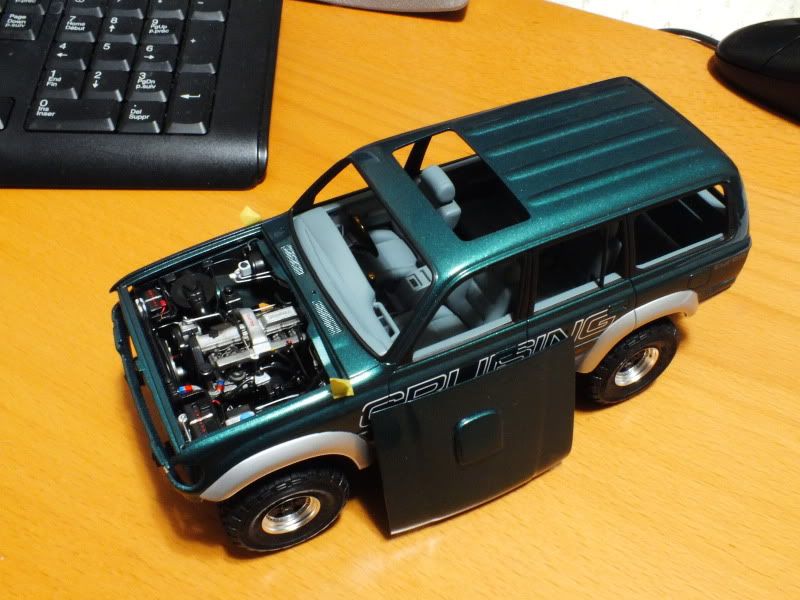 Brake lines, fuel lines, and PCV hose are made from craft wire first straightened with needle nose pliers then bent at the needed places. AC lines are mostly zip tie wires (I found some a little thicker than brake lines, luckily). Radiator hoses are made from window blinds strings and Plastruct 2mm hex rods, with craft wires placed through their centers to help bending. Vacuum hoses, throttle cable, coolant reservoir hose, and battery wires are Modeler's 0.45mm plug cords. Heater core hose and fuel hose are Detail Master scale 1" hoses. Wire harnesss are copper wires that I ripped out after destroying my old bicycle speedometer, but the ones inside Detail master hoses also work. I used my speedometer mainly because I can do the winding with a 6 foot long wire. One tip: Using a sewing needle to wind your wires around will ensure you can pull the resulting wire loom easily. Belts are made from two pieces of electrical tapes with their sticky sides stuck together, then cut to desired width and length and superglued onto pulleys. Hose clamps were replicated with autobody repair tape (those tin foil looking tapes that are very tough with a feisty sticky side) cut into thin strips. I also used these strips as battery tie downs. Dip sticks are craft wires looped and dipped into Tamiya acrylics. Dip stick holders are 1/32" x 0.006" brass tubes. I had no luck nor courage working with needles. Heat shielding on turbo are cigarette wrappers. Oil filler cap was cut off the valve cover, it is glued back in after reworking that part of the valve cover. Hard to see in pics but in real life it made a huge difference from the kit's molded on cap. I also got a radiator cap made up but I am having problems fitting on the hood with that cap on. I will most likely just paint that part on the radiator yellow. I have already made hinges for the hood out of some ball end pins. Only thing missing now is making a hood prop for it, which I have trouble figuring out how it will hook on the body. It's a shame that my alternator cannot be seen anywhere. 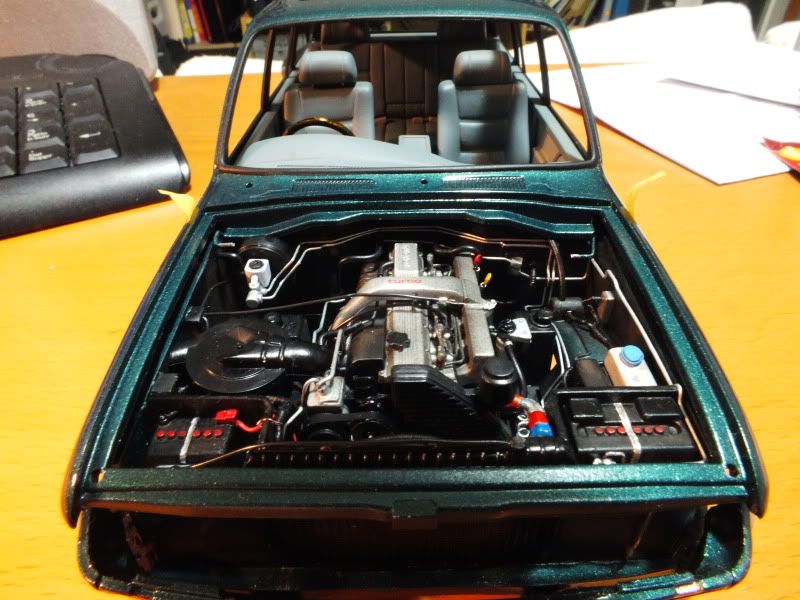 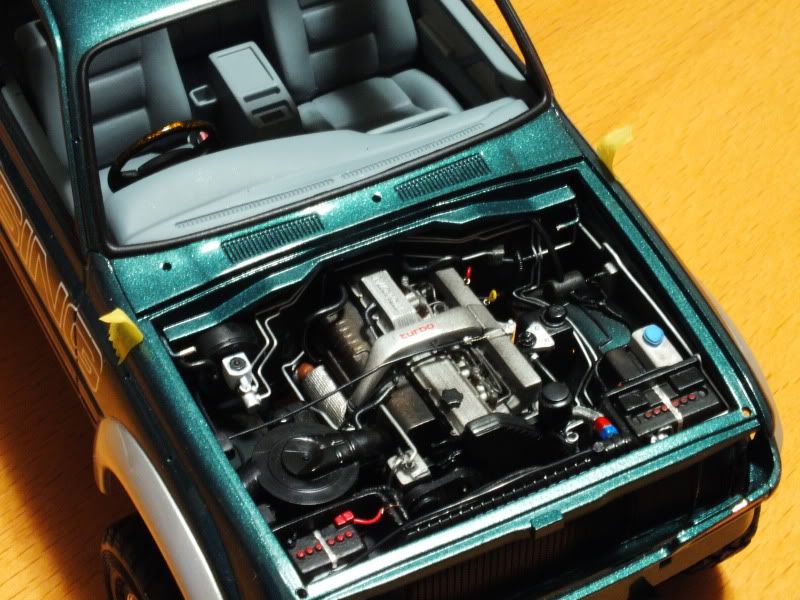 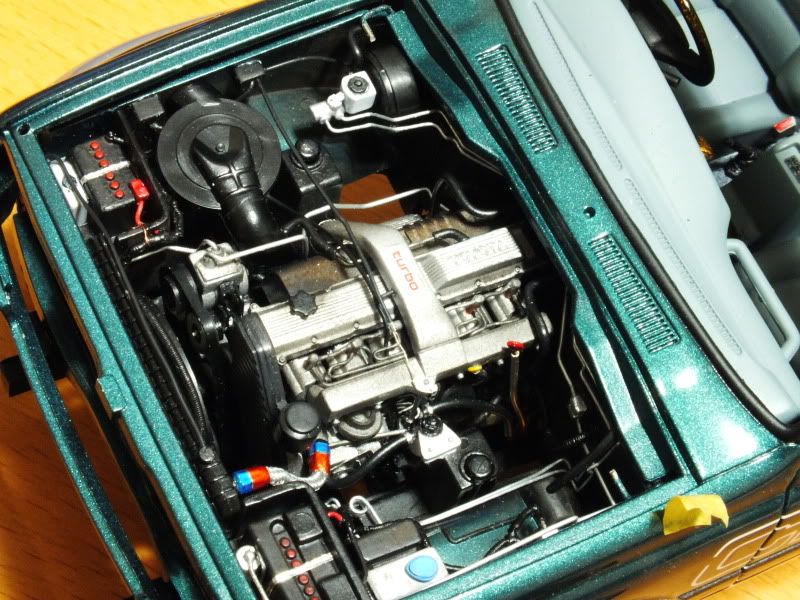 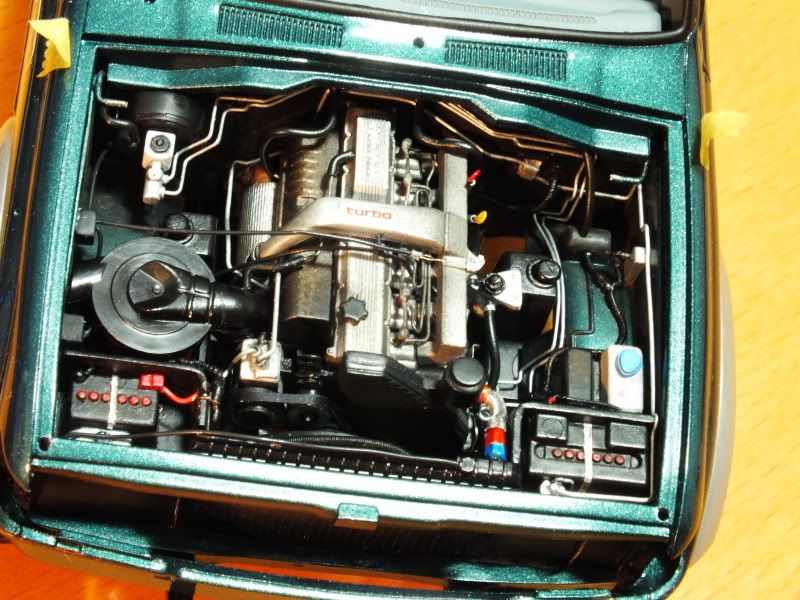
|
|
#7
11-26-2011, 09:54 PM
|
||||
|
||||
|
Re: Toyota Land Cruiser 80
Wow that engine is simply beautiful. Great detailing 101!!
__________________
In Progress    
|
| The Following User Says Thank You to MidMazar For This Useful Post: | ||
kaho (12-01-2011)
| ||
|
#8
12-01-2011, 03:38 AM
|
||||
|
||||
|
Re: Toyota Land Cruiser 80
With the engine, suspension, and basic interior completed, it is time to install some interior accessories before doing final assembly to the car itself. I plan to put the following parts inside the cabin: Ice box, jack stands, flashlight, jerry cans, and possibly a smaller tool box. I was thinking of putting on the roof one of those ramps that get jeeps unstuck in soft sand, but I can't look them up, since I don't even know what word to google for.
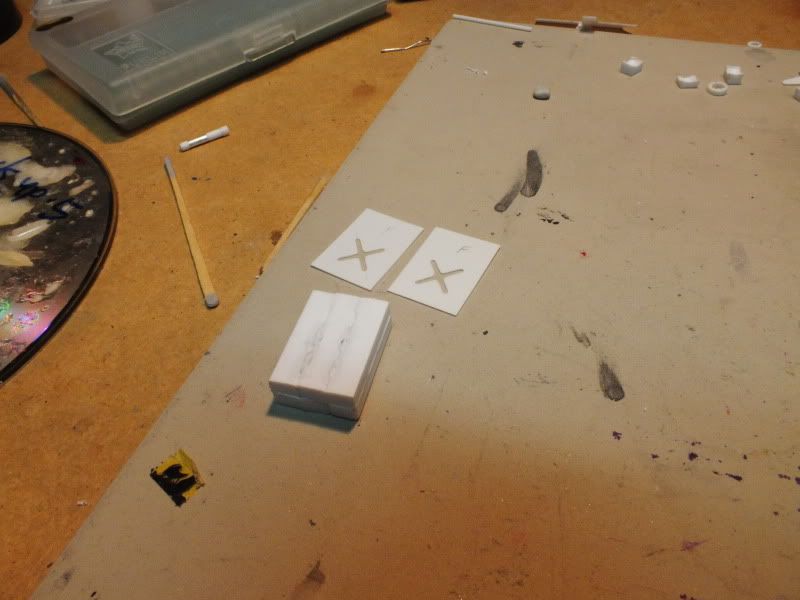
Jack stand design is followed by a random picture that popped up after googling "truck jack stands"  Just something remotely lookalike that I could make the interior not as plain. 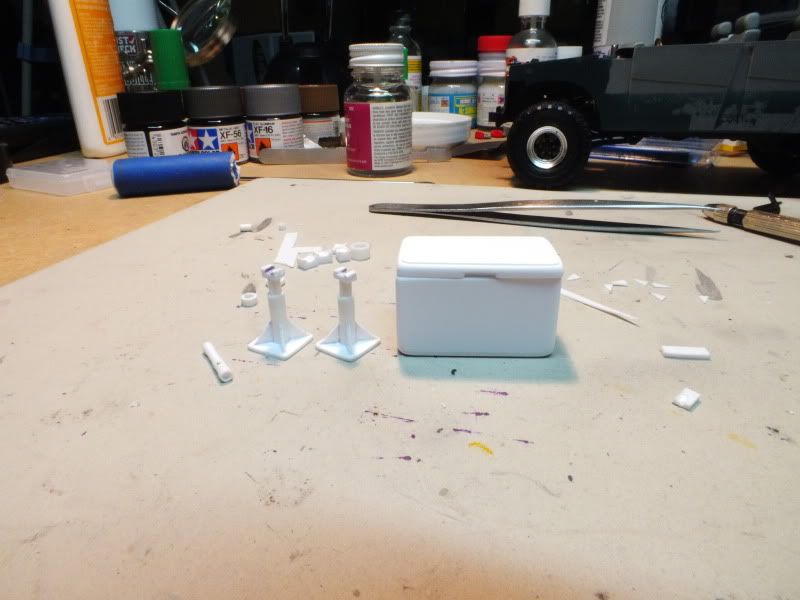  Jerry cans will take some more time, since I want to have at least a couple in the car, plus it will be handy to have a few more ready for my future builds. Because of this, I decided to build one and cast a few more afterwards. I have a little bit of RTV left from almost a year ago which I am crossing my fingers again hoping it will all work out (quantity wise, and condition of the RTV near the end of its shelf life.) The leftover RTV is the Alumilite Quick Set type and it is very fragile when cured, therefore I will only cast the main body of the can and individual handles will be build out of paperclip wires for each cast piece. The scale size of a 5 gallon jerry can can be quite closely replicated with Plastruct 3.2 x 4.0mm retangular rods cut to 18mm length, and glued to each other like this. (Mind you, I did not use a caliper to get exact measurements. There are many dimensions for jerry cans but the particular one I am looking at was said to have 13.75" x 6.5" x 18.25".) 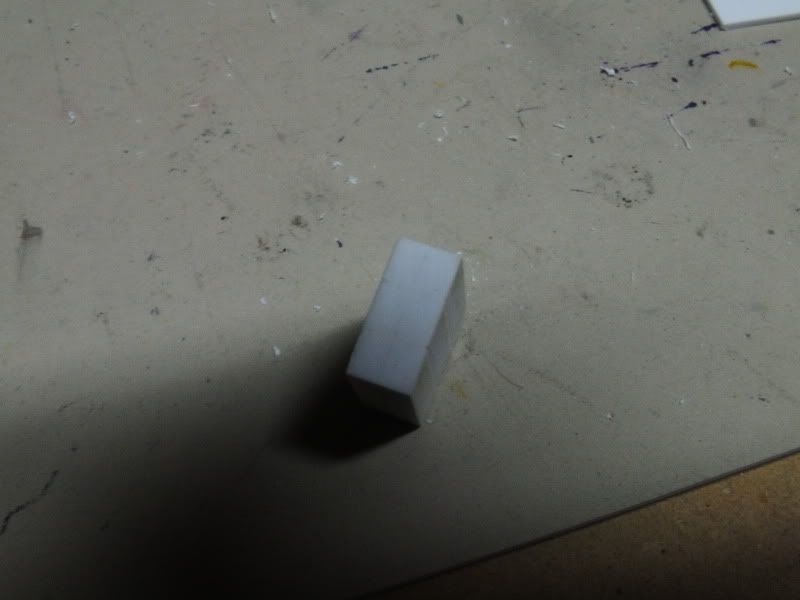 Shape top with big file after glue dries. 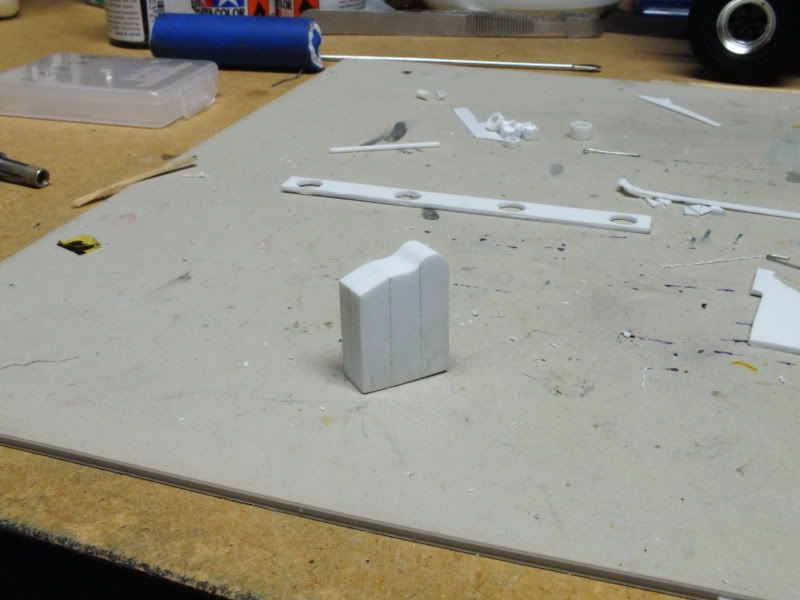  Round out vertical edges. 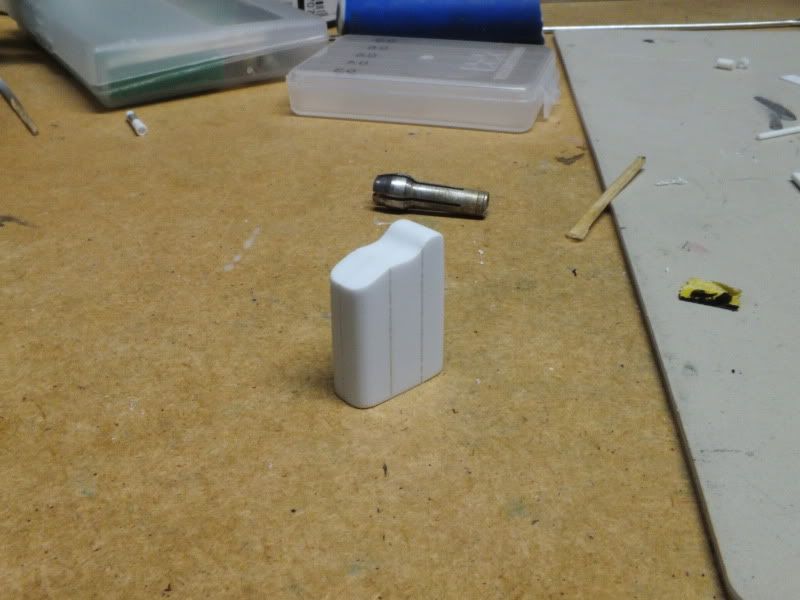 Added weld seam and indent details. 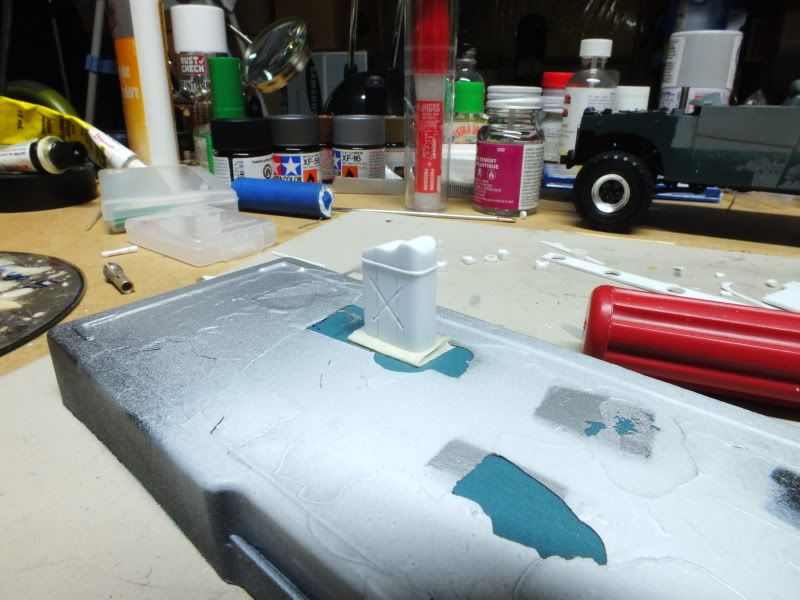 First layer of primer followed by smoothing of details and glue seams. 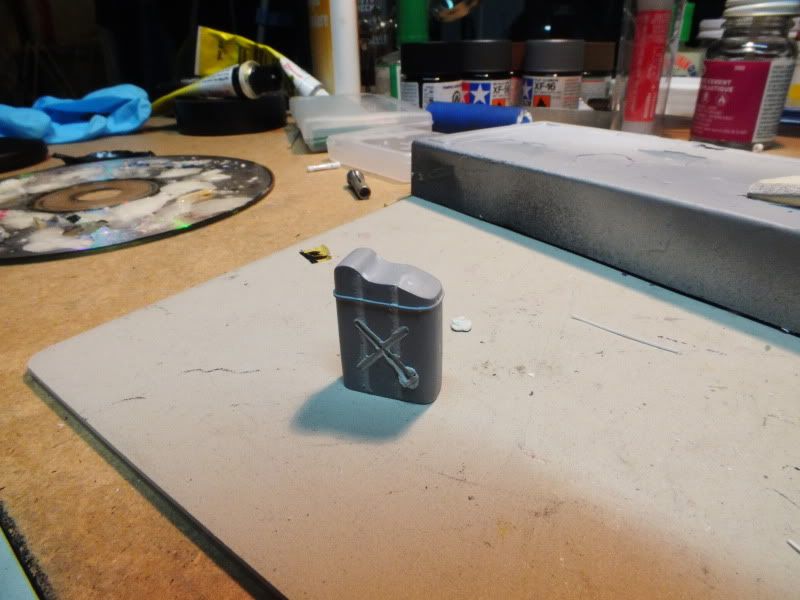
|
|
#10
12-02-2011, 05:56 PM
|
||||
|
||||
|
Re: Toyota Land Cruiser 80
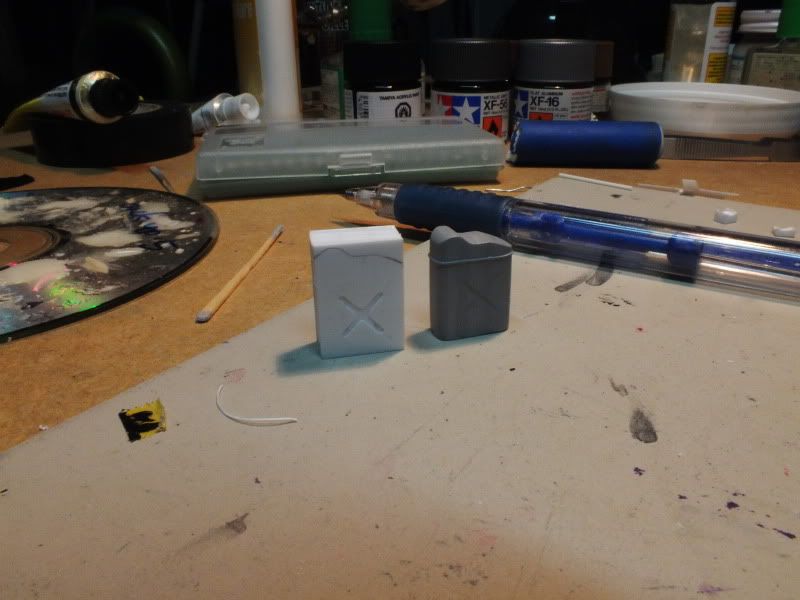
I have decided to take a different approach to making the gas can. This is mainly due to the cross pattern on the first piece being extremely hard to carve out smoothly. This time i made sure the gaps between the rods are filled flat where it shows under the cross in order to minimize prep work near the end. Currently waiting for the glue to dry before reshaping top end.
|
|
#11
12-03-2011, 01:24 AM
|
||||
|
||||
|
Re: Toyota Land Cruiser 80
Looks really great!
Looks like you like to fabricate too...good job on the jack stands, and gas cans! Jimmy
__________________

|
| The Following User Says Thank You to CrewDawg15 For This Useful Post: | ||
kaho (12-05-2011)
| ||
|
#12
12-05-2011, 03:44 AM
|
||||
|
||||
|
Re: Toyota Land Cruiser 80
Crewdawg: I was trying to find the pre-made jack stands and tools by Jada Toys actually. Unfortunately my local store that had them on sale before had no more in stock when I visited again. Oh well, building these from scratch saved me a couple bucks.
So the new gas can is reshaped and weld details were added again. A silicone mold is made and after one whole day the mold is fully cured and I used the remains of my resin from 2 years ago. I guess I am very lucky to have the silicone work fine after leaving it unused for 2 years. When I first opened the cap I saw the liquid and solid of the uncatalyzed silicone split, with the solid being very very hard. 30 minutes of vigorous stirring kind of broke the solid back down. The resin though, were not so kind. My finished castings are very bubbly but I think I will just let them be. Some bigger cavities are filled with Tamiya smooth type epoxy putty. 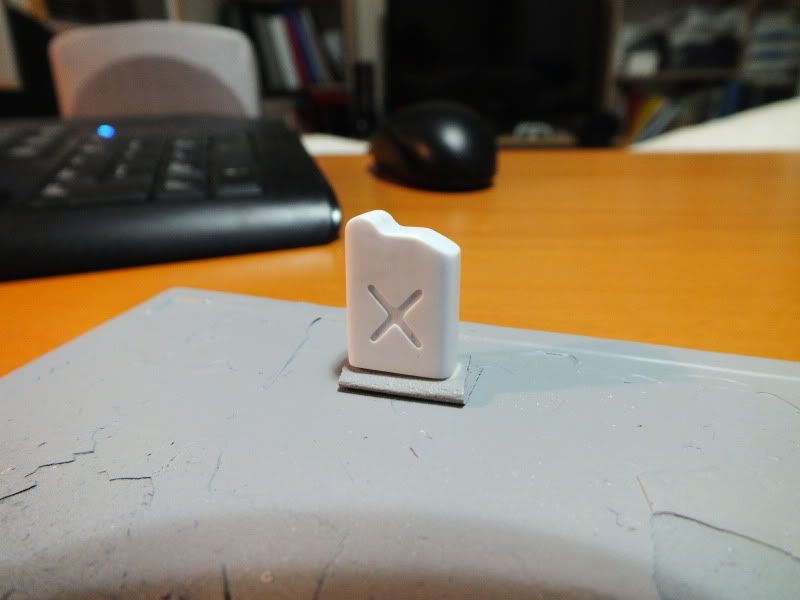 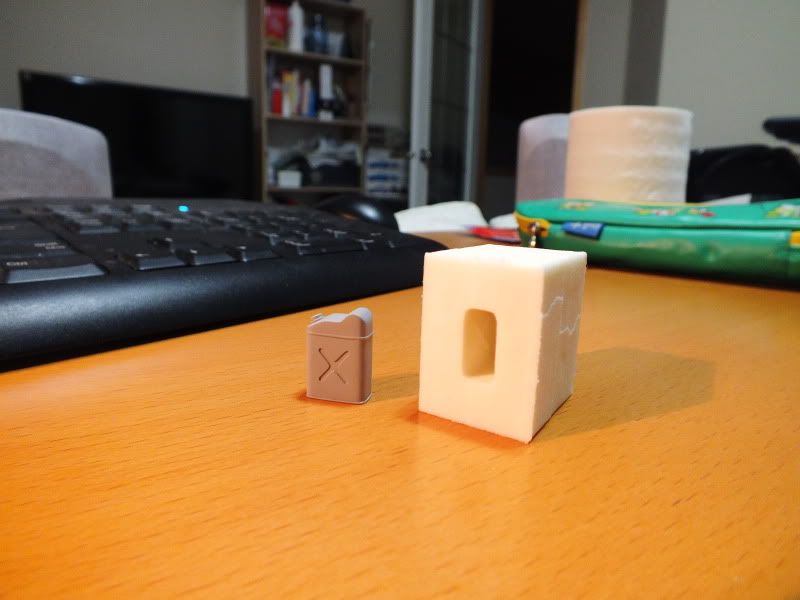 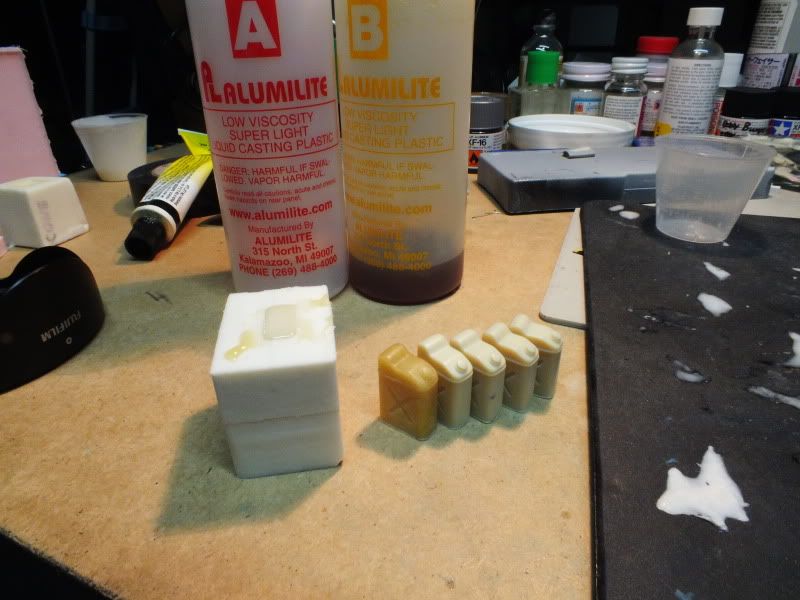 By the way, if anyone in Calgary has a lot of A side compare to their B side Alumilite resin, I have the amount shown of the B side leftover that could even it out. It's probably not in the best condition but it's fine if you want to make something with sand casted-looking surfaces, or don't mind the tiny bubbles it makes. I feel uneasy throwing away that bottle looking like it still has usable stuff inside. 
|
|
#13
12-08-2011, 01:28 AM
|
||||
|
||||
|
Re: Toyota Land Cruiser 80
Sorry for the back-to-back posts. Hopefully this will be the last post I make before showing the finished product in the completed gallery. After 3 months of working on this, I can't wait to get it over with!
Handles are made on the gas cans using twist tie wires (the larger varieties are used which were found inside Ikea furniture packages). The colors on the jerry cans tells which liquid they are supposed to be filled with: Red = gasoline, Yellow = diesel, Blue = kerosene, Tan = water. I am only painting my cans red and yellow for the time being. 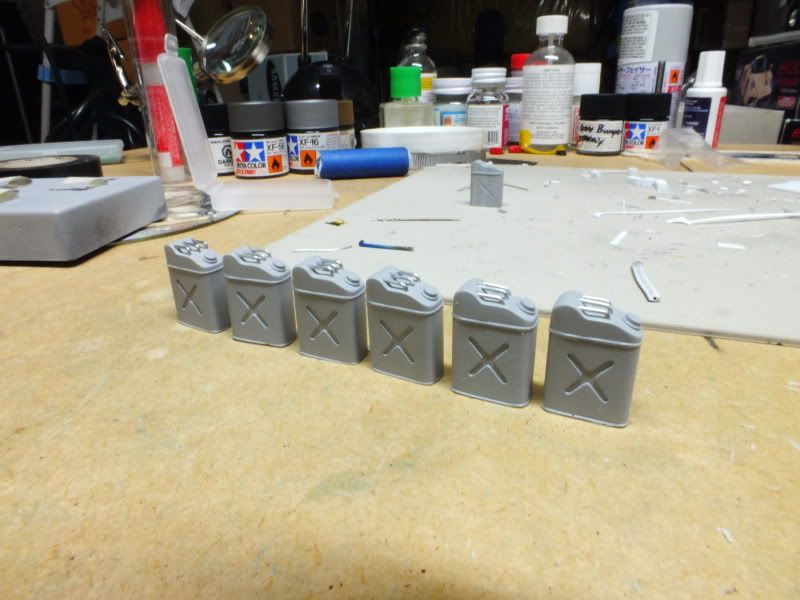  Tool box is made by stacking 1mm and 0.25mm styrene sheets. The box is painted Tamiya TS?? Bright Red. Handles in drawer are made with autobody repair tape. 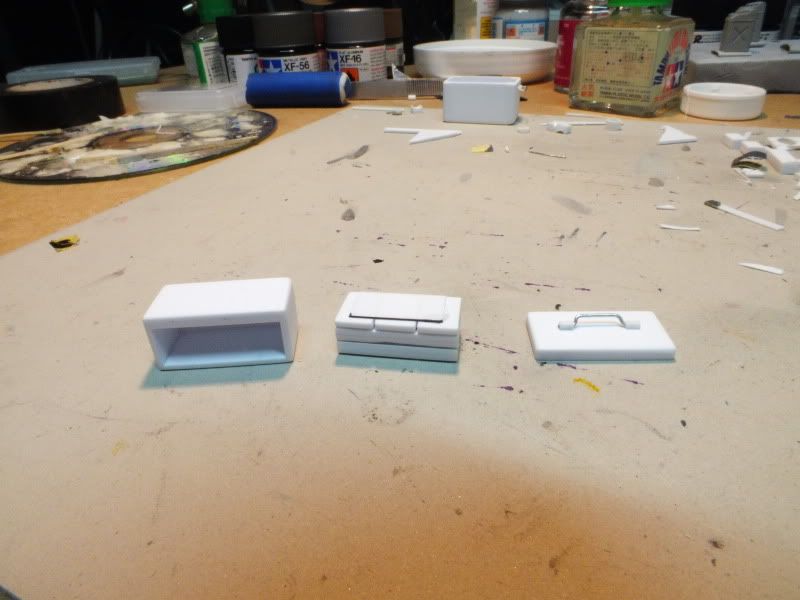 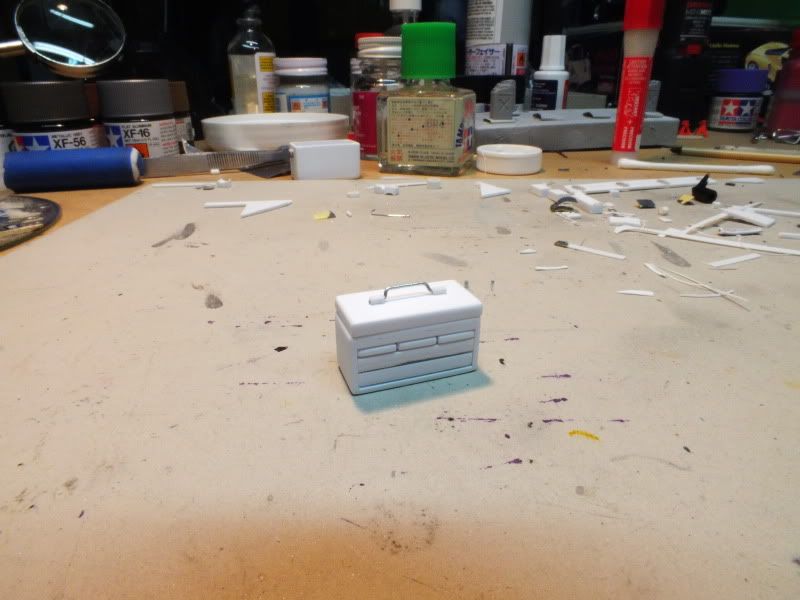 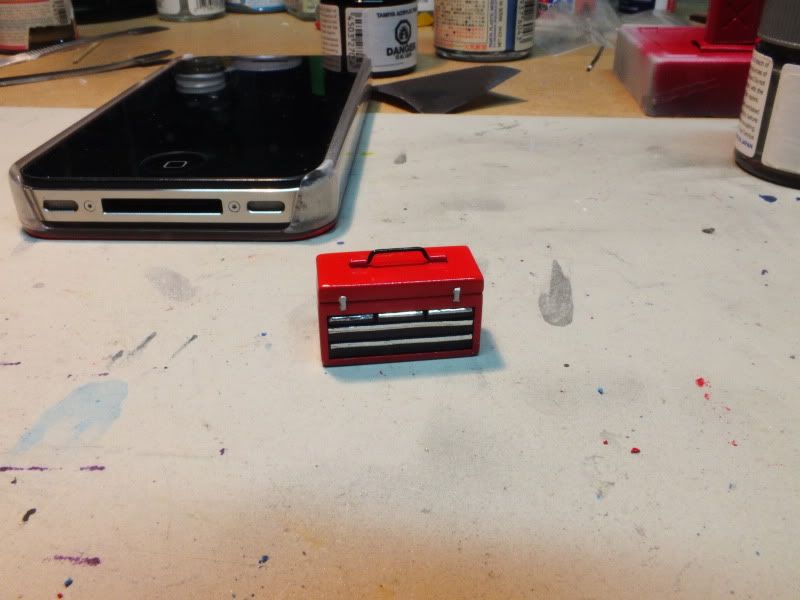
|
|
#14
12-08-2011, 03:42 AM
|
||||
|
||||
|
Re: Toyota Land Cruiser 80
Gas tank look excellent.
Good work, I like it!
__________________
WIP: Custom CUb F100 Ducati 916 STUNT YAMAHA GALLERY: VW Ducati 916 Custom CUb Mark Porsche 935 Tamiya 1/12 with Scale Motorsport Super Detail Kit FOR SALE
|
| ||||||||||||||||||||||||||||||||||||||
|
POST REPLY TO THIS THREAD |
 |
|
|


