|
|
| Search | Car Forums | Gallery | Articles | Helper | Air Dried Fresh Beef Dog Food | IgorSushko.com | Corporate |
|
|||||||
| Car Modeling Share your passion for car modeling here! Includes sub-forum for "in progress" and "completed" vehicles. |
 |
 Show Printable Version | Show Printable Version |  Subscribe to this Thread
|
|
|
Thread Tools |
|
#16
 10-13-2009, 11:22 PM
|
|||
|
|||
|
Re: Difference Between Photographing Indoor & Outdoor Pics
Quote:
your camera doesn't need a white balance adjustment. if its a regular digital camera with certain settings for portrait and what not you can easily manipulate it to give you the results you want. main suggestion? try them! most cameras now days have at least a little adjustment built in. the owner's manual can be your friend. as far as setup goes, a few garage work lamps (light source), wax paper or white nylon fabric (as a diffuser), white or black cardstock or even a same colored fabric sheets (for the background) will do wonders! if you need a reflector to bounce light where there are shadows a car shade you use for covering your front windshield also does the trick. yes, photogs can make things sound complicated but as someone else said, so can modelers. 

|
|
#17
10-14-2009, 10:19 AM
|
||||
|
||||
|
Re: Difference Between Photographing Indoor & Outdoor Pics
Quote:
__________________

|
|
#18
10-14-2009, 03:13 PM
|
||||
|
||||
|
Re: Difference Between Photographing Indoor & Outdoor Pics
A little explanation to a better photos.
3 point lighting The key light is placed about 45 degrees to the subject, either left or right, usually above and aimed down between 30 and 45-degrees. It is the dominant light. Position this light as you would if it were the only light you had. From this, you'll have defining shadows on the face which would be lost if the light were on a similar axis to the camera, but you'll notice that, in a room with no other lighting, it will create deep, dark shadows. Toning down those shadows is the job of the next light. The fill is usually two or three stops dimmer than the key light, and its placement is at a near 45-degree angle on the opposite side of the camera, often on a level with the subject's face. The fill light is a reaction to the key light, and its ultimate placement depends on the function of the fill - what shadows does it create? Where do you need to reduce them? The fill light can be the same size as the key light in wattage and bulb size, but you might then place it further away than the key. Watch as the fill drives back the shadows; though the lighting is not nearly as harsh, these two together still present a very two-dimensional view. The job of the third and final light is to create a sense of distance between the subject and the background, giving an illusion of a third dimension on the screen. The back light, sometimes called a rim or shoulder light, is aimed at the subject's back, and, like the key light, it is usually 45-degrees off the axis and shines down upon the subject. This creates a bright rim around part of the subject, creating an outline which then appears to separate the shoulders from the background. The back light should be at least as bright as the key, often brighter.  Leanr to ligh t better understanding light This should help. 
__________________
Almeida... I'm back!
|
|
#19
10-14-2009, 10:34 PM
|
||||
|
||||
|
Re: Difference Between Photographing Indoor & Outdoor Pics
I'm starting to view this topic in a whole new....way. Yea. I could have gone for the easy pun.
Here are a couple of full scale shots of an Aston DB4 GTZ where the photographer got creative with the lighting. They really accentuate the "muscles" in Zagato's coachwork. 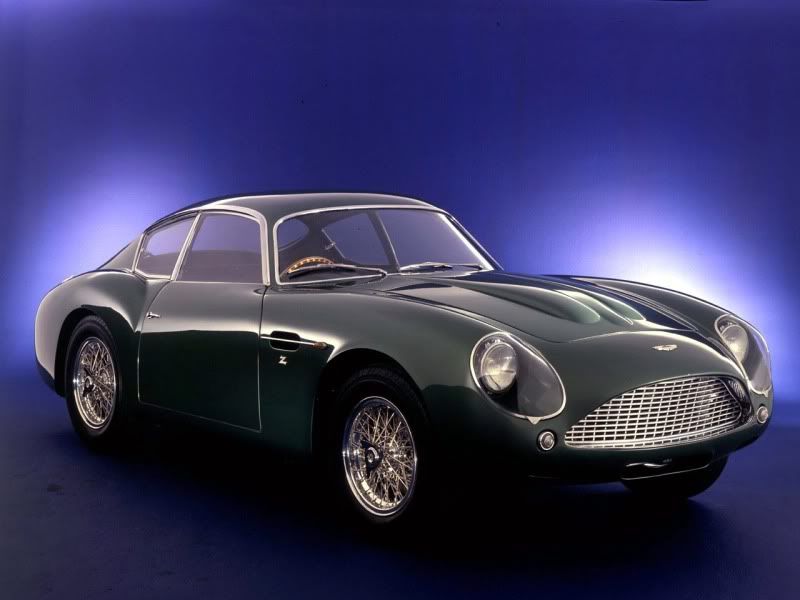 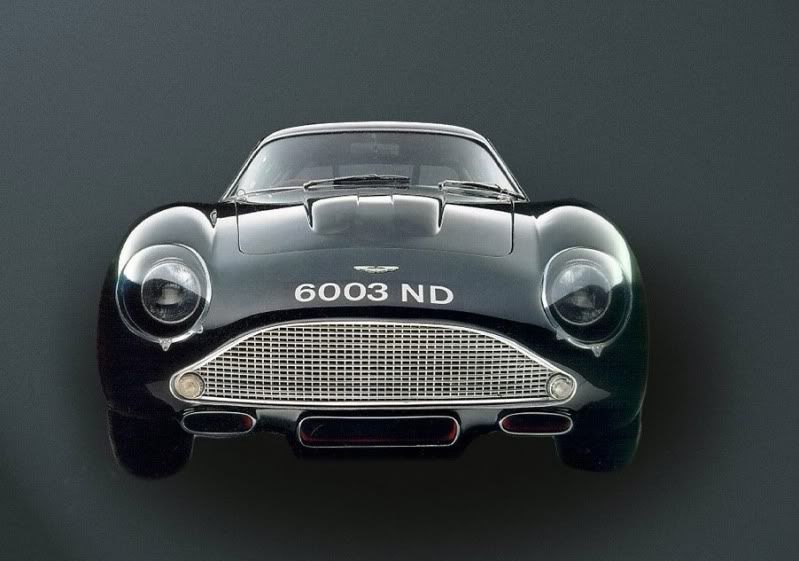
__________________
|
|
#20
10-15-2009, 01:42 AM
|
|||
|
|||
|
Re: Difference Between Photographing Indoor & Outdoor Pics
Quote:
  as mentioned, a bounce or an fill/indirect light source can come in handy. for another method of using the bounce technique you can use white card stock at an angle from the model and "bounce" light off of it if you don't want the light as harsh as simply shining it directly on the model (which may cause the picture to have all highlights "washed out" or overexposed). another trick to use if you've got a glass table is to put some white nylone fabric or similar material on the table, put the model on top, and shine a light source from underneath the table and see what kind of effect you get. remember that dark colors (especially black) will be quite a challenge. there's a reason why many professional magazines don't use black cars on the cover unless absolutely necessary. on the other end of the spectrum white cars w/ details tend to get washed out or overexposed as well. gray tends to be neutral.
|
|
|
POST REPLY TO THIS THREAD |
 |
|
|


