|
|
| Search | Car Forums | Gallery | Articles | Helper | Air Dried Fresh Beef Dog Food | IgorSushko.com | Corporate |
|
|||||||
| Car Modeling Share your passion for car modeling here! Includes sub-forum for "in progress" and "completed" vehicles. |
 |
 Show Printable Version | Show Printable Version |  Subscribe to this Thread
|
|
|
Thread Tools |
|
#1
 10-09-2009, 06:36 AM
|
||||
|
||||
|
Difference Between Photographing Indoor & Outdoor Pics
Was browsing some pics when I saw this page, its shot by japanese guy, not by me, but I'm using almost the same set up, and ever since I'm shooting my car model outdoor, I never shot indoors, here's the reason why
 THE SET UP:  note the sun is not bright THE INDOOR SHOT:  THE OUTDOOR SHOT:  rest of the outdoor shots: http://www5.ocn.ne.jp/~mokeden/sakuh...he934/p934.htm What do you guys think? 

|
|
#2
10-09-2009, 07:51 AM
|
||||
|
||||
|
Re: Difference Between Photographing Indoor & Outdoor Pics
In my opinion, I think if your setup is an endless background outdoors, it might be better to have a diffuser above the model to reduce the highlights on the bonnet & roof areas but keep the area under the car well lit. (You can see the interior detail is also lost compared to the indoor shot.) In this case, it's just the same as having the model indoors but with strong daylight lights. You might get the odd tree reflection to show how shiny your model is.
The reason I'd want to shoot outdoors is that: 1. Natural daylight means natural colours in your photos (white really is white) and it's often not too directional (nice even lighting) 2. With the right background, a scale model can look like a 1:1 real scale car/bike 3. You can also change the backgrounds to different locations (dirt-rally, concrete-carpark or having famous lankmarks in the background )
__________________

|
|
#3
10-09-2009, 08:01 AM
|
||||
|
||||
|
Re: Difference Between Photographing Indoor & Outdoor Pics
A bit of advice I got from my brother, who makes film and TV commercials:
Shoot still cars (pack shots) in the 30 minutes before sunset, or 30 minutes after sunrise (what time sunrise/sunset is up to you to find out). That tends to soften the light and shows the car's curves to best effect.
|
|
#4
10-09-2009, 09:59 AM
|
||||
|
||||
|
Re: Difference Between Photographing Indoor & Outdoor Pics
Quote:
__________________
Guideline for happy modeling: Practice on scrap. Always try something new. Less is more. "I have a plan so cunning, you could put a tail on it and call it a weasel" - Edmund Blackadder
|
|
#5
10-09-2009, 12:08 PM
|
||||
|
||||
|
Re: Difference Between Photographing Indoor & Outdoor Pics
I had not heard of this advice to shoot still cars in the 30 minutes after sunrise or the 30 minutes before sunset for the best lighting effect. Thanks for sharing this.
|
|
#6
10-12-2009, 04:03 AM
|
|||
|
|||
|
Re: Difference Between Photographing Indoor & Outdoor Pics
outdoor is wonderful to take advantage of natural light. just be more careful on overcast/cloudy days or really bright, direct sunlight. diffusers and reflectors will make your life easier to get the shot you want.
for indoors, it will depend on your lighting source. if you've got a camera that can fine tune white balance adjustments by all means fiddle with it (i.e. florescent, incandescent, mixed lighting, etc.). again, diffusers and reflectors will make your life easier. indoors you may also relay more heavily on multiple lighting sources (i.e. one light hitting from the front, one from parallel right side, one from above the model, etc.).
|
|
#8
10-12-2009, 08:42 AM
|
||||
|
||||
|
Re: Difference Between Photographing Indoor & Outdoor Pics
just a +1 from me.
that guy's outdoor set up needs a diffuser.
__________________
AF's Guidelines Read them. __________________  Currently in the process of re-hosting my photos. If any go missing, drop me a PM.
|
|
#9
10-12-2009, 09:49 AM
|
||||
|
||||
|
Re: Difference Between Photographing Indoor & Outdoor Pics
Of the two pics in the original post, I prefer the indoor shot because the light is more balanced (highlights vs. lowlights). Outdoor natural light's big advantage is that it is BRIGHT and FREE.
I've always needed a lot of intense light when working on tiny model parts so I have three cantilevered lights (fluorescent, halogen, and incandescent) at my bench that I can swing to within inches of my subject. My fingers get hot I have the lights so close! When I take photo's I just clear a space on the bench for a piece of white poster board that the model is placed on. Next I swing the lights down to within inches of the subject and take the shot. The different directions and spectra help create a diffusing effect. Here are a couple of quick indoor shots with three lamps and flash: 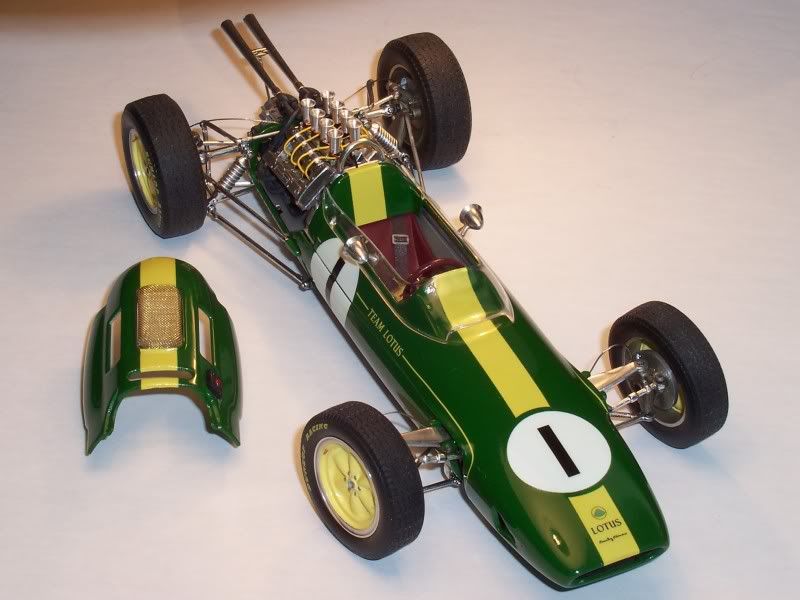 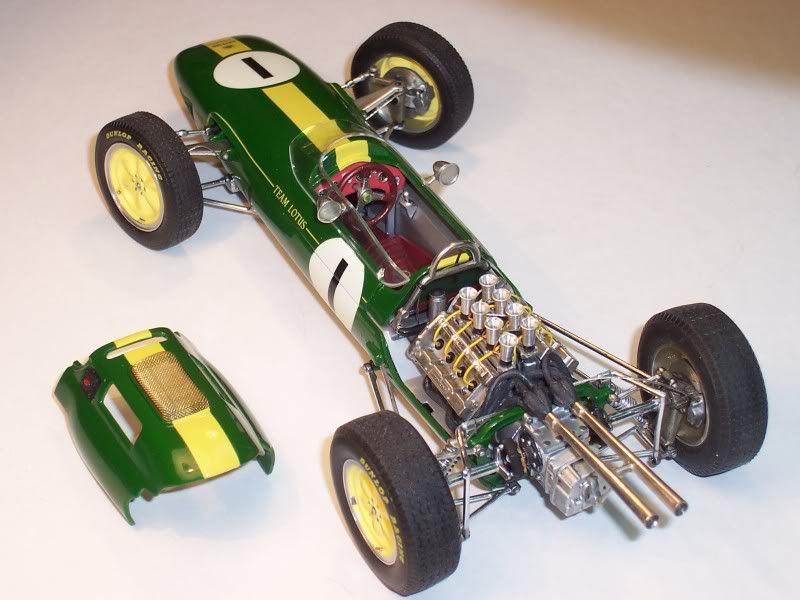 And here is how the sausage was made: 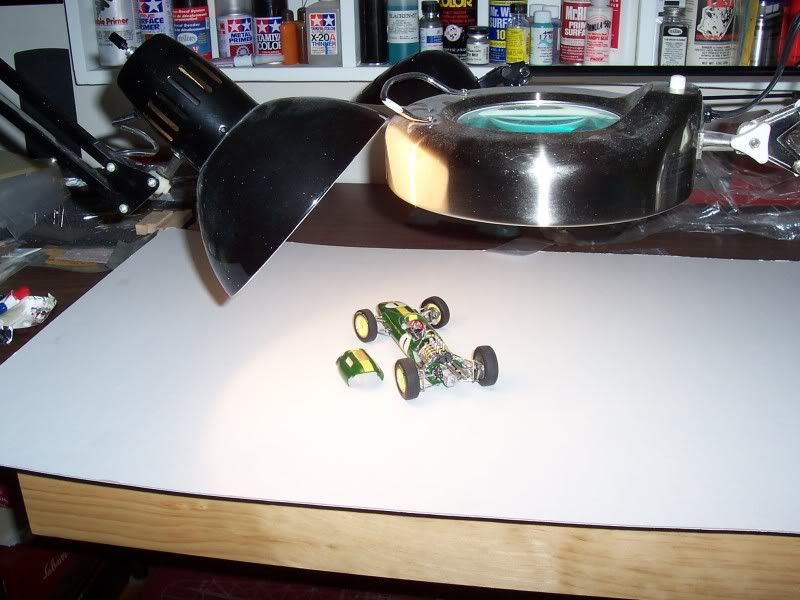 The shots aren't fantastic but I like them and it only took 5 minutes to set up. Also, it's cold and raining outside.
__________________

Last edited by CrateCruncher; 10-12-2009 at 10:21 AM.
|
|
#10
10-12-2009, 12:43 PM
|
||||
|
||||
|
Re: Difference Between Photographing Indoor & Outdoor Pics
And the neat thing is - you can accelerate the paint cure time with this rig!
Joking aside, those are lovely shots. How do you get that depth of field? Are you using a macro setting? (I'm no photographer, so I'd be interested to know how to get good focus like that). Graham
|
|
#11
10-12-2009, 01:16 PM
|
||||
|
||||
|
Re: Difference Between Photographing Indoor & Outdoor Pics
Oh yea, I forgot to mention that I sure don't leave the model sitting under those lights for too long. No melted plastic so far but I don't want to push it. That halogen light can get especially hot.
Graham, I have a bad habit of losing sunglasses and cameras so I've learned it's best not to spend much on either in my case. The shots above were taken with an old Kodak EasyShare CX6330 my friend traded me for a bottle of wine and he even let me help him drink it. By experimenting I discovered the best way to get close shots was to sit back about three feet from the subject in "close up" (aka macro) mode. Then while resting the camera on a piece of styrofoam board resting in my lap I use the zoom feature to fill the frame. Before, when I got in close the subject had a very narrow field of focus and the shot was more often than not blurry or completely out of focus. The reason I'm sharing this info is not to wow anyone. I know my photography skills aren't great and I'm never going to buy a lot of expensive equipment. Instead, I hope everyone reading this will appreciate that you can get reasonably good results with virtually no investment. I think the photography experts seem to always make everything unnecessarily complicated and expensive. Just my take.
__________________
Last edited by CrateCruncher; 10-13-2009 at 07:56 AM.
|
|
#12
10-12-2009, 02:06 PM
|
|||
|
|||
|
Re: Difference Between Photographing Indoor & Outdoor Pics
Quote:
to reduce melted models  , use florescent lights if you've got them. make sure to adjust the white balance if you've got a camera that can adjust them to reduce that bluish-greenish hue. , use florescent lights if you've got them. make sure to adjust the white balance if you've got a camera that can adjust them to reduce that bluish-greenish hue.
|
|
#13
10-12-2009, 02:12 PM
|
||||
|
||||
|
Re: Difference Between Photographing Indoor & Outdoor Pics
Quote:
|
|
#14
10-13-2009, 07:02 AM
|
||||
|
||||
|
Re: Difference Between Photographing Indoor & Outdoor Pics
Quote:
That is the main reason the outdoor pictures often look better, there is only one source of light (the Sun), and the default white balance setting in cameras is adjusted for it.
|
|
#15
10-13-2009, 07:47 AM
|
||||
|
||||
|
Re: Difference Between Photographing Indoor & Outdoor Pics
Tervo/Star, the reason I use four different types of light is to more closely mimic the wide spectrum of natural white light. The fluorescent adds blue, the incandescent adds orange, and so on. They are all focused at the top of the model so they blend to form something close to natural white light.
My camera doesn't have "white balance adjustment" so I developed the multiple light approach as a work-around using what I had at hand. I find it humorous that "white balance adjustment" is itself a work-around developed by camera manufacturers to adjust for indoor situations where one-source artificial light distorts the true colors of the subject. So, in effect, your posts recommend I eliminate my wide-spectrum white light configuration so "white balance adjustment" will work properly with the distorting effect of inferior one-source light. With all respect, this gadget-centric mindset is exactly the problem with this subject that I was talking about. Again, I encourage people who don't have a lot of elaborate equipment to try taking indoor pictures. If you are into photography with thousands invested in equipment great! Your pics will rock for sure; well, they should anyway. But if you're like the rest of us just trying to take a nice pic of a model with the girlfriend's point-n-click, try using what you have.
__________________
Last edited by CrateCruncher; 10-13-2009 at 09:36 AM.
|
|
|
POST REPLY TO THIS THREAD |
 |
|
|


