|
|
|

|
|
| Search | Car Forums | Gallery | Articles | Helper | AF 350Z | IgorSushko.com | Corporate |
|
| Latest | 0 Rplys |
|
|||||||
 |
 Show Printable Version | Show Printable Version |  Email this Page | Email this Page |  Subscribe to this Thread
|
|
|
Thread Tools |
 01-16-2008, 09:41 AM
|
#1 | |
|
AF Enthusiast

Join Date: Jan 2005
Location: Portville, New York
Posts: 3,570
Thanks: 1
Thanked 10 Times in 8 Posts
|
White Face Gauge Install on 1gA Turbo
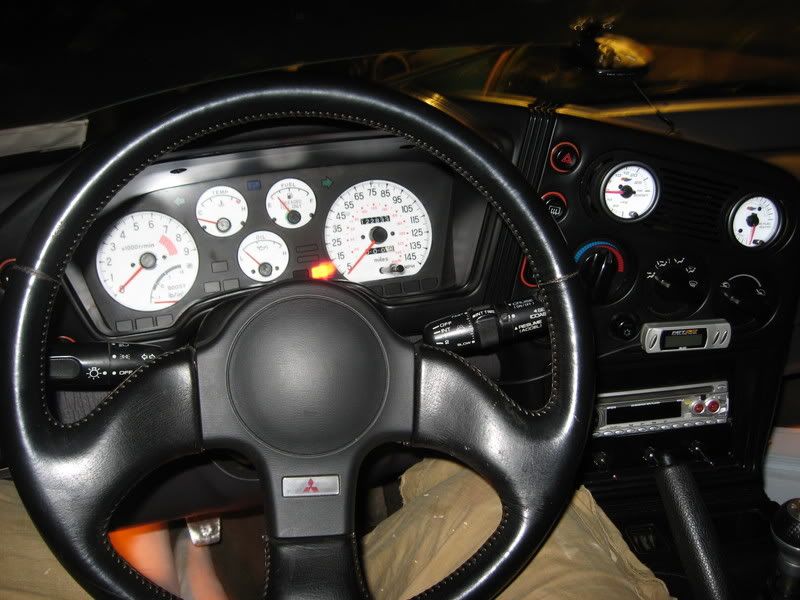
This thread is mainly going to be step by step through pictures. I'm not sure if this could be considered as a write-up or not but this will help all of you that want to install White face gauges. My gauges light up blue and green and I got them off Ebay.
There are 10 screws total that hold the gauge cluster in place including the housing. Sorry about the picture, I didn't take a picture before I pulled the cluster so I had to use a picture of my old n/t but o well you get the point. Where the circles are is the basic location of where the screws are located behind the steering wheel and the windshield wiper adjuster. After you pull the 1st 4 screws as shown in the picture, remove 2 more screws beneath the trim piece directly to the right of the gauge cluster (piece is about 3/4 of and inch wide and 8 inches long) then remove the piece by dropping the tilt wheel down and make sure you pull out the 3 wiring harness out of the back. Then remove the 4 screws that hold the cluster in place then wiggle the cluster out of the dash. 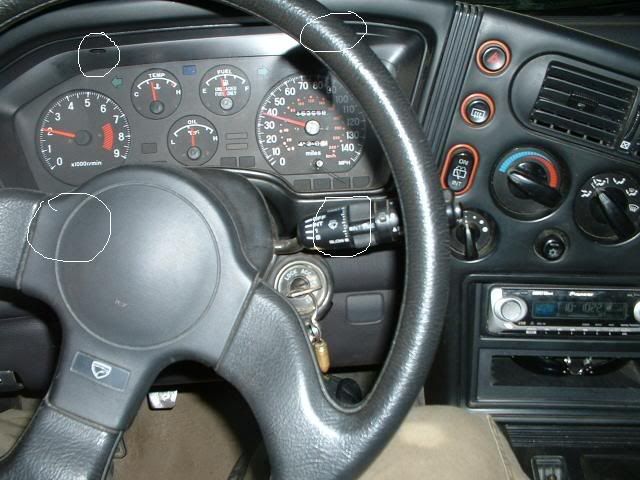 Make sure you either draw or take a picture of where the needles are at before you remove them or else you won't know where they need to go when you reinstall them.  Your going to want to drill a hole in the top of the housing big enough to feed the wires through. 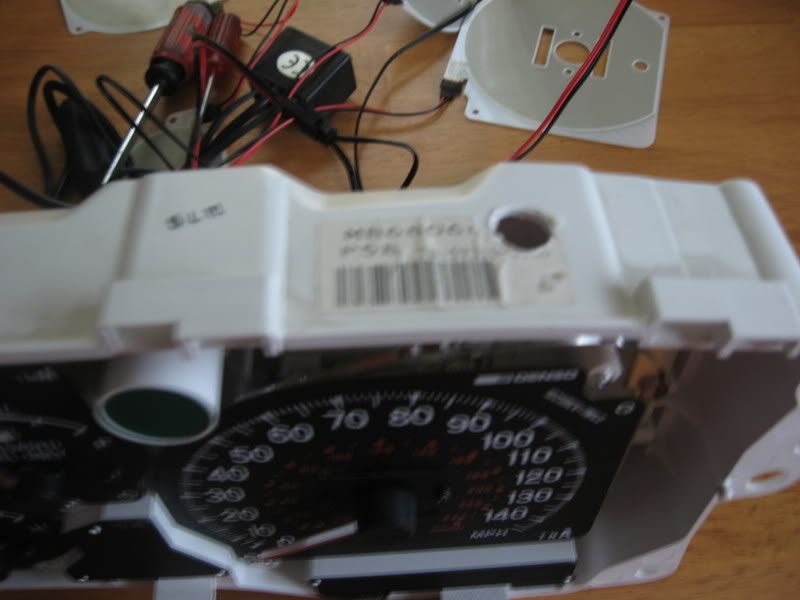 Next is to remove the plastic cover that covers the gauges. There are several tabs all around the housing that you will need to push down and out. But be sure to pull out the trip odometer button (just pull straight out). After you remove the clear plastic cover move onto the black plastic cover, this piece is held on too by tabs and also there is a hidden screw on the back of the cluster, make sure you remove this screw or you might damage something. You should be looking at something like this 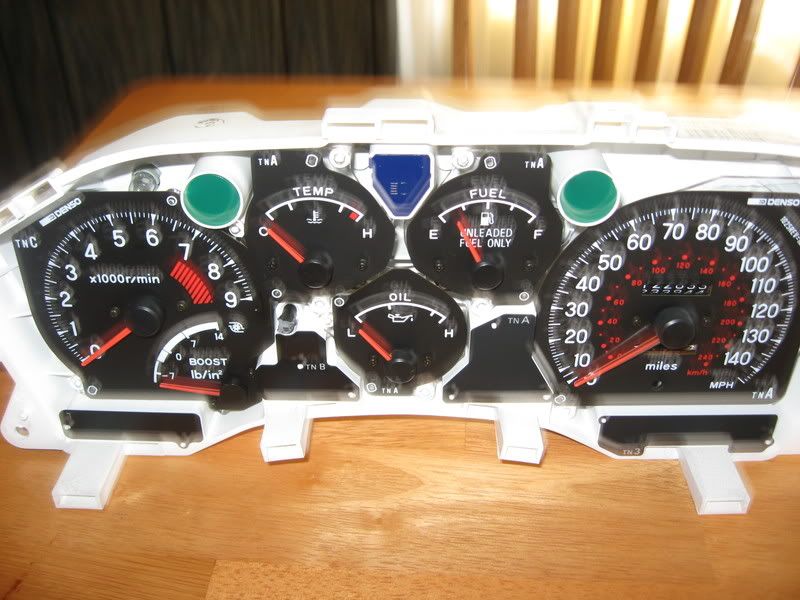 Start w/ which ever gauge you want, I did the gas and Speedo first, I'm sure there is a needle removal tool but I don't have one so I used a flat headed screw driver, slip under need black base and turn screw driver so it forces straight up. I am not responsible if you damage any part of your gauges so do this at your own risk. There are only 2 screws that hold on the face, just unscrew then pull of the black face and replace w/ the white face. Now if you bought the gauges that have wires and you will need to feed the wires through the hole, if you put the white face on and install then you won't be able to feed the wires through because the speedo will be in the way. So don't install the gauge until all the rest are installed first so you can fish all the wires through the hole. 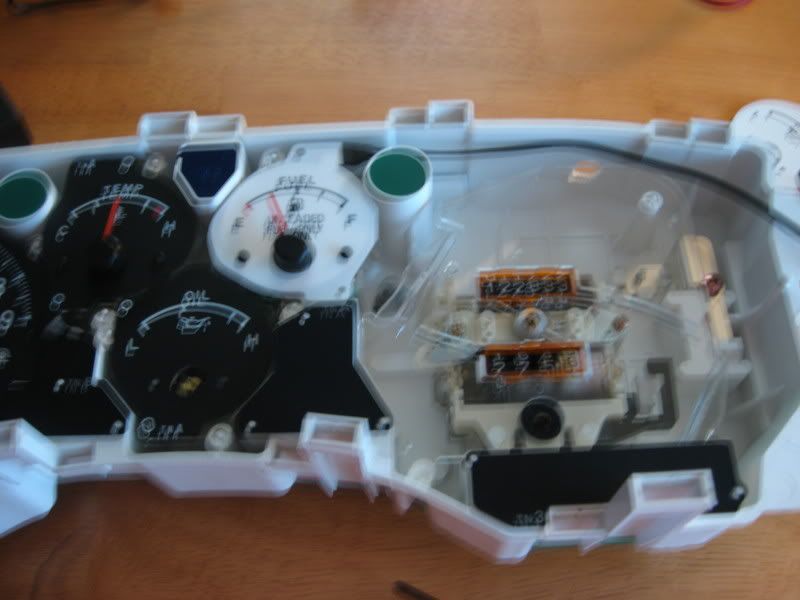 The most difficult gauge is the oil pressure gauge because once you unscrew the screws there is this little metal plate that has a habit of falling off and it is under the oil pressure gauge assembly. So your best bet is to hold up the cluster and unscrew the 2 screws that hold it in place and remove the assembly all in one piece then you can remove the face and replace w/ the white one. This step is a bit tricky good luck. The boost gauge needle is the hardest needle to remove, idk why but it requires a little more umph to remove. 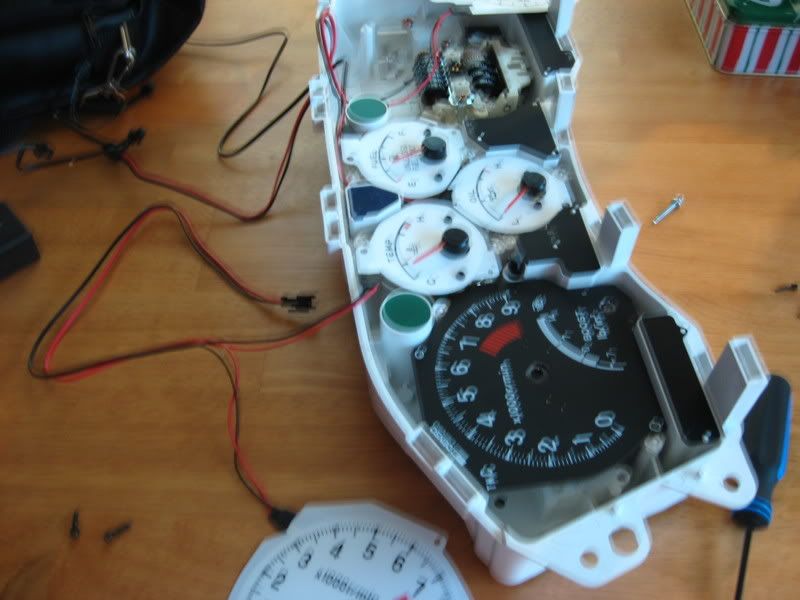 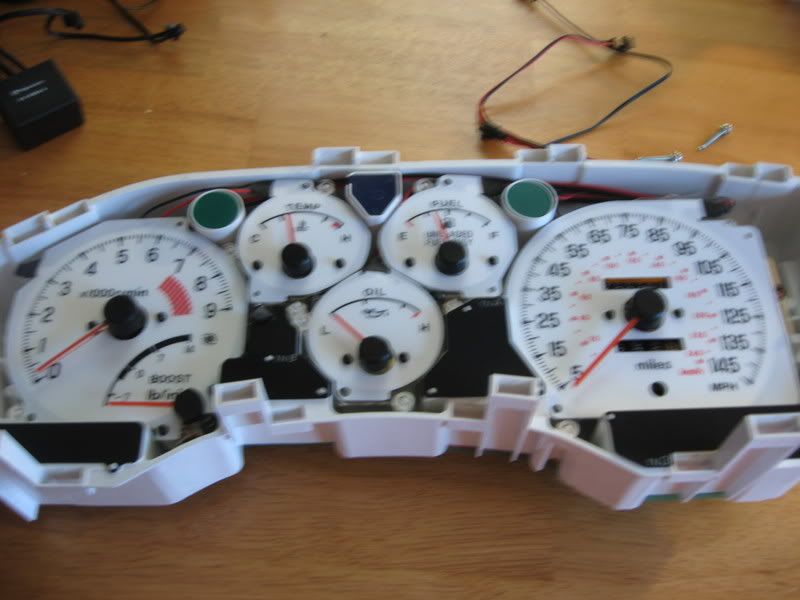  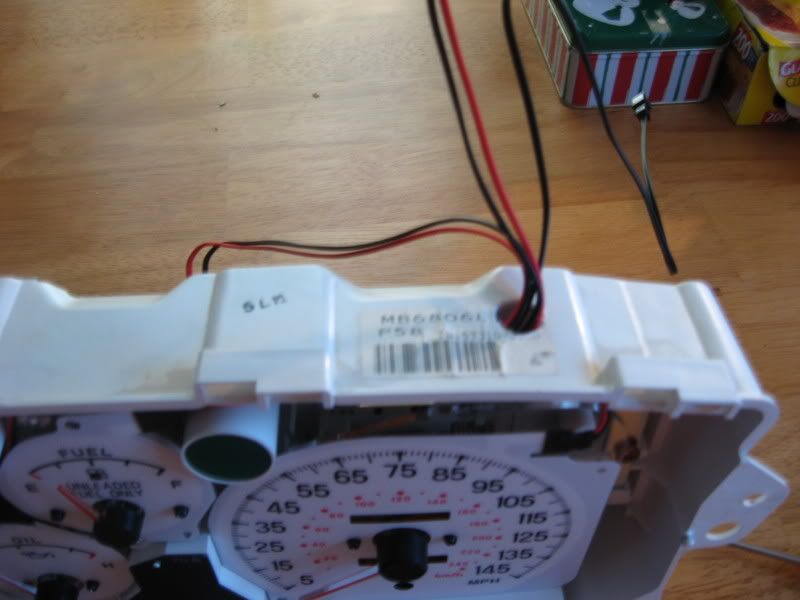 After each face you do, reinstall the needle to where it needs to be from when you started. The needles on the RPM gauge, speedo, and boost are the easiest because they can only go so far when it comes to setting. Refer to the old face for the speedo and the probably the best way to do these is to use a camera and just take a picture. Now you can reinstall the black plastic cover and all you need to do is just snap it back in place. 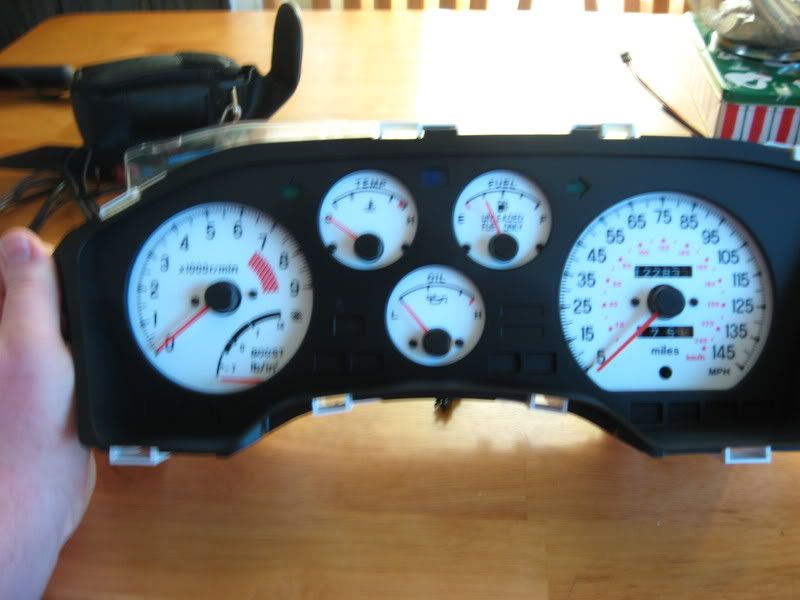 I would install the gauges now before you install the clear piece, start the car and make sure that everything is good to go before you put the finish the install. Check the RPM gauge and if you can, let the car get up to temp and just make sure that the needles are where the usually are. They are very touchy so make sure there right. Then you can do the clear plastic piece, make sure you clean both sides of the clear piece that way there aren't finger prints and dust all over the piece when you install it. Then push back in the Trip odometer button. Then reinstall the screws and the cluster cover. I hope this write up helps someone out there. Sorry about the bad pictures but I was having a hard time taking pictures because I kept getting a glare. Last edited by ned032002; 01-16-2008 at 03:47 PM. Reason: During Reinstallation, noticed that there were 2 screws I forgot about. |
|

|

|
|
01-16-2008, 09:47 AM
|
#2 | |
|
AF Fanatic
 
Join Date: Jul 2003
Location: Fargo, North Dakota
Posts: 5,625
Thanks: 0
Thanked 0 Times in 0 Posts


|
Re: White Face Gauge Install on 1gA Turbo
I think it's an excellent write-up, and should be posted in the write-ups. Good job Ned.
__________________
95 Talon TSI AWD 97 Eclipse GST 
|
|
|
|
|
|
01-16-2008, 09:51 AM
|
#3 | |
|
AF Moderator
 
Join Date: Jun 2002
Location: Salem, Ohio
Posts: 9,620
Thanks: 52
Thanked 24 Times in 23 Posts
|
Re: White Face Gauge Install on 1gA Turbo
I agree... Added to Writeups and indexed!

__________________
-Brian

|
|
|
|
|
|
01-16-2008, 10:34 AM
|
#4 | |
|
AF Enthusiast
Thread starter
Join Date: Jan 2005
Location: Portville, New York
Posts: 3,570
Thanks: 1
Thanked 10 Times in 8 Posts
|
Re: White Face Gauge Install on 1gA Turbo
Thank guys, this was my first one.
|
|
|
|
|
|
01-16-2008, 07:20 PM
|
#5 | |
|
AF Enthusiast
Thread starter
Join Date: Jan 2005
Location: Portville, New York
Posts: 3,570
Thanks: 1
Thanked 10 Times in 8 Posts
|
Re: White Face Gauge Install on 1gA Turbo
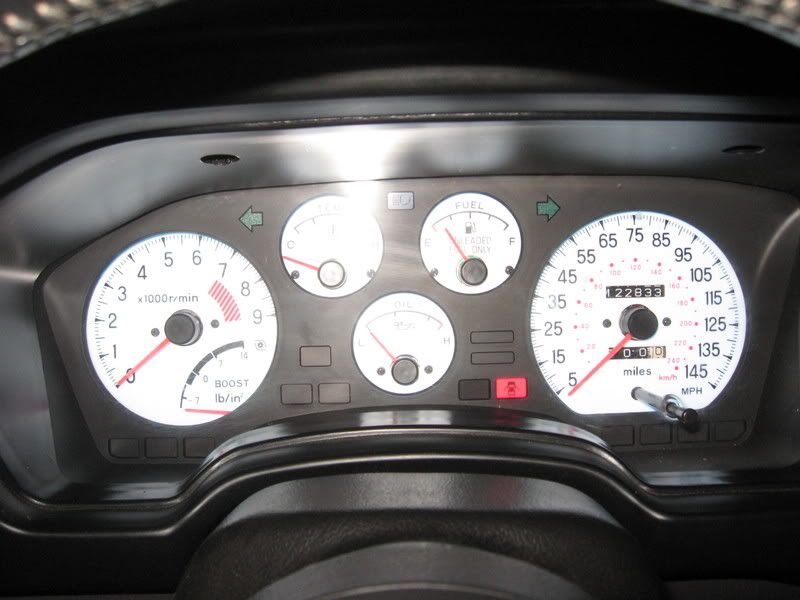
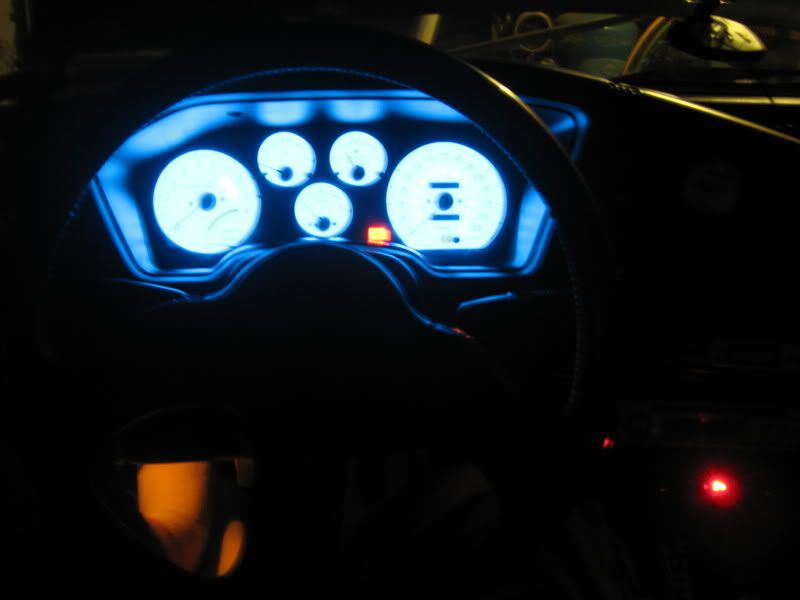
Final pictures, I need to pull back apart and mess w/ that temp gauge as soon as I make her legal again. Enjoy!! I am!!
    |
|
|
|
|
|
01-16-2008, 09:53 PM
|
#6 | |
|
Testiklees
Join Date: Jul 2004
Location: Jamestown, New York
Posts: 931
Thanks: 0
Thanked 0 Times in 0 Posts
|
Re: White Face Gauge Install on 1gA Turbo
Looks good. But why did you decide to take the first picture while driving?
__________________
Tim 1990 Talon AWD 2.3 stroker, 8.8 wiseco, FIC 750's, DSMLink, PTE SCM5031 
|
|
|
|
|
|
01-17-2008, 03:33 AM
|
#7 | |
|
AF Enthusiast
Thread starter
Join Date: Jan 2005
Location: Portville, New York
Posts: 3,570
Thanks: 1
Thanked 10 Times in 8 Posts
|
Re: White Face Gauge Install on 1gA Turbo
That 1st picture was from like 3 years ago in my n/t, it just seemed like a good idea at the time.
|
|
|
|
|
|
01-24-2008, 01:28 PM
|
#8 | |
|
AF Enthusiast
Thread starter
Join Date: Jan 2005
Location: Portville, New York
Posts: 3,570
Thanks: 1
Thanked 10 Times in 8 Posts
|
Re: White Face Gauge Install on 1gA Turbo
So I wasn't going to go w/ the carbon fiber bezel but now I'm starting to talk myself into it again. Will someone photoshop the white face gauges into this picture w/ the carbon bezel so I can see what i will look like? Thanks so much in advance. I don't know anything about photoshop. Thanks again.
 I want to see it in the day light, when i had it on the table top all put together will work fine. |
|
|
|
|
|
01-25-2008, 11:47 AM
|
#9 | |
|
AF Enthusiast
 
Join Date: Mar 2004
Location: Camp Hill, Pennsylvania
Posts: 1,634
Thanks: 0
Thanked 0 Times in 0 Posts
|
Re: White Face Gauge Install on 1gA Turbo
Nice write-up.
 A couple suggestions I have from when I installed mine. It was recommended to me that you start the car and let it come up to temperature before starting the installation. Mark where all the needles are, while the car is running and up to temperature, except for the speedometer and the tach. After you remove the clear cover, slightly bend the speedometer and tach needle up and over the lower stop point. Do this while the gauge is sitting face up on a level surface. This will allow the springs in the gauges to "relax" to their unwound state. Mark this on the housing somewhere out of the way. Then push the needle up to the stop again and let go. Allow it to relax again and mark that spot. Do that a couple times until you get an average of where the needle falls when it relaxes. The needles can be removed easily with 2 spoons, one on each side. It provides a smooth surface so you don't scratch anything. When you reinstall the needles, just line up the speedometer and tach with the lines from before. Then hook up the cluster to the car again. You don't have to reinstall everything since you'll need to take it out again. Warm up the car and install the accessory needles when the car is running. Just line them up with the marks you wrote down earlier. That's how I did mine.
__________________
 1997 Spyder GS-T 5-Speed EVO III 16g, DSMLink, Walboro 190 lph Fuel Pump, FIC 650cc injectors, CoolingMist 150psi Methanol Injection, Greddy EVO 2 Cat Back, 2.5" Extreme DP, 2.5" Extreme Hi-Flow Cat, Injen intake, HyperDrive C1 Street Disk & PP, HyperDrive Lightweight Flywheel, 1g BOV, RRE UICP, Home Depot MBC, AEM UEGO WBO2, Brembo Slotted rotors, Akebono Ceramic Pads |
|
|
|
|
|
01-25-2008, 08:36 PM
|
#10 | |
|
AF Enthusiast
Thread starter
Join Date: Jan 2005
Location: Portville, New York
Posts: 3,570
Thanks: 1
Thanked 10 Times in 8 Posts
|
Re: White Face Gauge Install on 1gA Turbo
I need to do the temp gauge again because I must have turned it a little because now I'm showing really low and when the car sits for a while it is way below "low". O well live and learn.
|
|
|
|
|
|
|
POST REPLY TO THIS THREAD |
 |
|
|

