|
|
|

|
|
| Search | Car Forums | Gallery | Articles | Helper | AF 350Z | IgorSushko.com | Corporate |
|
| Latest | 0 Rplys |
|
|||||||
| Car Modeling Share your passion for car modeling here! Includes sub-forum for "in progress" and "completed" vehicles. |
 |
 Show Printable Version | Show Printable Version |  Email this Page | Email this Page |  Subscribe to this Thread
|
|
|
Thread Tools |
 02-12-2004, 02:11 PM
|
#1 | |
|
AF Enthusiast

Join Date: Jun 2003
Posts: 1,175
Thanks: 0
Thanked 1 Time in 1 Post

|
How To - Casting Resin Part I Making the mold
Well I have been promising this for some time now and I finally have had some time to make some progress.
First I have a couple of disclaimers. I am not claiming any information contained here is original. I have compiled my method from many sources , the Interenet, Scale Auto, and personal acquaintances. This article is for informational purposes only. I also have to mention copyrights and so on. I do not condone making copies of kit parts and selling them for profit. I am sharing this info so that you might make copies of your favorite parts or original works. Now lets get to the fun. Basic materials needed for simple one and two piece molds. RTV Silicone ( Room Temperature Vulcanizing Silicone for Mold Making )-There are many types and companies out there. I personally use a 4 hour cure. Do some research and see what will work best for your needs. Rubber to Rubber Mold release Spray Mold Release Greasless Modelling Clay An old paint brush Graduated Mixing Cups Craft Sticks for Stirring Masking and Electrical Tape Elmers ( White ) Glue Exacto Legos 2 Part Thin Resin Plenty of Cleaning Rags http://www.ares-server.com/Ares/Ares...oduct&ID=82698  At this point I should mention that the part you are casting needs to be as clean and free from flaws as possible. Spend the extra time to make it perfect now otherwise you will only be duplicating flaws that will need to be repaired on every part. Your work area and mixing material need to be free from dust and dirt. In some cases as in this hollow cast tire you will need to fill the inside with modelling clay before making a mold, note the blue clay in the center  We will use the Legos to make a box to pour the mold in. It needs to be a little bigger and deeper than the total area of your pieces. Here is one that I made for doing a two piece mold for a tire. You will notice I marked the center of each side and drilled a hole for a sharpened nail to fit into, these hold the tire in place while you pour the first half of the mold.  A variety of other molds, notice they are wrapped in tape to make them hold liquid well  I like to work on an old piece of glass or plexiglass. For one piece molds make sure the back of each part is flat then use a little Elmers and glue it to the glass. This keeps it from floating up into the silicone once it is poured. In the next picture I am applying a small bead of modelling clay to the underside of my mold box. This acts to seal the box to the glass.   Next apply the Rubber to Rubber Mold release to the inside of the mold and to the part. If you don't you will never get the part out. Here I am applying it to a tire before pouring the second part of the mold. There may be other cheap substitues for the mold release but make dure you test them for comptibility with the silicone forst. And the must be thin, if they go on thick and leave brush marks the brush marks will show on every piece you cast  Do this for each mold you plan to make, I usually prep more than I will pour so I use every drop of Silicone. What I don't do this time I do the next. Now its time to mix up a batch of silicone, heres where the graduated cups come in. Its very important to be accurate, pour out equal amounts of part I and II into sperate containers 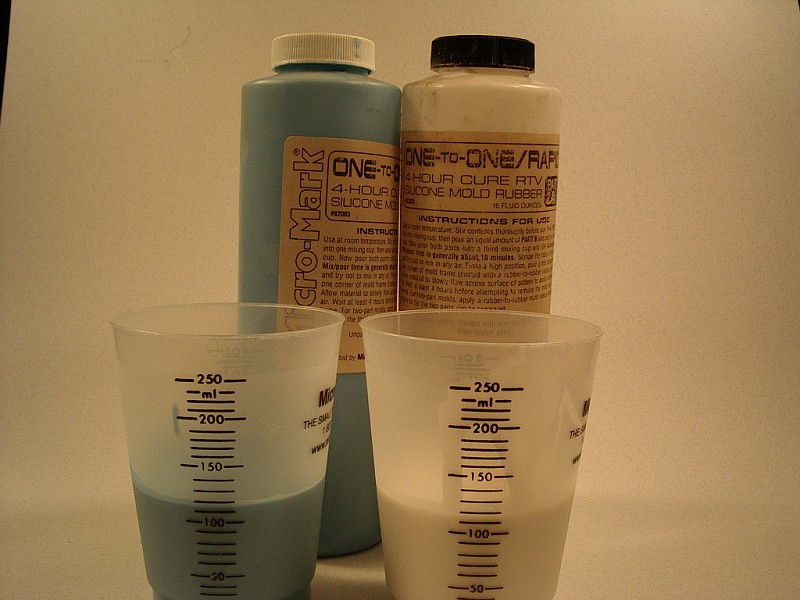 Then carefully transfer both parts to another contianer , be careful not to introduce any air into the mixture 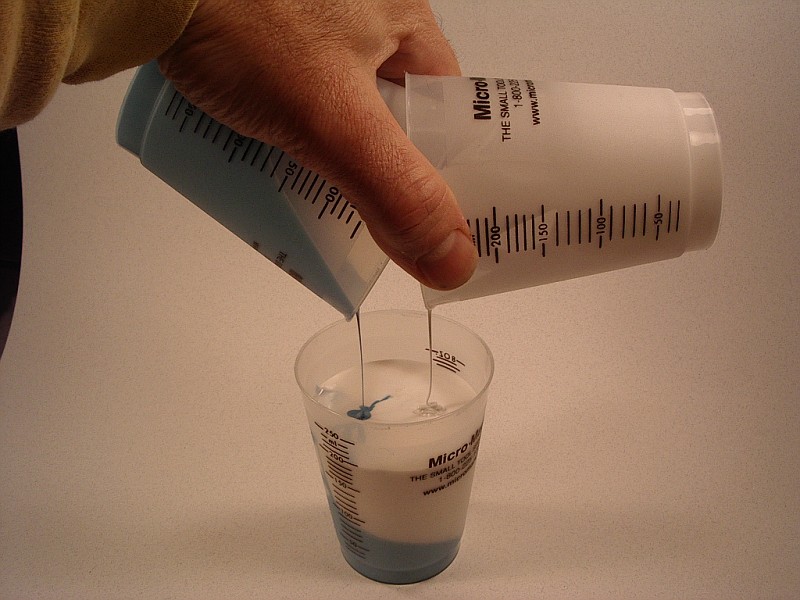 Now carefully mix with a craft stick , again take your time and don't make any air bubbles. Air is your enemy. It should be a uniform color once its all mixed. At this point if I had a vacum chamber I would put the silicone in there and suck out all the air. But I don't yet so on we go. Carefully pour the silicone in a very thin stream into the corner of the mold allowing it to ooze over the part until full. By pouring a very thin stream you will help to break up any small air bubbles in the mix. 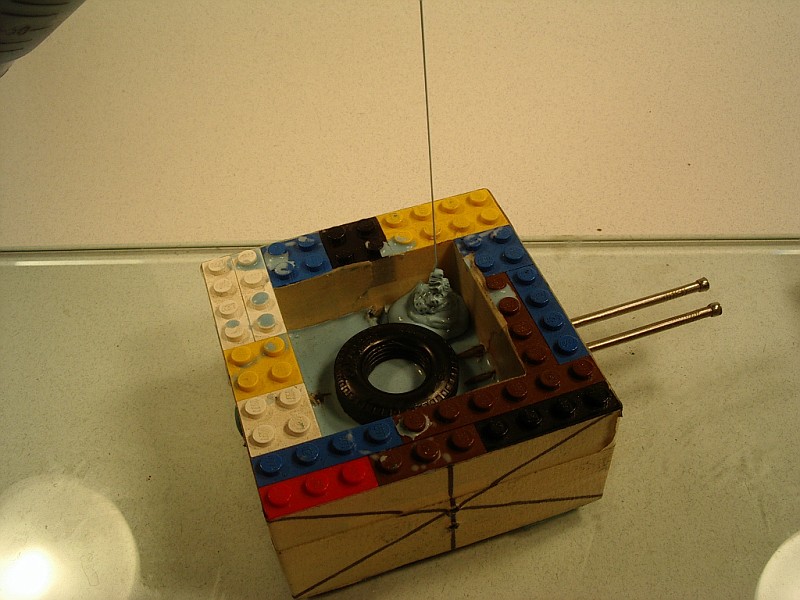  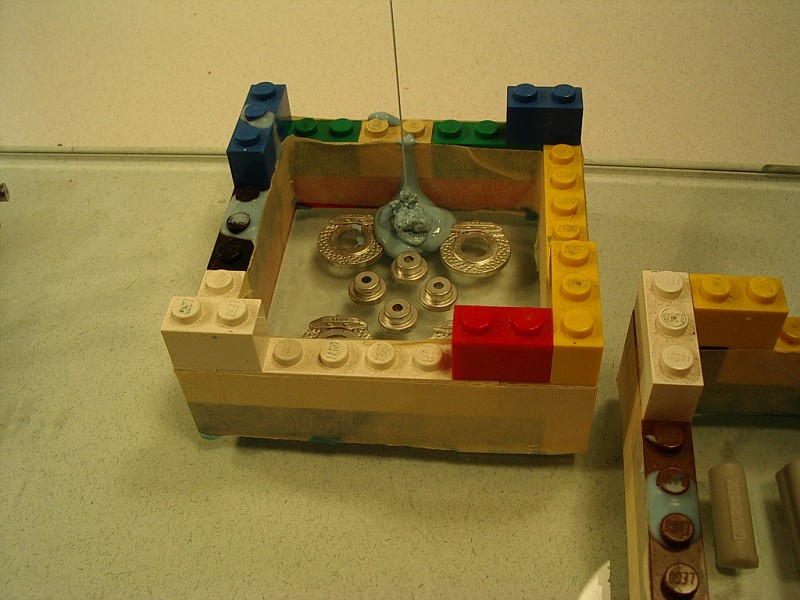  I found that if I use a small plastic cup and stick it in the resin and plunge it up and down it will pull most any air bubbles to the surface. 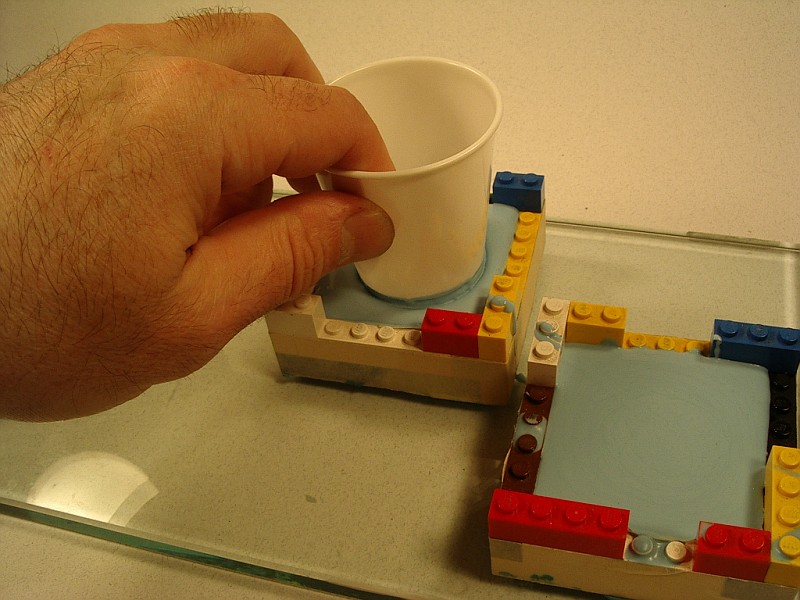 Let everything set up fully and then gently remove the box from the glass and push out the silicone. Then gently remove the master piece. I usually trim off any ragged edges around the edges of the mold with an exacto knife. Heres what you should have now 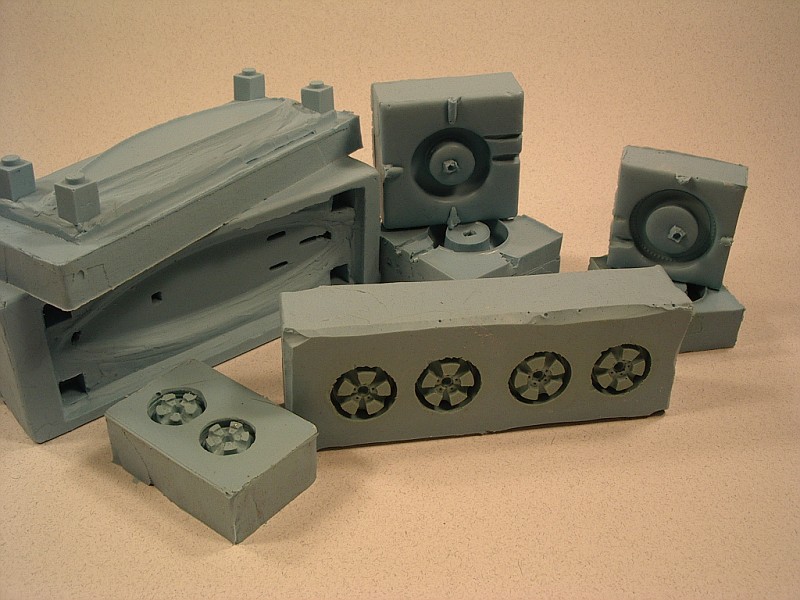 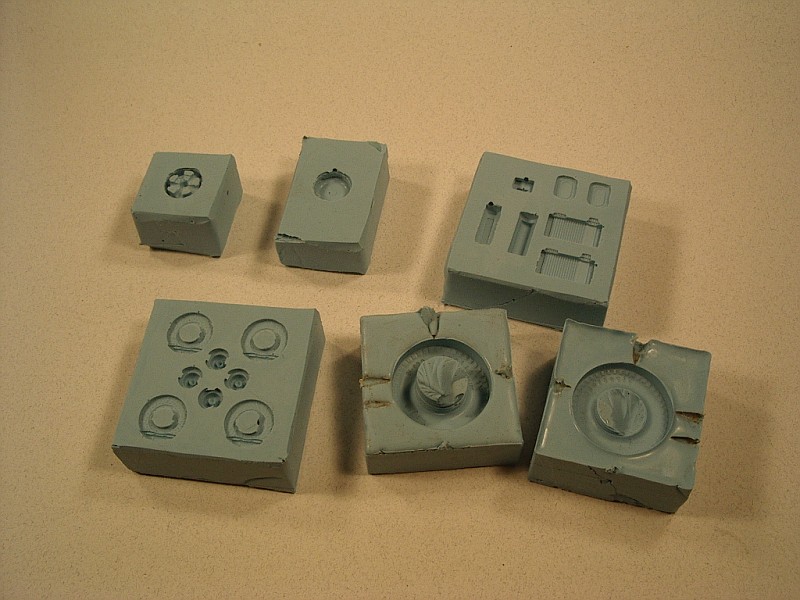 Here is a detail of a tire I used the area where the two nails were for a vent to pour in the resin and one to vent out air 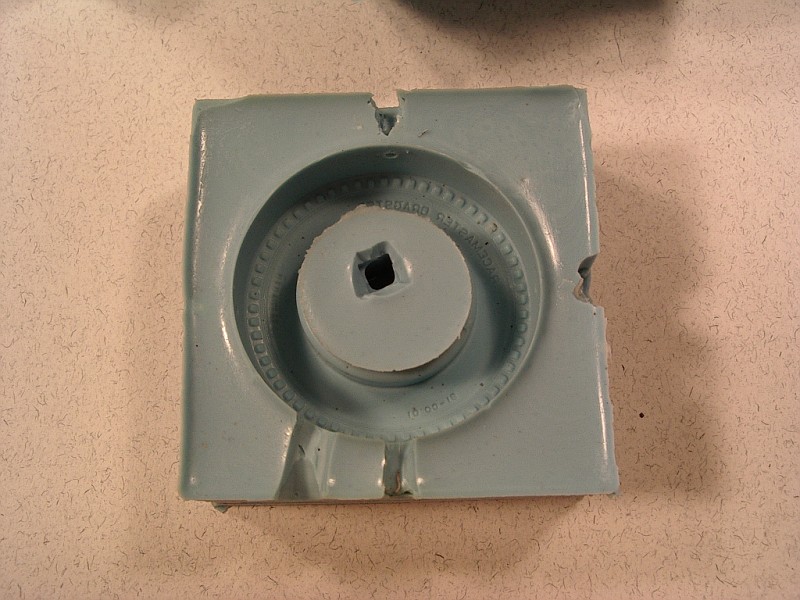 Here you can see a few air bubbles in the mold, these will be okay as once the are cast they will only be a small nib to remove 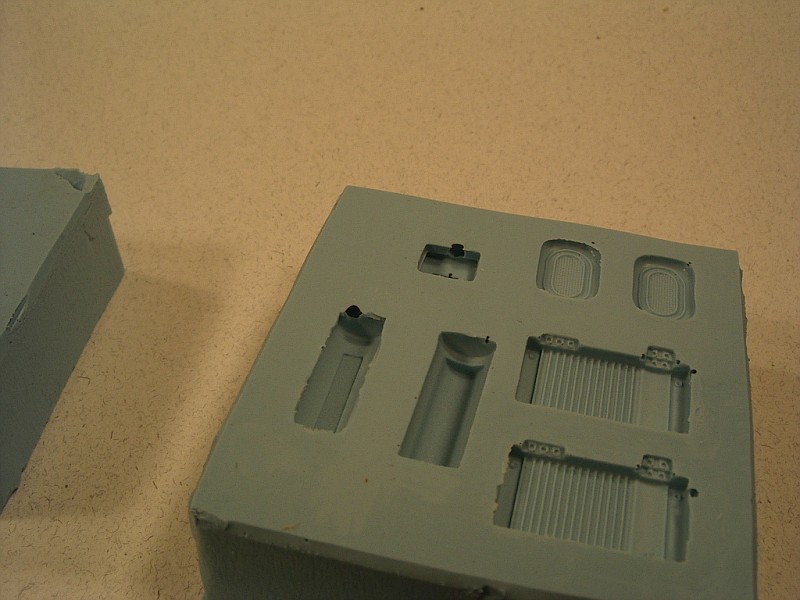 And here is what happens if you don't use the rubber to rubber mold release. I guess I forgot the center of the tire. Luckily this one will still work as the two pieces tore apart nicely. 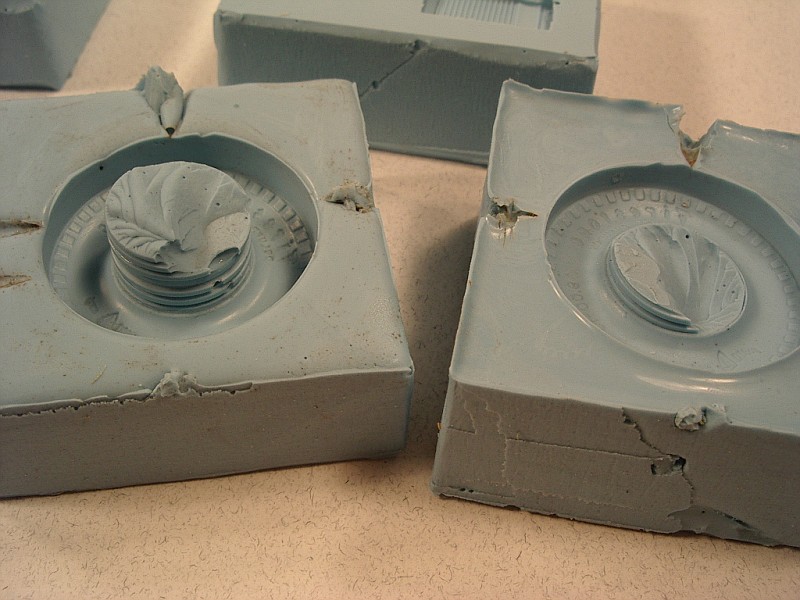 A set of Brembos  Next up Part II pouring the resin Last edited by dag65; 02-12-2004 at 04:50 PM. |
|

|

|
|
02-12-2004, 03:24 PM
|
#2 | |
|
AF Enthusiast

Join Date: Sep 2003
Location: East Hampton, Connecticut
Posts: 1,119
Thanks: 0
Thanked 0 Times in 0 Posts

|
Re: How To - Casting Resin Part I Making the mold
excellent explanation!
__________________
My real name is Justin don't be afraid to use it.
 |
|
|
|
|
|
02-12-2004, 03:47 PM
|
#3 | |
|
AF Fanatic

Join Date: Jun 2002
Location: Quebec
Posts: 5,623
Thanks: 3
Thanked 17 Times in 12 Posts


|
Re: How To - Casting Resin Part I Making the mold
Well made tutorial
maybe one day I will make my own resin part.
__________________
 CarsModeling.com. My Scale Model Cars blog. |
|
|
|
|
|
02-12-2004, 03:55 PM
|
#4 | |
|
20 inches and growing ...
 
Join Date: Jul 2003
Location: Torrance, California
Posts: 760
Thanks: 0
Thanked 0 Times in 0 Posts
|
Great stuff. Looks like I know what I'll be doing this long President's Day weekend.
|
|
|
|
|
|
02-12-2004, 04:05 PM
|
#5 | |
|
AF Enthusiast
 Join Date: Mar 2003
Location: Amarillo, Texas
Posts: 617
Thanks: 0
Thanked 0 Times in 0 Posts
|
Re: How To - Casting Resin Part I Making the mold
Thanks alot!! When do we get the Second part?!?!?!
__________________
Name is Luke. Faster and Faster until the thrill of speed overcomes the fear of death. CompletelyStock except 17 Enkei RS6, Megan racing Downpipe-3" piping-megan racing muffler. no cat. K&N filter. |
|
|
|
|
|
02-12-2004, 04:12 PM
|
#6 | ||
|
Captain Over Engineer
 Join Date: Feb 2003
Location: New York, New York
Posts: 6,711
Thanks: 27
Thanked 29 Times in 23 Posts
|
Re: Re: How To - Casting Resin Part I Making the mold
Quote:
__________________
-Mike AF Director of Media / Photographer  mike.lawrence@automotiveforums.com | AutomotiveForums.com | Flickr Gallery |
||
|
|
|
|
02-12-2004, 04:15 PM
|
#7 | |
|
fershizzle

Join Date: Oct 2003
Location: Ithaca, New York
Posts: 1,567
Thanks: 0
Thanked 0 Times in 0 Posts
|
Re: How To - Casting Resin Part I Making the mold
awesome dag!
__________________
Zach |
|
|
|
|
|
02-12-2004, 04:19 PM
|
#8 | |
|
Captain Over Engineer
Join Date: Feb 2003
Location: New York, New York
Posts: 6,711
Thanks: 27
Thanked 29 Times in 23 Posts
|
Hey Dag, would you mind giving us a list of prices for the materials? And what company supplied it (and where it was/can purchased)?
From what I hear RTV can get quite expensive. Thanks!
__________________
-Mike AF Director of Media / Photographer mike.lawrence@automotiveforums.com | AutomotiveForums.com | Flickr Gallery |
|
|
|
|
|
02-12-2004, 05:02 PM
|
#9 | |
|
AF Enthusiast
Thread starter
Join Date: Jun 2003
Posts: 1,175
Thanks: 0
Thanked 1 Time in 1 Post
|
Re: How To - Casting Resin Part I Making the mold
Hey guys I revised the first postand includied a link and picture to what I used.The RTV yielded all the molds you see, I am now out. I think it was a great starter kit for $70.
Another good place is alumilite.com and I am sure there are others. THese products have a limited shelf life so you don't want to buy more than you can use before it goes bad. I have had mine for 1 year and the Silicone was on the verge of being too old. And there are different types of silicone with different cure times and durometer ( hardness ) ratings. Some mix 1 to 1 others a re 10 to 1. There is no way I could cover it all in my little how to so I encourage you to do a little looking around and learn what you can As far as the second part goes I am anxious to get home and start using the new ones I made last night so I hope to have some more for you guys tommorow. Thanks for the feedback guys |
|
|
|
|
|
02-13-2004, 12:26 AM
|
#10 | |
|
Zomby Woof

Join Date: Nov 2002
Location: Oz
Posts: 8,871
Thanks: 0
Thanked 1 Time in 1 Post
|
Re: How To - Casting Resin Part I Making the mold
Very informative Dag. The pictures are great, really demystify the process. Makes me think I could give this a try one day. Looking forward to part two.
|
|
|
|
|
|
02-13-2004, 12:48 AM
|
#11 | |
|
AF Enthusiast

Join Date: Jul 2003
Location: Sydney
Posts: 660
Thanks: 0
Thanked 0 Times in 0 Posts
|
Re: How To - Casting Resin Part I Making the mold
Wicked!
I want to see more!!!!!!!!!!! 
__________________
Complete:   
|
|
|
|
|
|
02-14-2004, 06:12 AM
|
#12 | |
|
AF Enthusiast

Join Date: Jan 2004
Location: tel aviv
Posts: 193
Thanks: 0
Thanked 0 Times in 0 Posts
|
Re: How To - Casting Resin Part I Making the mold
cool idea i love it
|
|
|
|
|
|
02-14-2004, 01:46 PM
|
#13 | |
|
AF Enthusiast
Join Date: Mar 2003
Location: Beijing
Posts: 578
Thanks: 0
Thanked 0 Times in 0 Posts
|
Amazing tutorial. Thanks man.

__________________
La Vecchia Signora & BMW maniac. |
|
|
|
|
|
02-14-2004, 05:42 PM
|
#14 | |
|
AF Regular
Join Date: Dec 2003
Location: Calgary
Posts: 185
Thanks: 0
Thanked 0 Times in 0 Posts
|
Hi guys,
I've been pondering casting parts for a while now. My main gripe has been the cost. I found that resin and the mold material to be outrageously expensive! Also, has anyone tried "reusable" mold material? I've seen a big block at my LHS go for $23, and supposedly also has built in release agents. All you do is heat it in the oven to melt it, then mold to your part. I am just wondering how good it (ie. how well it will conform to details, etc..). clem.. |
|
|
|
|
|
02-14-2004, 07:43 PM
|
#15 | |
|
AF Enthusiast

Join Date: Aug 2002
Location: Vancouver
Posts: 133
Thanks: 0
Thanked 0 Times in 0 Posts
|
Re: How To - Casting Resin Part I Making the mold
it's great! thx man!!
the steps is so detail and now i understand how to do the mold. thx!! waiting for part 2 
__________________
Don Current project: Mini Cooper S, 350Z, Nismo R34GTR, Atlezza, Miata 
|
|
|
|
|
|
|
POST REPLY TO THIS THREAD |
 |
|
|


