|
|
|

|
|
| Search | Car Forums | Gallery | Articles | Helper | AF 350Z | IgorSushko.com | Corporate |
|
| Latest | 0 Rplys |
|
|||||||
| WIP - Motorsports Post topics for any "Work In Process" motorsports vehicles in this sub-forum. |
 |
 Show Printable Version | Show Printable Version |  Email this Page | Email this Page |  Subscribe to this Thread
|
|
|
Thread Tools |
 01-06-2021, 12:26 PM
|
#91 | |
|
AF Enthusiast
Join Date: Mar 2009
Location: Rio de Janeiro, Brazil
Posts: 1,209
Thanks: 6
Thanked 144 Times in 136 Posts
|
Re: Lancia Delta S4 Marlboro Beemax 1/24
I'm pretty sure this is one of the best builds of this model. Congratulations!
__________________
https://www.instagram.com/denilsonvm_modelcars/ |
|

|

|
|
01-07-2021, 10:29 AM
|
#92 | ||
|
AF Enthusiast
Thread starter
Join Date: Mar 2009
Location: Madrid
Posts: 649
Thanks: 109
Thanked 68 Times in 67 Posts
|
Re: Lancia Delta S4 Marlboro Beemax 1/24
Quote:
|
||
|
|
|
|
01-16-2021, 07:46 AM
|
#93 | |
|
AF Enthusiast
Thread starter
Join Date: Mar 2009
Location: Madrid
Posts: 649
Thanks: 109
Thanked 68 Times in 67 Posts
|
Re: Lancia Delta S4 Marlboro Beemax 1/24
Continuamos con el Delta S4 en una fase donde ya se ven resultados importantes. Una vez dado el color, es hora de poner las calcas y de darle brillo. Pero empecemos desde el principio. La tapa superior del porton delantero, sigue dando problemas ya que la superficie es curva, y pegar el fotograbado. Y como estaba arreglándola, aproveché a repasar un poco la superficie pues tenía un agujero en el centro, y una salto de superficie en un lateral. Tuve que enmasillar, lijar, pintar de blanco de nuevo.
We continue with the Delta S4 in a phase where important results are already being seen. Once the color is given, it is time to put on the decals and give it a shine. But lets start from the beginning. The upper cover of the front door, continues giving problems since the surface is curved, and paste the photoetch And as I was fixing it, I took the opportunity to go over the surface a bit because it had a hole in the center, and a surface jump on one side. I had to caulk, sand, paint white again. 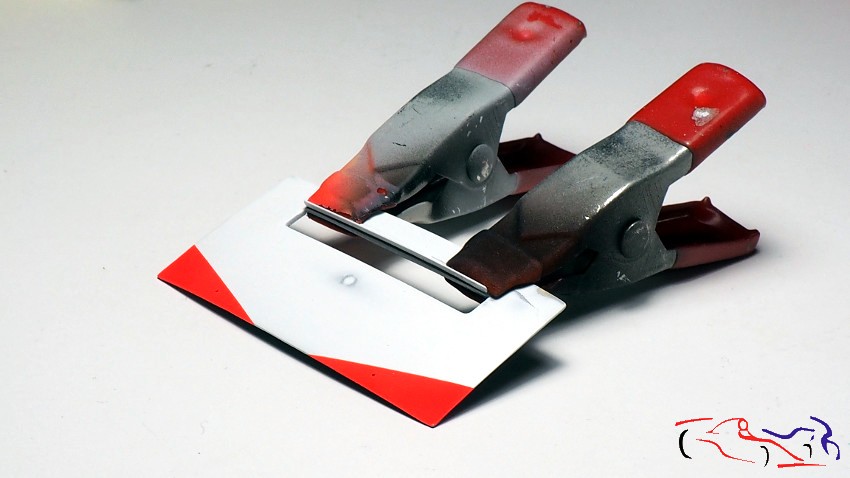 Lo siguiente fue poner las máscaras de los logos laterales, para pintarlos con el color de la carrocería. No recuerdo si las máscaras estaban con el primer juego de calcas o con el de KMP. The next step was to add the masks of the side logos, to paint them with the color of the body. I dont remember if the masks were with the first set of decals or with the KMP one. 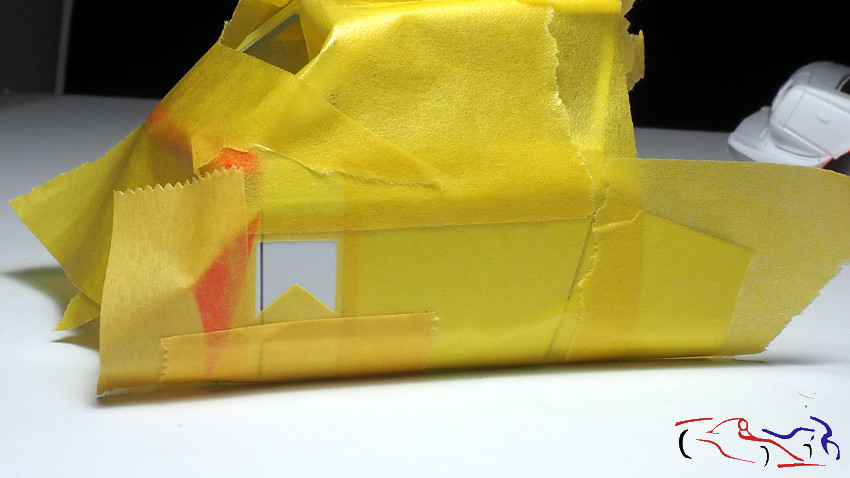 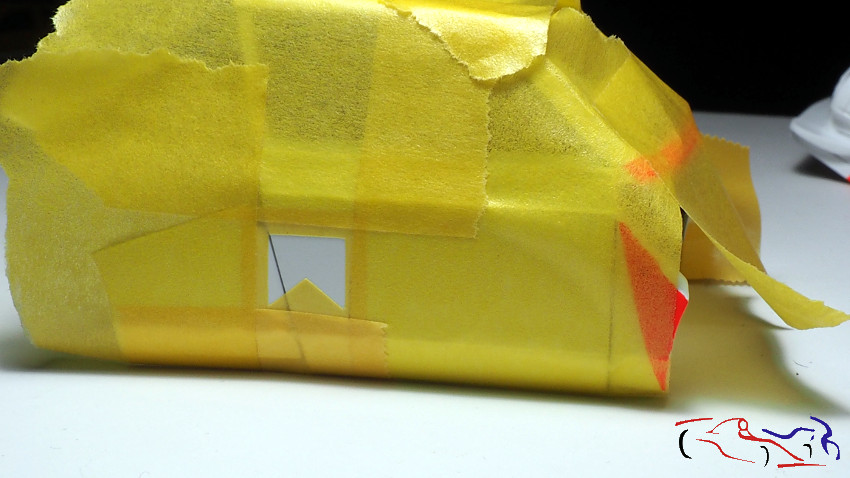 En este punto, ya estaba listo para dar una mano de barniz para poner las calcas a continuación. Pero el barniz prediluido de Zero no funcionó bien con la pintura roja de Gravity: empezó a disolverla haciéndola rosa. La suerte fue que empecé en una toma de aire lateral, que no iba a tener calcas, y que se podría tratar más fácilmente. Pero, qué hacía ahora? Y por esas fechas, recibí unos productos nuevos que tenía para probar, y que ya los había aplicado en cucharas. Y como me fueron bien, pues los usé en este kit. En concreto, usé el barniz prediluido, con 2 capas muy finas y otra más húmeda para dar brillo. El resultado fue bueno: At this point, I was ready to give a coat of varnish to put on the decals later. But Zeros prediluted varnish didnt work well with Gravitys red paint: it started to dissolve it the paint turning it to pink. The luck was that I started with a side air intake, which was not going to have decals, and which could be treated more easily. But what could I do then? And around that time, I received some new products that I had to test, and that I had already applied them in spoons. And since they were good for me, I used them in this kit. In particular, I used the prediluted varnish, with 2 very thin coats and another one more humid to give shine. The result was good: 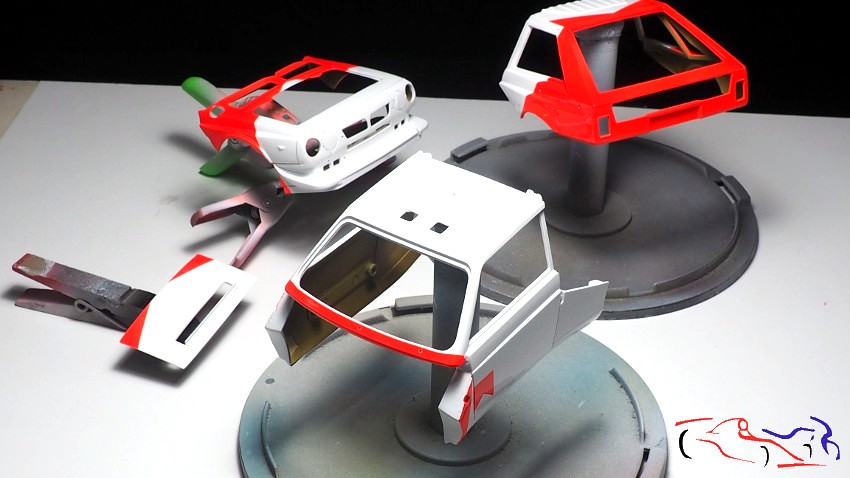 Y después de que estuviera seco, puse las calcas. Sin problemas con las de KMP!! Y este es el resultado: And after it was dry, I put the decals on. No problems with the KMP ones !! And this is the result: 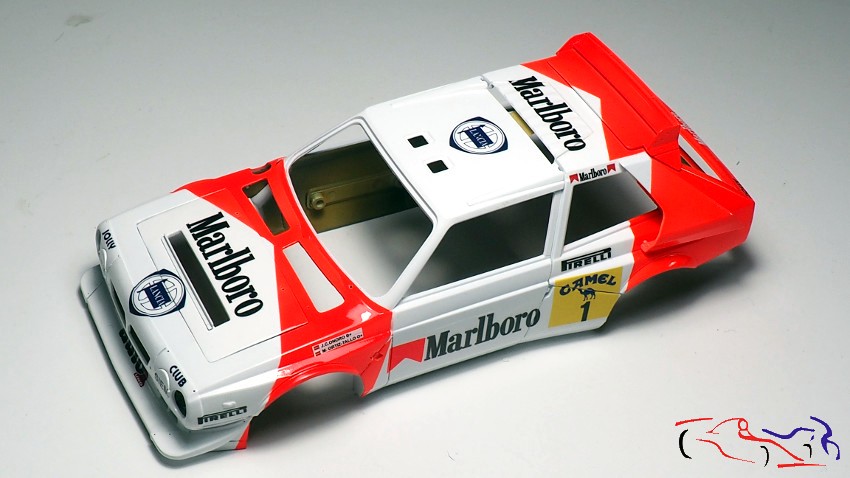 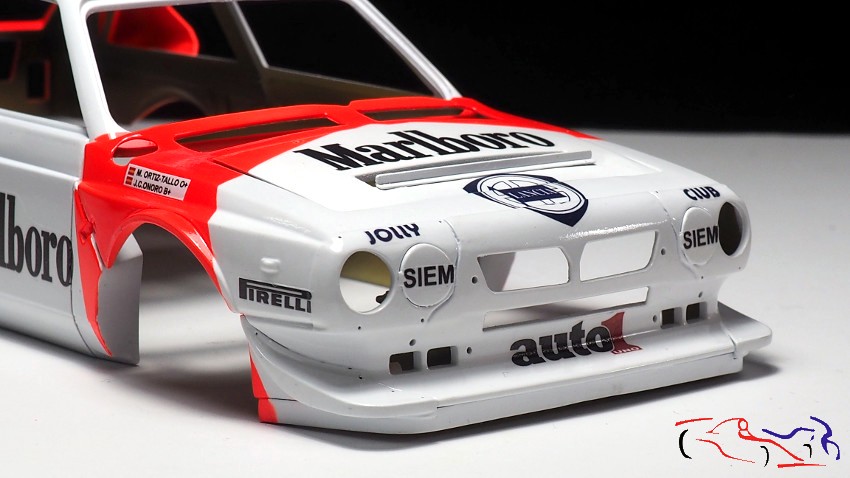 Algún comentario: La calca de LANCIA ESPAÑA de KMP no tenía la parte superior de la Ñ, con lo que usé la del primer juego de calcas que encargué localmente hace años a ARTECNODECALS: One comment about the KMP decals: The LANCIA ESPAÑA decal from KMP did not have the upper part of the Ñ, so I used the one from the first set of decals that I ordered locally from ARTECNODECALS years ago: 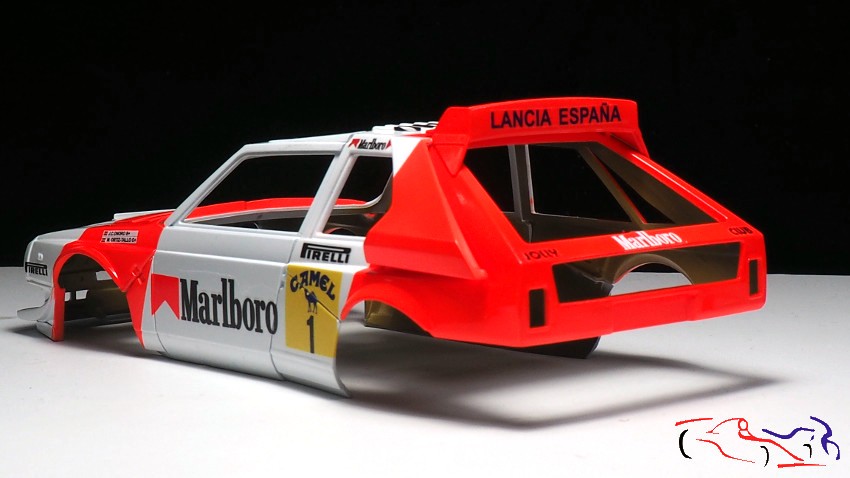 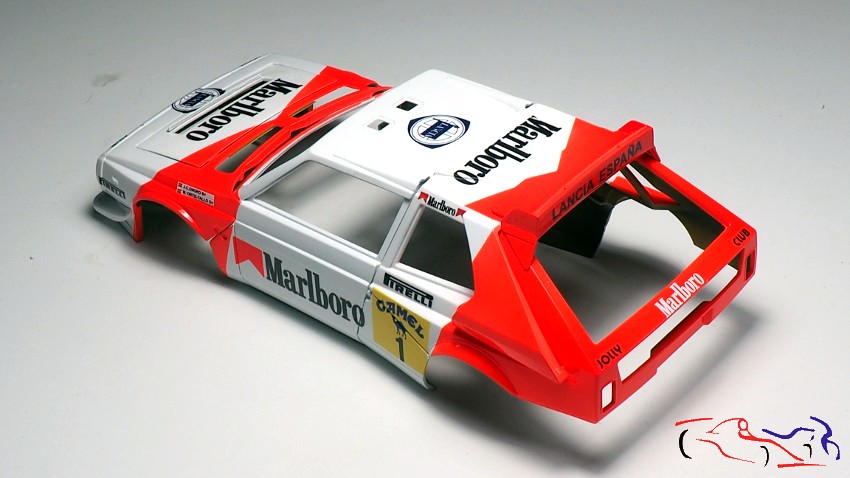 Aquí vemos la pieza que tuve que repinar de nuevo en rojo: Here we see the piece that I had to repaint again in red:  Como dato curioso, al poner las fotos en FB, un amigo llamado Juan Manuel Crespo, me dijo que faltaban los logos de Lancia en los laterales del alerón, en las puertas y en el frente. Y era cierto, los busqué y aunque la hoja de calcas de KMP no las tenía, usé las de Artecnodecals, que si las llevaba. Y aquí están! Gracias Juan Manuel!! As a curious fact, when I put the photos on FB, a friend named Juan Manuel Crespo told me that the Lancia logos were missing on the sides of the spoiler, on the doors and on the front. And he was true, I looked for them and although the KMP decal sheet did not have them, I used the Artecnodecals ones, which I did have. And here they are! Thanks Juan Manuel !!  Una vez puestas las calcas, enmascaré la carrocería por dentro, para el proceso de lacado con la marca Gravity: Once the decals were put on, I masked the body inside, for the lacquering process with the Gravity brand:  Y este es el resultado. Un poco gruesa para mi gusto pero es aceptable: And this is the result. A little thick from my opinion but it is acceptable:  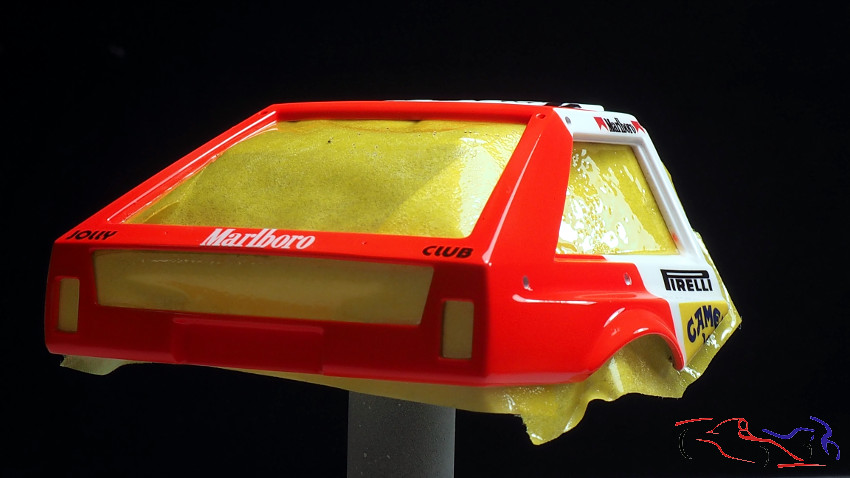 Y al secar, tenía que ponerla en el chasis!!! El resultado es muy bueno!!! And when drying, I had to put it on the chassis !!! The result is very good!!! 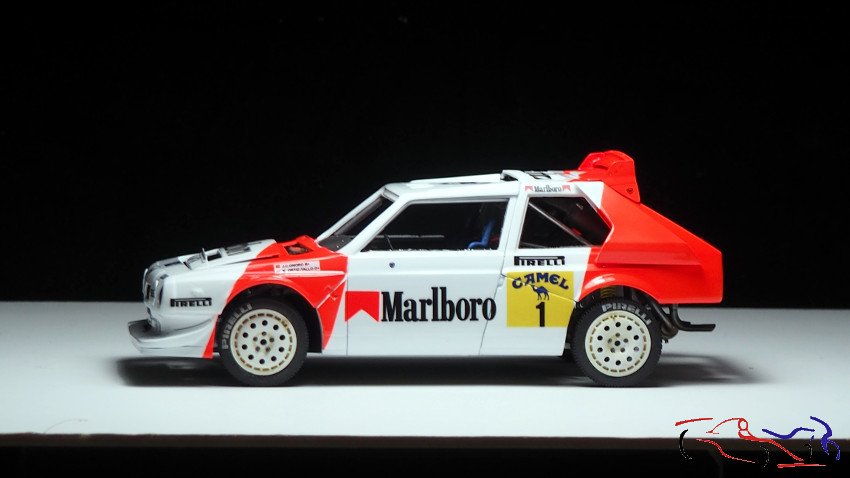 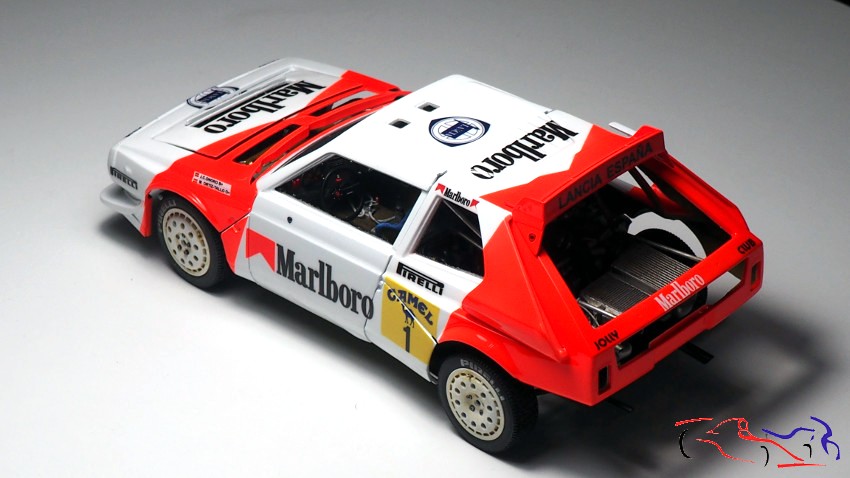 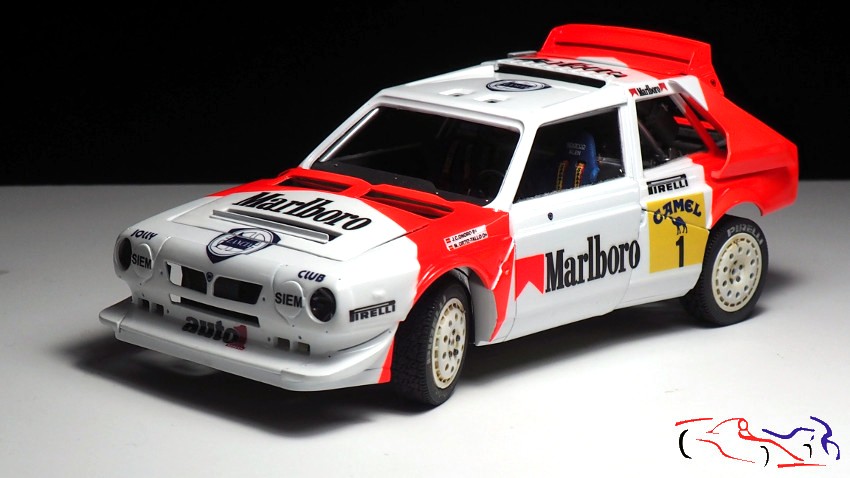       Lo próximo será empezar a poner detalles para el acabado final!! Gracias por ver y comentar!! The next step will be to start putting details for the final finish !! Thanks for viewing and commenting!! |
|
|
|
|
|
01-16-2021, 04:08 PM
|
#94 | |
|
AF Regular
Join Date: Oct 2011
Location: Kilmarnock, Scotland
Posts: 306
Thanks: 6
Thanked 37 Times in 35 Posts
|
Re: Lancia Delta S4 Marlboro Beemax 1/24
Looking good Jesus, it wasn't the most handsome rally car but an important car for the history of GpB.
You have made a superb example. |
|
|
|
|
|
01-16-2021, 04:59 PM
|
#95 | ||
|
AF Enthusiast
Thread starter
Join Date: Mar 2009
Location: Madrid
Posts: 649
Thanks: 109
Thanked 68 Times in 67 Posts
|
Re: Lancia Delta S4 Marlboro Beemax 1/24
Quote:
|
||
|
|
|
|
02-22-2021, 02:15 AM
|
#96 | |
|
AF Enthusiast
Thread starter
Join Date: Mar 2009
Location: Madrid
Posts: 649
Thanks: 109
Thanked 68 Times in 67 Posts
|
Re: Lancia Delta S4 Marlboro Beemax 1/24
Una vez que la carrocería está lacada, lo siguiente es empezar a detallarla tanto por dentro como por afuera. Y lo primero que hago es enmascarar para pintar de negro semimate de Tamiya X18, los laterales inferiores de las puertas, los intermitentes y los faros traseros, ya que ambos, llevan un reborde negro.
Once the bodywork is lacquered, the next thing to do is to start detailing it both inside and out. And the first thing I do is to mask for painting in Tamiya X18 semi-matt black, the lower sides of the doors, the indicators and the rear lights, as both have a black rim. 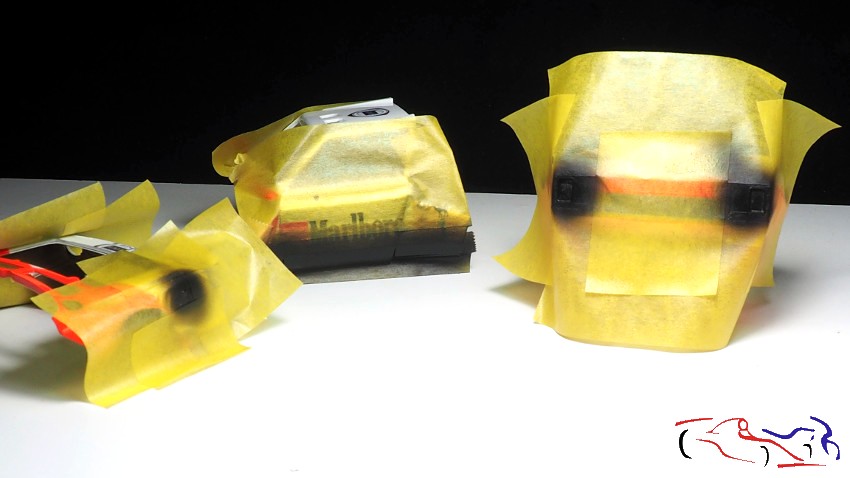 Si quitamos la máscara, los faros traseros tienen los bordes con las esquinas rectas del color negro, siendo en real redondeadas. Para conseguirlo, cojo un bastoncillo de Mr. Hobby, lo mojo en diluyente X20A y lo escurro. Y con él, froto las esquinas para redondear el borde poco a poco. If we remove the mask, the taillights have the edges with the straight corners of the black colour, being in real rounded. To achieve this, I take a Mr. Hobby swab, dip it in X20A thinner and wring it out. And with it, I rub the corners to round the edge little by little. 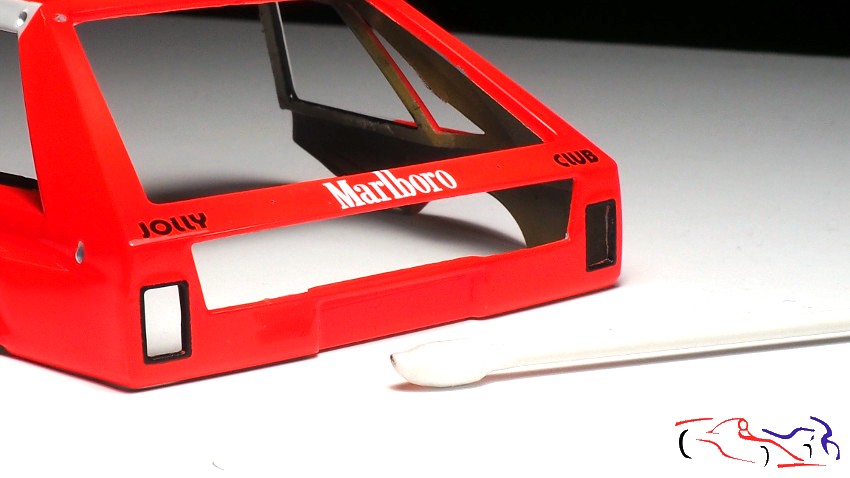 Pasamos al cockpit, que lleva una capa de material inflamable por el interior. Este lo vamos a reproducir con el papel que traen las cajetillas de tabaco, que guardé con cuidado cuando fumaba. We move on to the cockpit, which has a layer of flammable material on the inside. We are going to reproduce this with the paper that comes with the cigarette packets, which I kept carefully when I smoked. 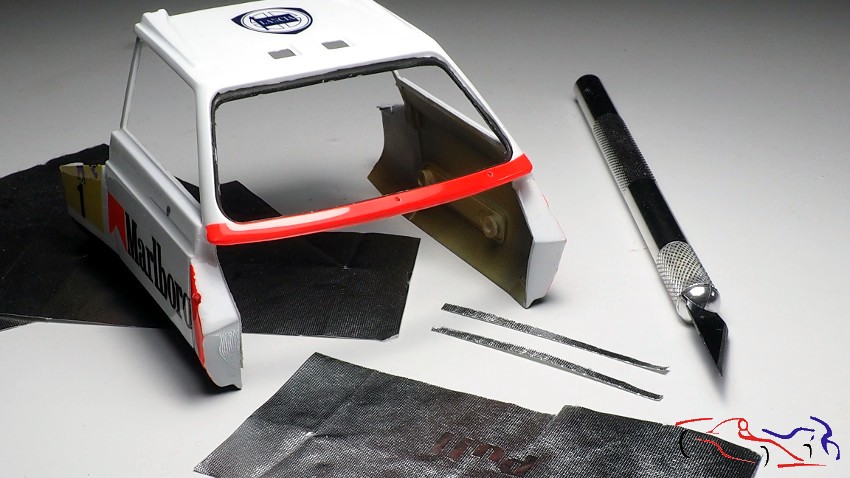 Esta papel lo recorto según las formas y lo pego con cola blanca por el interior, siendo éste el resultado: I cut out the paper according to the shapes and glue it with white glue on the inside, and this is the result: 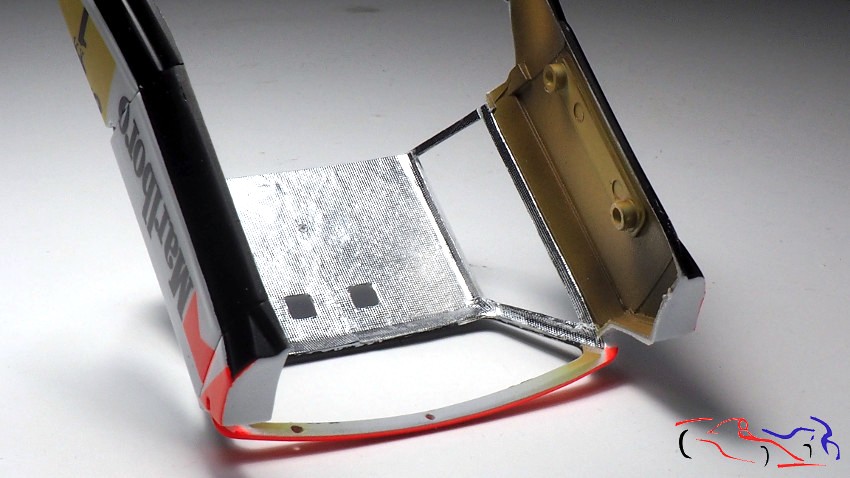 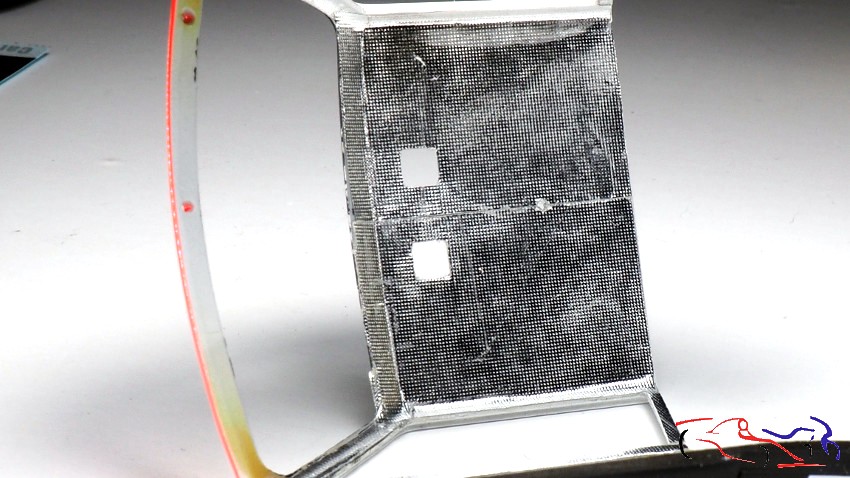 Una de las calcas que he dejado para este punto es la de Purolator, que iba encima del color negor. Pero antes, y como base, le he puesto otra blanca: One of the decals I have left for this point is the one from Purolator, which was on top of the black one. But before, and as a base, I put another white one: 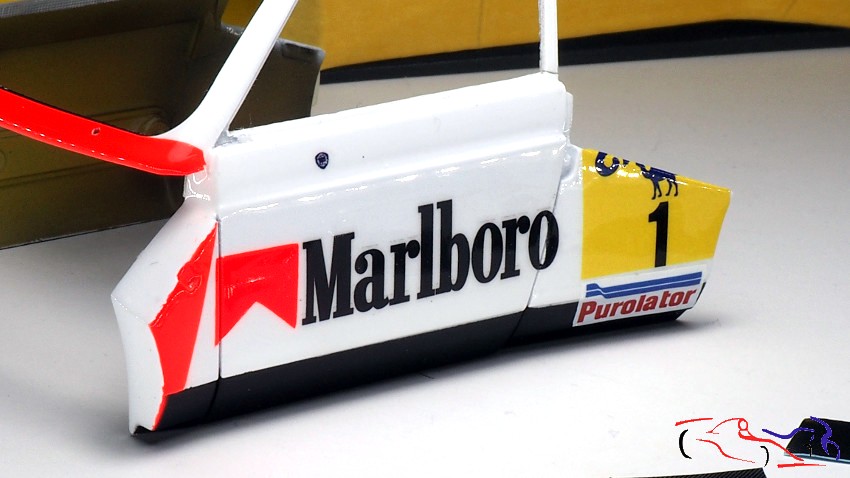 Pasamos a la parte delantera, la cual leva un fotograbado en la parte de abajo, que pego con ciano y lo sujeto con pinzas: We move on to the front, which has a photoengraving on the bottom, which I glue with cyano and clamp it with tweezers:  Sobre esta pieza, recorto un trozo de calca de fibra de la que he usado anteriormente . On this piece, I cut a piece of fibre decal from the one I used previously .. 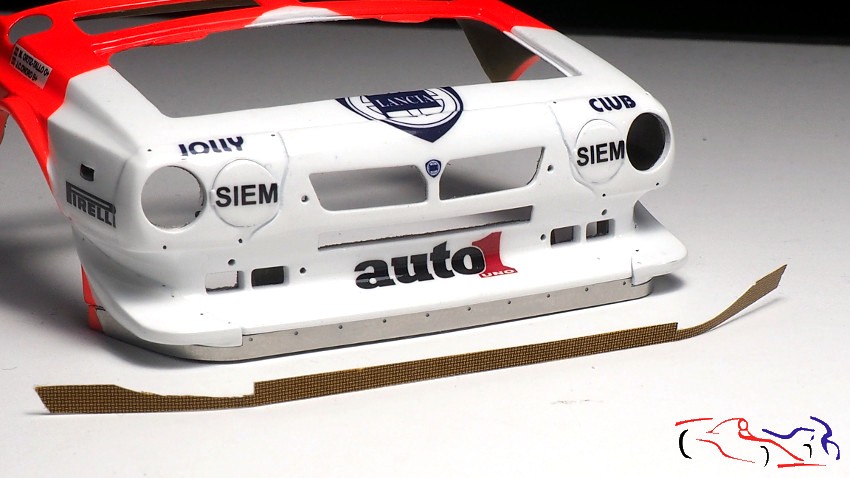 .y la colocamos. . and we place it. 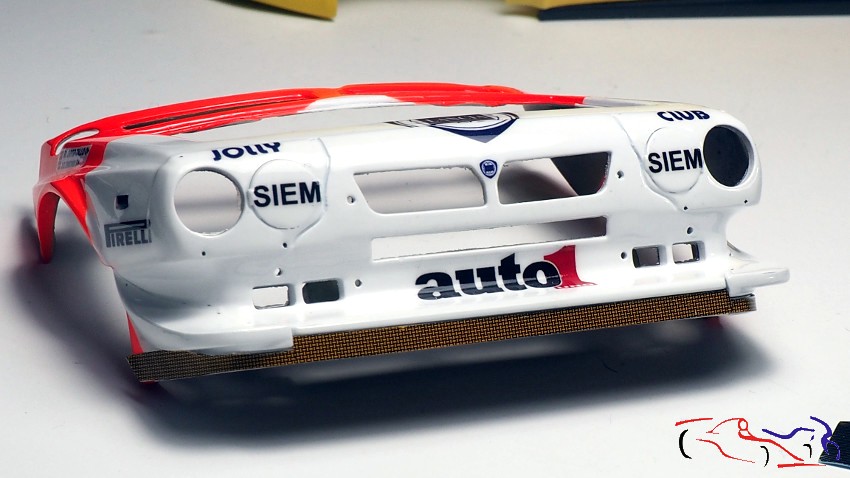 También ponemos los fotograbados rojos, y los blancos del frontal, utilizando de prueba, el pegamento de MIG para metales y cristales. siendo el resultado muy bueno. We also put the red photoetched parts, and the white ones on the front, using the MIG glue for metals and glass as a test, and the result was very good. 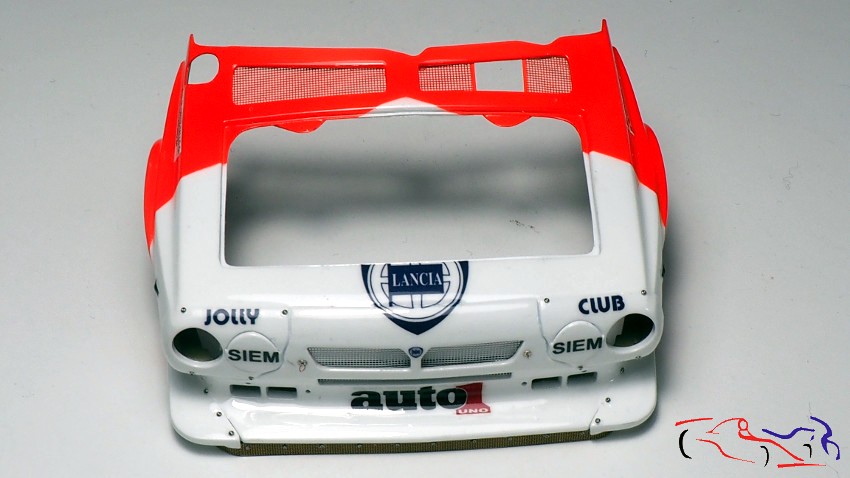 Y ese es el mismo pegamento que uso para los remaches que pongo en el frontal. Los que usado en la fibra, son remaches simulados que pertenecen a Top Studio, en la medida de 0,7 mm. Hayq ue detallar, que hay dos fijaciones a los lados de la rejilla frontal, que sirven para los faros auxiliares, y que he hecho con una arandela por donde he metido los dos extremos de un cable.. And thats the same glue I use for the rivets I put on the front. The ones I used on the fibre are simulated rivets from Top Studio, in the 0,7 mm size. There are two fixings on the sides of the front grille, which are used for the auxiliary headlights, and which I have made with a washer through which I have put the two ends of a cable 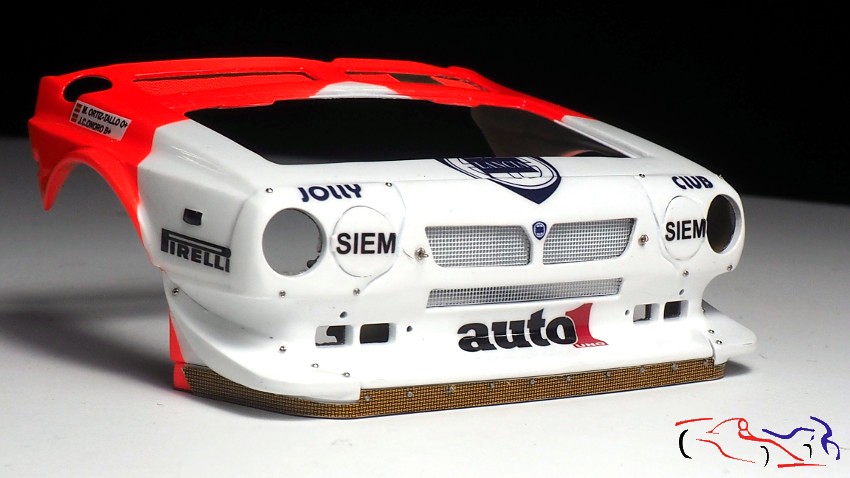 Para el intermitente, que había pintado de negro semimate, he recortado un rectángulo del adhesivo espejo de Hasegawa, y después, lo he pintado con un rotulador Edding de color naranja. For the indicator, which I had painted semi-matt black, I cut out a rectangle from the Hasegawa mirror sticker, and then painted it with an orange Edding marker. 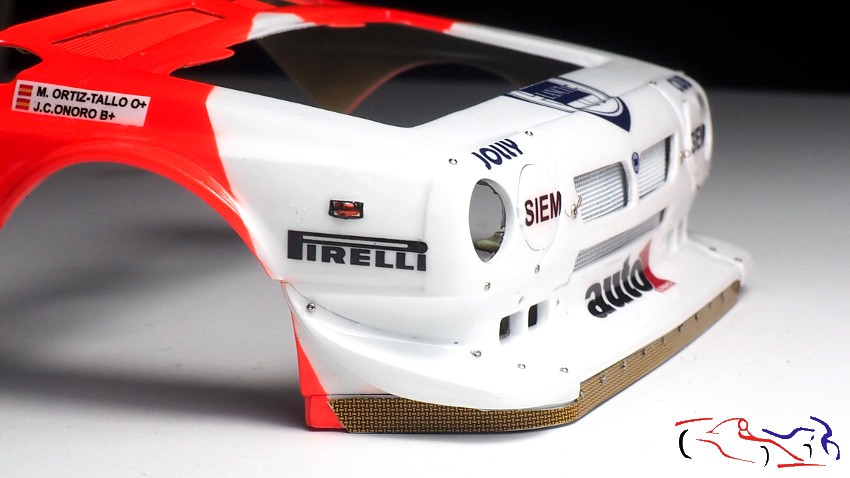 También he puesto los remaches simulados de Top Studio en el alerón trasero: I have also put the Top Studio simulated rivets on the rear wing: 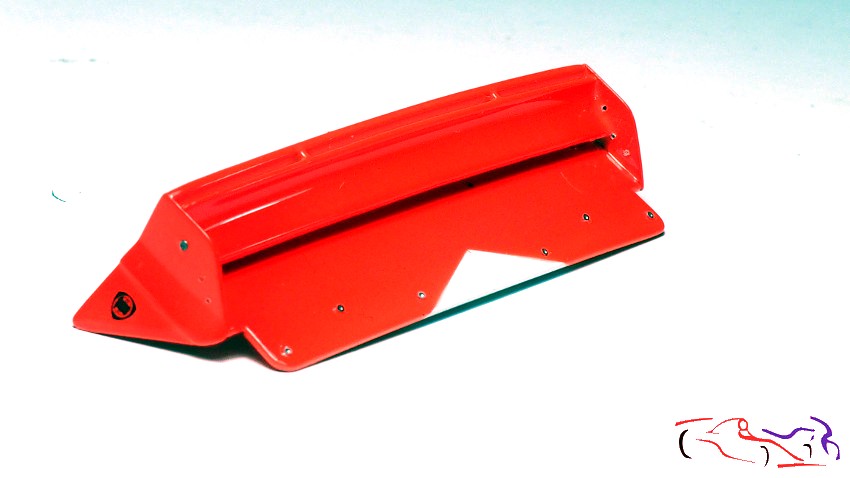 Para las matrículas, he recortado un rectángulo como base del metal que tenían los antiguos diskettes de los ordenadores. Una irá detrás, y la de delante va detrás de los asientos: For the number plates, I have cut out a rectangle as a base from the metal of the old computer floppy disks. One will go on the back, and the front one will go behind the seats: 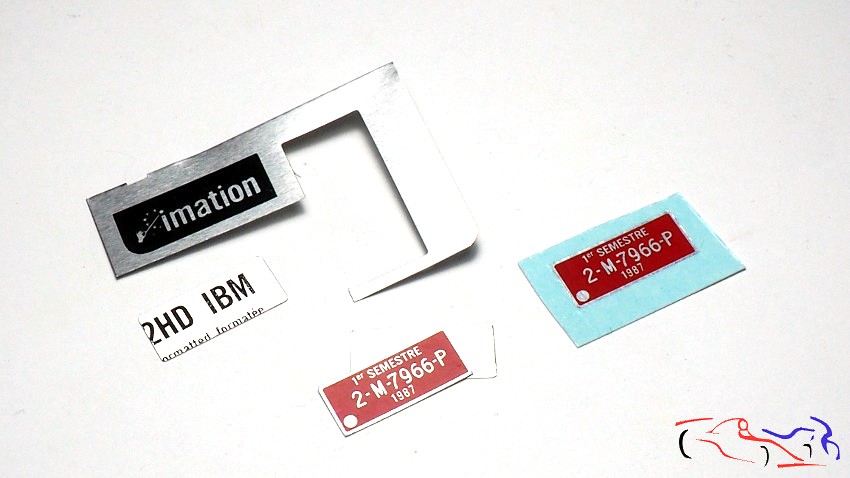 Un consejo que mi amigo Juanlu me dio fue que pusiera polvo por las ruedas, y para ello usé el XF-57 con una plantilla de papel. Decir que ese mismo polvo lo di también en el motor y en la parte delantera. Recordad, que la base sucia de las llantas la hice con el producto de AK que véis en la foto. A piece of advice that my friend Juanlu gave me was to put powder on the wheels, and for that I used the XF-57 with a paper template. I also put the same powder on the engine and the front part. Remember that I did the dirty base of the rims with the AK product that you can see in the photo. 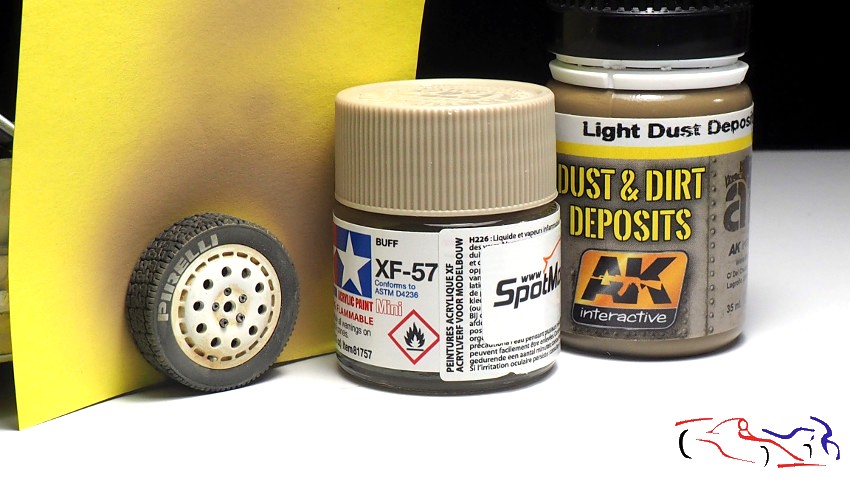 Lo siguiente que hice fue los cables de las luces. Como el capó y el portón trasero irán abiertos, los cables se tenían que ver y me dispuse a hacerlos. Para ello, usé tubo termoretráctil, estaño, y cable negro de 0,3 mm. El estaño lo meto por el tubo termoretráctil para dar la forma que quiero, y después lo caliento para que se ajuste, como guía de los cables. Así, los cables de 0,3 mm son los que llegan a los pilotos: The next thing I did was the light wires. Since the hood and tailgate will be open, the cables had to be seen and I set about making them. For this, I used heat shrink tubing, tin, and 0.3mm black wire. I put the tin through the heat shrink tubing to give the shape I want, and then heat it up to fit, as a guide for the cables. Thus, the 0.3 mm cables are the ones that reach the pilots: 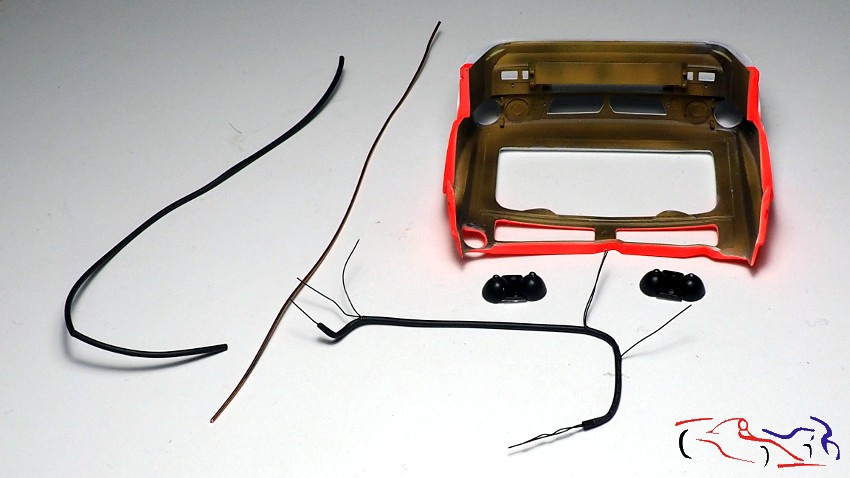 Y aquí está el resultado antes de montarlos, con sus fijaciones realizadas con plastico blanco estirado. Solo flatarán los conectores electricos que se usan cuando capó y portón se quitan para trabajar en el coche. And here is the result before mounting them, with their fixings made of stretched white plastic. Only the electrical connectors that are used when hood and tailgate are removed to work on the car will flare. 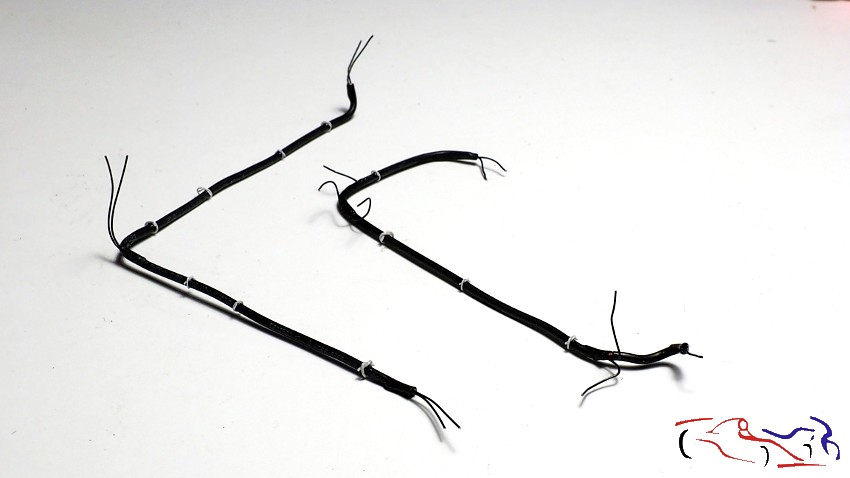 Y casi para terminar, le colocamos al portón, las entradas de aire de KMP que pinté anteriormente (con fibra y negro satinado), las piezas de las luces y los fotograbados: And almost to finish, we put on the gate, the KMP air inlets that I painted earlier (with fiber and satin black), the parts of the lights and the photo-etched parts: 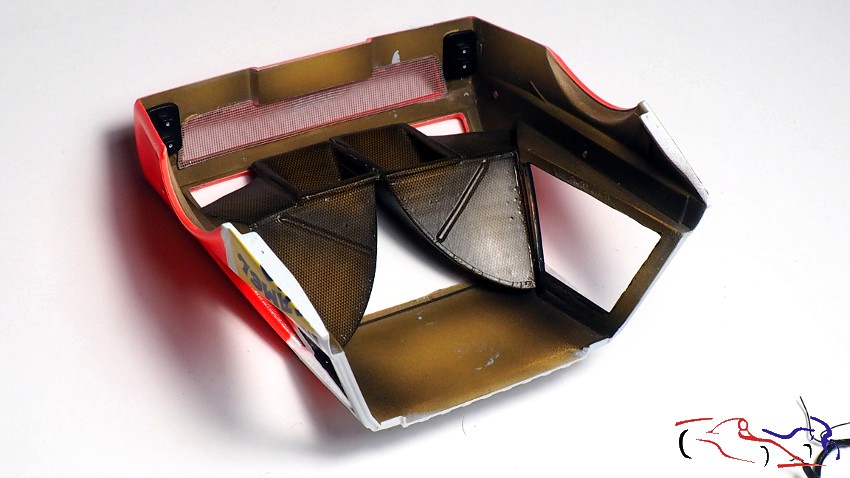 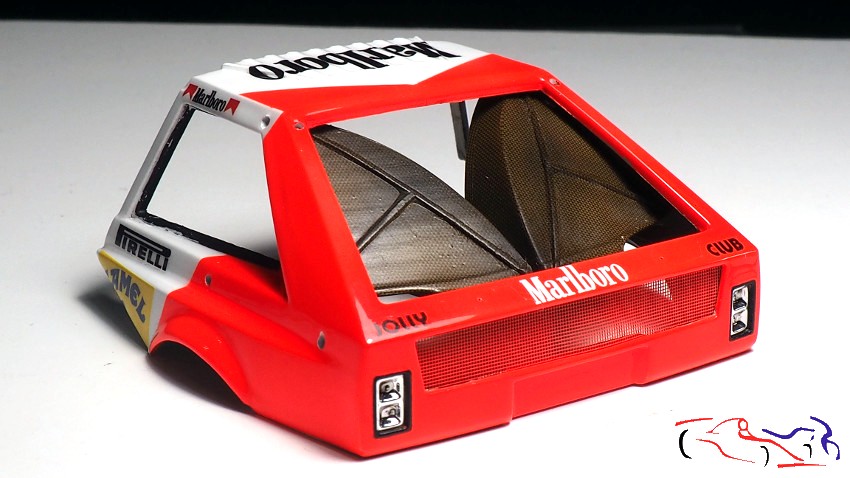 Decir que tanto al capó como al portón, después de poner los cables, le aplicaré un poco de polvo para ensuciarlo un poco: Say that both the hood and the gate, after laying the cables, I will apply a little powder to make it a bit dirty: 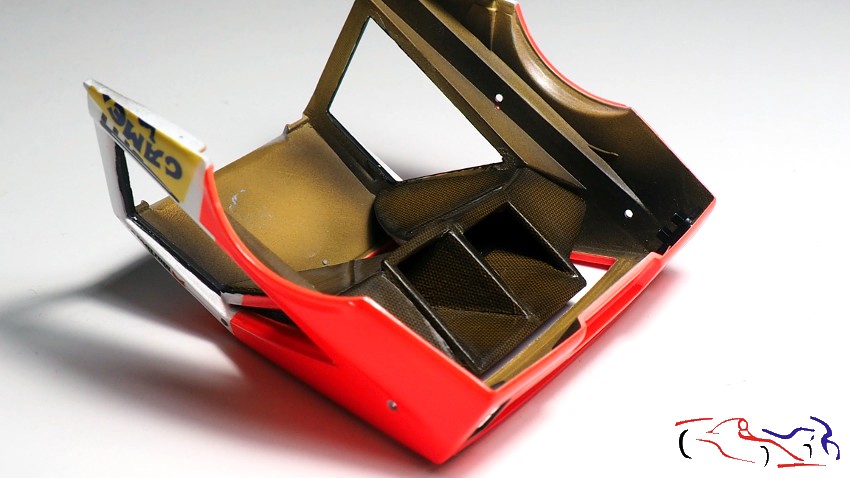 Y para terminar, aquí os dejo los cristales con las calcas negras puestas, y con el borde pintado de blanco Tamiya LP en los del piloto y copiloto: And to finish, here you have the crystals with the black decals on, and with the edge painted in white Tamiya LP on the pilot and co-pilot: 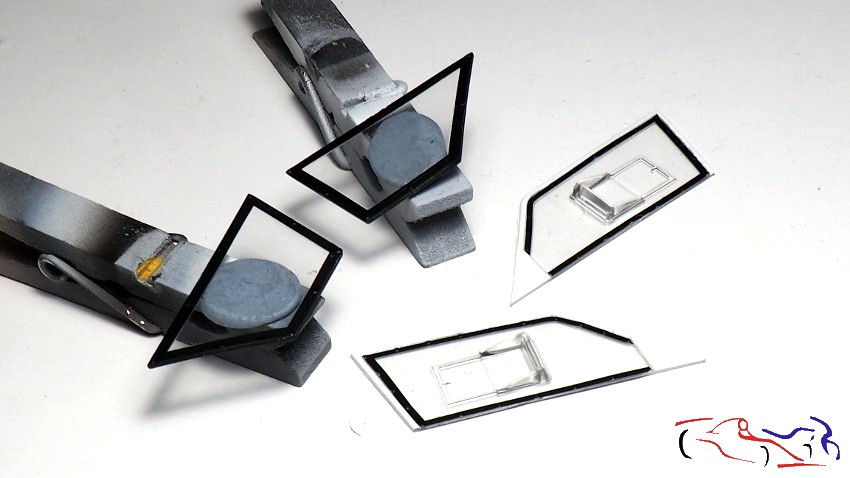 Ya va quedando menos!! Gracias por mirar y comentar!! There is less left !! Thanks for looking and commenting !! |
|
|
|
|
|
02-22-2021, 03:22 AM
|
#97 | |
|
AF Regular

Join Date: Feb 2006
Location: Parla - Madrid
Posts: 194
Thanks: 37
Thanked 30 Times in 27 Posts
|
Re: Lancia Delta S4 Marlboro Beemax 1/24
Ufff, what level of detail!! Probably, the best S4 built I have seen!!
|
|
|
|
|
|
02-22-2021, 04:05 AM
|
#98 | ||
|
AF Enthusiast
Thread starter
Join Date: Mar 2009
Location: Madrid
Posts: 649
Thanks: 109
Thanked 68 Times in 67 Posts
|
Re: Lancia Delta S4 Marlboro Beemax 1/24
Quote:
|
||
|
|
|
|
02-24-2021, 05:00 AM
|
#99 | |
|
AF Regular
Join Date: Aug 2011
Location: Torino
Posts: 390
Thanks: 175
Thanked 62 Times in 58 Posts
|
Re: Lancia Delta S4 Marlboro Beemax 1/24
Great work with the kevlar Jesus M, I really like all the finishing details you've done on the Delta!!!
 |
|
|
|
|
|
02-24-2021, 07:25 AM
|
#100 | ||
|
AF Enthusiast
Thread starter
Join Date: Mar 2009
Location: Madrid
Posts: 649
Thanks: 109
Thanked 68 Times in 67 Posts
|
Re: Lancia Delta S4 Marlboro Beemax 1/24
Quote:
|
||
|
|
|
|
03-02-2021, 07:26 AM
|
#101 | |
|
AF Enthusiast
Thread starter
Join Date: Mar 2009
Location: Madrid
Posts: 649
Thanks: 109
Thanked 68 Times in 67 Posts
|
Re: Lancia Delta S4 Marlboro Beemax 1/24
Como comenté en el post anterior, el proyecto va llegando a su fin y los detalles finales aumentan. En este caso, vemos los faros delanteros con sus cristales pegados con el pegamento Ultra Glue de MIG, dedicado a cristales y fotograbados. Buen resultado!!
As I mentioned in the previous post, the project is coming to an end and the final details are increasing. In this case, we can see the headlights with their lenses glued with MIGs Ultra Glue, dedicated to lenses and photoetched parts. Good result! 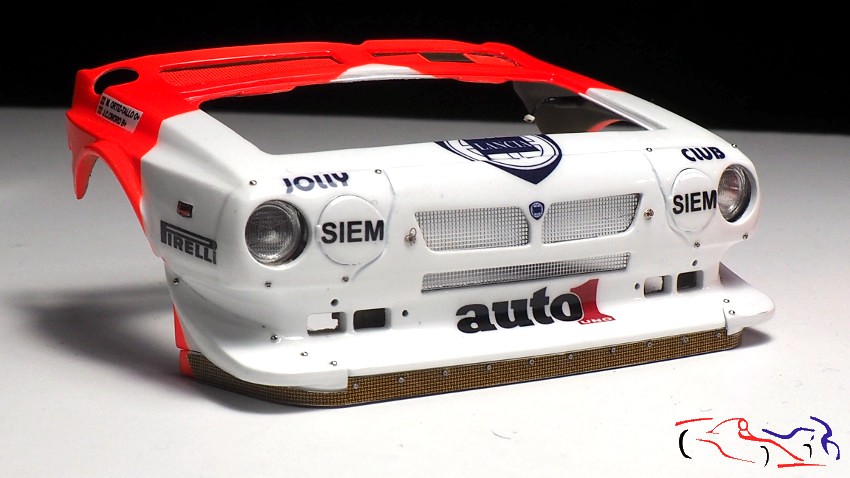 Y claro está, que dichos faros llevan los cables que vimos en el post anterior, a colocados y ensuciados con Tamiya XF75, el Ligth Dust Deposits de AK y el Shader Dust de MIG. Los tres son buenos complementos tanto en el capó delantero como en el portón trasero!! And of course, these headlights are fitted with the wires that we saw in the previous post, which were placed and dirtied with Tamiya XF75, AKs Light Dust Deposits and MIGs Shader Dust. All three are good additions to both the front bonnet and tailgate!!! 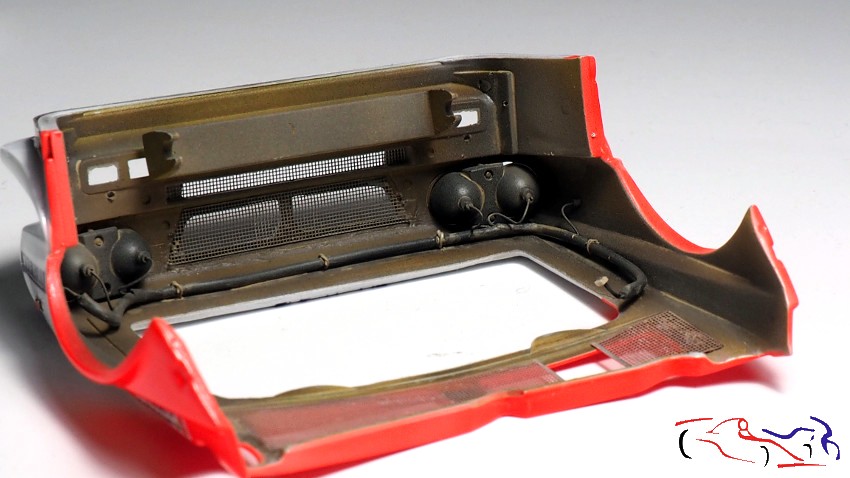 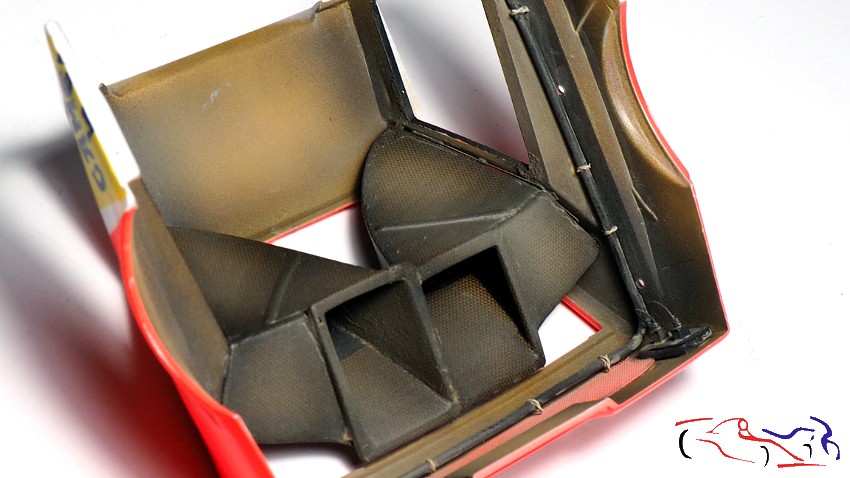 Y como no, ya era hora de pegar la parte central de la carrocería al chasis, utilizando pegamento epoxy de dos componentes, y para fijarla bien, utilicé un sargento previamente protegido en sus pinzas: And of course, it was time to glue the central part of the body to the chassis, using two-component epoxy glue, and to fix it well, I used a clamp previously protected in its clamps: 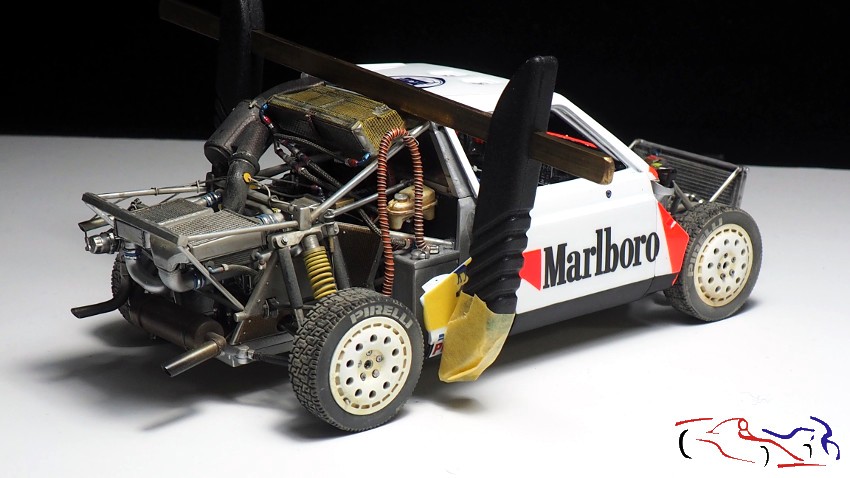 Y una vez pegado, os muestro los extermos del coche, con el último ensuciado general con XF57. El tono se unifica permitiendo ver las partes de metal y sus detalles: And once glued, I show you the exteriors of the car, with the last general dirtying with XF57. The tone has unified all allowing to see the metal parts and their details: 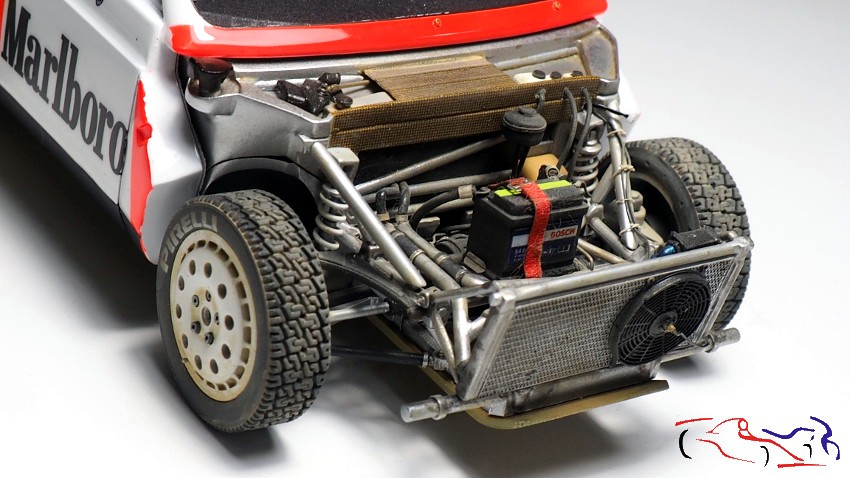 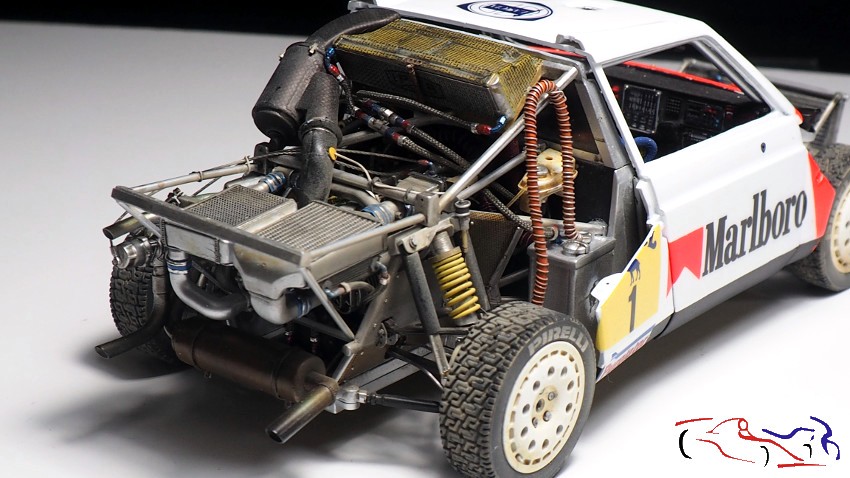 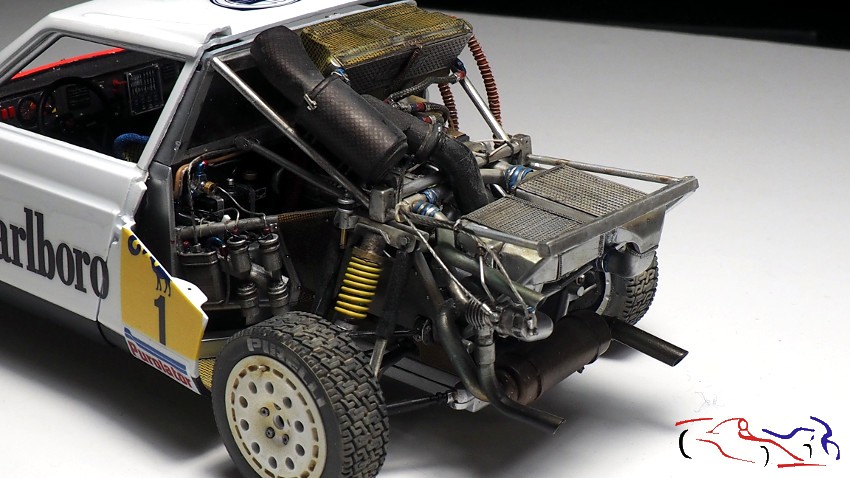 Y por supuesto, las fotos de esa parte de la carrocería colocada: And of course, the photos of that part of the body in place: 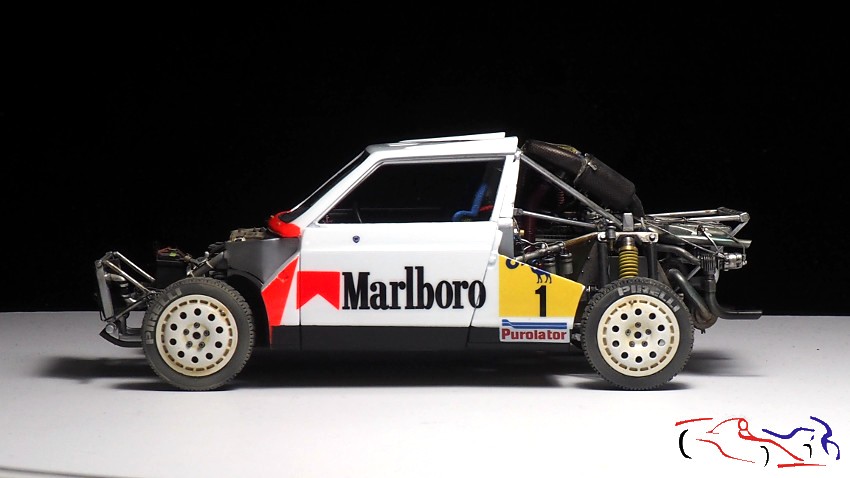 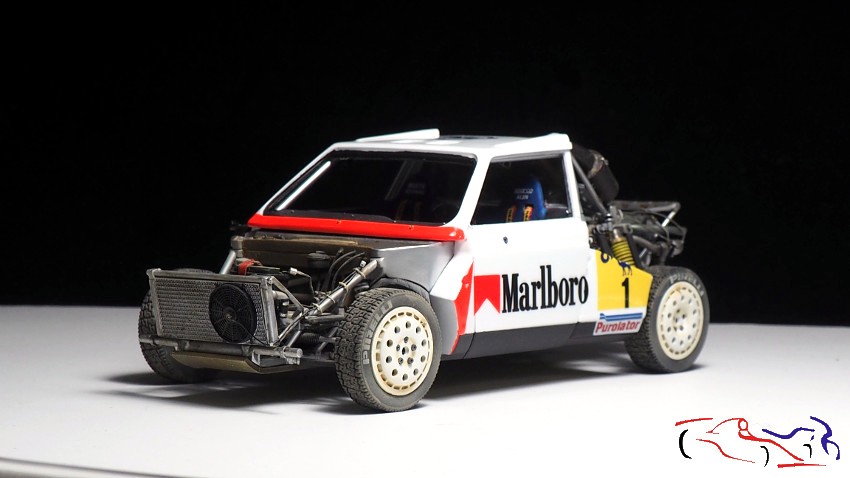 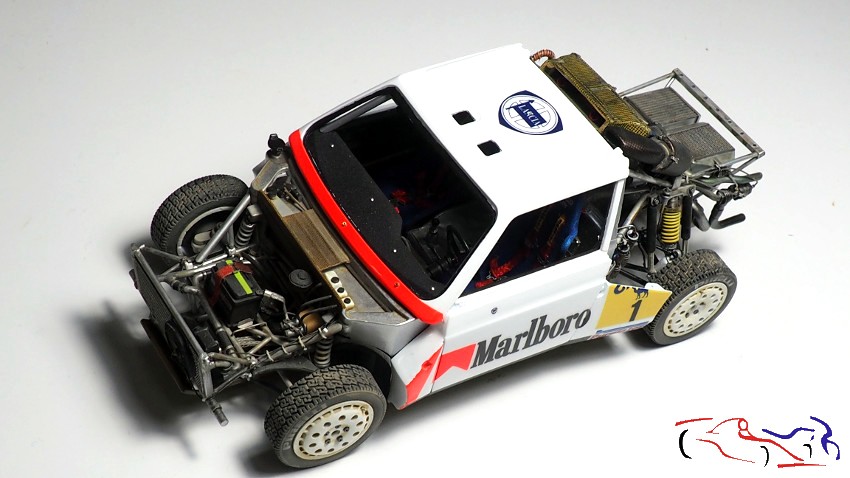 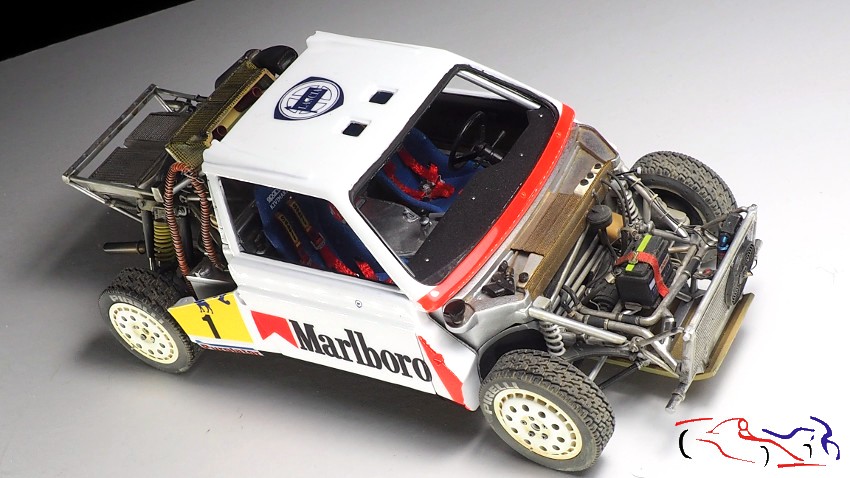 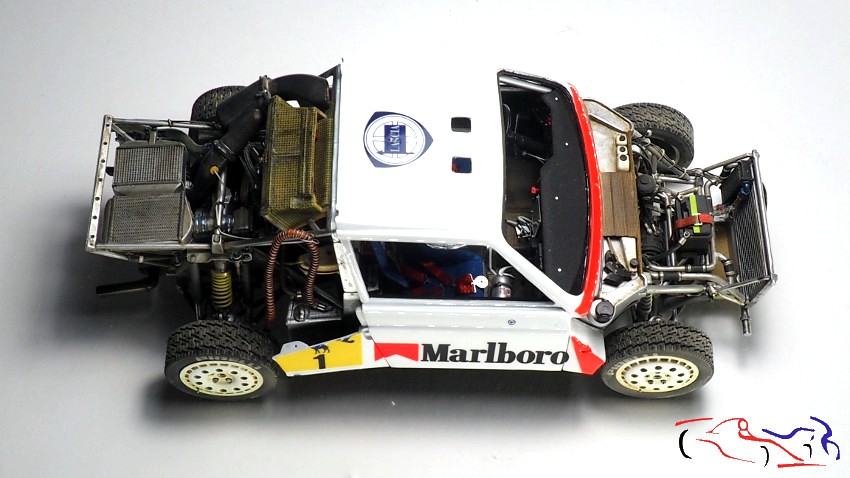 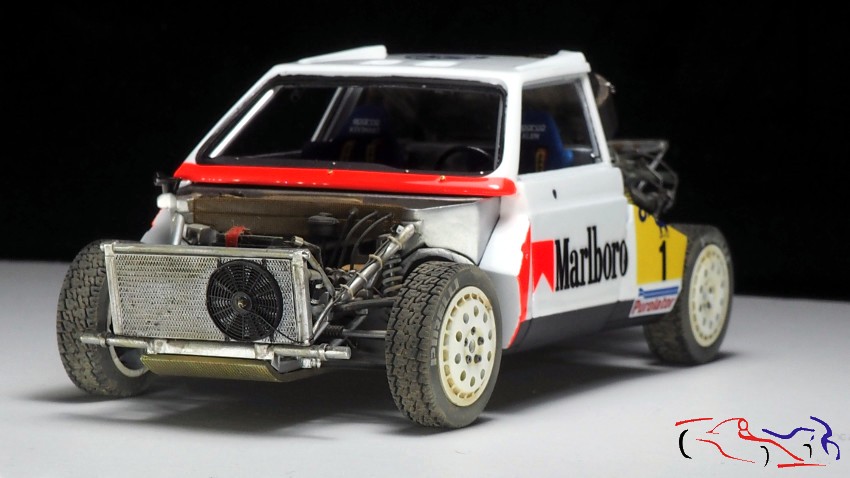 Y para terminar esta serie, cuatro fotos de ambas partes del coche: Y para terminar esta serie, cuatro fotos de ambas partes del coche: 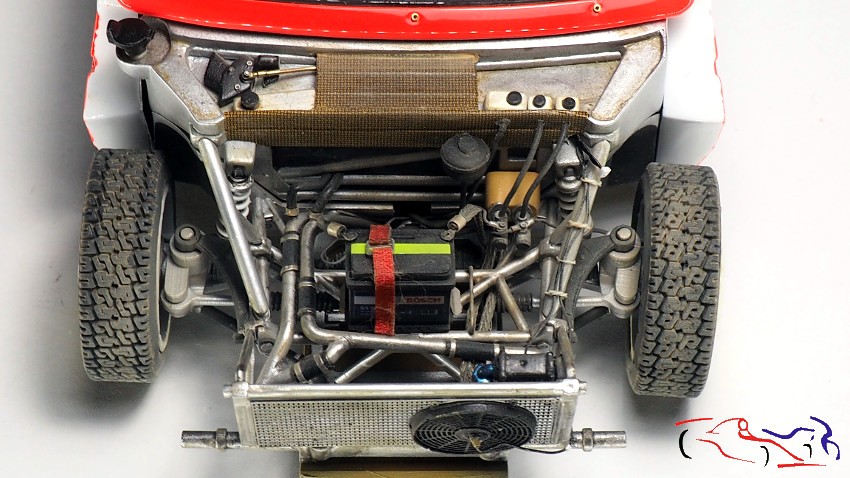 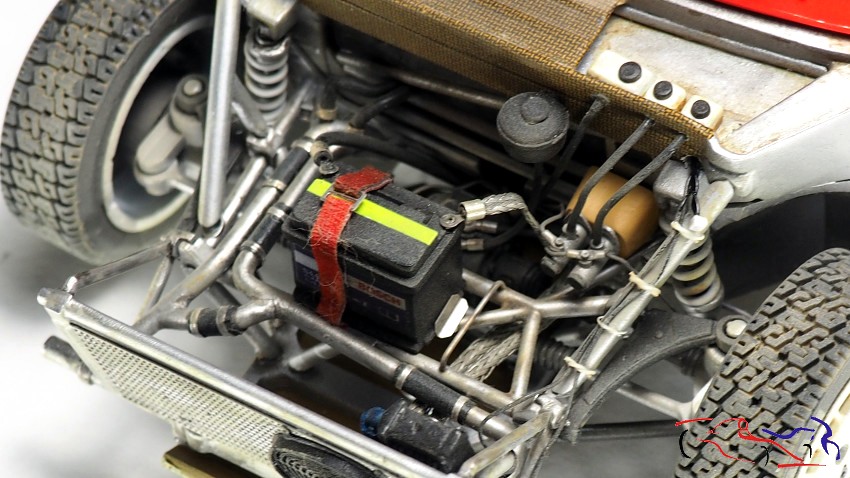 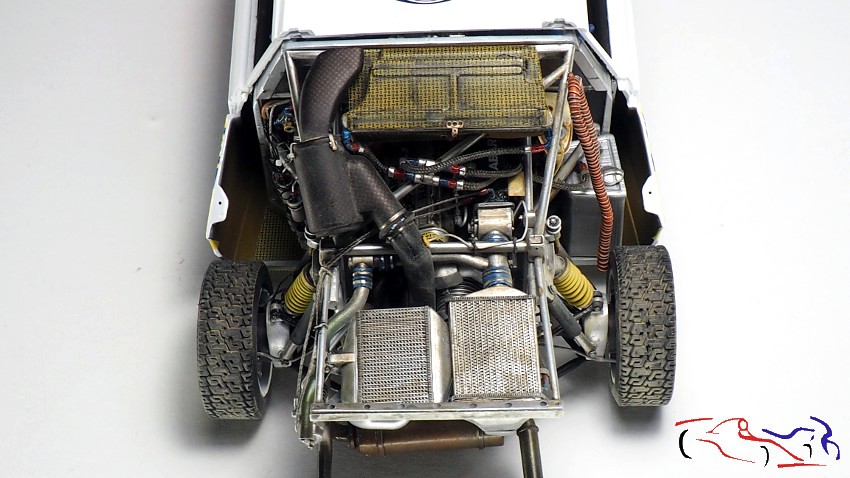 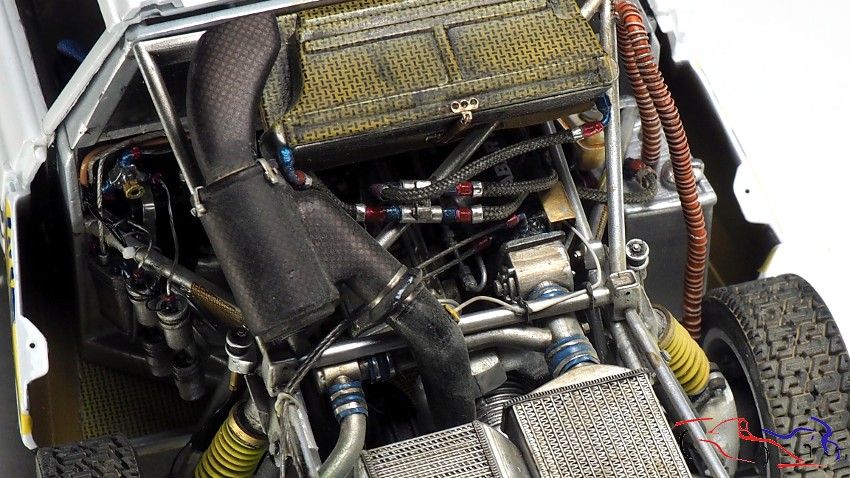 Y ahora ponemos, lo que he añadido ahora. Primero os pongo la barra que sujeta el portón trasero cuando está abierto. He tomado dos piezas de aluminio que las he doblado y taladrado por un lado. Ese taladro contiene un remache que se ha pegado en la barra transaversal del chasis. Y el la del lado izquierdo, he colocado una barra de aluminio con un agujero, para que pueda girar, y así sijetar el portón, oapoyarse en la ottra pieza del lado derecho. Para que la barra pueda girar, aplasté un extremo con unos alicates, hice un agujero y limé las esquinas, redondeando el extremo. And now we put, what I have added now. First Ill show you the bar that holds the tailgate in place when its open. I have taken two pieces of aluminium which I have bent and drilled on one side. That hole contains a rivet that has been glued to the transverse bar of the chassis. And on the left side, I have placed an aluminium bar with a hole in it, so that it can rotate, and thus hold the tailgate, or lean on the other piece on the right side. To allow the bar to rotate, I flattened one end with a pair of pliers, drilled a hole and filed the corners, rounding the end. 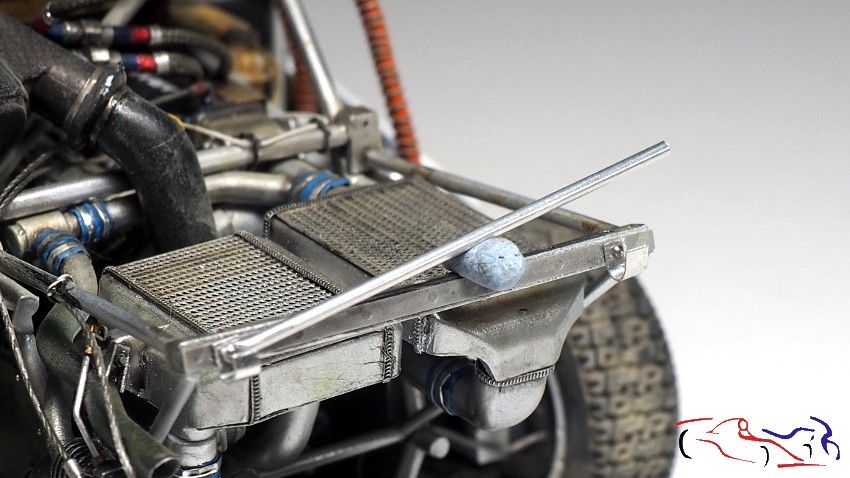 Más cosas: las bisagras del portón trasero. Ya tenía la parte vertical que aparece en la foto, pero la parte horizontal que hice era de quita y pon, y poco fiable. Por tanto, cogí lámina de latón, la corté para que cupiera por el agujero de la parte vertical, y la soldé a una lámina de latón por el extremo. La introduje, doblé y la volví a soldar a la pieza de latón por debajo. Una vez limado toda la pieza, le hice dos taladros para los remaches que irán anclados al techo de la carrocería, y las puse en esa posición para pintar. Decir, que están fijadas con cinta de doble cara autoadhesiva!! More stuff: the tailgate hinges. I already had the vertical part that appears in the photo, but the horizontal part I did was removable and unreliable. So I took a sheet of brass, cut it to fit through the hole in the vertical part, and welded it to a sheet of brass at the end. I pushed it in, folded it, and soldered it back to the brass piece underneath. Once the entire piece had been filed, I made two holes for the rivets that will be anchored to the roof of the body, and I put them in that position to paint. Say, they are affixed with self-adhesive double-sided tape !! 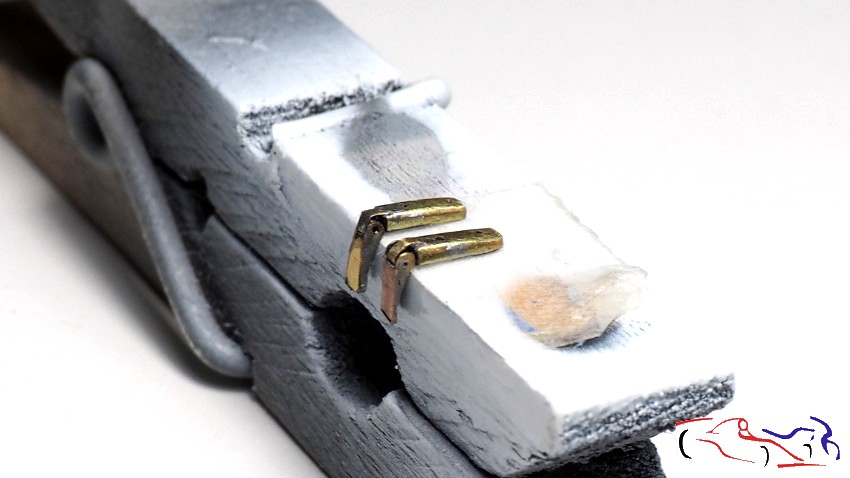 Mas piezas: los pilotos traseros. Los pegué sobre cinta autoadhesiva de docble cara y las pinté con los rotuladores Edding 3000 permanentes: More parts: the taillights. I glued them onto double-sided self-adhesive tape and painted them with Edding 3000 permanent markers: 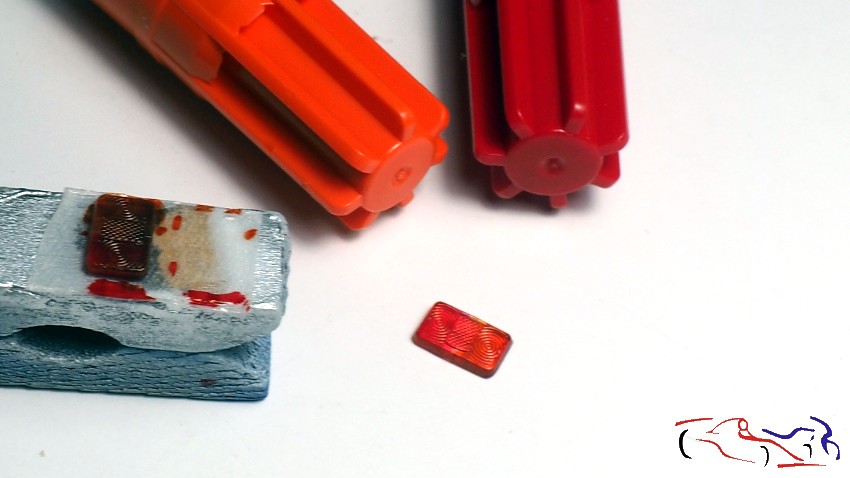 Y por último, para las bisagras de la trampilla del capó, utilizo piezas diseñadas en 3d que me hizo un amigo (gracias Julio!!), que modificándolas un poco, sirven muy bien para esta pieza. Luego irán pintadas de blanco y se fijarán con un remache con agujeros realizados directamente en la carrocería, para que su fijación sea más fuerte. And finally, for the bonnet hatch hinges, I use pieces designed in 3d that a friend made for me (thanks Julio!!), which, modifying them a little, works very well for this piece. Then they will go painted in white and they will be fixed with a rivet with holes made directly in the body, so that their fixation is stronger. 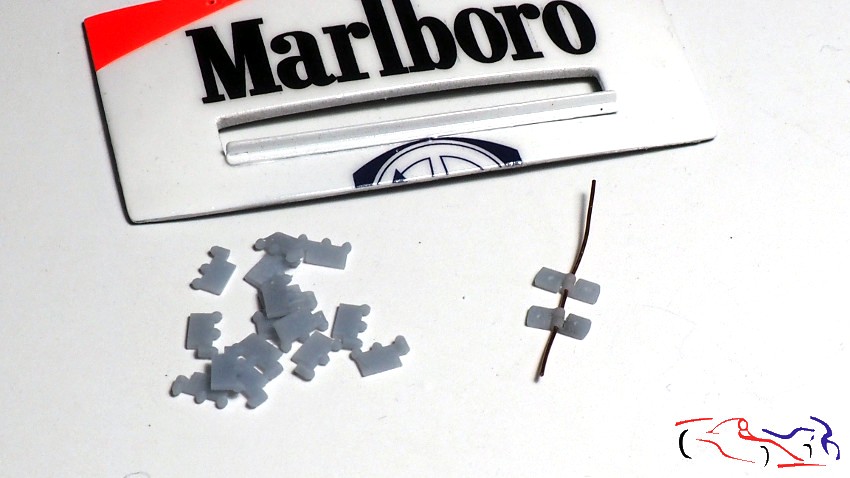 Ya queda menos!!! Gracias por mirar y comentar!! Less is left!!! Thanks for watching and commenting !! |
|
|
|
|
|
03-07-2021, 08:35 AM
|
#102 | |
|
AF Regular
Join Date: Aug 2011
Location: Torino
Posts: 390
Thanks: 175
Thanked 62 Times in 58 Posts
|
Re: Lancia Delta S4 Marlboro Beemax 1/24
Looks fantastic JesusM! Superb weathering on the chassis and on the wheels! The best Lancia Delta S4 model I've seen! Big thumbs up!
|
|
|
|
|
|
03-07-2021, 09:41 AM
|
#103 | ||
|
AF Enthusiast
Thread starter
Join Date: Mar 2009
Location: Madrid
Posts: 649
Thanks: 109
Thanked 68 Times in 67 Posts
|
Re: Lancia Delta S4 Marlboro Beemax 1/24
Quote:
|
||
|
|
|
|
03-20-2021, 12:52 PM
|
#104 | |
|
AF Enthusiast
Thread starter
Join Date: Mar 2009
Location: Madrid
Posts: 649
Thanks: 109
Thanked 68 Times in 67 Posts
|
Re: Lancia Delta S4 Marlboro Beemax 1/24
Ya estamos casi al final del proyecto, puesto que el siguiente post, tendrá los últimos pasos y las fotos finales. Pero anes de nada, os presento las modificaciones realizadas. Empezamos con los guardabarros traseros y sus faldillas. He usado la varilla redonda del TK de HD, doblándola según aconsejan. Y para las faldillas, he usado lata de refresco para las de detrás, y envoltura de las botellas de vino para las delanteras. En las traseras, necesitaba un material fino y rígido, pero que se pudiera doblar bien, puesto que el coche que hago, las tenía enrolladas (las faldillas del fotograbado son muy duras). En cambio, las de delante, debían ser moldeables para ajustarse la paso de rueda. Y aquí las tenéis!!
We are almost at the end of the project, since the next post will have the last steps and the final photos. But before anything else, I present you the modifications made. We start with the rear mudguards and their skirts. I used the round rod from HDs TK, bending it as advised. And for the skirts, I used a soda can for the rear ones, and wine bottle wrap for the front ones. For the rear ones, I needed a thin and rigid material, but that could be folded well, since the car I make, had them rolled up (the photoetched parts are very hard). On the other hand, the front ones had to be mouldable to fit the wheel arch. And here they are! 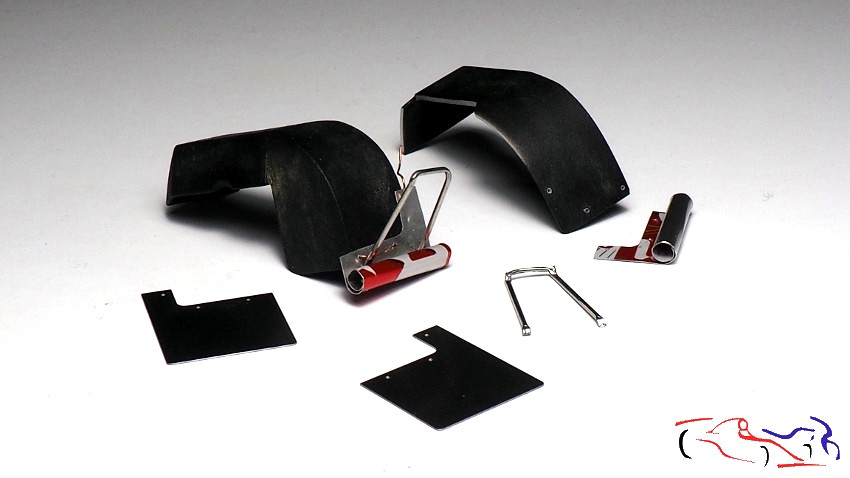 Una vez cortadas y formadas, las imprimo y las pinto con un rojo que se parece al que llevaba el coche en realidad: el rojo Coca-Cola de Gravity: Once they are cut and shaped, I print them out and paint them with a red that looks like the actual car: the Coca-Cola red from Gravity: 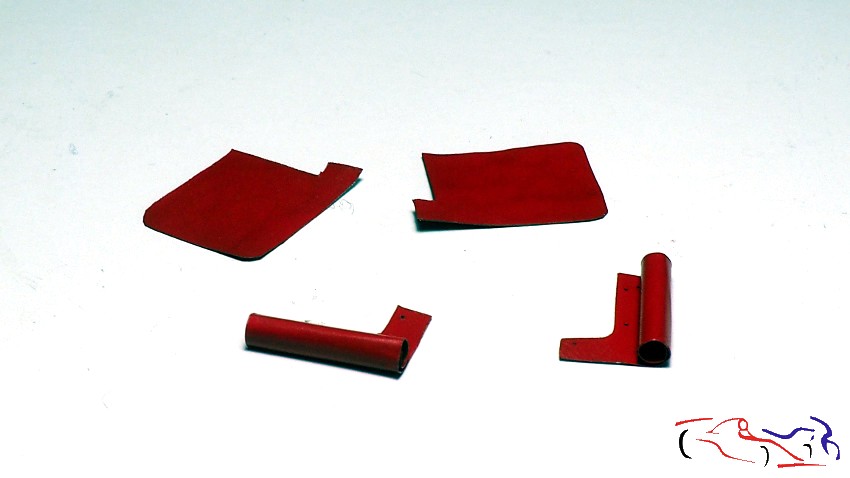 Aquí ya tengo colocadas las traseras. Veréis que he puesto unos fotograbados en los remaches, y plástico estirado blanco a modo de fijaciones plásticos. Here I have the rear ones in place. You will see that I have put some photoetched parts on the rivets, and white stretched plastic as plastic fixings. 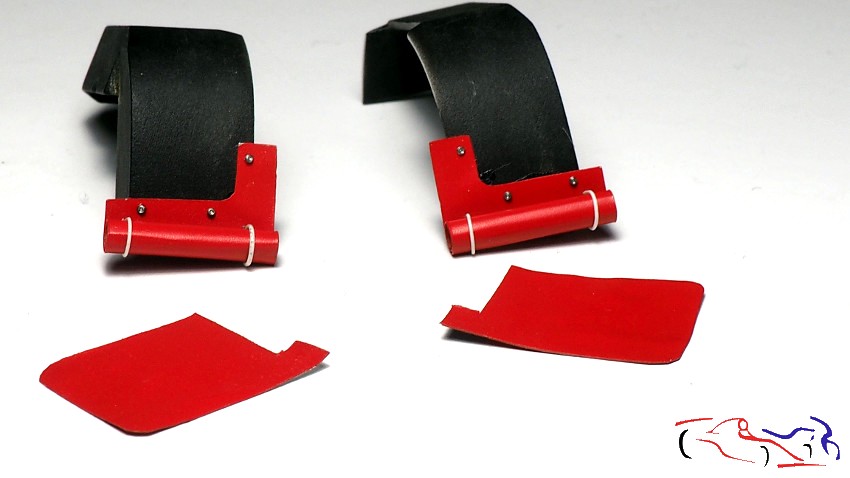 Las pegamos con ciano y posteriormente, las varillas dobladas: We glue them with cyano and then the bent rods: Aquí vemos las delanteras con sus remaches. Decir que están pegadas con cinta adhesiva de doble capa, para poder ajustarlas con cuidado, hasta que estén bien colocadas, y entonces, se presionar para que se adhieran correctamente. Here we can see the front ones with their rivets. They are glued with double-sided adhesive tape, so that they can be carefully adjusted until they are well positioned, and then they are pressed to adhere properly. 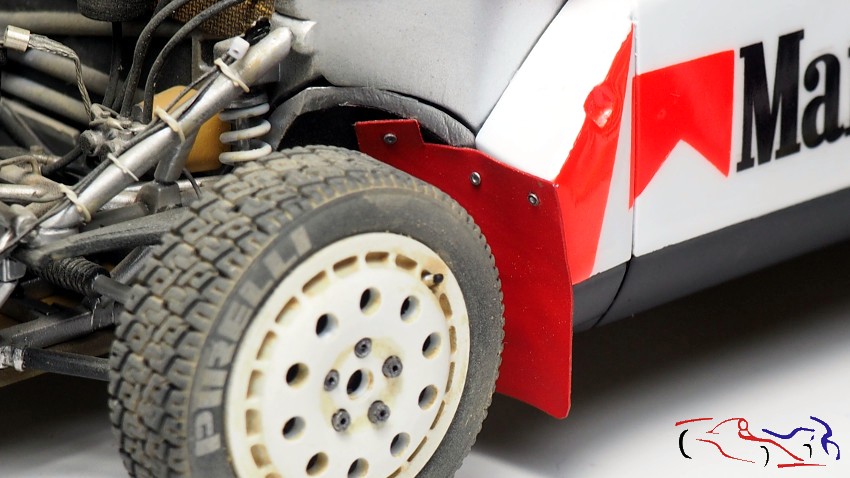 Otro detalle que he puesto ahora al final: las dos tomas de aire superiores que van de kevlar en la parte de avajo. Para ello, pongo cinta de enmascarar donde quiero que vaya, marco, y las traspaso a la calca. Después irán a la pieza: Another detail that I have now put at the end: the two upper air intakes that are made of kevlar at the bottom. To do this, I put masking tape where I want them to go, mark them, and transfer them to the decal. Then they will go on the part: 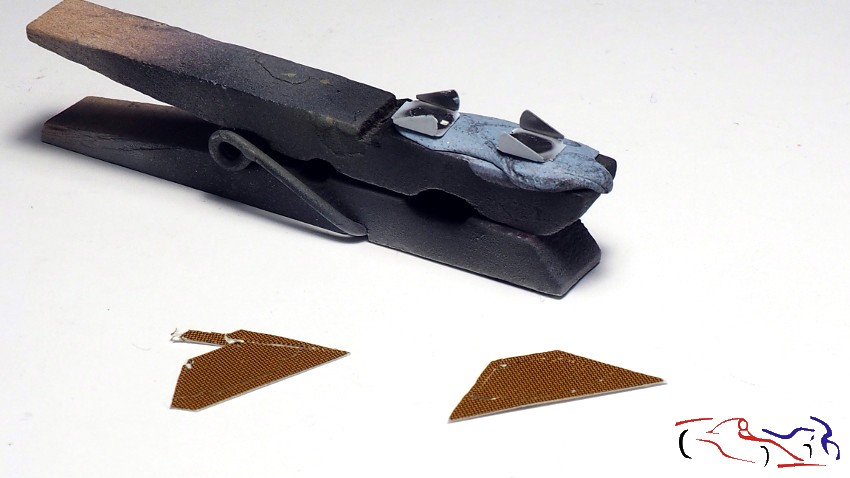 Ya las veis una vez puestas! You can see them once they are on! 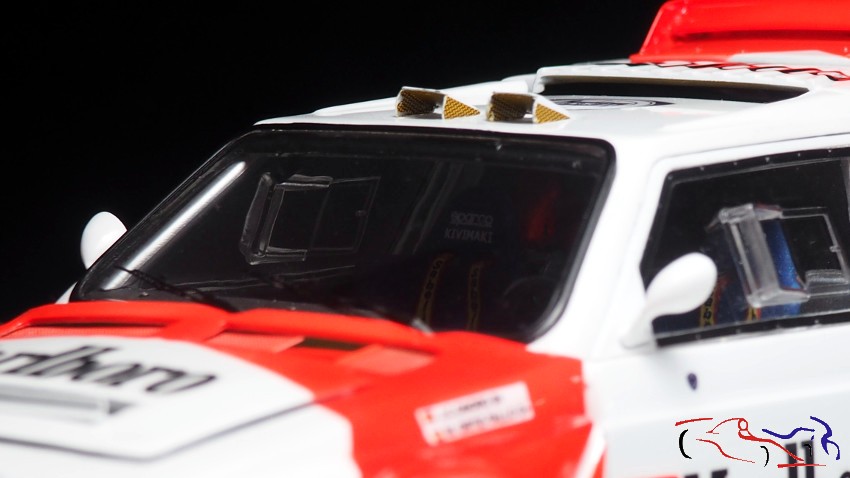 Más cosas que he colocado: el alerón trasero y las tomas de aire laterales. EL alerón tiene sus remaches de fotograbado: More things I have fitted: the rear spoiler and the side air intakes. The spoiler has its photoetched rivets: 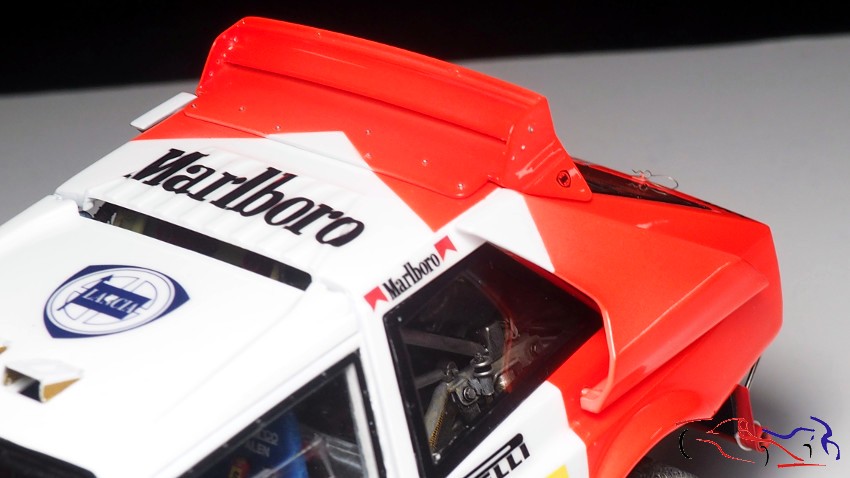 También he colocado la matrícula, los cristales de las luces traseras y los fotograbados de los anclajes del portón trasero. I have also fitted the number plate, the rear light lenses and the photo-etched parts for the tailgate anchorages. 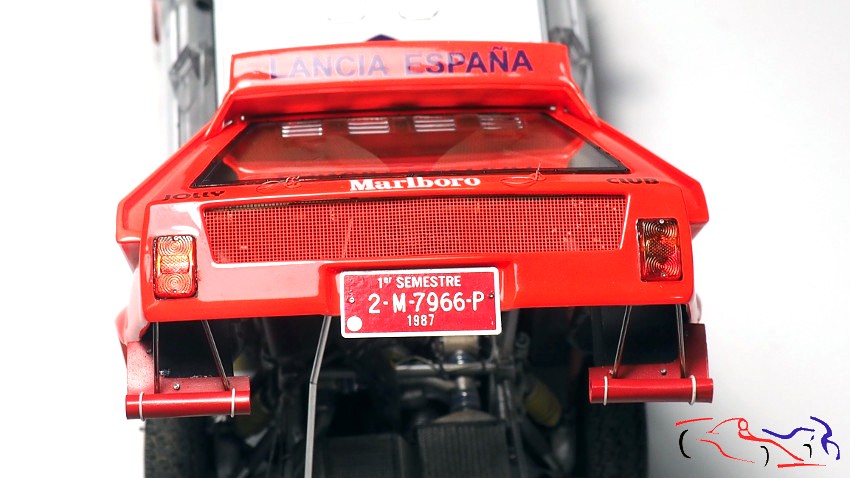 Para que el portón trasero quede abierto, el tubo que puse al final del motor, y que giraba desde la izquierda, lleva la siguiente extensión que se intruduce en el tubo . To make the tailgate open, the tube that I put at the end of the engine, which swivels from the left, has the following extension that goes into the tubing at .. 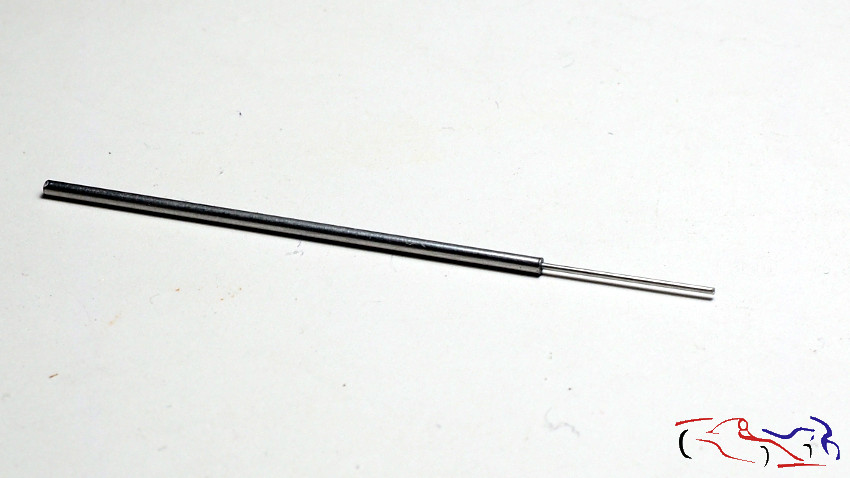 quedando de la siguiente manera: as follows: 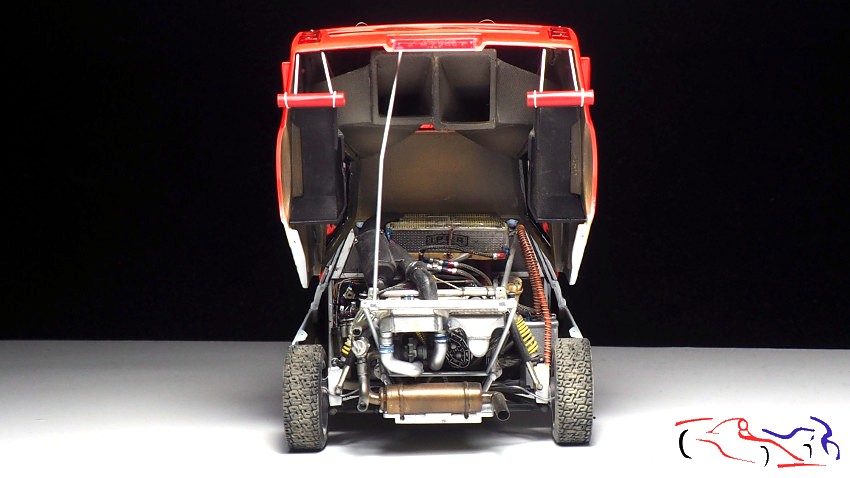 Aquí os presento unas fotos del coche, con los cristales ya puestos, a falta de 3 calcas y la bisagras: Here are some photos of the car, with the windows already in place, with only 3 decals and the hinges missing: 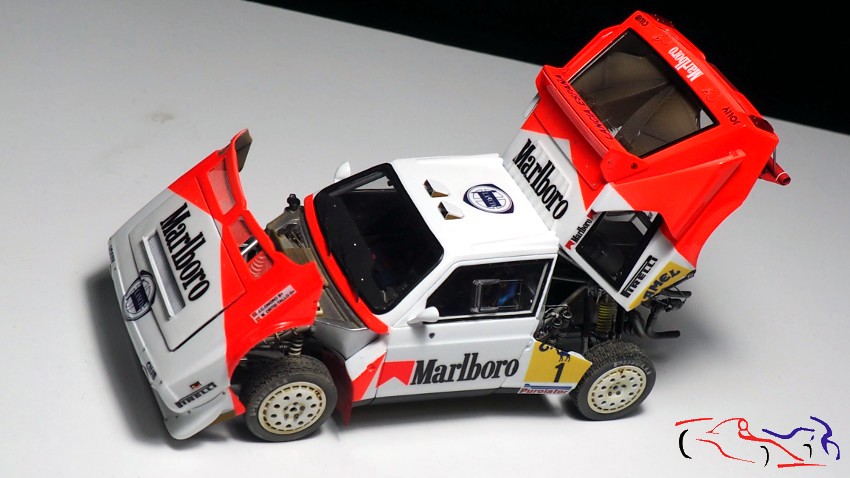 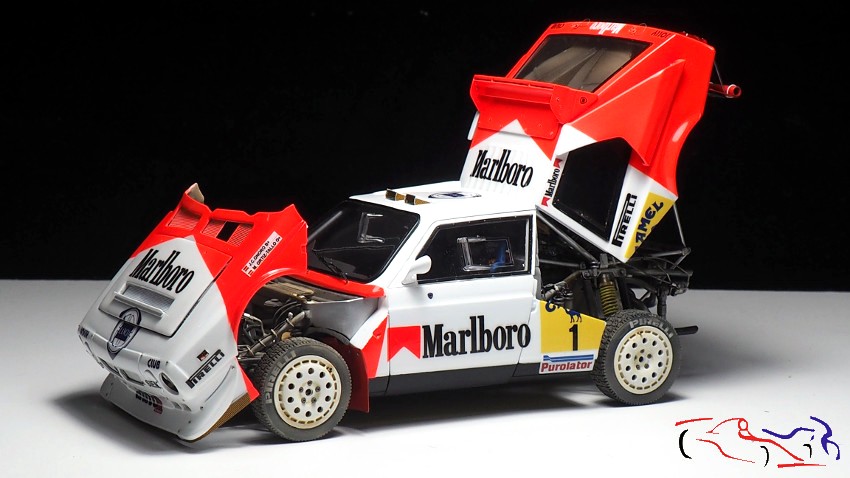 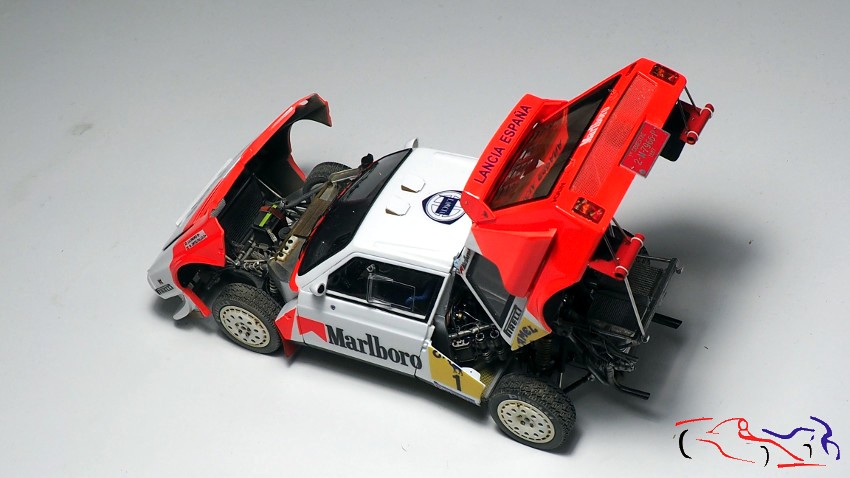  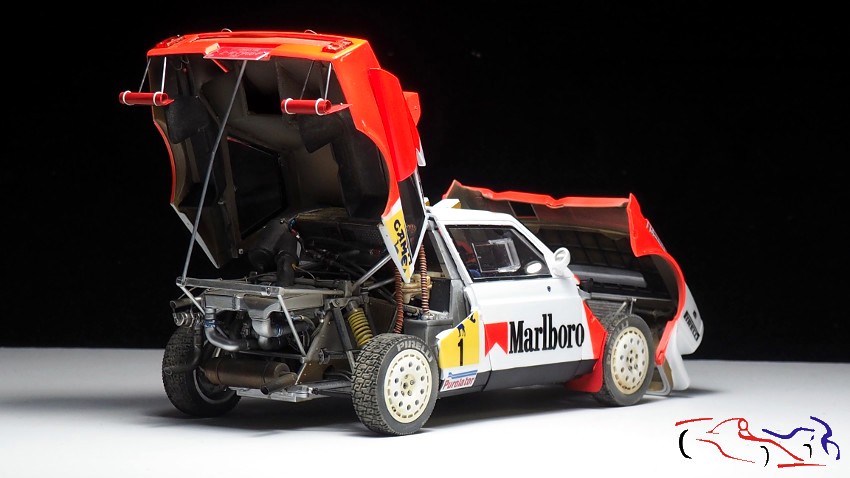 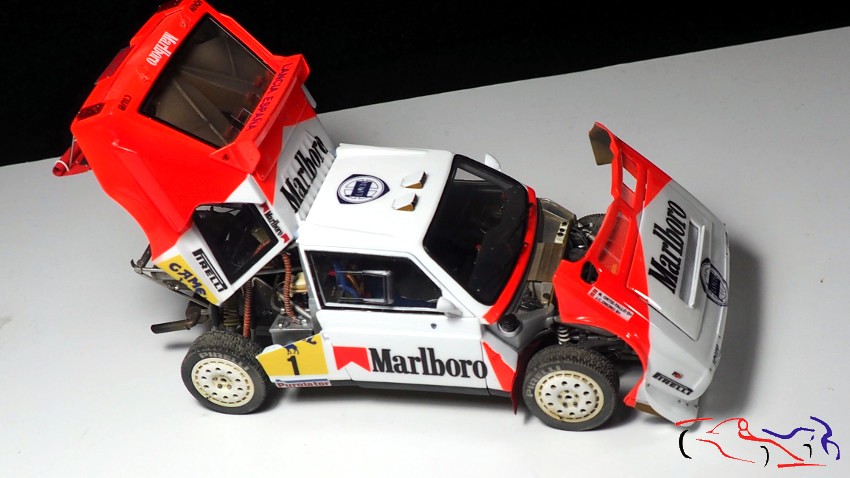 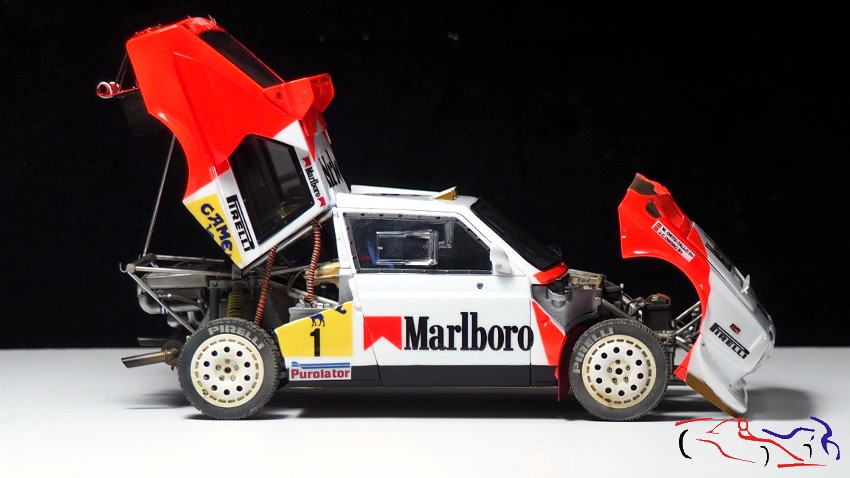 Las siguientes dos fotos nos enseñan lo que el capó y el portón guardan en su interior: The following two photos show us what the bonnet and tailgate hold inside: 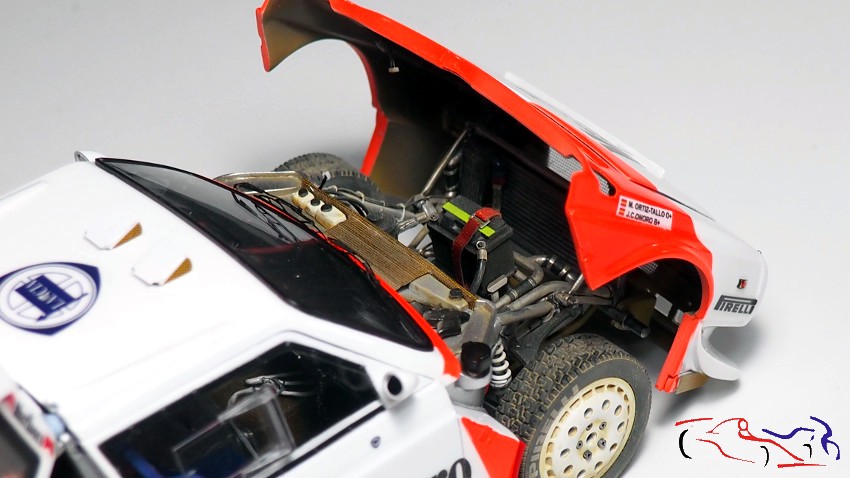  Y a continuación, fotos con el capó y portón trasero cerrados. Destacar que como he añadido muchos elementos que no estaban en el kit original, el cierre no es perfecto y no llegan al final, pero se ve muy bien como es el resultado: And next, photos with the bonnet and tailgate closed. Note that as I have added many elements that were not in the original kit, the closing is not perfect and they do not reach the end, but you can see very well how the result is: 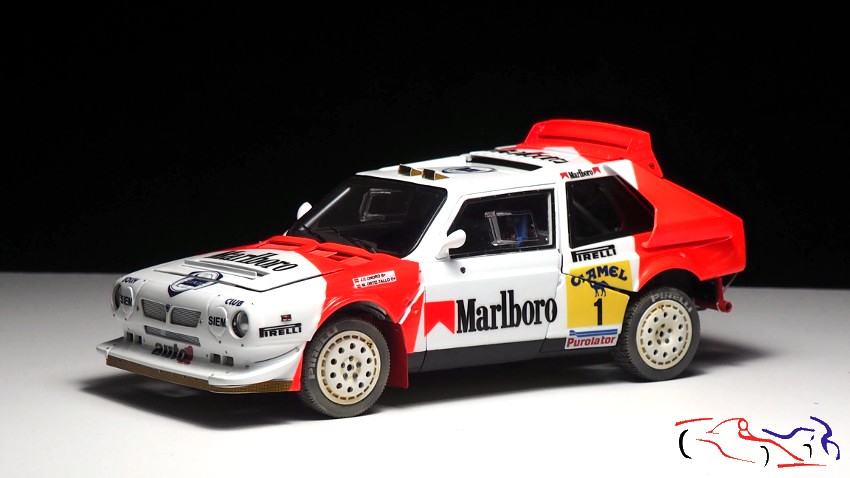 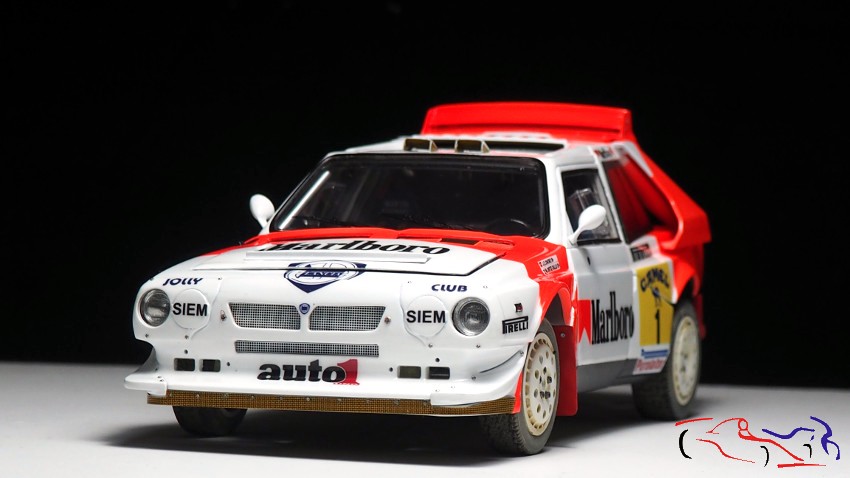 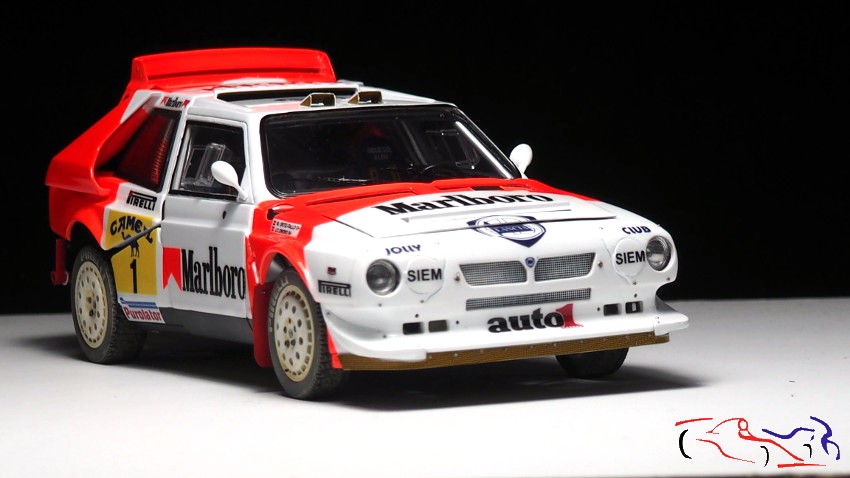   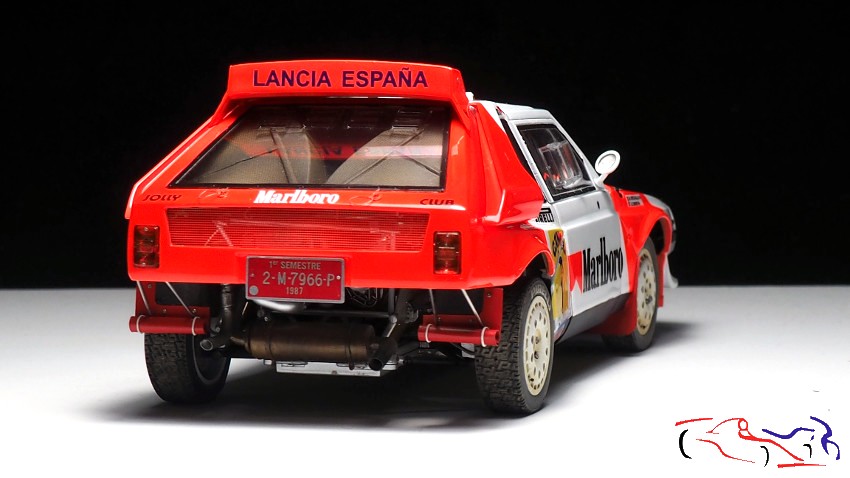 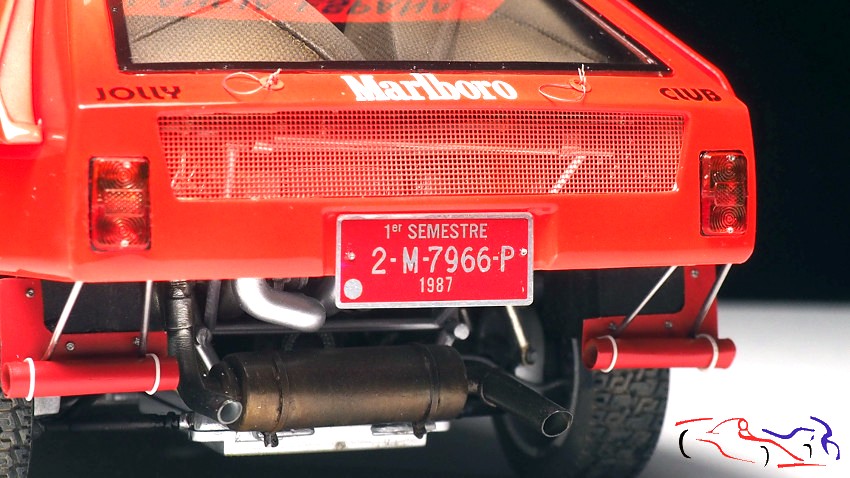 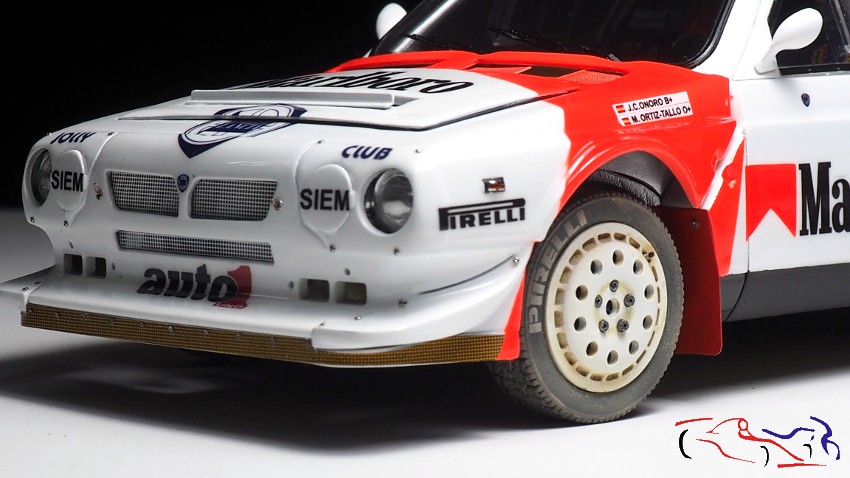 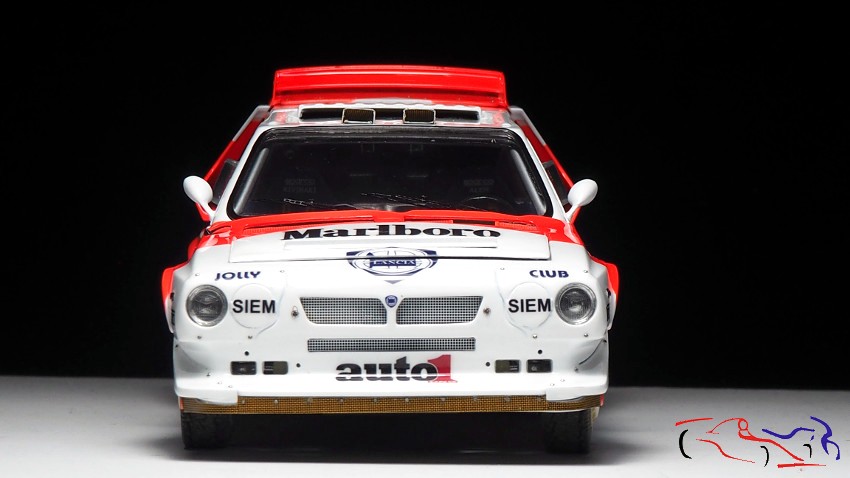 Y esto es todo. EN la siguiente entrada, las fotos finales. Gracias por ver y comentar! And thats all. In the next post, the final photos. Thanks for watching and commenting! |
|
|
|
|
|
03-20-2021, 08:17 PM
|
#105 | |
|
AF Modelrater
 Join Date: Jul 2002
Location: Forks Township, Pennsylvania
Posts: 12,894
Thanks: 18
Thanked 63 Times in 56 Posts
|
Re: Lancia Delta S4 Marlboro Beemax 1/24
Awesome build!!!
Thank you for sharing all you techniques, great way to learn from you.
__________________
|
|
|
|
|
|
|
POST REPLY TO THIS THREAD |
 |
|
|


