|
|
|

|
|
| Search | Car Forums | Gallery | Articles | Helper | AF 350Z | IgorSushko.com | Corporate |
|
| Latest | 0 Rplys |
|
|||||||
| WIP - Motorsports Post topics for any "Work In Process" motorsports vehicles in this sub-forum. |
 |
 Show Printable Version | Show Printable Version |  Email this Page | Email this Page |  Subscribe to this Thread
|
|
|
Thread Tools |
 08-23-2005, 12:30 AM
|
#76 | |
|
AF Enthusiast
 
Join Date: Oct 2003
Location: Canton, Ohio
Posts: 584
Thanks: 0
Thanked 0 Times in 0 Posts

|
Re: WIP: 2000 Peter Maxx "Extreme Build" LONG FIRST THREAD!!
Absolutly stunning!!!!! Perfection in scale is all I can say.
|
|

|

|
|
08-24-2005, 10:12 AM
|
#77 | |
|
AF Enthusiast
Thread starter

Join Date: Mar 2003
Location: Zephyrhills, Florida
Posts: 981
Thanks: 4
Thanked 5 Times in 5 Posts
|
Re: WIP: 2000 Peter Maxx "Extreme Build" LONG FIRST THREAD!!
Thank you !!!
New update guys.... engine bay is almost ready for the engine!!! I need to make some shocks and get the radiator and shroud built and detailed. Here is what I have so far. I scratch built fro msqaure plastic tubing and rod the master cylinder reservoir and clutch setup. These were completely plumbed for the front and rear brake system. 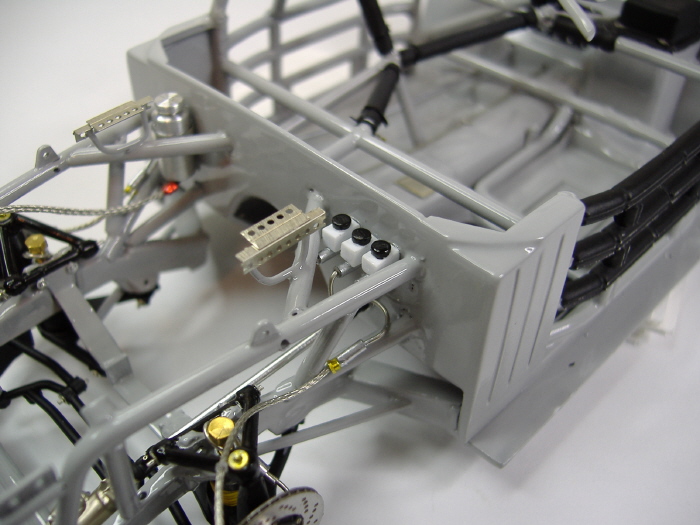 I used plastic rod and a few RB motion parts to make the brake junction blocks to go from hard to braided line. You can also see the DM Coolant overflow tank mounted nicely on the firewall where the molded in kit one once lived. 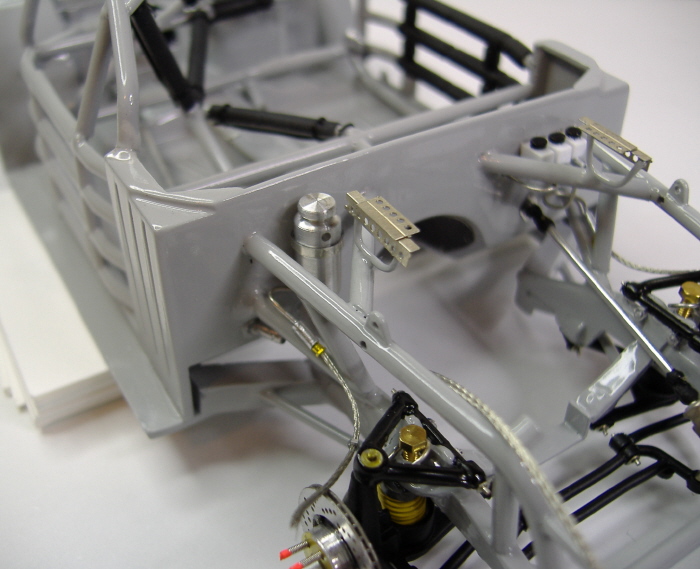 Disc brakes are installed as well... waiting for calipers.... 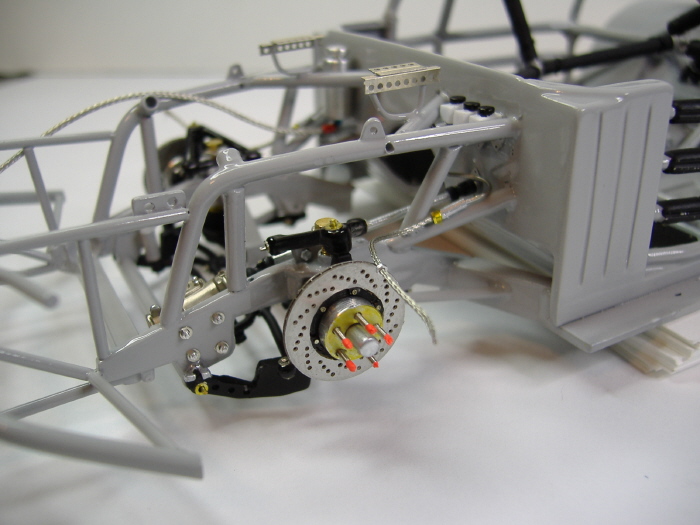 GOod pic of the body on the car with the brakes hanging out.... calipers will finish this scene off!!! 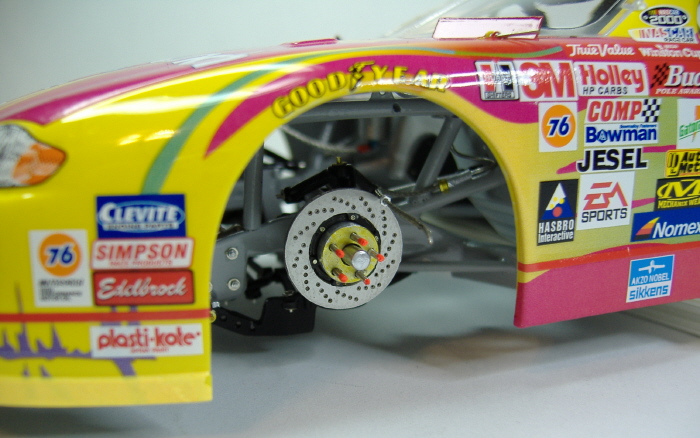 In the firewall area I decided to add a black rubber cover I had seen on a Terry Labonte Monte of the same year from pics provided by Al. (thank you Al) I added MCG PE rivets for realism. 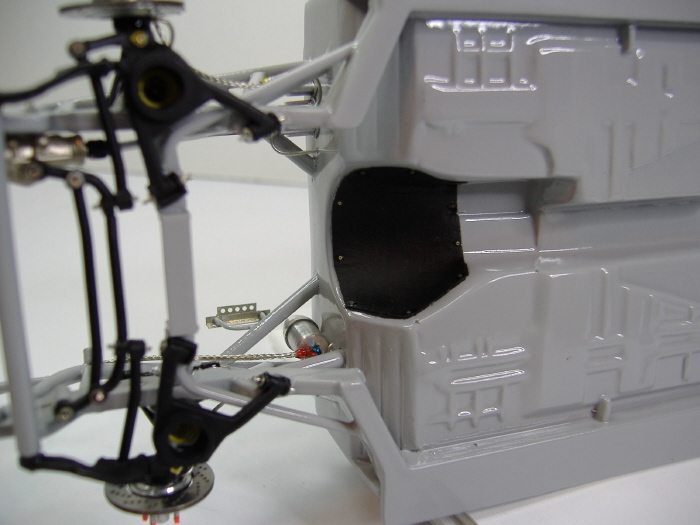 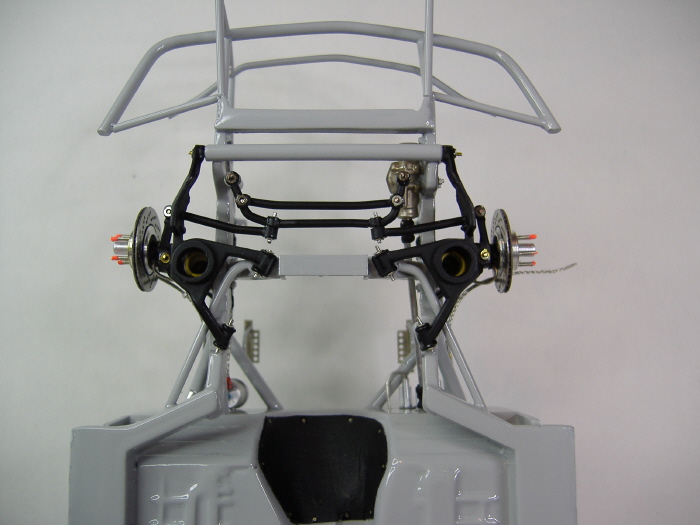 Nice shot with the chassis in its present state. 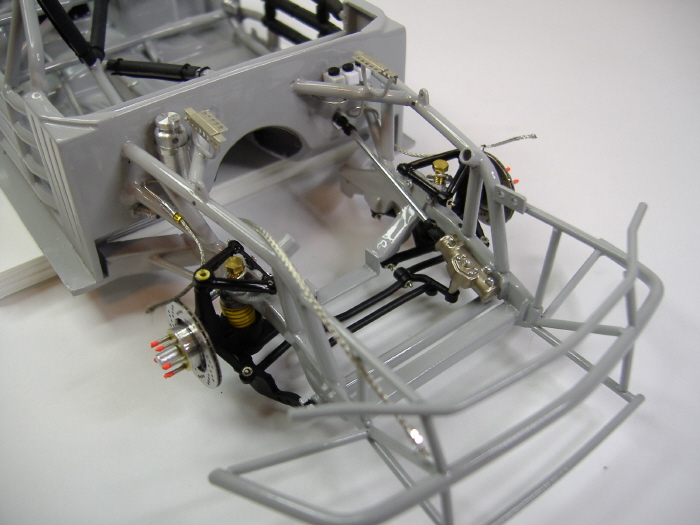 And with the body on!!! 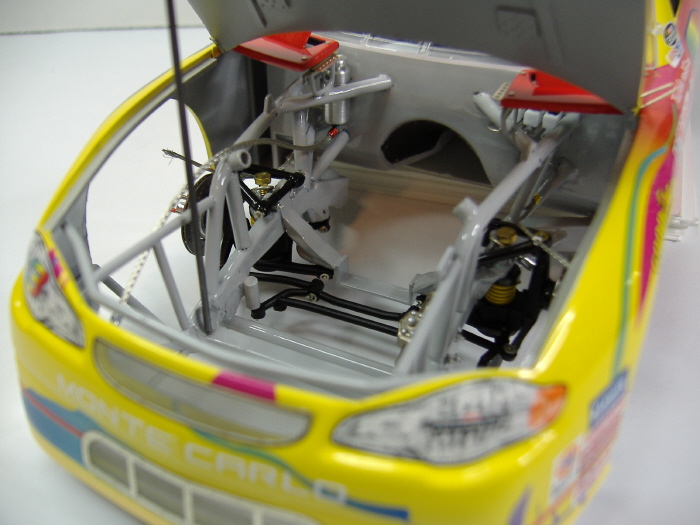 FInally. I added the hard aluminum tubing that houses the fuel line on the real cars.. also take note the brake line is run to the rear of the car for the rear brakes. 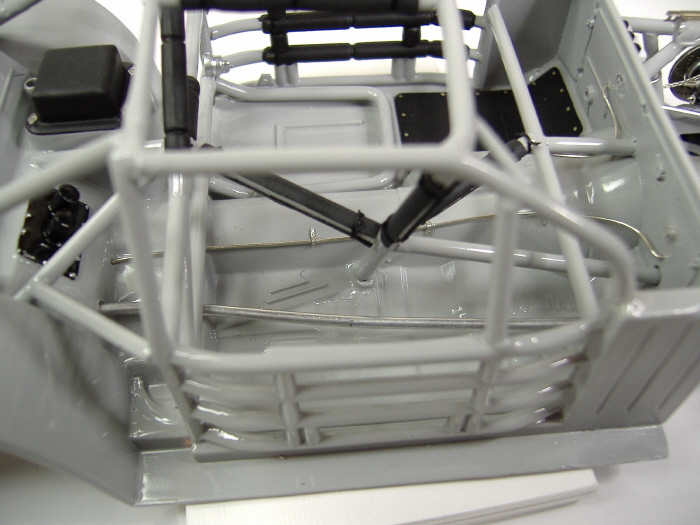 |
|
|
|
|
|
08-24-2005, 10:18 AM
|
#78 | |
|
AF Enthusiast

Join Date: Jan 2002
Location: wolfe city, Texas
Posts: 3,513
Thanks: 1
Thanked 5 Times in 5 Posts

|
Re: WIP: 2000 Peter Maxx "Extreme Build" LONG FIRST THREAD!!
awesome. amazing. gorgeous. a fitting tribute to the number 3. lol. i think i've said enough. I wish i had the extra funds for some of that RB motion stuff.
__________________
My name is Russell, feel free to use it. I'd rather be hated for Who I Am than be loved for Who I Am Not |
|
|
|
|
|
08-24-2005, 11:05 AM
|
#79 | |
|
AF Modelrater
 Join Date: Jul 2002
Location: Forks Township, Pennsylvania
Posts: 12,894
Thanks: 18
Thanked 63 Times in 56 Posts
|
Re: WIP: 2000 Peter Maxx "Extreme Build" LONG FIRST THREAD!!
Great to see you're still pushing the limits Dave.
__________________
|
|
|
|
|
|
08-24-2005, 11:23 AM
|
#80 | |
|
AF Enthusiast

Join Date: Oct 2004
Location: x
Posts: 1,135
Thanks: 17
Thanked 49 Times in 46 Posts
|
Wonderfully stunning work!
|
|
|
|
|
|
08-24-2005, 11:37 AM
|
#81 | |
|
AF Enthusiast

Join Date: Oct 2004
Location: Stockholm
Posts: 498
Thanks: 0
Thanked 0 Times in 0 Posts
|
Not sure weather I should cry or laugh, your level of detail is just out of this world. Also how do you attach those tiny rivets and washers without getting glue overflow?
Keep it up!
__________________
/Fredrik Current Projects: -´70 Camaro Z28 (Baldwin Motion hood wanted!!!) -´32 Ford Roadster (on hold) ´69 Camaro thread |
|
|
|
|
|
08-28-2005, 12:14 AM
|
#82 | ||
|
AF Enthusiast
Thread starter
Join Date: Mar 2003
Location: Zephyrhills, Florida
Posts: 981
Thanks: 4
Thanked 5 Times in 5 Posts
|
Re: WIP: 2000 Peter Maxx
Quote:
Thanks guys!!!!!! Well more progress...... Rear suspension is done. I took Clay's advice and cannibalized an AMT kit for the rear differential. These units are far more accurate than the Revell ones. One great thing is they are solid not hollow!! I carefully glued it to the Kit truck arms. Below is how it came out!! Here you can see the top part of the diff. I scratch built brake hard line to braided #1 lines junction tubes from scratch. The pumpkin is painted semi gloss red. I added grey to the edge to represent the silicone sealant. The pump is from the kit with a AAA Pulley system installed. I decided to make a small strip of electrical tape for the belt. 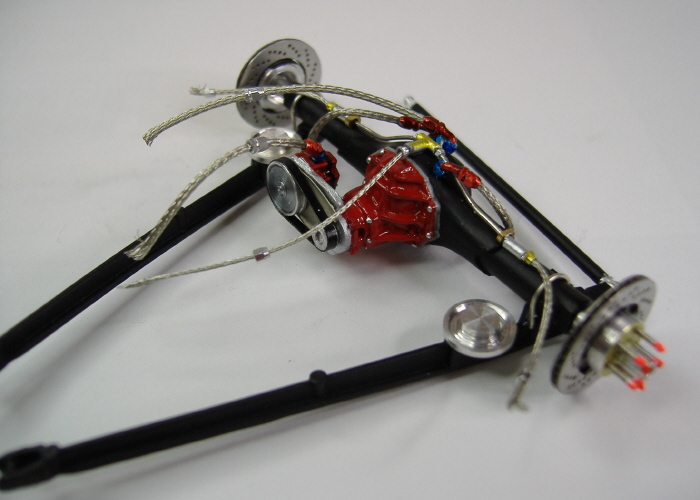 Here is a nice pic of the plumbing and fittings in size #3. I added a filter from aluminum tubing and anodized it with clear orange. The brake rotors were added and glued to aluminum tibing to extend the axle to proper length. 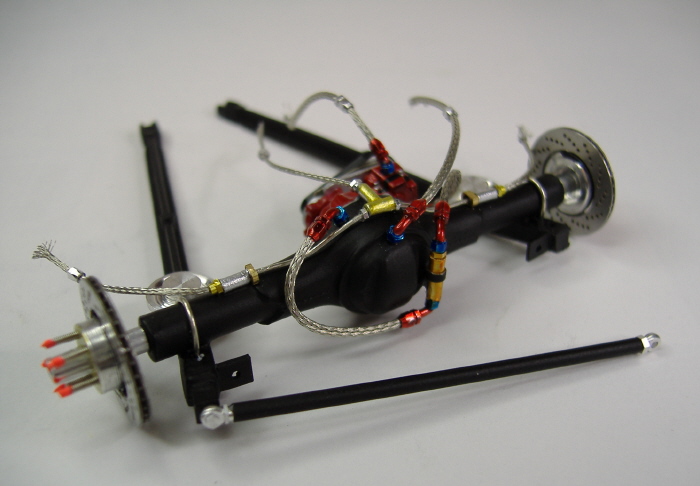 The rear Trac bar was made from aluminum tubing and capped off woth RB motion ball links and will bolt perfectly to the rear trac bar adjuster sleeve on the chassis. 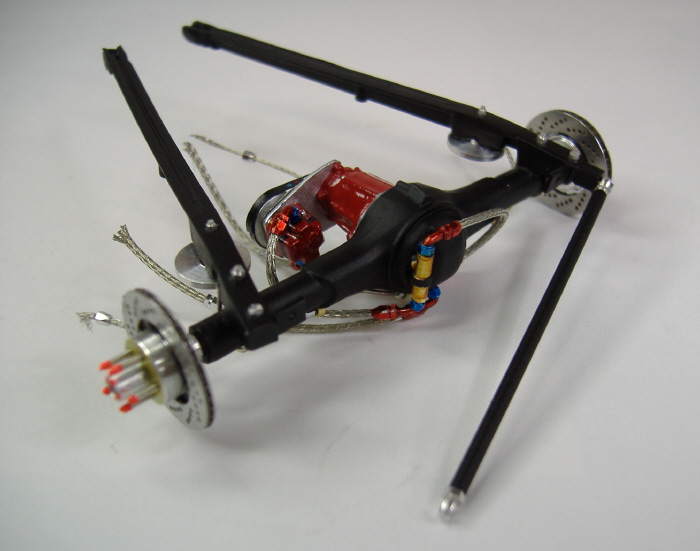 I also scratch built 2 sets of shocks from various sizes of aluminum tibing and DM hard line. 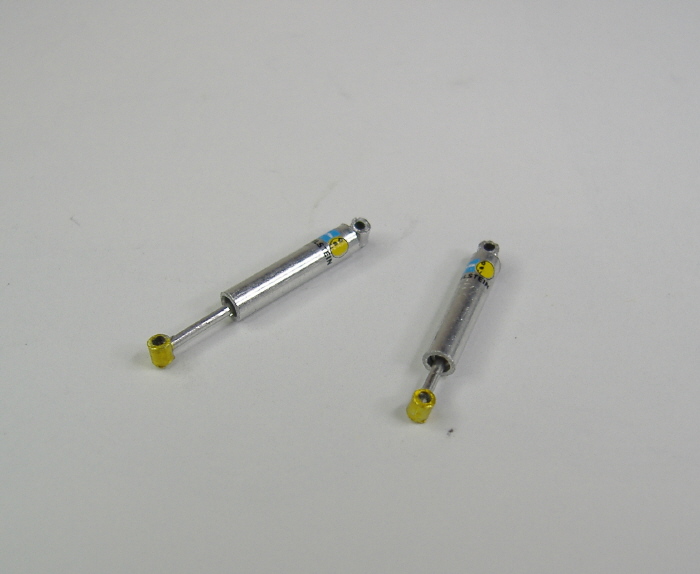 Front shocks are installed. BIG difference from the kit front end setup. 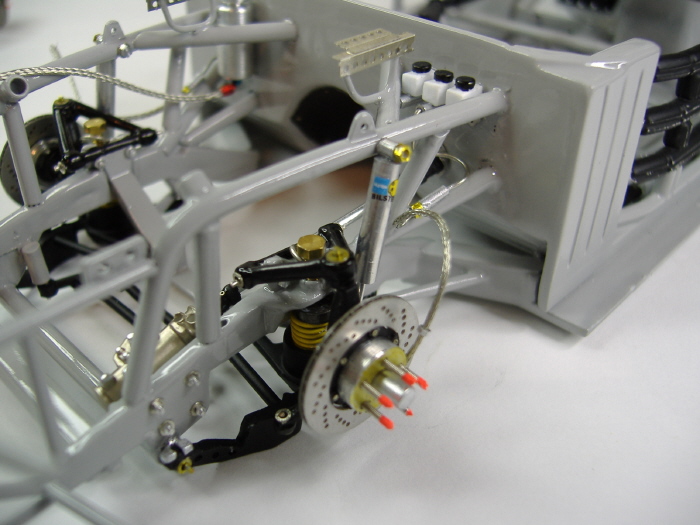 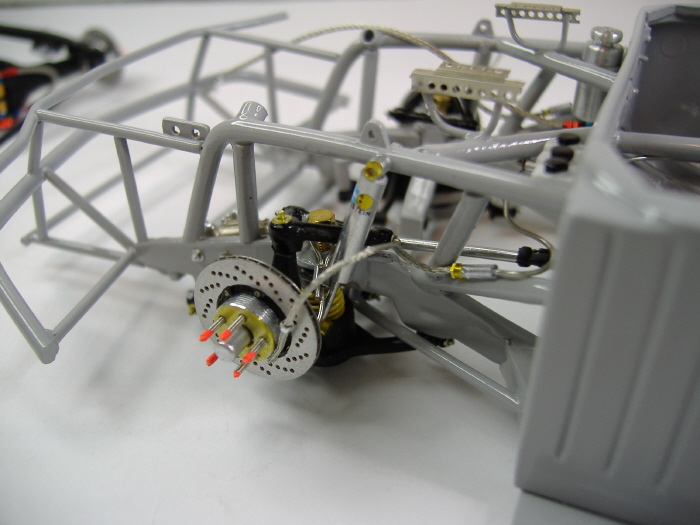 FInally, I installed the bottom of the oil tank. I used a MAS Billet tank. Added red decal ot the bottom and thin strips of soft metal to represent metal straps. I ran a #4 line and fitting to the bottom of it. 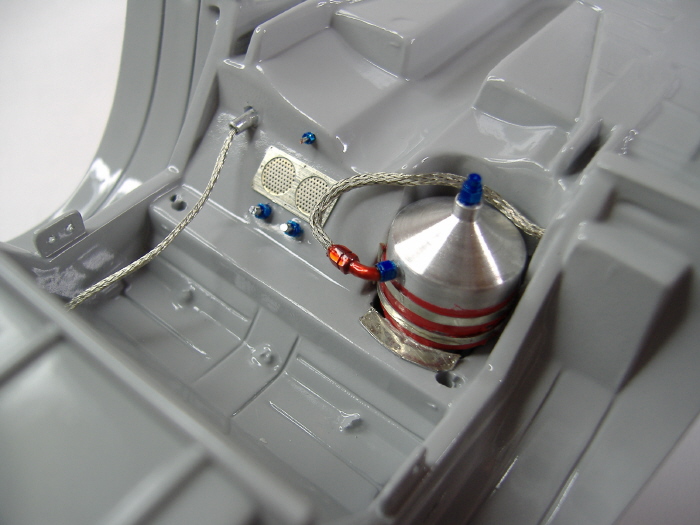 I also added a MCG PE cooler grill for the rear end cooler area. I also plumbed it ready for the lines from the diff... ( boy will that be fun getting all these lines installed!!! ) The smnall little fitting is for the brake line. The lower line coming out of the aluminum tube is the fuel line that goes to the trunk. 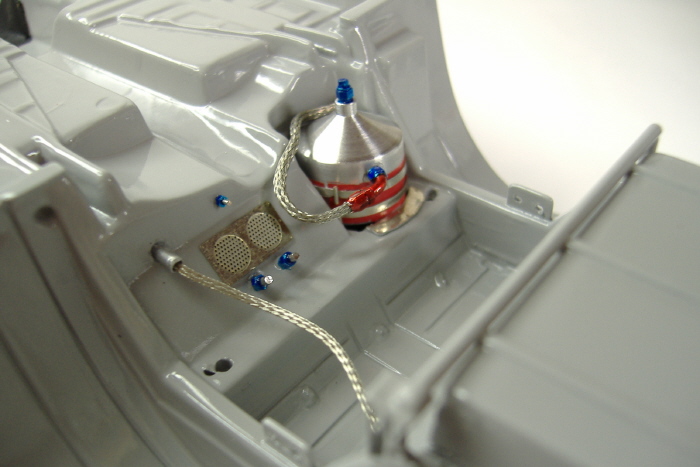 |
||
|
|
|
|
08-28-2005, 07:59 AM
|
#83 | |
|
AF Regular
Join Date: Jul 2003
Posts: 446
Thanks: 5
Thanked 1 Time in 1 Post
|
This is some serious eye candy Dave.
 I am enjoying this build very much, as I do with all your builds. Incredible detailing and clean building style. If I may make two small comments without appearing rude. (1) I have heard some guys mention thinning the fenders to a slightly more realistic thickness. The kit ones are pretty thick. (2) the red A/N fitting on the Billet Oil tank near the diff is not as well applied as other fittings. However the rest of it is awesome. Please don't take my comments the wrong way.  Nenad (Perth, WA)
__________________

|
|
|
|
|
|
08-28-2005, 09:01 AM
|
#84 | |
|
AF Enthusiast

Join Date: Feb 2003
Location: F1...
Posts: 1,410
Thanks: 3
Thanked 3 Times in 3 Posts
|
How could I missed this thread???
Anyway, holy s***!!! This is AMAZING!!! wonderful, great attention to details. Can't wait for the next update (with many many pics  )! )! |
|
|
|
|
|
08-28-2005, 09:59 AM
|
#85 | |
|
AF Newbie
 
Join Date: Jul 2005
Location: Victoria, Virginia
Posts: 17
Thanks: 0
Thanked 0 Times in 0 Posts
|
On the overflow canister, dont hold me to this but I think that car ran a pressurized system without a canister. and would need a puke line out the cowl area. or maybe it had both, but I thought it had one or the other not both.
Awesome build. detail is out of this world. Keep em coming. |
|
|
|
|
|
08-28-2005, 10:54 AM
|
#86 | |
|
AF Enthusiast

Join Date: Jan 2004
Location: Gellivare
Posts: 1,989
Thanks: 1
Thanked 22 Times in 22 Posts
|
Re: WIP: 2000 Peter Maxx "Extreme Build" LONG FIRST THREAD!!
Looks awesome! I cant belive that's an model car! Keep it up!
__________________
Best Regards Anton |
|
|
|
|
|
08-28-2005, 04:02 PM
|
#87 | ||
|
AF Enthusiast
Thread starter
Join Date: Mar 2003
Location: Zephyrhills, Florida
Posts: 981
Thanks: 4
Thanked 5 Times in 5 Posts
|
Re: WIP: 2000 Peter Maxx
Quote:
 |
||
|
|
|
|
08-28-2005, 04:05 PM
|
#88 | ||
|
AF Enthusiast
Thread starter
Join Date: Mar 2003
Location: Zephyrhills, Florida
Posts: 981
Thanks: 4
Thanked 5 Times in 5 Posts
|
Re: WIP: 2000 Peter Maxx
Quote:
|
||
|
|
|
|
08-31-2005, 03:04 AM
|
#89 | |
|
AF Newbie

Join Date: Apr 2005
Location: Melbourne
Posts: 40
Thanks: 0
Thanked 0 Times in 0 Posts
|
Re: WIP: 2000 Peter Maxx "Extreme Build" LONG FIRST THREAD!!
great build, amazing detail...
|
|
|
|
|
|
09-01-2005, 10:38 PM
|
#90 | |
|
AF Enthusiast
Thread starter
Join Date: Mar 2003
Location: Zephyrhills, Florida
Posts: 981
Thanks: 4
Thanked 5 Times in 5 Posts
|
Re: WIP: 2000 Peter Maxx "Extreme Build" LONG FIRST THREAD!!
Thanks guys.... This is a small update, but I am really proud this one came out well... I am going to have the battery compartment in the left rear drivers fender well open with the battery hanging out. This was challenging because the chassis was already painted!! I puled it off though.
Here is the battery, scratchbuilt from styrene sheet and a detailmaster battery hardware kit added. I figured AC delco was the appropriate cell for this car   Here is how it will look hanging out. I will make a cover out of aluminum and prop it up around the fender area..... 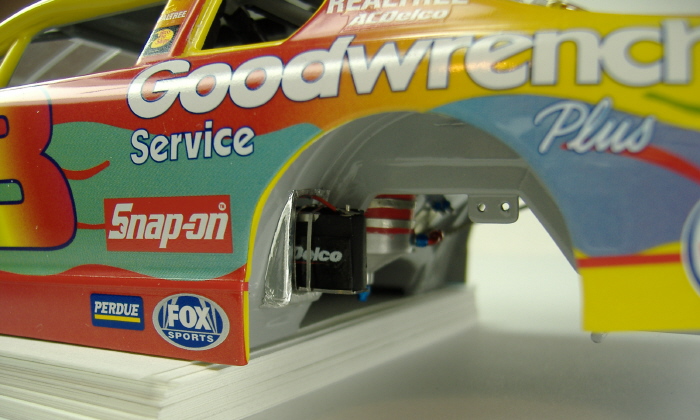 DaveT |
|
|
|
|
|
|
POST REPLY TO THIS THREAD |
 |
|
|

