|
|
|

|
|
| Search | Car Forums | Gallery | Articles | Helper | AF 350Z | IgorSushko.com | Corporate |
|
| Latest | 0 Rplys |
|
|||||||
 |
 Show Printable Version | Show Printable Version |  Email this Page | Email this Page |  Subscribe to this Thread
|
|
|
Thread Tools |
 10-20-2009, 01:16 PM
|
#1 | |
|
AF Enthusiast
 Join Date: Nov 2004
Location: Gainesville, Florida
Posts: 615
Thanks: 0
Thanked 0 Times in 0 Posts
|
I've decided that Ford has two main objectives. Designed obsolescence to sell more parts and ensuring that no one can repair the vehicle except a dealership that sells only Ford parts. The way the dust cover dry rotted on my ball joints could not be accidental as well as the way that they angle the ball joint to make it extremely hard to remove without specific Ford tools. Enough complaints. I replaced my ball joints this past weekend and I'm sharing step by step how to do it for anyone who is interested.
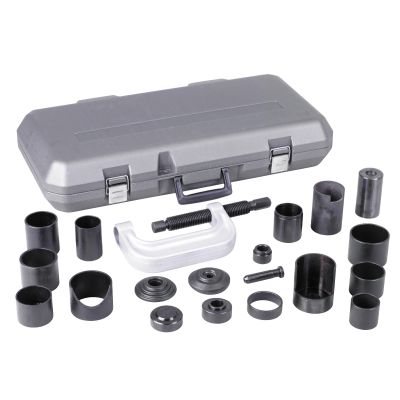
Special tools: 3 in one C-Clamp tool Harbor Freight #3385 (can be made to work with effort). Propane torch Pitman puller 4 metal clothes hangers 4 foot steel pipe 3/4 to 1" Loosen lug nuts (Torque spec 95 ft-lbs) and hub nut (torque 190 ft-lbs). Put the car on jack stands with stands fairly far forward on the subframe. Remove wheels and place under middle of car in case stands slip. Pull cotter pin and loosen tie rod nut half way Pop it loose with pitman puller then remove nut. Push tie rod to side. Remove bolt that holds the brakeline support to give more slack in line. Remove caliper bolts and calipers (Torque spec 25 ft-lbs). Press the piston in a small bit using a c-clamp or brake tool. Hang caliper from strut springs using bent clothes hanger. Remove shoes and caliper supports (torque spec 75 ft-lbs) and rotor. Remove ball joint bolt and pop joint off control arm with pitman puller. Remove the hub nut. Use a large 2 arm puller to press the spindle of the half shaft loose, but do not remove the half shaft yet. Place pipe in hole in control arm so that it is pointing under the car. (In this position the leverage causes the control arm to push down when the pipe is raised.) Put floor jack under the far end of the pipe and raise it to push the control arm down. Very little force is needed. Remove the ball joint spindle from the control arm and push the steering knuckle/hub to the side, then let the jack down and put the pipe away. Remove the half shaft spindle from the hub and hang it from the spring with a clothes hanger. Remove the wheel speed sensor bolt (a 1/4 socket will work) and hang sensor from strut spring. Remove the strut pinch nut that holds the steering knuckle to the strut. (torque spec 95 ft-lbs) Support the steering knuckle with one hand and remove the bolt. Jiggle the steering knuckle and hub assembly until it comes off. Remove the cir-clip from the ball joint and put the steering knuckle in a vise (clamp the area that holds the tie-rod in the vise to support it). WARNING: The knuckle assembly is cast aluminum! Do not hit with hammer or air hammer it. Do not use a acetylene torch with oxygen (too hot). Place the medium cylinder (from the 3 in one kit) against the knuckle over the blunt end of the joint and place one of the disks on the end of the cylinder. Put the end of the c-clamp that doesn't have the bolt over the disk and tighten the c-clamp bolt against the ball joint beside the spindle on the side of the joint closest to the knuckle. The spindle should be forced outwards. It takes a good bit of doing, but it will work. If you have the clamp very tight and it doesn't start pressing out, you may wish to heat the knuckle again. You may also want to use the steel pipe to prevent the clamp from rotating when turning the bolt on the clamp. It takes a LOT of force. Before you insert the new joint, remove the dust boot. The boot makes it hard to press the new joint in and it's difficult to get the circlip over the dust boot once it's installed. The dust boot is held in place with a spring similar to a key ring. To press in the ball joint: put the small cylinder against the knuckle on the side where the spindle will come through. Put the disk with the large hole on the end of the cylinder and the other disk (or large socket) after it. Put the end of the clamp without the bolt on the blunt end of the joint and the c-clamp bolt against the second disk and press the joint in place. Install the circlip. Check for dirt, add grease, and reinstall the dust boot. Reinstall the knuckle assembly on the strut, insert the pinch bolt and install the nut loosely. (There is a bracket on the back of the strut that the bolt goes through.) Thread the half shaft spindle back through the hub and screw the bolt on a few turns. Use the pipe to lower the control arm again and insert the ball joint spindle into the control arm. Allow the control arm to raise SLOWLY. Install bolt loosely. Tighten strut pinch bolt and torque. Tighten hub nut, but to not torque yet. Tighten ball joint nut to torque. Install tie-rod and make sure that brake line is not threaded between half shaft and tie-rod. Torque to 35 ft-lbs then tighten as needed to line the holes up for the cotter pin. Insert pin. Install the rotor and caliper support and torque. Ensure metal dust cover on knuckle/hub assembly has not been bent and is rubbing rotor. This can happen easily, but it bends out again by hand. Rotate rotor to ensure it spins freely. Clean and lubricate caliper slides with high temp brake grease. Put caliper in position and tighten top bolt hand tight. Pivot caliper up. Reinstall shoes and lower caliper. Be sure anti-rattle springs are lined up correctly and don't poke through spaces in caliper. Insert a screw driver through the space in the center of the caliper so that it goes into the cooling slots in the rotor. This will prevent the rotor from turning. Torque the hub nut and remove the screwdriver. Reinstall the wheel speed sensor and the brake line support bracket. Reinstall the tires and lower the car. Torque lug nuts. Pump the brakes a couple times to move the pads back into position before driving the car. |
|

|

|
|
10-20-2009, 01:41 PM
|
#2 | |
|
AF Enthusiast

Join Date: Jan 2008
Location: Twin Cities, Minnesota
Posts: 2,383
Thanks: 0
Thanked 7 Times in 7 Posts
|
Re: Ball joint installlation for 2001 Taurus SEL
That's a half hour a side job if you would have had a ball joint press.
__________________
|
|
|
|
|
|
10-20-2009, 10:11 PM
|
#3 | |
|
SHO No Mo
 
Join Date: Jun 2004
Location: Cedar Rapids, Iowa
Posts: 10,961
Thanks: 101
Thanked 352 Times in 346 Posts
|
Re: Ball joint installlation for 2001 Taurus SEL
From his description I think he has the standard ball joint/U-joint press rather than the master kit you show. The master kit, along with experience using it, probably would take some of the work out of it. It's nice to read though what to expect when using the standard kit such as what is typically available as part of the Loan-a-tool programs.
-Rod |
|
|
|
|
|
10-20-2009, 11:28 PM
|
#4 | |
|
AF Enthusiast
Join Date: Jan 2008
Location: Twin Cities, Minnesota
Posts: 2,383
Thanks: 0
Thanked 7 Times in 7 Posts
|
Re: Ball joint installlation for 2001 Taurus SEL
I agree, I was just illustrating that there are tools that don't have to be "made to work with effort".
__________________
|
|
|
|
|
|
10-21-2009, 10:18 AM
|
#5 | |
|
AF Enthusiast
Join Date: Nov 2004
Location: Gainesville, Florida
Posts: 615
Thanks: 0
Thanked 0 Times in 0 Posts
|
Re: Ball joint installlation for 2001 Taurus SEL
The ball joint goes in at an angle that makes the typical press (even the one you show) very difficult to use. Because of the angle, there isn't enough room on the spindle side of the joint to position the cylinder and disk from the kit in the appropriate way. A $65 special cone shaped tool, that is good for the Taurus and almost nothing else, will make short work of it. I found a thread here on the forum that describes how to make an installation tool from pieces of pipe, but most people don't have access to a wire welder. I considered following the directions and making one, but it would have taken more time to make it than I spent using what I had. Mainly, I was trying to provide assistance for people that are weekend mechanics such as myself and can't afford to spend a lot of money on tools with very limited applications. Incidentally, it took me less than 15 minutes to press the joints out and install the new ones with the method I described (at least on the second joint).
|
|
|
|
|
|
10-21-2009, 11:34 AM
|
#6 | |
|
AF Enthusiast
Join Date: Jan 2008
Location: Twin Cities, Minnesota
Posts: 2,383
Thanks: 0
Thanked 7 Times in 7 Posts
|
Re: Ball joint installlation for 2001 Taurus SEL
The angle isn't the factor. the surfaces that the joint mates to are still flat. If you flip the tool over so that it is pulling the joint into the socket there is no clearance issue with the part of the knuckle that the strut sits in. With the basic ball joint press this is impossible because shaft of the joint will interfere with the adapter so you are forced to use the tool to push the ball joint into the socket so the shaft of the joint can move through the hole of the adapter and press. With a master set there is an adapter that is long enough to allow you to pull the joint into the socket without any clearance issues. This eliminates the angle factor and allows the joint to be installed straight easily.
I'm not criticizing, your step by step is very detailed and right on I'm just saying there are tools that make this easier.
__________________
|
|
|
|
|
|
10-21-2009, 12:55 PM
|
#7 | |
|
SHO No Mo
Join Date: Jun 2004
Location: Cedar Rapids, Iowa
Posts: 10,961
Thanks: 101
Thanked 352 Times in 346 Posts
|
Re: Ball joint installlation for 2001 Taurus SEL
I must admit, I ran into an issue on my wife's Lincoln LS very similar to what Doug describes. I cut my losses and, even though I already had the bare ball joints, I ended up buying a new knuckle and hub assembly. I have the 3-in-1 kit (not the master kit), a 6 ton hydraulic press, welder, several fabrication tools, but there just was no way I was going to be able to get on the ball joint straight enough to apply the force I expected would be needed to press the ball joint out without risk to my health. I was able to buy the new OEM knuckle and hub for less than an ambulance ride.
I've not used a master kit and don't doubt you Airjer that there probably is an adapter that would have taken most of the work out of it, but I'm still impressed that Doug was able to solve the issue with what he had, and I'm sure he was proud of his accomplishment (as he should be). Both you and Doug have created a valuable thread here. If someone plans to do this type of work on modern cars and don't already have several tools to do so, take Airjer's advice and buy the master kit. It may save you a few hundred dollars the first time you use it. If you already have a tool that may do the job, don't give up (but be safe). These are the kinds of feedback that make these forums so valuable, and it's great to see people investing so much time to help others out based on their learning experiences! I know Airjer did not post with the intent to criticize. -Rod |
|
|
|
|
|
10-22-2009, 08:38 AM
|
#8 | |
|
AF Enthusiast
Join Date: Sep 2006
Location: Athens, Georgia
Posts: 4,662
Thanks: 0
Thanked 64 Times in 64 Posts
|
Re: Ball joint installlation for 2001 Taurus SEL
Their is a special adapter for Ford Taurus. O'Riley's parts stores have a loaner tool for your use. Lisle's and Moog, and OTC have adapters.
http://www.amazon.com/ Search OTC-8032A,OTC-8032 http://www.tooltopia.com/ Search LIS-45450,OTC-8032A,OTC-8032 |
|
|
|
|
|
10-24-2009, 10:15 AM
|
#9 | |
|
AF Regular
Join Date: Oct 2005
Location: Northern, New Jersey
Posts: 149
Thanks: 0
Thanked 2 Times in 2 Posts
|
Re: Ball joint installlation for 2001 Taurus SEL
Another alternative would be to take the knuckle to a local machine shop with $15 and have them press the joint out and in. Takes the fun out of it, though.
|
|
|
|
|
|
10-24-2009, 01:24 PM
|
#10 | |
|
AF Enthusiast
Join Date: Sep 2006
Location: Athens, Georgia
Posts: 4,662
Thanks: 0
Thanked 64 Times in 64 Posts
|
Re: Ball joint installlation for 2001 Taurus SEL
Last edited by rhandwor; 10-24-2009 at 01:55 PM. |
|
|
|
|
|
09-28-2020, 07:37 AM
|
#11 | |
|
AF Newbie
Join Date: Sep 2020
Location: reserve, Louisiana
Posts: 1
Thanks: 0
Thanked 1 Time in 1 Post
|
Re: Ball joint installlation for 2001 Taurus SEL
I'm in the middle of replacing suspension on my Taurus and I found that if you torch or sawzall the bolt off of the ball joint they can be pressed out easily
|
|
|
|
|
| The Following User Says Thank You to uncleleesac For This Useful Post: |
shorod (09-28-2020)
|
|
|
POST REPLY TO THIS THREAD |
| Tags |
| 2001 , ball , installation , joint , taurus |
 |
|
|

