|
|
|

|
|
| Search | Car Forums | Gallery | Articles | Helper | AF 350Z | IgorSushko.com | Corporate |
|
| Latest | 0 Rplys |
|
|||||||
| WIP - Street Post topics for any "Works In Progress" street vehicles projects in this sub-forum. |
 |
 Show Printable Version | Show Printable Version |  Email this Page | Email this Page |  Subscribe to this Thread
|
|
|
Thread Tools |
 04-09-2009, 06:10 AM
|
#16 | |
|
Zomby Woof
 
Join Date: Nov 2002
Location: Oz
Posts: 8,871
Thanks: 0
Thanked 1 Time in 1 Post
|
Re: Yet another Hasegawa Miura
Nice.
 Can never have too many Lamborghini's, especially Verde ones. |
|

|

|
|
04-09-2009, 07:51 AM
|
#17 | |
|
Razor Sharp Twit

Join Date: Mar 2004
Location: london
Posts: 5,865
Thanks: 0
Thanked 26 Times in 22 Posts
|
Re: Yet another Hasegawa Miura
I'm glad that I'm not the only one with 2 year old unfinished builds in a box somewhere...
I'm also glad that something this beautiful has been dug out. Goes to show folks, you don't need to ask people for updates; they will come when the time is right. Lovely looking paint by the way. Is that the "Twiggy" colour?
__________________
AF's Guidelines Read them. __________________  Currently in the process of re-hosting my photos. If any go missing, drop me a PM. |
|
|
|
|
|
04-09-2009, 12:38 PM
|
#18 | |
|
AF Newbie
Join Date: Oct 2002
Location: Mexico City
Posts: 63
Thanks: 0
Thanked 0 Times in 0 Posts
|
Re: Yet another Hasegawa Miura
I love that paint job
 What color is that? Cheers |
|
|
|
|
|
04-10-2009, 07:43 AM
|
#19 | |
|
AF Enthusiast
Thread starter

Join Date: Mar 2002
Location: Western MI, Michigan
Posts: 683
Thanks: 43
Thanked 9 Times in 5 Posts
|
Re: Yet another Hasegawa Miura
Thanks for the comments, guys. . .
Color is Verde Chiaro/Verde Pistachio used on 5064. Little update. Got my S27 upgrade set yesterday and slapped the steering column together. 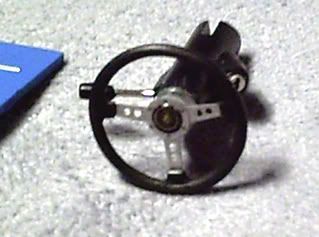 This set awesome and includes parts for both the 400, S, SV and Jota One thing I didn't like was the absence of a proper thickness of the steering hub once you trim away the old spoke of the steering wheel. I used a shim of polished aluminum tubing of the correct diameter. 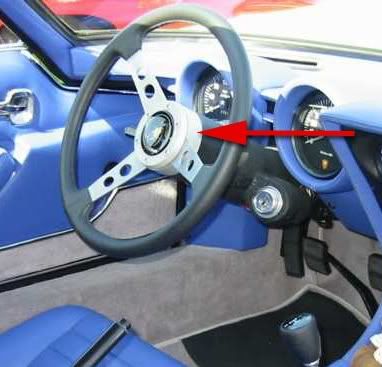 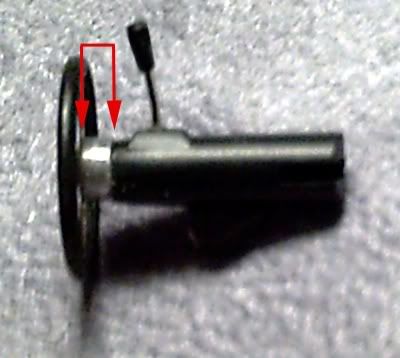 Also had to thin the rim points from the back where the spokes meet the rim. Would have looked crappy if simply mounted to the stock trimmed steering wheel.
__________________
Chuck
|
|
|
|
|
|
04-10-2009, 01:26 PM
|
#20 | |
|
AF Enthusiast

Join Date: Feb 2006
Location: Salonica
Posts: 1,336
Thanks: 138
Thanked 111 Times in 106 Posts
|
Re: Yet another Hasegawa Miura
One of most good looking cars ever... Great design.
Interesting color choice. Great start. Keep modeling... |
|
|
|
|
|
04-10-2009, 01:35 PM
|
#21 | |
|
AF Enthusiast

Join Date: Jul 2005
Location: London
Posts: 899
Thanks: 3
Thanked 11 Times in 10 Posts
|
Re: Yet another Hasegawa Miura
Twiggy green...my favourite!
Bodywork looks peeerfect. |
|
|
|
|
|
04-12-2009, 12:31 AM
|
#22 | |
|
AF Regular

Join Date: Aug 2007
Location: Passaic, New Jersey
Posts: 295
Thanks: 0
Thanked 0 Times in 0 Posts


|
Re: Yet another Hasegawa Miura
great job with the motor and the wheel almost real
|
|
|
|
|
|
04-13-2009, 02:04 PM
|
#23 | |
|
AF Enthusiast
Thread starter
Join Date: Mar 2002
Location: Western MI, Michigan
Posts: 683
Thanks: 43
Thanked 9 Times in 5 Posts
|
Re: Yet another Hasegawa Miura
Thanks. . .
Movin' along slowly but surely. . . Removed the rear latch button and drilled through the rear panel. Was scary since the body was already painted. I then turned a new aluminum piece. I Never like molded in details such as this and thought a polished metal part would look so much better than attempting to foil it. . .  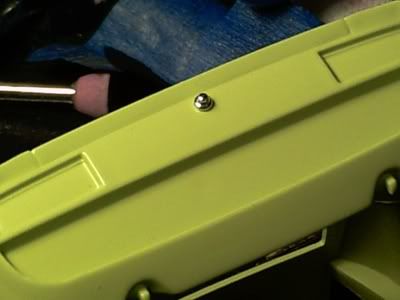 May reduce it a bit more for scale . . . but happy with the results as is. . .
__________________
Chuck
|
|
|
|
|
|
04-15-2009, 01:43 AM
|
#24 | |
|
AF Fanatic

Join Date: Dec 2004
Location: Up the creek with no paddle
Posts: 5,888
Thanks: 7
Thanked 16 Times in 15 Posts
|
Re: Yet another Hasegawa Miura
Nice touch!

__________________
Guideline for happy modeling: Practice on scrap. Always try something new. Less is more. "I have a plan so cunning, you could put a tail on it and call it a weasel" - Edmund Blackadder |
|
|
|
|
|
04-22-2009, 02:26 PM
|
#25 | |
|
AF Enthusiast
Thread starter
Join Date: Mar 2002
Location: Western MI, Michigan
Posts: 683
Thanks: 43
Thanked 9 Times in 5 Posts
|
Re: Yet another Hasegawa Miura
Thanks Klutz!. . .
Instrument cluster time. . .  . . lol . . lolI didn't like the decals as is and thought they needed to be behind "glass" as with the real gauges. I made transparencies of the decal sheet as described in my How-to tutorial. I made a punch set for the gauge faces with quarter inch plexi. You can buy a punch set online but it's about 40 dollars. 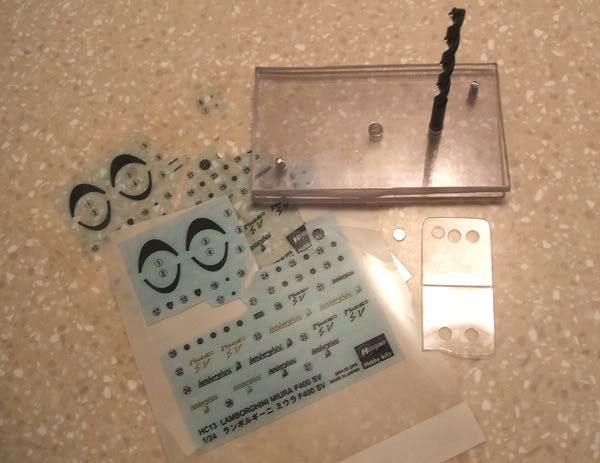 I stacked four pieces of plexi together prior to drilling. The top and bottom pieces will help stabilized the drill bit giving you clean, precise holes. Discard these pieces afterwards. I then drilled in sequence (with a drill press). Drilled #1 hole and inserted a pin (aluminum rod). Drilled #2 hole and inserted another pin. With these points secure I was able to drill out the punch hole with the correct size bit I needed for the gauges (3/16ths). 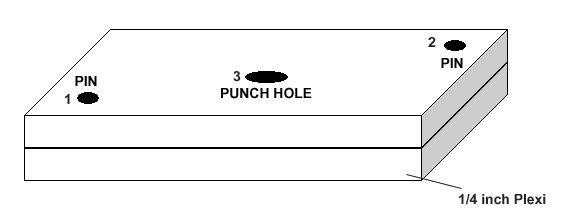 Remove the bit you used to drill the punch hole from the drill press and grind the stem flat. 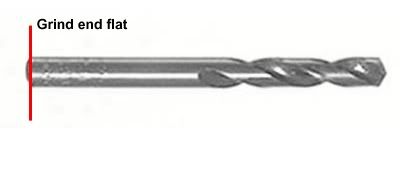 The drill bit will act as your punch and all you need to do is sandwich and center your printed gauges and then tap with a hammer. Light tap is all you need and it shouldn't hurt the bit at all. You can use a piece of wood or rubber mallet of you want to protect the bit but, you're not drivin' nails and only piercing thin plastic. . .lol You can buy an entire set of drill bits and do several hole in different sizes. You can also buy additional metal rod to use as punches if ya don't wanna be bangin' on your drill bits and eventually dulling them. Great tool for scratch building with out that huge price tag. Anyway, Here are the resulting gauges. . . They look better than the kit decals and actually look as if they're "under glass". 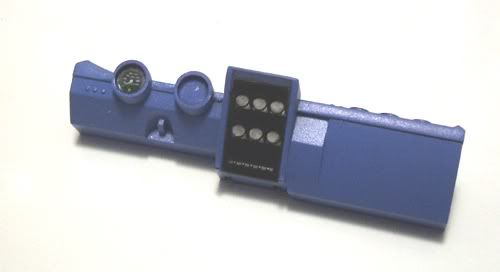 If you look in the first pic, I also punched out additional clear disks to go on top of the punched out gauge to increase the realism. This was a little bit thicker than the transparency film and will lay completely flat. Not really necessary but it does add a little more depth to them. Going to do the center console next in the same manner. I hope they come out as nice as the larger gauges did . . .
__________________
Chuck
Last edited by Lambo003; 04-22-2009 at 05:25 PM. |
|
|
|
|
|
04-23-2009, 02:58 AM
|
#26 | |
|
AF Fanatic
Join Date: Dec 2004
Location: Up the creek with no paddle
Posts: 5,888
Thanks: 7
Thanked 16 Times in 15 Posts
|
Re: Yet another Hasegawa Miura
Cool
I have just been doing a similar effect on my Lotus. I also have a punch and die set and I have to say it is a great tool that comes in useful at the most unexpected times!
__________________
Guideline for happy modeling: Practice on scrap. Always try something new. Less is more. "I have a plan so cunning, you could put a tail on it and call it a weasel" - Edmund Blackadder |
|
|
|
|
|
04-23-2009, 02:07 PM
|
#27 | |
|
AF Enthusiast
Join Date: Nov 2008
Location: Highland, California
Posts: 652
Thanks: 1
Thanked 7 Times in 7 Posts
|
Re: Yet another Hasegawa Miura
nice, like these DYI's. ill be doing this soon, i need to do on for my v-dub build.
build is looking good, what do you use to turn the aluminum pieces? |
|
|
|
|
|
04-26-2009, 06:56 AM
|
#28 | |
|
AF Enthusiast
Thread starter
Join Date: Mar 2002
Location: Western MI, Michigan
Posts: 683
Thanks: 43
Thanked 9 Times in 5 Posts
|
Re: Yet another Hasegawa Miura
Thanks. . .
It depends on the complexity of the part. Usually a mill/lathe but for smaller simple parts I just use my Dremel or drill. This is a 1/24th Murciélago shifter turned on a Dremel from 1/8th inch aluminum rod . . . 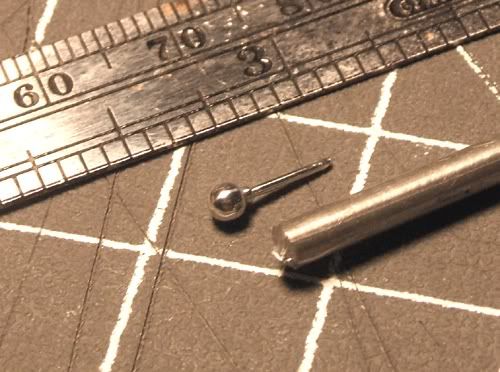 A steady hand along with something to catch the part is all that's needed.
__________________
Chuck
|
|
|
|
|
|
04-26-2009, 12:08 PM
|
#29 | ||
|
AF Fanatic
Join Date: Dec 2004
Location: Up the creek with no paddle
Posts: 5,888
Thanks: 7
Thanked 16 Times in 15 Posts
|
Re: Yet another Hasegawa Miura
Quote:
 Can you share some more details about how you do that? How do you hold the Dremel? What do you use as cutters? etc etc..
__________________
Guideline for happy modeling: Practice on scrap. Always try something new. Less is more. "I have a plan so cunning, you could put a tail on it and call it a weasel" - Edmund Blackadder |
||
|
|
|
|
04-26-2009, 07:28 PM
|
#30 | |
|
AF Enthusiast
Join Date: Sep 2004
Location: Tuttle, Oklahoma
Posts: 2,176
Thanks: 0
Thanked 24 Times in 21 Posts
|
Re: Yet another Hasegawa Miura
I know what he's doing, and how. I have used this method to make wheel lips, steering wheels and all sorts of other tiny little details like his shifter and trunk/hood release.
Simply chuck the bar stock into the drill/dremel/lathe substitute, use sand paper, x-acto (#11 hobby knife) blades, what ever fits the part you are turning, and use your imagination. I LOVE the progress on this build. I've been following it, but just lurking 'till now. Keep up the excellent work!
__________________
There is a very fine line between "hobby" and "mental illness." 
|
|
|
|
|
|
|
POST REPLY TO THIS THREAD |
 |
|
|


 opcorn:

