|
|
| Search | Car Forums | Gallery | Articles | Helper | Air Dried Fresh Beef Dog Food | IgorSushko.com | Corporate |
|
|||||||
| Car Modeling Share your passion for car modeling here! Includes sub-forum for "in progress" and "completed" vehicles. |
 |
 Show Printable Version | Show Printable Version |  Subscribe to this Thread
|
|
|
Thread Tools |
|
#1
 07-06-2008, 04:00 PM
|
|||
|
|||
|
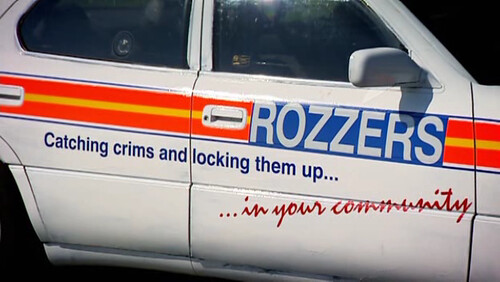
Building kit models is great for the first in a series, but what about those neat custom ideas you have that you don't have the time or skill to sketch out on paper. The solution is pretty simple and all you need is your idea, the internet, a scanner and a photo editiong program (though Photoshop is the easiet to do this with).
Take your instructions (Tamiya kit instructions work best and you can see why).  Then using the magic wand or what ever tools you are comfortable with, section out the areas you want to edit (just because you dont make new layers via cut or you'll destroy the orginal scan and cant instantly revert back to a 'clean' spot. Here is a really rough (it took me longer to write this up than it did for me to do this example) concept of a GT-R35 police car I have in my head. As I said it is really rough, so no laughing at it  . I'll probably use it later as far a coloring goes, but the decal work will need some serious fixing up. . I'll probably use it later as far a coloring goes, but the decal work will need some serious fixing up. Another nice thing about this is that you can take aftermarket logos and get a great idea on size andplacement as well as alter colors to see how your paint scheme will work with the custom decals you'll print or have made. Size and placement is jsut as important as color and shape when designing a custom model, so this method works even better for those of us who enjoy taking nothing into something to the Nth degree. 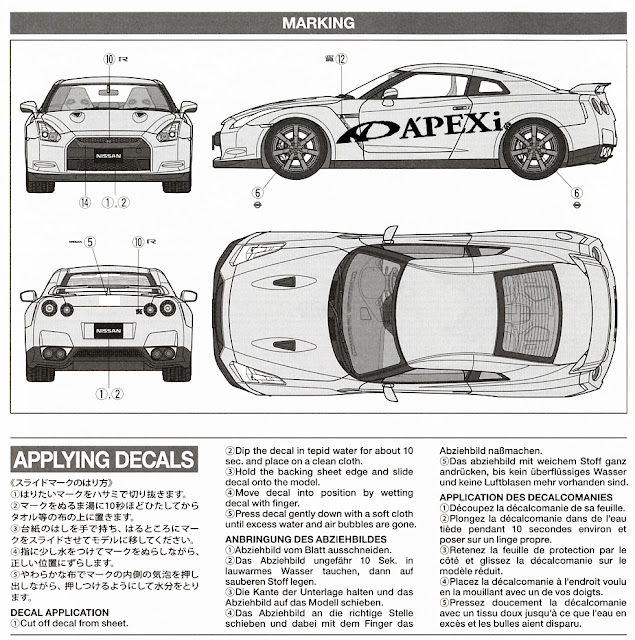 Yes, again this is poop compared to what CAN be done, butas before this is only an example. Most of you out there have been doing this a LOT longer (I've been doing this since Nov of 07) so I don't need to tell you guys HOW to place and color. I'm jsut introducing (hopefully) and new idea and a more efficient work flow that could save a lot of "WTF did I jsut do?" in the physical world by showing you the reversable "WTF did I just do?" in the digital one. 
|
|
#2
07-07-2008, 03:22 AM
|
||||
|
||||
|
Re: HOW TO - Use kit instructions to conceptualize an idea.
Hi, it's a good idea...
but this can only solve decal placements or coloring only... what about body mods? like changing the GTR into a sedan or cabriolet...you have any ideas on that? please share & thankx! marc  SGP
__________________
I can feel the adredalin, the same adredalin of what it's like... to be a classic ferrari coachbuilder.
|
|
#3
07-07-2008, 06:25 AM
|
||||
|
||||
|
Re: HOW TO - Use kit instructions to conceptualize an idea.
I do that a lot except I make copies of the instructions and increase the size, then freehand my ideas.
__________________
There is a lesson in every kit.
|
|
#5
07-07-2008, 02:22 PM
|
||||
|
||||
|
Re: HOW TO - Use kit instructions to conceptualize an idea.
Very nice. I did something similar for my Champion Audi.
__________________
2014 - All previous models lost during move. Here's whats new Completed 1/24 Corvette C5R (2003 conversion) 1/24 Audi R10 (Champion Racing) 1/24 Porsche 911 GTD (Champion Racing) WIP 1/24 BMW Z4 GTD (Turner Motorsports) 1/24 Mazda MX5 2016 Cup car (Champion Racing) 1/24 Pescarolo P1 (Champion Racing)
|
|
#6
07-07-2008, 07:32 PM
|
|||
|
|||
|
Re: HOW TO - Use kit instructions to conceptualize an idea.
Quote:
|
|
|
POST REPLY TO THIS THREAD |
 |
|
|