|
|
| Search | Car Forums | Gallery | Articles | Helper | Air Dried Fresh Beef Dog Food | IgorSushko.com | Corporate |
|
|||||||
| WIP - Motorsports Post topics for any "Work In Process" motorsports vehicles in this sub-forum. |
 |
 Show Printable Version | Show Printable Version |  Subscribe to this Thread
|
|
|
Thread Tools |
|
#1
 04-09-2008, 01:48 PM
|
||||
|
||||
|
1/20 Tamiya F2001
I've been reading and watching this forum for a while now and it's helped enormously with my builds. I'm still below par compared to most on here but hopefully some constructive critisism will help me along
 Apologies to the guy who's just done an F2001 by the way but I happened to have already started it when your thread came up. You did the 2002 livery anyway so mine will at least be different. I'm actually half way through when you join me. It's gone alright so far. The major problem was the nose cone. Tamiya moulded it in two halves so I spent a long time with the milliput smoothing it out, came out well though Decided this would be Schumacher's car from the Japanese GP so the raised part halfway up the nose had to be sanded off (unfortunately I only realised this wasn't present at the Japanese GP after I'd painted it...at least it was before I put the Marlboro on though!). The other problem was the silver block behind the air intake. In the kit it's far too far back from the air intake, it should be right up against it. So I've taken it off and have made a new one from styrene. It's not finished yet though. I plan on doing the pipes around the silver block so it had to be moved. Other than the standard kit I've used some insulation tape to recreate the heat sheild ont he floor of the engine bay and the inside of the engine cover. Also got myself a brake set from hiroboy but haven't got around to doing those yet. Also I haven't used any CF decals on here as I'm not confident enough with the microsol yet. Perhaps on my next build I will Apologies to the guy who's just done an F2001 by the way but I happened to have already started it when your thread came up. You did the 2002 livery anyway so mine will at least be different. I'm actually half way through when you join me. It's gone alright so far. The major problem was the nose cone. Tamiya moulded it in two halves so I spent a long time with the milliput smoothing it out, came out well though Decided this would be Schumacher's car from the Japanese GP so the raised part halfway up the nose had to be sanded off (unfortunately I only realised this wasn't present at the Japanese GP after I'd painted it...at least it was before I put the Marlboro on though!). The other problem was the silver block behind the air intake. In the kit it's far too far back from the air intake, it should be right up against it. So I've taken it off and have made a new one from styrene. It's not finished yet though. I plan on doing the pipes around the silver block so it had to be moved. Other than the standard kit I've used some insulation tape to recreate the heat sheild ont he floor of the engine bay and the inside of the engine cover. Also got myself a brake set from hiroboy but haven't got around to doing those yet. Also I haven't used any CF decals on here as I'm not confident enough with the microsol yet. Perhaps on my next build I will So here are the pictures so far. Apologies for the long intro but I had to explain what I've done. Cheers!  This was actually the first time I used microsol! 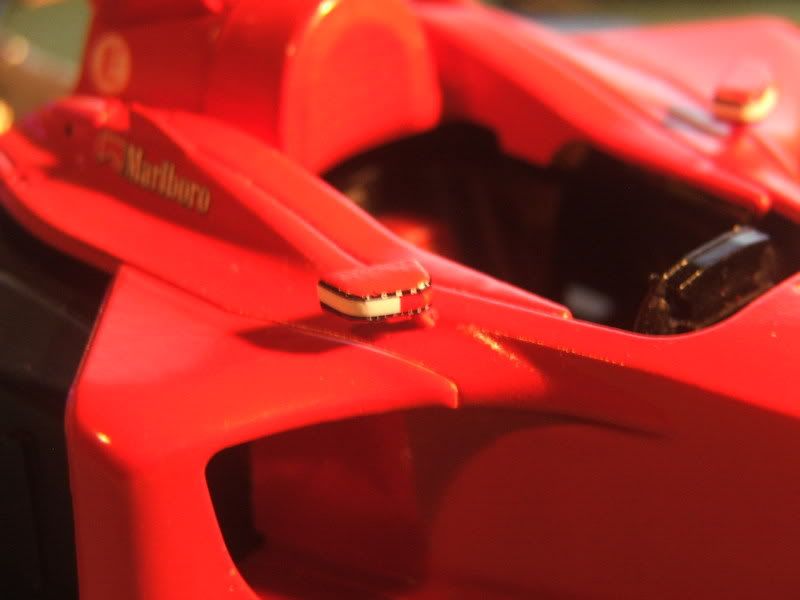 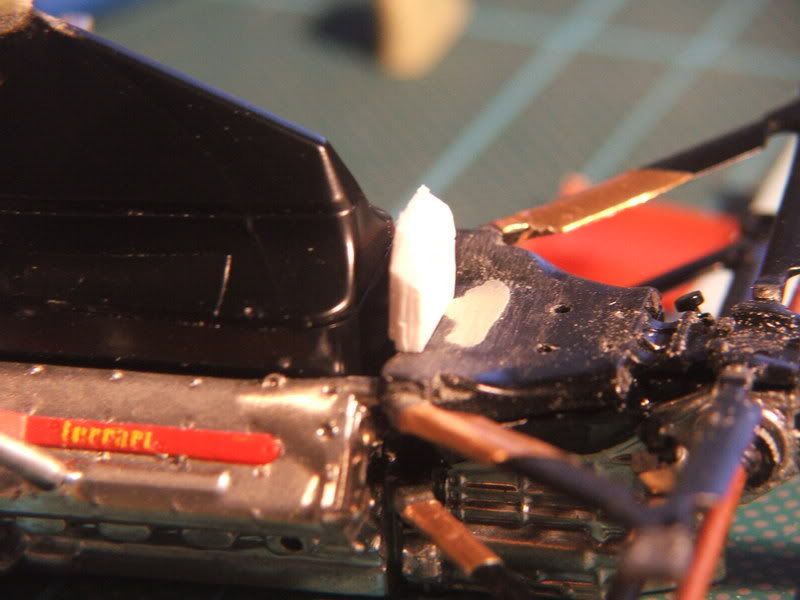 Here is the real picture from a similar angle. Apologies if I'm not meant to be posting this, it's from gurneyflap 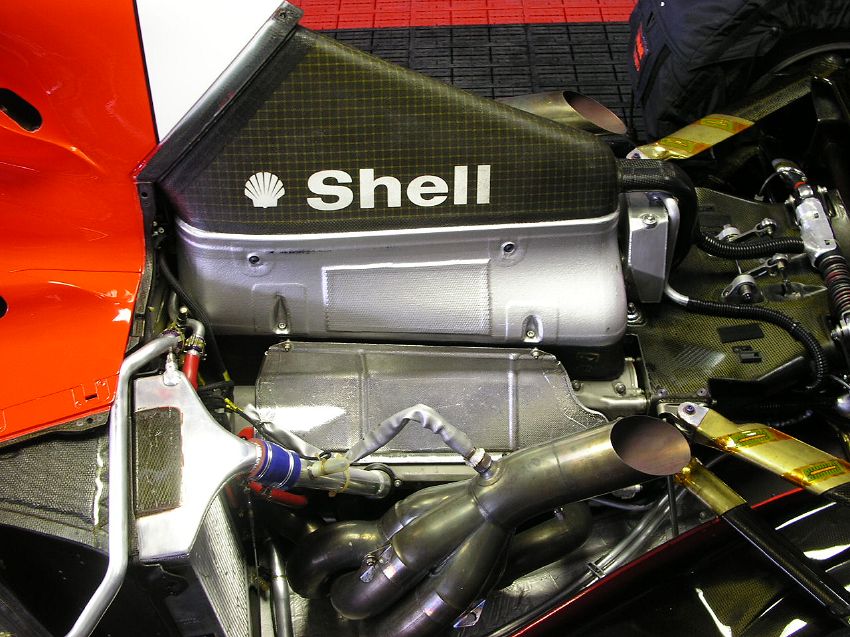 Notice where I've sanded down the raised part  Insulation tape 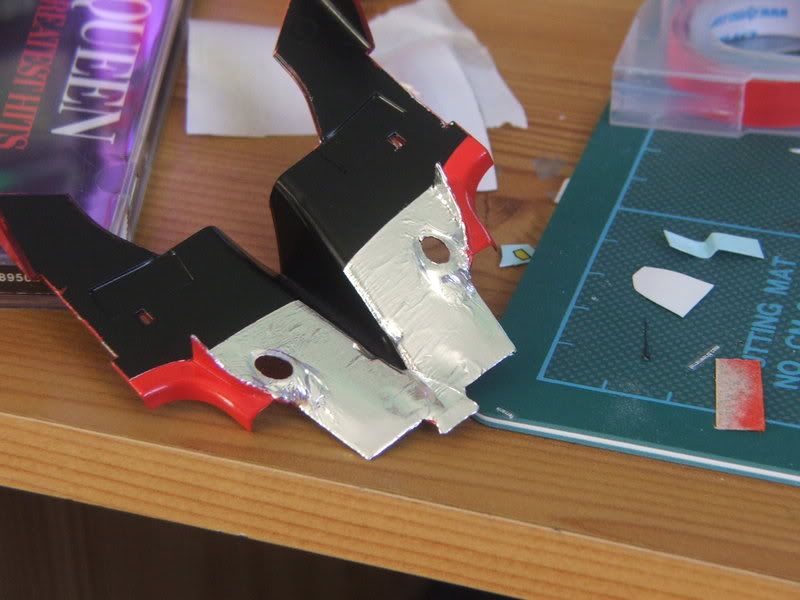 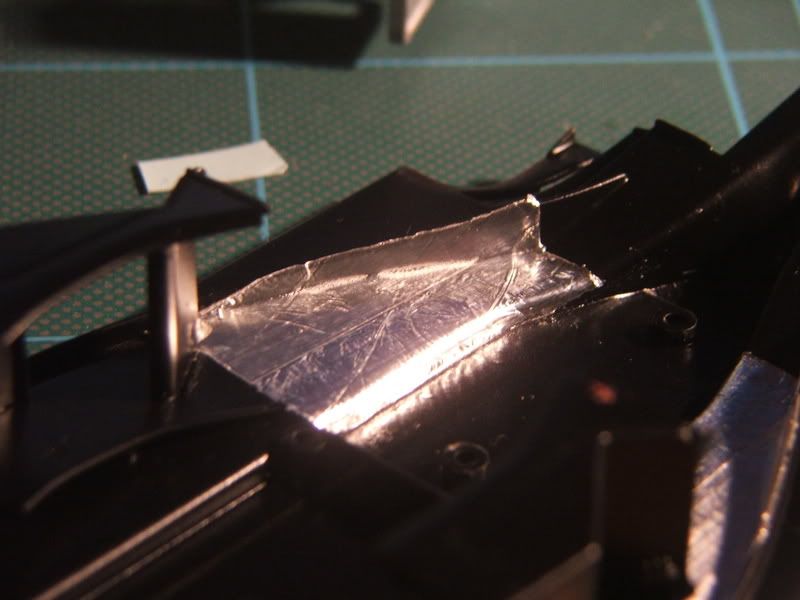 Steering wheel took me a while 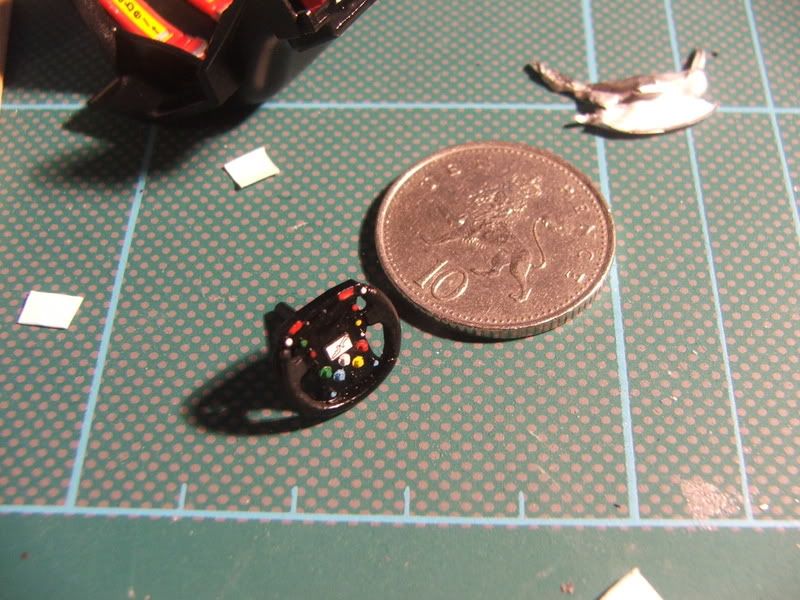 A picture of the instructions showing the construction of the nose. The small piece in between the wing supports actually sat too low so a lot of milliput and sanding was needed to make the gap smooth 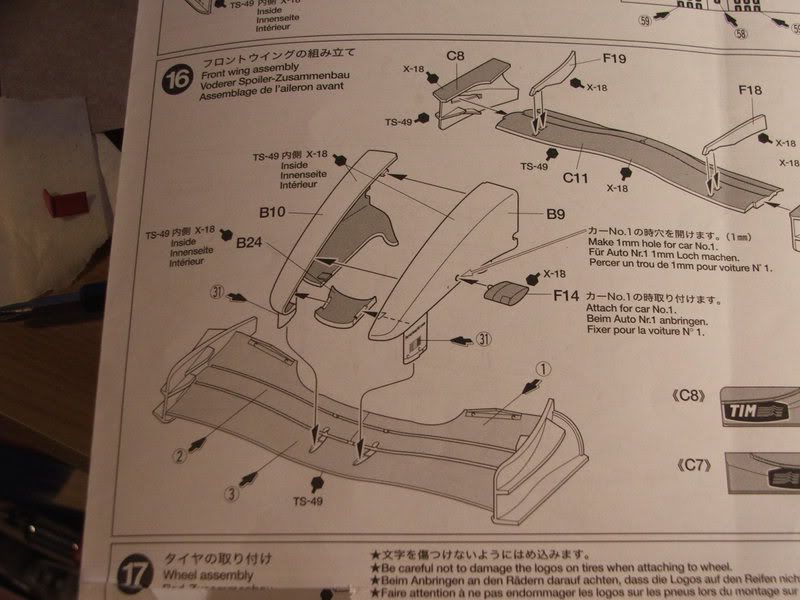 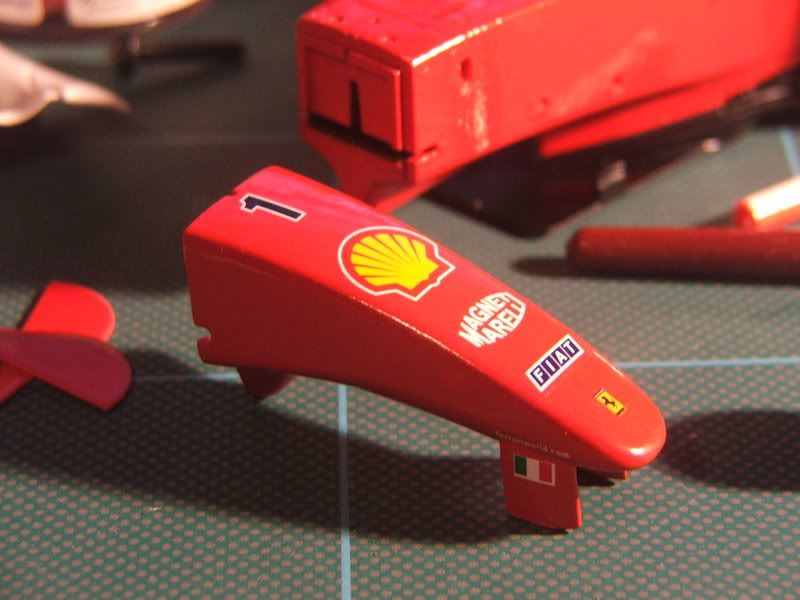 
Last edited by ejsmith; 04-09-2008 at 02:39 PM. 
|
|
#2
04-09-2008, 02:28 PM
|
||||
|
||||
|
Re: 1/20 Tamiya F2001
look great so far if you are not that confident doing the c/f decals why dont you try the way i did mine on my f1 by using ladies tights and spray gun metal lightly over the parts but it a nice build so far top marks

__________________
Current build Tamiya 1/12 YZR M1 2004 Siderman Bike Tamiya 1/12 yzr500 grand prix racer Home Page 
|
|
#3
04-09-2008, 02:32 PM
|
||||
|
||||
|
Re: 1/20 Tamiya F2001
Yeah I thought that was a great idea! I saw someone try the same sort of thing with some wire mesh and I managed to get hold of some but it didn't really work. Perhaps I was using too similar a shade (gloss black over satin) whereas you used gun metal over the black and it stands out more so I might try that. Thanks
|
|
#6
04-19-2008, 11:36 PM
|
||||
|
||||
|
Re: 1/20 Tamiya F2001
Quote:
 I have yet to try my first F1 beastie but I am looking forward to it (even though I am rather intimidated by the skill level of some of our colleagues here on AF) Keep up the good work 
__________________
Guideline for happy modeling: Practice on scrap. Always try something new. Less is more. "I have a plan so cunning, you could put a tail on it and call it a weasel" - Edmund Blackadder
|
|
#7
04-20-2008, 09:20 AM
|
||||
|
||||
|
Re: 1/20 Tamiya F2001
I've been really busy recently so I haven't had much time on this. Plus a lot of the parts are still being painted so I don't have photos of them...
Anyway I started working on the brakes last night. The Tamiya kit brakes are very basic and don't really look the job so I bought a brake set from hiroboy instead It turned out to be hours of fiddly work though...First off the discs were painted silver. The silver I've used isn't quite the right match but I might try and weather the disc a bit to make it look worn. Then there are 10 0.3mm dia holes around the centre and the vague instructions tell you to cut a length of solder and put it in the hole. It doesn't say what length though! I guessed 10mm as they gave me 60cm for 4 brakes. 10mm was a little big but not too bad. Anyway then tiny tiny gold rings were threaded onto each piece of wire and then a larger ring threaded over the top of all of this. 10 more tiny gold rings were then threaded over each wire. While I'm here I'll just point out that the rings were actually more like semi-circles because they were flat on one side and the flat side had to face outwards. So not only did I have to thread the rings on, I had to get them to face the right way as well. Now at this point the instructions say to put a sort of washer over the top as a guage to cut the wire at the same height for all 10 but I decided this would be far too fiddly and just guessed them. Anyway all that needs doing to finish the brakes now are the callipers which need to be sprayed gold and some more wire used Anyway, pictures... So this is halfway throught he first stage, the wires are in place and the first few gold rings have been slipped on. You probably know how big a 1/20 brake is but the 10p just shows how small those gold rings were! 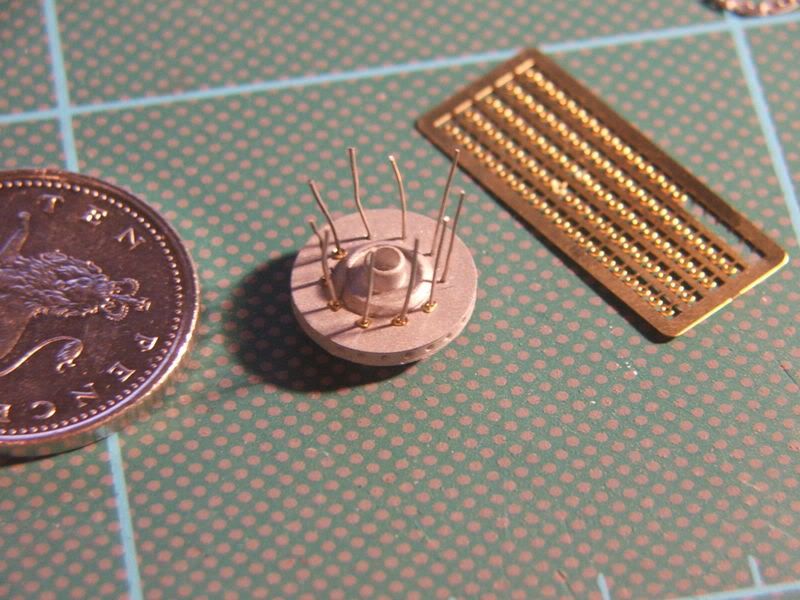 The finished brake. Notice the ring next to it. That's the washer that was supposed to be slipped over so the wires could be cut 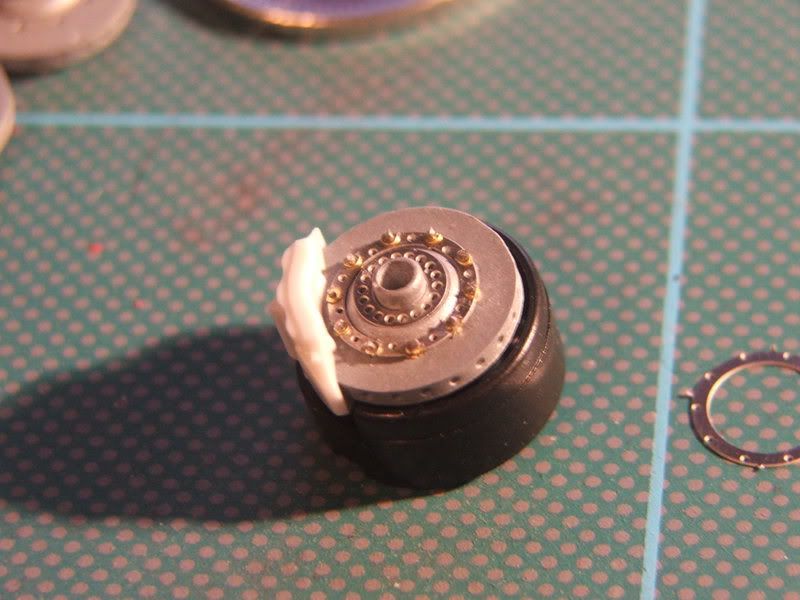 Here's the kit piece which is unpainted 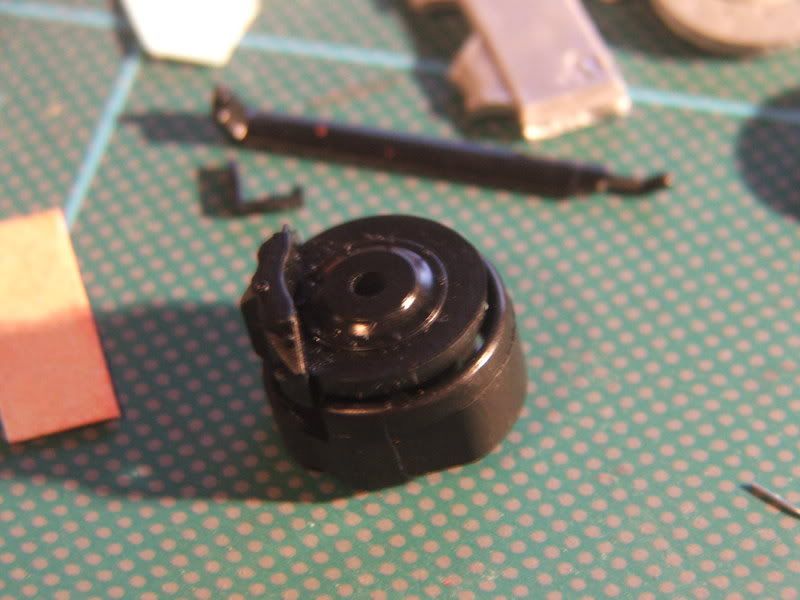 And a better picture of the brake 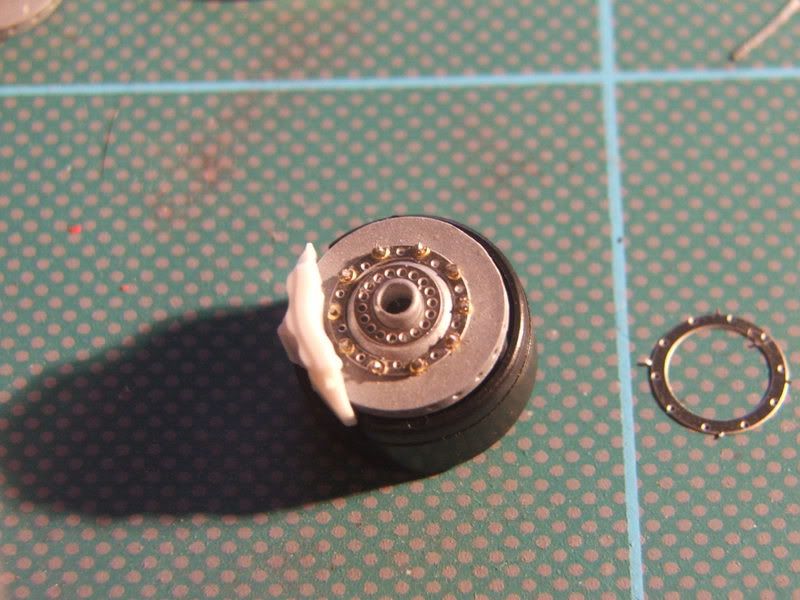 That's all for now, hopefully more to come soon though!
|
|
#9
04-20-2008, 09:57 AM
|
|||
|
|||
|
Re: 1/20 Tamiya F2001
Nice brakes! I just got one but havent got a try on it yet.
Ro
__________________
       http://absolutmodeling.blogspot.com Current project Ferrari 248 F1 Ferrari 250 GT California Spyder
|
|
#10
04-29-2008, 03:45 PM
|
||||
|
||||
|
Re: 1/20 Tamiya F2001
Sorry it's been so slow guys. After doing that one brake I just lost all enthusiasm for this model, it's meant to be fun not a painstaking task. Anyway I brought back a magnifying glass, masking tape and some very fine tweesers from work so I'll be having a go at number two soon enough. Anyway I just bought another kit to join the growing pile yet to be done so I've got some new motivation to get this model finished. Also I've been preoccupied with a diecast conversion this week so it's been rather slow going. anyway I finally finished painting the rear cowling and glued it all together. I've also put the decals on. I decided I would paint the matt black exhaust outlet after the red but I wanted to brush paint it for a better effect so I masked around the edge so that I could get it straight. I ran out of masking tape recently so I bought more at the weekend but this roll seems to be stickier because it left a horrible mark after I peeled it off
 I'm just hoping that I can hide it when I spray the model with a coat of clear because it would be a shame to have come so far. Also I'd already put the decals on by this point and no way was I going to lift them all and place them back again. Decals are from Tabu as I think I've said before, went on very nicely, no problems at all, just a bit of micro set/sol did the trick nicely I'm just hoping that I can hide it when I spray the model with a coat of clear because it would be a shame to have come so far. Also I'd already put the decals on by this point and no way was I going to lift them all and place them back again. Decals are from Tabu as I think I've said before, went on very nicely, no problems at all, just a bit of micro set/sol did the trick nicely Been busy painting other parts too and I think all I have left to do is paint the barge boards and the white element of the rear wing and the painting will be finished, only construction left. The front suspension is waiting to be assembled as I want to clear the whole body but not the suspension so now I've done the rear cowling I'll start clear coating once the final painting has been finished (don't want paint particles in the air when I'm spraying clear...though my main worry is the dust! - on that note actually; I've come up with a new solution, get an old dettox bottle, fill it with water, and give the room a good spray before you start spraying, it really helps keep the dust down!) Oh and on the engine front, the silver block has been carved and is currently receiving a good dose of primer. I also noticed that Tamiya have got the radiator pipes seriously wrong, they're completely the wrong shape. I'll get a photo in the next post to show what I meant. Anyway here's the cowling 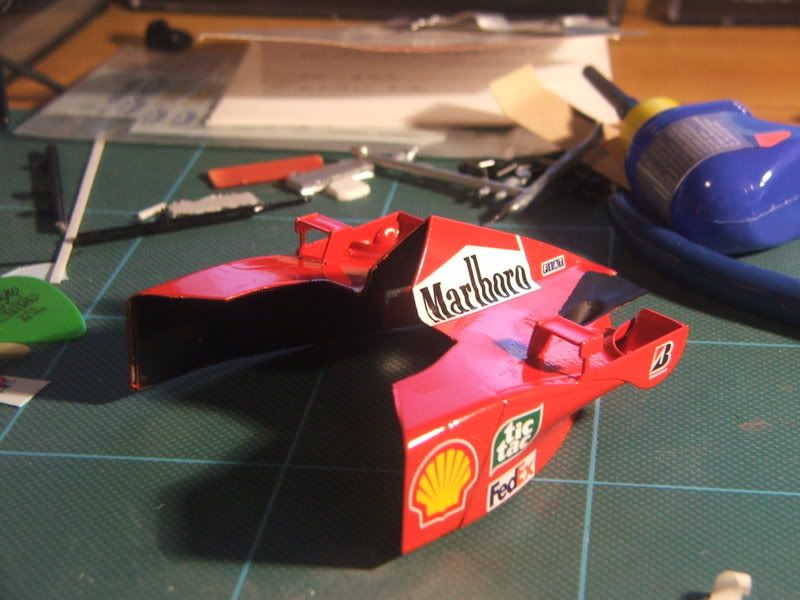 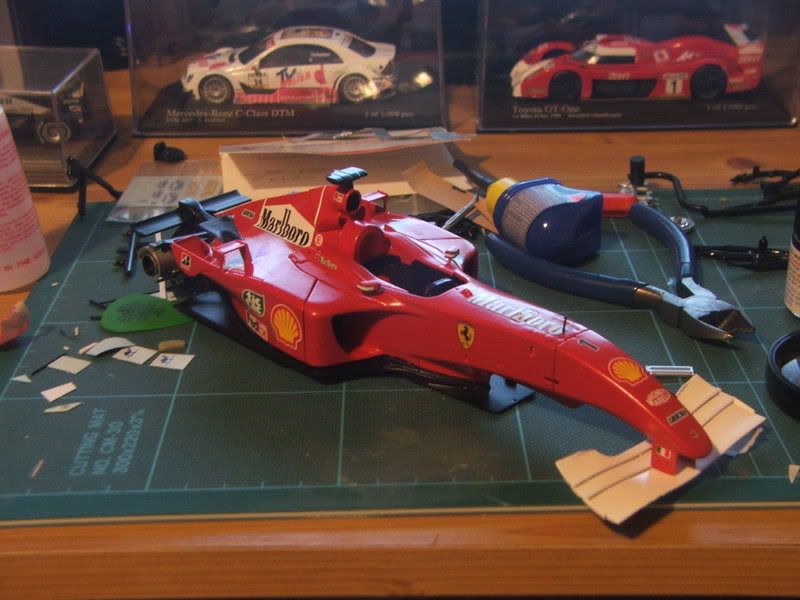 
|
|
#11
04-30-2008, 03:00 AM
|
||||
|
||||
|
Re: 1/20 Tamiya F2001
Looking good. I sympathise with your view that model making should be enjoyable... I get that painstaking feeling when applying CF
Bill
__________________
On the workbench: Completed WIPs: Completed Models Gallery:
|
|
#12
04-30-2008, 05:20 PM
|
||||
|
||||
|
Re: 1/20 Tamiya F2001
Right, more progress today. Finished painting everything red that needs to be other than the main element of the rear wing (both front and rear wing end fences have now been painted). The only painting left for me to do is spraying the rear wing white and finishing the silver block. Other than that I only have detailing left (for example I'm planning on putting some heat stains on the exhaust and the exhaust outlet. Oh and there are two fins that go under the front wing which need a coat of paint. Otherwise nothing. so it looks like I'm finally on the home stretch
So I did the front wing today. The fit could have been better but it could have been far worse. It was pretty easy to get the end plates square and most of the decals are going onto a flat surface. The only trouble I had was the 'TIM' decals on the end plates...There's quite a complex surface they have to go over and I'm sure a more skilled modeller would have been able to do it no trouble but I've only ever used micro sol/set on this model, never used it previously. Anyway I gave it a go and it wasn't bad for a first attempt but I did get a couple of small splits on the decals in a couple of places but managed to salvage it so it's not so noticeable. So now I'll do the rear wing tomorrow hopefully and then I'll have to wait a week for the decals to cure before clear coating the model. In the mean time I can finish this silver block and perhaps try and sort out the weathering on the exhausts. So here are the pictures... 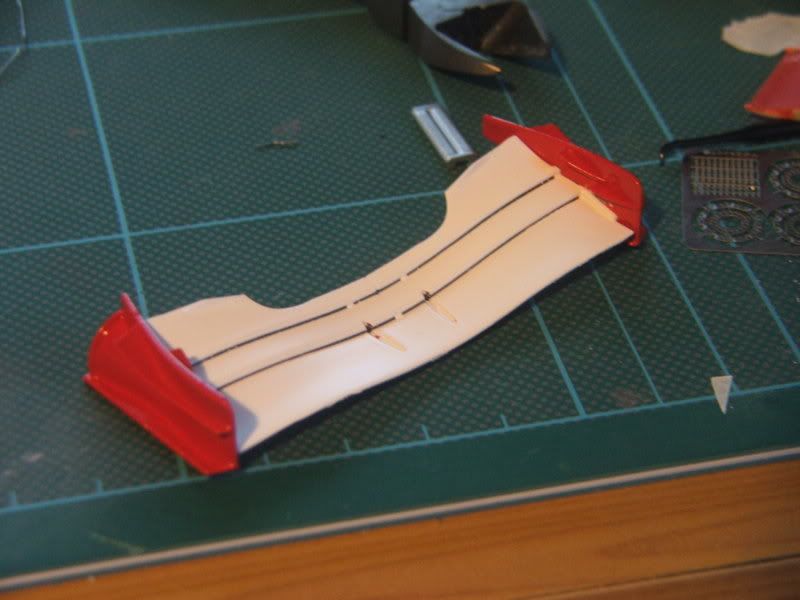 This doesn't really show the contours very well but in addition the decal is too large so it has to fold back onto the underside of the top flap 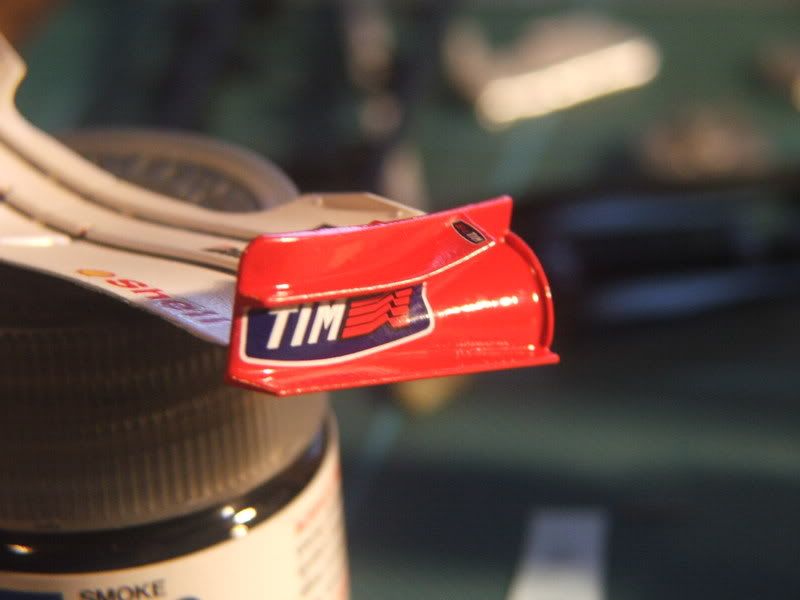 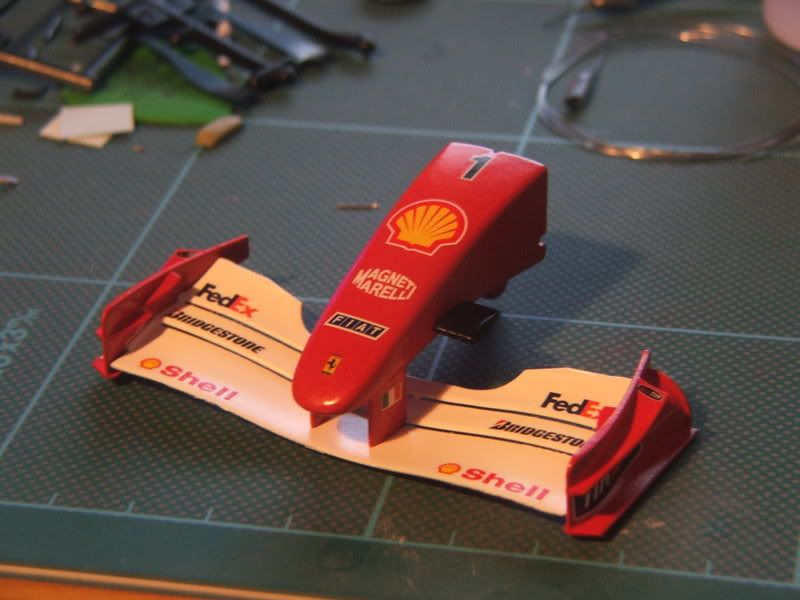 Oh I almost forgot about the radiators. Basically Tamiya have got this part completely wrong. Here's the kit part 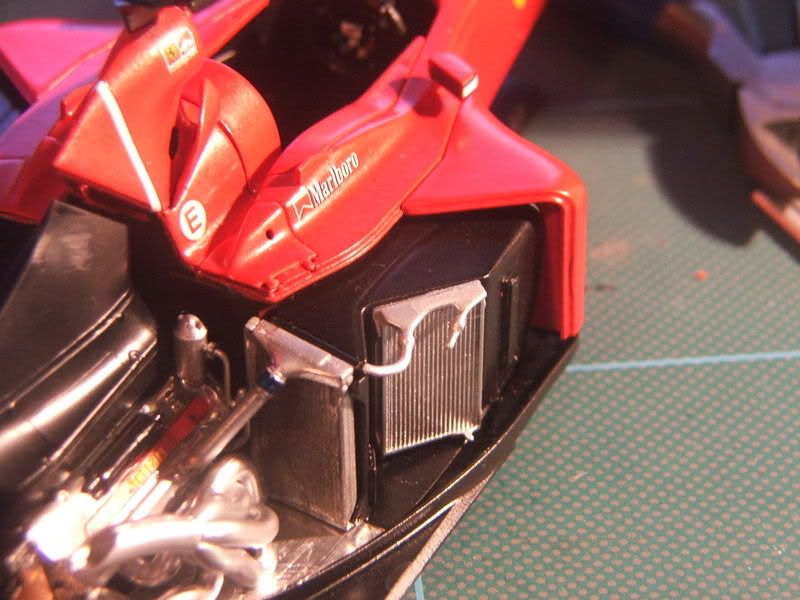 And this is the real thing...(image from gurneyflap.com) 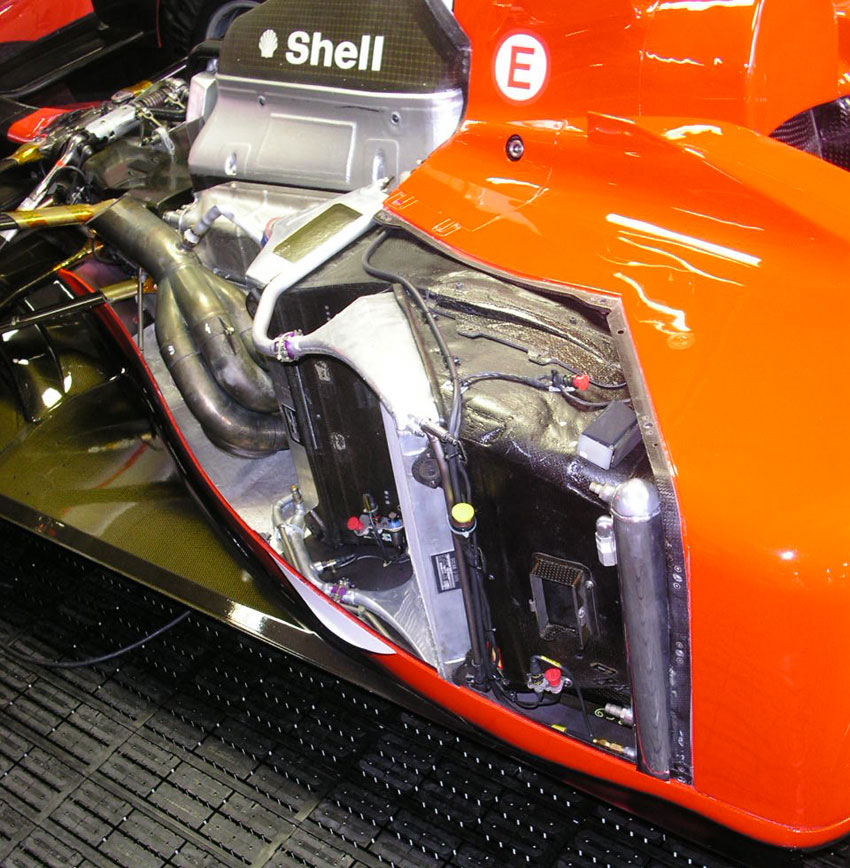 Not sure if there's much I can do to fix this, I don't have any suitable pieces of styrene...perhaps if I filled in where the pipe should be with some milliput...Anyway, hopefully another update tomorrow so stay tuned!
|
|
#13
05-06-2008, 04:50 PM
|
||||
|
||||
|
Re: 1/20 Tamiya F2001
Definitely on the home stretch now. I've not glued the barge boards on, fixed the front suspension in place and glued the nose cone on. I've also tackled two more of those photoetched brakes and they're much easier to do with a different approach. Basically I've started with much shorter pieces of wire and instead of using tweesers to pick the gold rings up i've used my fingers. Why? Well they kept flicking out of the tweesers as the grip was too strong and if you give them a good prod they'll stick to the bottom of your finger and it actually makes them easier to place over the wires. So I have 1 rear brake left and that's it. I've also painted the callipers now though I haven't got a picture. Apart from a little touching up in the engine bay all I'm waiting for now is the rear wing to be painted. It's halfway there all I need to do is spray one gurney flap white
Oh and I've also glued the tub to the floor and clear coated the front nose and engine cover. I must say the fit on my model is terrible. I don't know whether this is a problem with the batch this came from or all the F2001s but the fit on Tamiya models is usually very good but the tub just did not want to sit flush with the floor. I even tried superglue but in the end I left it with about a 1mm gap. Also the engine cover doesn't sit flush with the rest of the body. I'll try and get some pictures to illustrate later. I'm waiting to see how far I get with this painting though because I may have the wing done by tonight so we'll see then...Ah well pictures of what I have so far...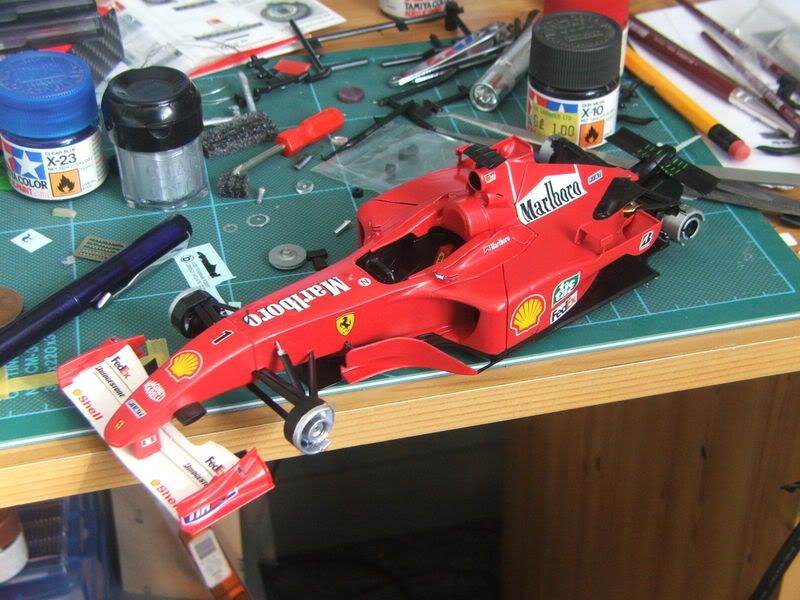 (and yes, that's an F310b with no rear suspension under my desk. was damaged a long time ago and just serves as spares now) 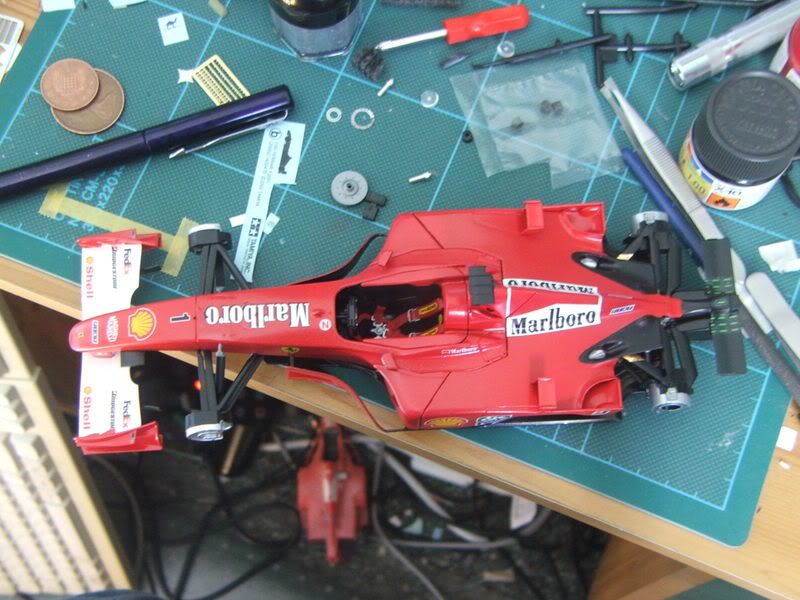 I also bought an airbrush from work the other day. Worked out at £16 with staff discount (I work in my local model shop) and I was pretty chuffed with that. It's very basic and I haven't got a compressor sorted out yet but it should be a lot better than spray cans!! I haven't usde it yet as there's virtually no painting left on the F2001 and I don't want to be mixing shades halfway through EDIT: Just finished the rear wing and as promised here's the picture. Well chuffed with it, especially the split marlboro on the upper element as it curves round onto the underside and it's my first proper use of microsol and I must say i'm converted! the stuff is brilliant!! ;D Anyway here's a little teaser picture, I'll have some more up tomorrow! 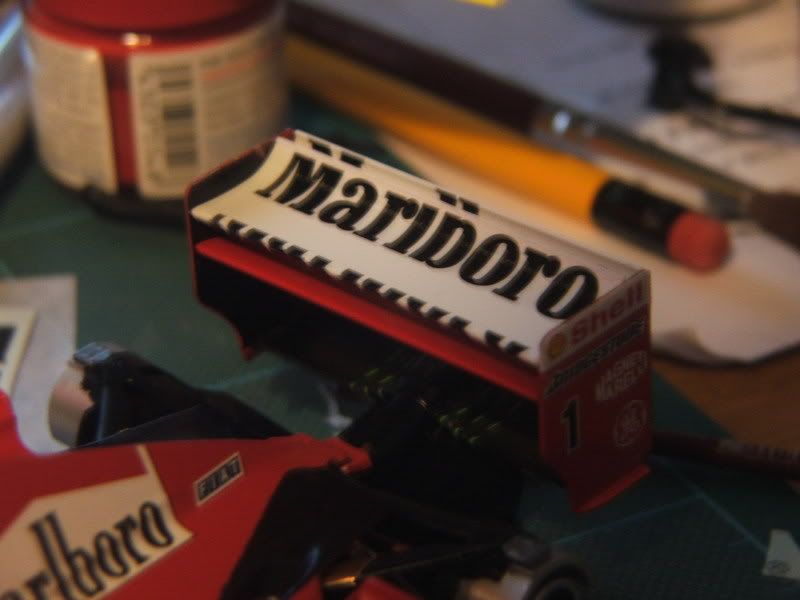
|
|
#14
05-07-2008, 02:07 AM
|
||||
|
||||
|
Re: 1/20 Tamiya F2001
It makes me nervous just seeing your model hanging off the edge of your work-bench.

__________________
On the workbench: Completed WIPs: Completed Models Gallery:
|
|
#15
05-07-2008, 06:29 AM
|
||||
|
||||
|
Re: 1/20 Tamiya F2001
Quote:
 . Looks brilliant so far. Brakes look the business! Did you use PE seatbelts or are those molded? I can't tell. And £16 for an airbrush!? I want one . Looks brilliant so far. Brakes look the business! Did you use PE seatbelts or are those molded? I can't tell. And £16 for an airbrush!? I want one 
__________________

|
|
|
POST REPLY TO THIS THREAD |
 |
|
|


