|
|
| Search | Car Forums | Gallery | Articles | Helper | Air Dried Fresh Beef Dog Food | IgorSushko.com | Corporate |
|
|||||||
| Car Modeling Share your passion for car modeling here! Includes sub-forum for "in progress" and "completed" vehicles. |
 |
 Show Printable Version | Show Printable Version |  Subscribe to this Thread
|
|
|
Thread Tools |
|
#1
 02-17-2008, 03:17 PM
|
||||
|
||||
|
Repairing metallic paint
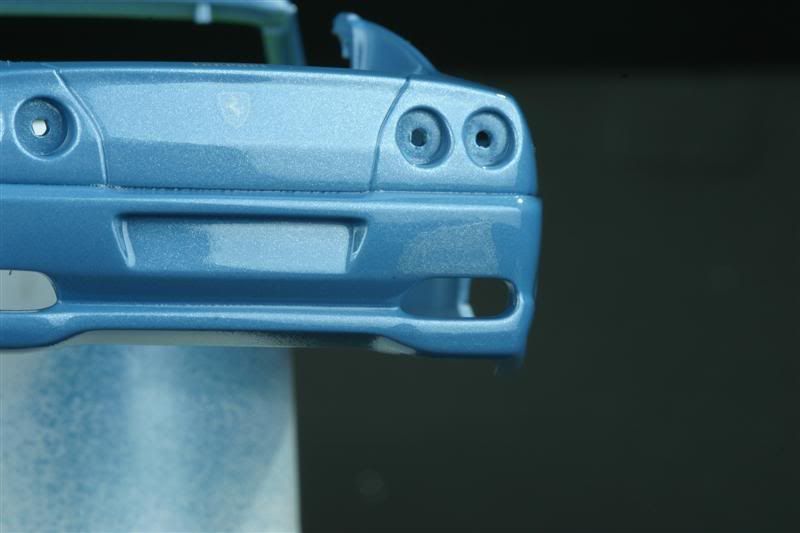
Everytihing on my Revell Superamerica build was going too smoothly...
 I noticed some "silvering" on the rear bumper and wetsanded the spot away. Then I cut a hole in some wax paper to mask off the spot (so as to not overspray onto the whole car) and proceeded to spray the same paint in the same orientation as it was orginally applied. When I pulled the mask away, the patch was a noticeably lighter shade of blue. The rest of the car is clear coated and the patch isn't. After applying a quick coat of clear, it doesn't appear to be darkening enough to match the rest of the body. Any tips or experiences with these types of repairs? If this were a real car, they would never strip the whole thing and start over.... The car is cleared and decalled anyway; I can't (don't want to ) strip and start over. Looking for some help on this one!!!! Paint is duplicolor for color and clear.
__________________
Recently completed projects:      
|
|
#2
02-17-2008, 03:44 PM
|
|||
|
|||
|
Re: Repairing metallic paint
If I am understanding you correctly, it's the rear bumper only.
If this is he case, you could try wetsanding the rear bumper and then mask and spray the rear bumper only.
__________________
|
|
#3
02-17-2008, 03:58 PM
|
||||
|
||||
|
Re: Repairing metallic paint
This is one of the problems with metallic paints.They are so awkward sometimes and you can end up with a lighter colour on the repaired area or sometimes a dark edge to the repair.I used to work in a body repair shop and the way we used to spot repair with metallics was as follows sometimes works,sometimes doesn't but it may be worth a try.
1: Repair the problem area by sanding,filling whatever you need to correct it. 2: Primer the repaired area.Try to keep it very local.Allow to dry.Then very gently wet flat the primer with fine wet and dry. 3: Apply your metallic colour coat.Go just past the primer repaired area.Usually 3 coats of colour. 4: After the last coat of colour and before it fully dries and I'm assuming you are using an airbrush? Put a very small quantity of your colour into the airbrush and add to it about 3 times the amount of thinners.This will create a very thin almost 60-70% thinner mix but still with some colour in it. 5: Now very lightly dust the thinner mix across the edges of the repair between the old coat of paint and the new repaired area.This will blend the repaired area into the old paint and should hide the join of the 2 layers.It may take a couple of applications of the thinner mix,but go steady,be patient and slow.Too much thinner mix too fast will melt the paint edges instead of blending them. 6: Once happy with the blending and it has dried sufficiently apply your clear coat as usual going slightly past the edge of the repair and blending as before adding extra thinner to the clear coat mix or alternatively clear the whole part again,no blending of the clear required. 7: Once dry polish as normal to a nice finish!!! Hope this helps.Takes a couple of practices to get it right but it usually does work.
__________________
Steve Noble
|
|
#4
02-17-2008, 04:06 PM
|
|||
|
|||
|
Re: Repairing metallic paint
Steve
I know this wasn't my question, but it helps me out the nonetheless! Thanks for the great information! I know I've had my share of problems with metallics! Derrick
|
|
#5
02-17-2008, 04:07 PM
|
||||
|
||||
|
Re: Repairing metallic paint
I wouldn't have used that kind of a mask. I would have masked further away at natural panel breaks, and carefully spot/blend in the metallic paint over the affected area, and then re-cleared the entire area. You made the repair in too small an area, you have to do it like a real car. Pics??
__________________
My Fotki Album
|
|
#6
02-17-2008, 04:10 PM
|
||||
|
||||
|
Re: Repairing metallic paint
Quote:
Steve, I'll give that a shot. I did wetsand down past the flaw to a lighter shade than the body work. I then applied two more wet coats of body color, wetsanded the slight edge, and cleared over it. This body work is done from the can. I may try decanting it and see if I can't get more control with the AB. This might just might have to be something I have to live with. The rest of the job is my best ever. Maybe I can put a bumper sticker over it?  I'll post some pics and see what you guys think. I'll post some pics and see what you guys think.
__________________
Recently completed projects:
|
|
#7
02-17-2008, 04:31 PM
|
||||
|
||||
|
Re: Repairing metallic paint
Here are the pics. It's actually difficult to photograph how bad it is. It looks f'ing awful in real life.
 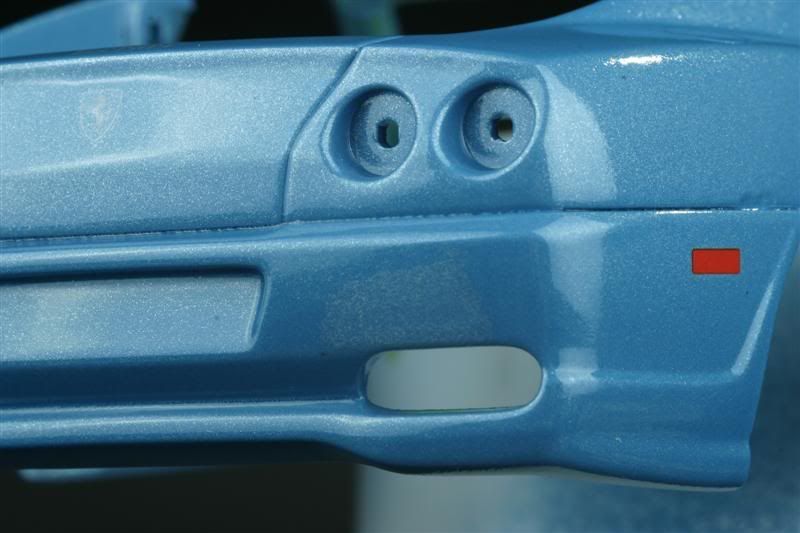  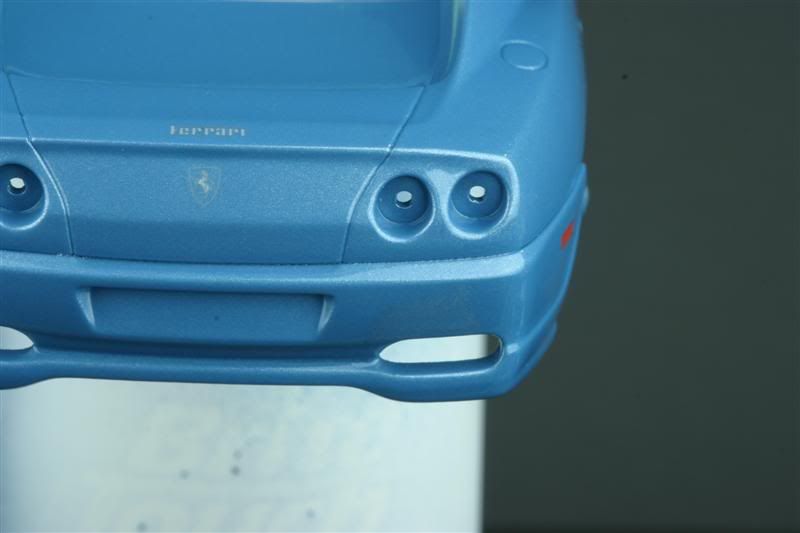 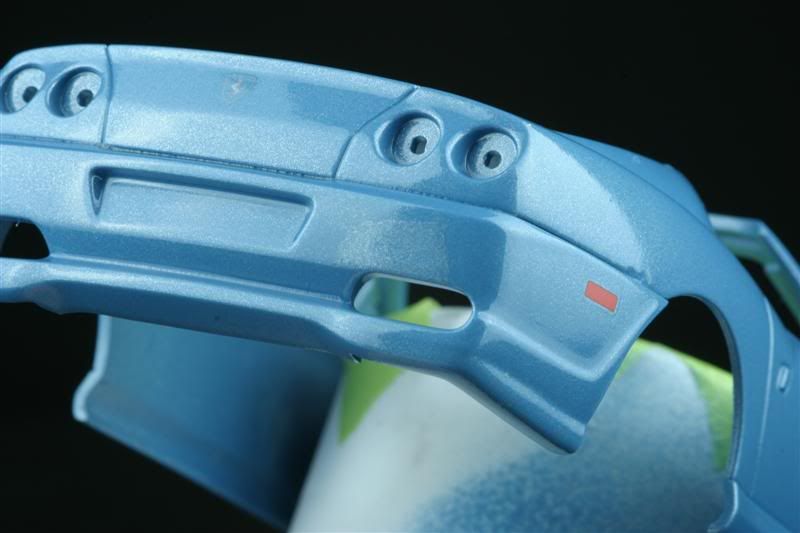
__________________
Recently completed projects:
|
|
#8
02-17-2008, 04:54 PM
|
||||
|
||||
|
Re: Repairing metallic paint
That's a shame because it's such a nice paint job as well.It looks like the clear coat may have slightly eaten into the colour coat and taken away some of the pigments,then pooled up and resettled which gives it that patchy appearance.Maybe you could mask and repair and respray the whole rear bumper as Ray suggested.You could make some new decals from plain red decal sheet for the side markers?
__________________
Steve Noble
|
|
#9
02-17-2008, 05:13 PM
|
||||
|
||||
|
Re: Repairing metallic paint
Quote:
Thanks again for the help guys!!!!
__________________
Recently completed projects:
|
|
#10
02-17-2008, 05:45 PM
|
||||
|
||||
|
Re: Repairing metallic paint
Quote:
__________________
Steve Noble
|
|
#11
02-17-2008, 06:00 PM
|
||||
|
||||
|
Re: Repairing metallic paint
Quote:
Thanks again for the help guys!!!!
__________________
Recently completed projects:
|
|
#12
02-19-2008, 11:44 PM
|
||||
|
||||
|
Re: Repairing metallic paint
By the look of this I'd say that you need to feather out that patch more, easy with AB, difficult with can. As for the silvering, a few thoughts: first, the clear will definitely tone down the silvering and darken the color a little bit; also, as the can gets nearer to empty there is a tendency I think for the metallic flakes to get more concentrated because you *didn't shake the can religiously with every single spray*. I know it sounds like crap, but it is true, I promise you. The extra silver will make the paint appear a bit lighter in color and a bit more reflective. The only way to get a match is to spray paint in the same condition. You can do it like this - if the can is getting low, get a new can. Shake it long and hard, then let it sit for about 45 minutes, then give it a few very light horizontal swirls - that's *very light* - don't stir up the metallic flakes too much, the swirl is just to mix any separation in the color components (this does happen). Then try a light spray, I guarantee it will come out a bit darker and a bit less reflective. Adjust if necessary by varying the 45 minutes (45 is a good start I think). But your problem may simply be fixed when you apply the clear - but you need a very smooth feathered edge, smoother than what you have there probably, or paint up to panel lines and natural boundaries.
|
|
#13
02-20-2008, 02:48 PM
|
||||
|
||||
|
Re: Repairing metallic paint
I had done the same thing on a lighter metallic blue Duplicolor paint job, way down on a rear quarter panel. I shot it with the car upright, wasn't getting the coverage and finally shot it with the body inverted, which worked and shielded the rest of the body from over spray. I did roughly mask off the rest of the car just in case.
Bob
|
|
|
POST REPLY TO THIS THREAD |
 |
|
|


