|
|
| Search | Car Forums | Gallery | Articles | Helper | Air Dried Fresh Beef Dog Food | IgorSushko.com | Corporate |
|
|||||||
| Car Modeling Share your passion for car modeling here! Includes sub-forum for "in progress" and "completed" vehicles. |
 |
 Show Printable Version | Show Printable Version |  Subscribe to this Thread
|
|
|
Thread Tools |
|
#1
 02-06-2008, 10:05 AM
|
|||
|
|||
|
Dehydrator
Hey guys,
Well looking for another project to kick around some time. I have been looking at the idea of building a DIY Dehydrator. As many on here i am sick of waiting a week for bodies and days to be able to work on painted or filler parts. Let me get this straight, Ideally we are looking for a in a dehydrator a small fan for circulation, heating element that is controllable and timmer to control how long its one for. What my thoughts where was to build a aluminum box around the same size as a bankers box, Split this into 3 portions as the image shows below. I would have the main drying area where i would have shelves for my models, i would have the top portion for air flow where i would also have a furance filter just to collect any dust that might be in the box and then the third side on the side of the model i would have the heating element so i would be sucking warm air from the element blowing it into the storage area, which the fan in return would suck up and then back in recirculating the air ofcourse drying the models much faster than letting them sit. My thoughts where to use an old toster oven i have kicking around i was going to remove the heating elements and build a metal box for it i have tested the oven an i can get the little toaster over to hit 85-90 degrees and maintain it pretty consistant. I would also set it up so that the element plugs into a Digital timmer i have which i can set start and stop times, also alows me to punch in a running time so i could punch in 6 hours and hit start and after 6 hours it would just shut down. the other option i have for possible heating is a spare Aquarium heater - 150 watt keeps my tanks a nice balmy 80 degrees so i do not see why i could not mount it into the box and set the temp i want and then use it plugged into the timmer.. it would be safer i think being a copper heating coil incased in glass as long as i dont smack it with anything it would not cause harm. My thoughts are to encase the whole inside with insulation foam ( Fire retardant ) with heavy aluminim foil to help retain heat. Anyone else got ideas? or thoughts on this. 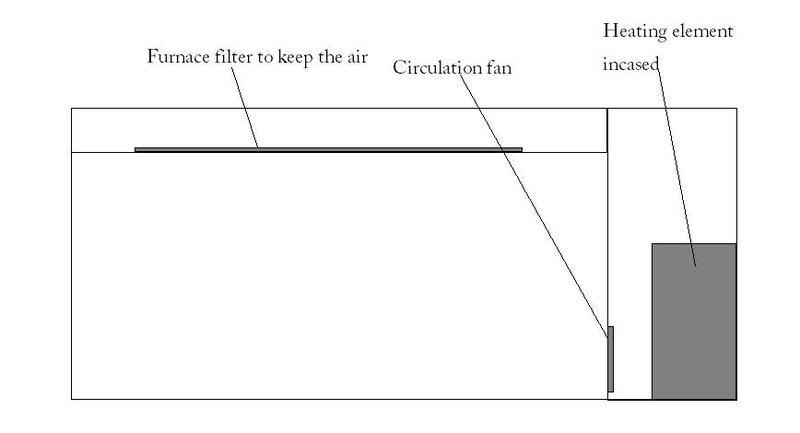

|
|
#2
02-06-2008, 10:54 AM
|
||||
|
||||
|
Re: DIY Dehydrtrator
Quote:
__________________
Guideline for happy modeling: Practice on scrap. Always try something new. Less is more. "I have a plan so cunning, you could put a tail on it and call it a weasel" - Edmund Blackadder
|
|
#3
02-06-2008, 11:00 AM
|
|||
|
|||
|
Re: DIY Dehydrtrator
Quote:
Cause i can't find a Canadian seller who is selling one, for me to order it through ebay.. I am going to pay $20 for the item, $15-$20 for shipping and then upwards to $30 for Customs and brokerage! I can build one for $10.. and spend the other $50-60 on kits to practice on  not to mention the cheap $20 dollar units dont really hold that much and when i get into teh 1/12 scale cars.. i gotta build one then anyways.
|
|
#5
02-06-2008, 11:51 AM
|
|||
|
|||
|
Re: DIY Dehydrtrator
Yea no Kmart here anyone they where bought out by Zellers.
I will have to hit a couple of the local stores on the way home and see if i find something. My only concern was the fact of size.. I figured making it i would have my trays.. i can spray the item on my trays right in my spray booth and then move the tray and all right into the dehydrator.. No more stupid ass finger prints 
|
|
#6
02-06-2008, 12:28 PM
|
|||
|
|||
|
Re: DIY Dehydrtrator
Well boys and Girls..
Never conduct crap on the interent with your spouse looking over your shoulder She has put her foot down and refuses to alow me to build something as such.. lol, BUT i found a local Caynes who has THIS model in stock for $40 So i will jump on it, Her concern was the electrical stuff which i could understand where she was coming from. Only issue with this dehydrator is the shelves are soild and part of the outter frame so i either have to make a new dome and saves these selves for god knows what, or glue all the shelves together and then cut out the centers in orde to be able to lift it off as one peice and fit car bodies in there Might be a silly question, Could i not just take say a larger box idea like i had and just place this dehydrator base in it??? such as this image below. I can use like a bankers box lined with Foil to keep the warmth in, and just install a couple of windows to see whats going on inside.. makeing a sealed lide for it.. Can anyone see issues with this? 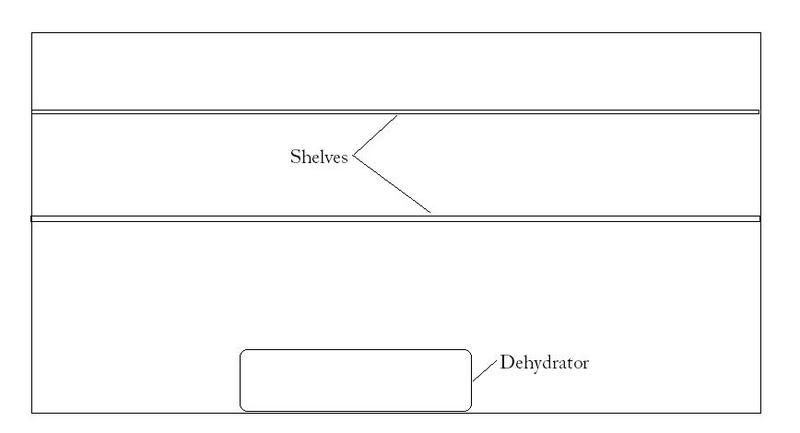
|
|
#7
02-06-2008, 01:15 PM
|
|||
|
|||
|
Re: DIY Dehydrtrator
I have one with stackable plastic shelves. I cut centers out of the top two shelves and it works fine. Remember not to but a body in your dehydrator with a stand that stresses the body. The heat will warp the body.
|
|
#8
02-06-2008, 01:21 PM
|
||||
|
||||
|
Re: DIY Dehydrtrator
+1 with Klutzky,
I haven't had food dehydrator in my 6 years of on-off modelling, mostly on for the last 2 years though. I guess the key is being patient, and wait for the paint to dry (What kind of paint did you use? I usually waited 3 days before painting after primer and 2 days before polishing)
|
|
#9
02-06-2008, 01:24 PM
|
|||
|
|||
|
Re: DIY Dehydrtrator
Pharr,
thanks for the recommendation, i did not think of that! Now i think i read someplace that this was something like 275watts or something? Ideally how long should i be looking at for a fresh coat of paint on a body to completey dry enough to either apply a clearcoat or decals..ect. I work with Tamiya paints - I use there TS paints for the bodies. As it stands now i typically wait 5-6 days before i can actually handle the model with out smelling the paint. I do work in my garage witch is usually cooler and very dry to start with.
|
|
#10
02-06-2008, 01:48 PM
|
|||
|
|||
|
Re: DIY Dehydrtrator
I'm not sure about how the wattage translates into heat. From my research you shouldn't use more than 95 to 105 degrees. Also, others have said that the dehydrator decreases the drying time by a factor of 8. I have not tried a painted body in mine yet. I've used it to dry primer coats on a couple of projects and they were ready to wet after 3 hours. I would experiment with the drying times.
|
|
#11
02-06-2008, 05:38 PM
|
|||
|
|||
|
New dehydrator - Am i screwed?
Well,
Got the new dehydrator and got it hooked up and running vents open full and i have a thermometer on the top rack and its reading 170 degrees F! That is RIGHT 170.... Everything i have read says 105 is best and its suggested not to go above 110  What does one do in my case
|
|
#12
02-06-2008, 05:53 PM
|
|||
|
|||
|
Re: New dehydrator - Am i screwed?
I use a Nesco brand American Harvest dehydrator. It has an adjustable temperature control right on the top. It goes from 95° F to at least 150° F, in 10° increments. I usually run mine at the low end, but occasionally I'll bump it up to 110° if I feel like it may take more heat to cure the paint.
This is a picture of the type I have (this isnt my dehydrator, cant find the pics I have of the one I own), pulled this pic from ebay.   http://cgi.ebay.com/NESCO-American-H...QQcmdZViewItem
|
|
#13
02-06-2008, 05:55 PM
|
|||
|
|||
|
Re: New dehydrator - Am i screwed?
As recommended in previous threads on the subject (which one cannot find since the search feature is poked!), you drill holes around the outer circumference of the racks to dissipate heat.
Best is to drill holes around a shelf and measure the heat drop and continue with progressive shelves until you dissipate enough heat to get the temp down to where you need it.
__________________
|
|
#14
02-06-2008, 05:56 PM
|
|||
|
|||
|
Re: New dehydrator - Am i screwed?
Yea this one has not adjustments, just a vent on top to controll the heat i assume.. Its strickly a turn on and go operation.
I presume i will be returnig this tomorrow.. Unless i can make a new lid for it so that i can make larger slots to let more of the heat out faster to regulate the heat better.
|
|
#15
02-06-2008, 05:59 PM
|
|||
|
|||
|
Re: New dehydrator - Am i screwed?
Quote:
|
|
|
POST REPLY TO THIS THREAD |
 |
|
|


