|
|
| Search | Car Forums | Gallery | Articles | Helper | Air Dried Fresh Beef Dog Food | IgorSushko.com | Corporate |
|
|||||||
| Car Modeling Share your passion for car modeling here! Includes sub-forum for "in progress" and "completed" vehicles. |
 |
 Show Printable Version | Show Printable Version |  Subscribe to this Thread
|
|
|
Thread Tools |
|
#1
 11-29-2007, 06:34 PM
|
|||
|
|||
|
When scratch building What's best used to make wheel wells ?
Hey guys, still new to the site but i am researching into scratch building a engine bay for a fujimi '90 prelude
so far i have opend the bonnet and looking at combining the revel integra kit engine and scratch building the supports I have this car and know it inside and out but i am lost as to what i should build the wells out of. Should i go and buy a cheap 1/24 kit and butcher that or can i get scrap [plastic and make the wells myself .. Also has n e one made the tamiya 84 prelude before ? What is the detail on that like ? |
|
#2
11-29-2007, 07:39 PM
|
|||
|
|||
|
Re: When scratch building What's best used to make wheel wells ?
You can get plastic and make the engine bay yourself.
"n e one" is not a word and this isn't AIM, please type properly.
__________________
|
|
#3
11-29-2007, 09:08 PM
|
|||
|
|||
|
Re: When scratch building What's best used to make wheel wells ?
thankyou for the grammer leson but keep it to ur self.
I was after some help as to techniques and different "ideas" to help me with this build. thankyou. |
|
#4
11-29-2007, 09:19 PM
|
|||
|
|||
|
Re: When scratch building What's best used to make wheel wells ?
How-to post to follow/
__________________
It ain't cool 'till your wife hates it. Imagine a world without Alabama Recent builds: Rocket Bunny FR-S and stock BRZ Toyota bB Bro-style Civic K20 powered SiR converted EK WIP I build slowly and poorly. 
|
|
#5
11-29-2007, 09:20 PM
|
|||
|
|||
|
Re: When scratch building What's best used to make wheel wells ?
You may read your PM in response to your first comment.
For an idea on what can be done to add an engine, check out these threads: http://www.automotiveforums.com/vbul...ilt+engine+bay http://www.automotiveforums.com/vbul...skyline+engine http://www.automotiveforums.com/vbul...skyline+engine http://www.automotiveforums.com/vbul...skyline+engine
__________________
|
|
#6
11-30-2007, 12:10 AM
|
|||
|
|||
|
Re: When scratch building What's best used to make wheel wells ?
One a EK Civic build I'm currently working on, I intend to add a scratch/bashed K20 to the curbside Fujimi kit. This of course requires an engine bay, and since the Revell engine bays are 1:25 instead of 1:24, and would require just as much work as reworking the Fujimi engine bay from the ground up, I've decided to make the engine bay for plastic sheet.
Kits all come with wheel wells, curbside or not (with exceptions, of course). I'd eat my hat if your Prelude kit did not come with wheel wells. What I am guessing you really mean is the shock towers, which aren't molded in on curbside kits, for the most part. This is how I went about adding these to the Fujimi wheel wells.  In this picture, you can see that I've already done the driver's side shock tower. I will be building the passenger side one for the illustration of this how-to. I will retrace a couple steps for the sake of explanation. (Forgive my shoddy firewall, it will be reworked, and the white bit by the grill is an artifact of an early, removed radiator support.) 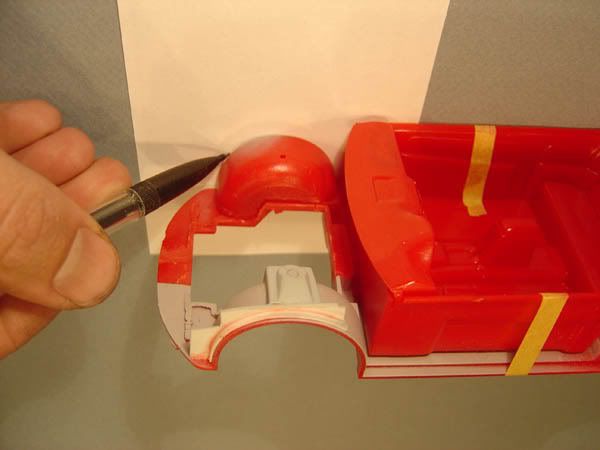 The first thing I want to build is the side of the engine bay, which goes under the car's fender. The first step is, then, to trace the wheel well onto a notecard, which I will use to make my pattern. 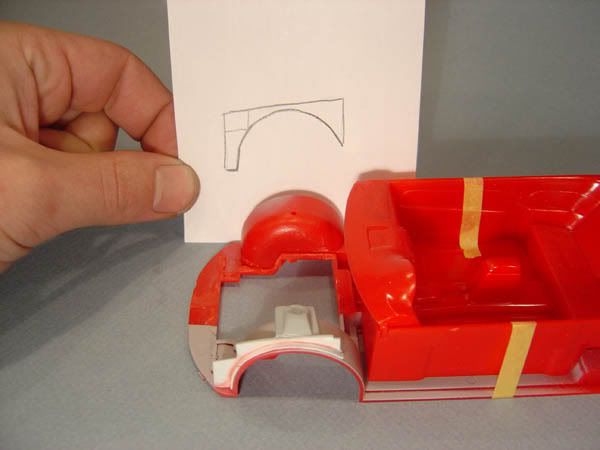 With the wheel well traced, I make an educated guess at how the rest of the part will be shaped, to fit under the fender, behind the headlight and the grill.  Woah! That doesn't fit at all! Big deal, there is a lot of adjusting in this process. I cut the pattern, and tried it again, and cut and tried and cut and tried until I had one that fit. 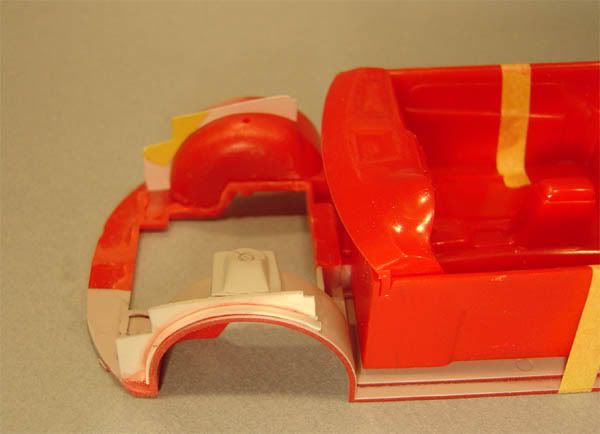 It finally fit. It still wouldn't be perfect, but it was a starting point for the plastic that would eventually make the final part.  Of course, the next step is to trace the pattern onto some plastic sheet. I cut this out, and fit it into the car, between the chassis and the body.  Looks pretty good right?  Close, but no cigar. The part didn't fit, and there was interference between the new part and the car's fender, not allowing the chassis to slip into the slot on the body as intended.  Like I said, lots of adjusting. This is simple, though. I filed off just a but of the plastic and refit the body. This took a few tries, too, but in the end I had a well fitting part. Also, it's important to point out that this is the second part I made, the first was too short, leaving a substantial gap between the engine bay side, and the fender. I had to start over from the pattern, and do the whole adjustment process twice in plastic. Never be afraid to mess up, it's only plastic. Give it a few tries until you are satisfied.  Using what was leftover from my notecard, I traced the wheel well again, this time for the shape that would make the front and back of the shock tower. Actually, there was no tracing. Just more educated guesses at the shape, drawn on the notecard. It's helpful to mark on the notecard the very top and the very side of the curve of this shape (a 90 degree angle forming the topmost and sidemost boundary of the curve) and drawing a quarter circle from there. That's the hard part, the dimensions are easy. After several tries, I had a part the right size, and the right contour, to mate with the wheel well. I drew what I thought to be the right angles for the top, side, and bottom of the oddly shaped Civic shock tower onto the card, to make another pattern for a new part.  An old trick for making two identical parts is to glue two pieces of the plastic sheet together, and cutting the part out once. Just a drop of CA (superglue) on one side of the plastic I was going to make the pattern from is all it takes, placing the drop on the plastic where it will still be holding the two pieces together after the cutting is helpful too. This is a good time to point out that when cutting plastic, many shallow cuts is always better than one deep one. Take your time, make many passes, and eventually you'll have two sheets of plastic cut to the shape you want.  Separating the two parts is as easy as slipping a knife between them where there isn't glue, and breaking them apart. CA bonds are strong, but brittle. Be careful and work it gently; they'll snap apart easily when you get the right spot. 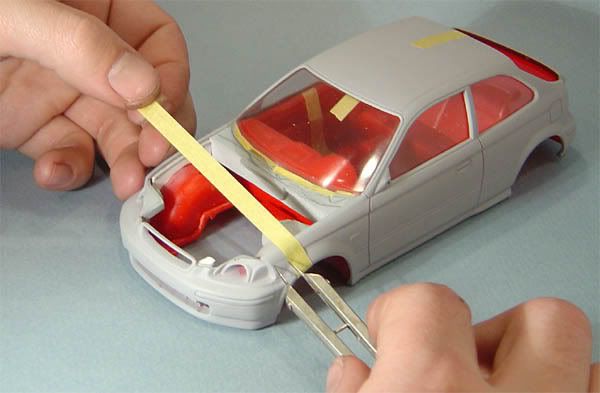 Lining the two shock towers up properly is tricky, as there isn't much to accurately measure from on the body of the chassis, at least not with conventional methods. Using a shipbuilders' trick, I use a length of narrow masking tape to align the new shock tower. I line up one edge of the tape with the front side of the first tower, and measure from the other edge of the tape to the headlight along a character line on the car. This ensures a reliable, reproducible measurement that I can use on the other side. I use the caliper to measure from the headlight to the edge of the tape on the other side of the car, along that same character line. Since the width of the tape is constant, I mark the other side of the car where the tape touches it, and extend that mark to the top of the wheel well. This is where I will place the front of the second shock tower.  Using my caliper again, I measure the width I used on the first shock tower, and mark it out on the second, so I'd be able to place the rear of the second one in the proper spot as well. After they are gently glued in, I adjust them to look right, and finally glue them securely. All that's left is to box them in, using three pieces of plastic the correct width and length for the top, side, and underneath bit of the shock tower. I use similar methods as what I've used so far: making patterns, using calipers, and adjusting adjusting adjusting until everything is just right. Finally, using some sheet plastic, I cut, sand, and shape the shock mount and give the top of the shock tower the contour it has on the real car, just as you can see in the first photos of the first tower I made. I hope this helps, and remember, building isn't difficult, it just takes a lot of time, tries, and patience.
__________________
It ain't cool 'till your wife hates it. Imagine a world without Alabama Recent builds: Rocket Bunny FR-S and stock BRZ Toyota bB Bro-style Civic K20 powered SiR converted EK WIP I build slowly and poorly.
|
|
#7
11-30-2007, 12:28 AM
|
|||
|
|||
|
Re: When scratch building What's best used to make wheel wells ?
If you have the Tamiya Prelude kit, you're in luck. It's actually an 82 XX model, and it is full detail; meaning it has an engine and full engine bay already.
If you have the Fujimi kit, that one's a curbside, and it'll be as much work as you initially thought.
__________________
It ain't cool 'till your wife hates it. Imagine a world without Alabama Recent builds: Rocket Bunny FR-S and stock BRZ Toyota bB Bro-style Civic K20 powered SiR converted EK WIP I build slowly and poorly.
|
|
#8
11-30-2007, 02:40 AM
|
||||
|
||||
|
Re: When scratch building What's best used to make wheel wells ?
Hi all, yes scratchbuilding is the only way to go if you wanna build something out-of-the-box extra...
for me, anything that has a straight line will be by styrene rods, tubes, sheets etc... anything irregular will be polyester putty, resin cast or even wet toilet paper! hope this helps... marc SGP
__________________
I can feel the adredalin, the same adredalin of what it's like... to be a classic ferrari coachbuilder.
|
|
#9
11-30-2007, 05:30 AM
|
|||
|
|||
|
Re: When scratch building What's best used to make wheel wells ?
thanks fella's... willimo your a champ !
this info was so much more helpfull Quote:
  well this is what the kits chassis looks like ... very basic huh ? okay so after soem of this reading i have been lookin into some of what my other kits had and found that the focus kit came very close .. could i just re work the front end to incorperate the suspnsn as well .. here are the pics Oh b4 i show u these pix i must not .. i have a few of the kits and the whie shell u see isnt the one i will use .. its a peace of shite..    
Last edited by xlr8r_boy; 11-30-2007 at 06:24 AM. |
|
#11
11-30-2007, 06:14 AM
|
|||
|
|||
|
Re: When scratch building What's best used to make wheel wells ?
Quote:
|
|
#12
11-30-2007, 06:21 AM
|
||||
|
||||
|
Re: When scratch building What's best used to make wheel wells ?
Quote:

__________________
Julian |
|
#13
11-30-2007, 06:32 AM
|
||||
|
||||
|
Re: When scratch building What's best used to make wheel wells ?
Quote:
This forum is full of members who are willing to help when asked. However, you should remember that you need them to want to help you. Chill out please.
__________________
Guideline for happy modeling: Practice on scrap. Always try something new. Less is more. "I have a plan so cunning, you could put a tail on it and call it a weasel" - Edmund Blackadder |
|
#14
11-30-2007, 09:43 AM
|
||||
|
||||
|
Re: When scratch building What's best used to make wheel wells ?
The "anal guy" is a Moderator and it's his job to enforce the forum's rules and etiquette. If you can't respect that, don't expect anyone to be real helpful or even to be around very long!
Kurz |
|
#15
11-30-2007, 12:31 PM
|
||||
|
||||
|
Re: When scratch building What's best used to make wheel wells ?
Quote:
yes, we are all here to show our work & learn from the others...no need to get so personal on such little issues right? so please gentlemen, cool it cos' we've got lots of modeling to chat & build!!! Mr moderator, give the newbies like me a chance to get adapted into AF. i'm a chinese & not a good english writer too... Mr newbie...come'on, we're plastic builders...not doctors in the hospitals, so please don't use those body languages ok? we all be friends ok!? it's all fate that we can gather here & share our passion at this very moment, the world is already messy enough... let's keep this place that one very last haven we all can rest & enjoy in... cool ok??  smile!!  marc SGP
__________________
I can feel the adredalin, the same adredalin of what it's like... to be a classic ferrari coachbuilder.
|
|
|
POST REPLY TO THIS THREAD |
 |
|
|


 gio
gio


