|
|
|

|
|
| Search | Car Forums | Gallery | Articles | Helper | Quality Dog Food | IgorSushko.com | Corporate |
|
| Latest | 0 Rplys |
|
|||||||
 |
 Show Printable Version | Show Printable Version |  Email this Page | Email this Page |  Subscribe to this Thread
|
|
|
Thread Tools |
 11-21-2007, 11:42 PM
|
#1 | |
|
AF Newbie
Join Date: Sep 2006
Location: Baltimore, Maryland
Posts: 12
Thanks: 0
Thanked 0 Times in 0 Posts
|
1995 Lumina 3.1L valve adjustment procedure?
Well, I'm going to spend my Thanksgiving holiday replacing the lower intake manifold gaskets on my 1995 Lumina. It's a 3.1L, vin M, w/Ball & Pivot rocker arms. I've done a lot of research and got the Fel-Pro MS98004T gasket set.
The thing is, I'm getting conflicting advice on how to adjust the valves during re-assembly. One of my (older) Haynes books says they need to be adjusted like older valves... find TDC, determine 0-lash point, then 3/4 turn more. Turn crank one turn and repeat for other half. (blah, blah, blah, you know the routine.) But yet my other (slightly newer) Haynes book says to just torque them to 18 Ft-lbs. !?!? Before I start this I'd like to know which procedure is correct. Does anyone have hands-on experience with this particular engine? I've pretty much got the rest down pat, but I just can't get a definitive answer to the above question. Thanks! |
|

|

|
|
11-22-2007, 02:38 AM
|
#2 | |
|
AF Enthusiast

Join Date: Mar 2004
Location: Snellville, Georgia
Posts: 556
Thanks: 0
Thanked 0 Times in 0 Posts
|
Re: 1995 Lumina 3.1L valve adjustment procedure?
Just torque. The lifters will take up any slack in the valvetrain, to an extent. None of that adjustment babble like solid lifters. If you're not taking the heads off, then just do the usual checks for wear and tear in the rocker arms and pull a lifter or two and check it. Just be sure every nut and bolt goes back where it came from.
Are you replacing the gasket due to a confirmed leak, or just as a precaution? If it is a leak into the lifter valley, and thusly contaminating oil, you'll want to make sure you get rid of all the coolant from the oil galleys and such. |
|
|
|
|
|
11-22-2007, 09:53 AM
|
#3 | |
|
A990 racer
 Join Date: Mar 2002
Location: Chestertown, New York
Posts: 17,051
Thanks: 26
Thanked 383 Times in 374 Posts
|
Re: 1995 Lumina 3.1L valve adjustment procedure?
18ft/lbs is close enough, do not mix up the pushrods, different lengths here. You should be getting the updated intake bolts also with the revised torquing procedure.
__________________
|
|
|
|
|
|
11-22-2007, 10:51 AM
|
#4 | |
|
Registered Offender
Join Date: Mar 2006
Location: Rural
Posts: 6,562
Thanks: 8
Thanked 346 Times in 341 Posts
|
Re: 1995 Lumina 3.1L valve adjustment procedure?
18 ft/lb MAXIMUM! And you might want to clean and dry the threads, then apply a couple drops of LocTite 242 (service removable) thread locker upon assembly. The bolt bosses in the heads will strip very easily, and inadequate torque can allow the bolts to back out, causing untold carnage:

__________________
Permanent seat assignment on the Group W bench... Automotive Forums Survival Guide |
|
|
|
|
|
11-22-2007, 12:18 PM
|
#5 | |
|
A990 racer
Join Date: Mar 2002
Location: Chestertown, New York
Posts: 17,051
Thanks: 26
Thanked 383 Times in 374 Posts
|
Re: 1995 Lumina 3.1L valve adjustment procedure?
Saving that pic for the right occasions, cool.
__________________
|
|
|
|
|
|
11-22-2007, 12:37 PM
|
#6 | |
|
Registered Offender
Join Date: Mar 2006
Location: Rural
Posts: 6,562
Thanks: 8
Thanked 346 Times in 341 Posts
|
Re: 1995 Lumina 3.1L valve adjustment procedure?
You remember that "P300 - Random Misfire" error code, eh?

__________________
Permanent seat assignment on the Group W bench... Automotive Forums Survival Guide |
|
|
|
|
|
11-22-2007, 12:38 PM
|
#7 | |
|
AF Newbie
Thread starter
Join Date: Sep 2006
Location: Baltimore, Maryland
Posts: 12
Thanks: 0
Thanked 0 Times in 0 Posts
|
Re: 1995 Lumina 3.1L valve adjustment procedure?
Thanks guys! - Ok, I just found this on AutoZone's site: Install the pushrods in their original location, making sure they seat in the lifter sockets. Install the rocker arms and ball, then tighten the nuts to 14-20 ft. lbs. (19-27 Nm).
I'll be starting this tomorrow (Friday), and since I got till Sunday night to get it finished, I'll be taking my time. (And my old back ain't what it used to be!) And yes, I'm doing this due to a confirmed leak. Several actually. The three corners of the engine that I can see all are damp with coolant, right where the intake manifold seats against the heads. I've known about the gasket issue with these engines for a few years now, so I've been checking this one about once a week. I'm the original owner, and over the years I don't normally have to top off the coolant reservoir more then once a year. But in the last month I needed to fill it twice. Still didn't see anything unusual under the oil cap though. And no puddles under the car. That is until the other day, when I noticed some of the tell-tall mayonnaise goo on the oil cap and on the under side of the valve cover. (Oil on rockers and head still looks pretty good.) Theres no "visible" coolant in the oil yet, (though I know it's there). The oil on the dip stick still looks great. The engine has NEVER over heated so I'm going to leave the heads on. And the car still runs fine with no unusual noises. Oh, and there's no oil in the coolant. So I'm fairly confident I caught it in time. I'm planing to reuse the intake bolts, if I can. And of course use the revised torquing procedure. I will clean the threads using the wire wheel on the bench grinder and reapply blue (medium) thread-lock. I'll also chase the threads in the holes if I can find my Tap&Die set. And I might as well change the water pump too, since it's the original pump with 142000 miles on it. OH, a couple more questions... Do I really need to use a crows foot on some of the intake bolts? Or can I get away with a flexible extension and socket? I guess if I need to use a crows foot I'll need to readjust the torque wrench setting on those. (Depending on the amount of offset on the crows foot... man I hate math!) Wow Blue Bowtie, that's some carnage! But those are Roller rocker arms, I have the older Ball & Pivot rocker arms. I know theres a big difference in the torque spec between mine and yours. |
|
|
|
|
|
11-22-2007, 01:06 PM
|
#8 | |
|
Registered Offender
Join Date: Mar 2006
Location: Rural
Posts: 6,562
Thanks: 8
Thanked 346 Times in 341 Posts
|
Re: 1995 Lumina 3.1L valve adjustment procedure?
That wasn't mine, but, yes, they are different in that respect, but the result of incorrect torque could be the same. I probably would have stopped driving it after the first one came off and killed one cylinder, instead of waiting until five rockers had pulled out.
Instead of LocTite medium on the intake bolts threading into the water jackets, you might consider using a true thread sealant:  As for the blinded bolts through the intake, even if using a universal joint or flexible extension, there can be torque multiplication (and falloff) in the drive arrangement. However, a truly flexible extension (wirewound cable type) is going to act more like a constant velocity joint, and therefore create less torque multiplication and falloff - It should be close enough.
__________________
Permanent seat assignment on the Group W bench... Automotive Forums Survival Guide |
|
|
|
|
|
11-24-2007, 05:55 PM
|
#9 | |
|
AF Newbie
Thread starter
Join Date: Sep 2006
Location: Baltimore, Maryland
Posts: 12
Thanks: 0
Thanked 0 Times in 0 Posts
|
Re: 1995 Lumina 3.1L valve adjustment procedure?
Well, I was just about to put it all together when I noticed that the coolant tube's quick disconnect internal parts had disintegrated. I'm referring to the the plastic parts that fit into the nipple behind the o-ring. I'm sure this thing's going to leak without those plastic parts.
 Does anyone know what I should be asking for at a parts counter? And can anyone tell me where I can find these on a Sunday? (OK, about now I'd settle any day of the week!) The plastic parts that stayed on the tube look OK, but my guess is everything will be included in the (whatever it's called) kit. Called AutoZone and the guy had no idea what I was talking about. LOL Does anyone know what I should be asking for at a parts counter? And can anyone tell me where I can find these on a Sunday? (OK, about now I'd settle any day of the week!) The plastic parts that stayed on the tube look OK, but my guess is everything will be included in the (whatever it's called) kit. Called AutoZone and the guy had no idea what I was talking about. LOL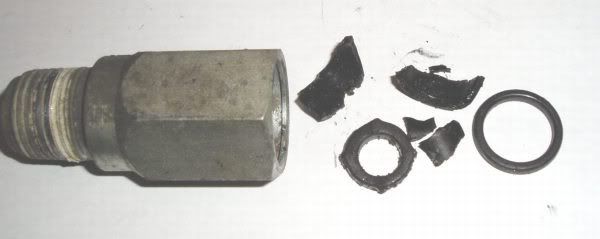 As for the rest of the job, it looks like I really did catch this in time. VERY little signs of contamination. Except for a little mayonnaise goo under the valve cover, but mostly the front one, it looks very good inside. Just a little pitting of the aluminum intake, but nothing some J-B Weld wont take care of. Any (quick) help would be GREATLY appreciated!!! |
|
|
|
|
|
11-24-2007, 08:15 PM
|
#10 | |
|
A990 racer
Join Date: Mar 2002
Location: Chestertown, New York
Posts: 17,051
Thanks: 26
Thanked 383 Times in 374 Posts
|
Re: 1995 Lumina 3.1L valve adjustment procedure?
Try a " real " parts store this time, Napa, Carquest, Dorman makes these fittings.
__________________
|
|
|
|
|
|
11-24-2007, 08:46 PM
|
#11 | |
|
AF Newbie
Thread starter
Join Date: Sep 2006
Location: Baltimore, Maryland
Posts: 12
Thanks: 0
Thanked 0 Times in 0 Posts
|
Re: 1995 Lumina 3.1L valve adjustment procedure?
Well unfortunately I'm not lucky enough to live anywhere near one of those. But if I knew what to ask for I still may be able to find it locally. - Does this thing even have a name?
|
|
|
|
|
|
11-25-2007, 01:16 AM
|
#12 | |
|
AF Enthusiast
 Join Date: Mar 2005
Location: San Antonio, Texas
Posts: 587
Thanks: 0
Thanked 0 Times in 0 Posts
|
Re: 1995 Lumina 3.1L valve adjustment procedure?
heater hose/water hose quick connect?? may just wana take it with you and goto autozone, they seem to be able to figure it out if they can see it...rofl. best of luck.
|
|
|
|
|
|
11-25-2007, 04:19 AM
|
#13 | ||
|
Lactose the Intolerant

Join Date: Aug 2004
Location: Nowhere, Missouri
Posts: 6,410
Thanks: 4
Thanked 52 Times in 51 Posts
|
Re: 1995 Lumina 3.1L valve adjustment procedure?
Quote:
Whoops...it was probably a Dorman part... http://www.dormanproducts.com/catalo...Disconnect.pdf Should find it here...
__________________
You made three mistakes. First, you took the job. Second, you came light. A four man crew for me? F**king insulting. But the worst mistake you made... ...empty gun rack. |
||
|
|
|
|
11-26-2007, 01:09 PM
|
#14 | |
|
AF Enthusiast
Join Date: Oct 2004
Location: Hudson, Wisconsin
Posts: 605
Thanks: 0
Thanked 0 Times in 0 Posts
|
Re: 1995 Lumina 3.1L valve adjustment procedure?
The part is called a "coolant pipe nipple" for intake manifold.
__________________
Great quote: "I am noticing a loud fuel odor" |
|
|
|
|
|
11-28-2007, 04:29 PM
|
#15 | |
|
stupidity should hurt

Join Date: Aug 2004
Location: Flint, Michigan
Posts: 10,129
Thanks: 2
Thanked 22 Times in 22 Posts
|
Re: 1995 Lumina 3.1L valve adjustment procedure?
The Dorman part number is 800-401 for that quick-connect nipple. I know Advance Auto Parts carries them, Auto-Zone may also (although they still may not be able to find it even if you give them the part number).
__________________
 Still waiting for the "good old days" I'll get to bore my future grandchildren with! |
|
|
|
|
|
|
POST REPLY TO THIS THREAD |
 |
|
|

