|
|
| Search | Car Forums | Gallery | Articles | Helper | Air Dried Fresh Beef Dog Food | IgorSushko.com | Corporate |
|
|||||||
| Engine, Transmission and Drivetrain Discuss Engine, Transmission, Drivetrain, and all other performance modifications here. |
 |
 Show Printable Version | Show Printable Version |  Subscribe to this Thread
|
|
|
Thread Tools |
|
#1
 06-24-2007, 01:00 AM
|
||||
|
||||
|
This is meant as a semi-writeup/instructional/about for the head swap that I've done in June of 2007. This is meant for anyone with a 420a to get a better understanding of rebuilding, replacing, or fixing the head. There is a lot of information on the 4g63 and how to replace a head and all, but not too much on the 420a, so here is how it goes. I'm not going to go into detail on the steps since you should be using a manual anyways, and there's information all over the internet on the actual steps. This is just to help with the not-so-obvious.
-Prep.- - Firstly, figure out what's going on. Are you going to rebuild the head? Replace the head? Fix a leaking headgasket? Timing belt replacement? Whatever you're doing, the steps are pretty much the same. I got a hold of a spare head and decided to rebuild it while off the engine. It was the easiest since my Talon is a my DD. Figure out what you want to do with it, what kind of power you want to make, and so on. I went with a full port and polish job on the head and the intake manifold. 3-angle valve job is sufficient for a N/T 420a. 5-angle is overkill. Mine ready to go in 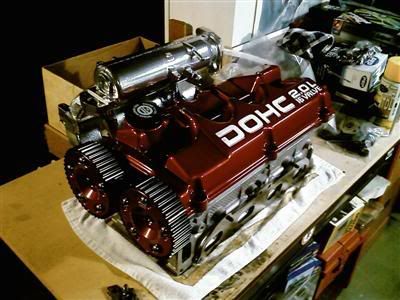 -When you start the job, make sure you have everything you need. All the tools, liquids, gasket sealers, and so on. Read the manual (Haynes) the whole way through to understand. When you start, make sure you relieve the fuel pressure and burn off any gas in the lines, drain the oil, and drain the coolant. -Use Zip-lock bags and label them for all parts. I didn't do this.  Taking apart  -Timing Belt- -Taking off the underdrive crank pulley can be hard. They recommend to use a 3-jaw pulley puller. You can rent these at Autozone. Get the big one. When I got mine, it didn't work too well. I had an aftermarket UDP on mine, and the threads didn't seem to want to line up. Also, I couldn't get all 3 jaws around the pulley due to the frame being in the way. You can try to get it off with the puller, or be like me, get angry at it and take a big crow bar to it, wedge between the block, and pop that thing right off. -When getting to the timing belt, you have to take off the passenger-side engine mount. This is pretty easy. If you can't get the center bolt out of the mount itself, lift up the engine with a jack slightly and try pulling it out then. I recommend having 2 jacks around, as they will come in handy. -For the easiest and quickest way to get this whole job done, take off the passenger-side, front, and drivers-side (tranny) mounts. Make sure the engine is hoisted up by the jacks. This way, when you want to move the engine up to get to something it's easy. The engine is then only mounted to the rear roll mount, making the engine "swivel" on it. Makes everything very easy to get to. -With that done, it is now much much easier to pull the mount from the engine itself. You can now hoist it up and move it around in order to get the long bolts out from the mount on the block. -My timing belt cover did not make it in the process. I ended up shattering it in about a million pieces. This is not good. You MUST have at least a lower timing belt cover. I would buy a spare on just in case if this is your first time doing this. Be careful when working around it because it is just cheap plastic. -Removal- -Always make sure you do what the instruction manual says. Follow the patterns on the head-bolts, cam holder bolts, and so on. Everything will fall apart nice and quickly and easily if you do everything right. -When the head is off, scrape the top of the block to get the old gaskets and gunk off. Then clean with brake cleaner. Try not to get anything inside the block or cylinders. I also took a scraper and cleaned the carbon build up off the pistons where the valves set in. Check for damage, or anything that looks bad. Pic of head off of block. 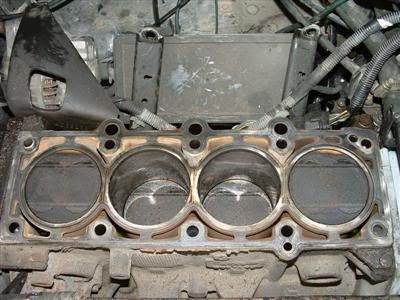 -Install- -Again depending on what you're doing, this may just be a direct drop in and go. With a new head, make sure the springs, valves, and locks are installed and prepped good. When putting the head on, it's good to have another person there to help. It does get heavy and takes awhile to seat it right. I had the head gasket all prepped, laid down, and then 2 of us put the head on. I put the outside head bolts on first to just align up everything. Tighten to make sure they're in there, but don't tighten all the way. -When installing the headbolts, do it right. Follow the torque pattern, and do it as many times as it says. This is very important. Once done, you have a pretty head now. 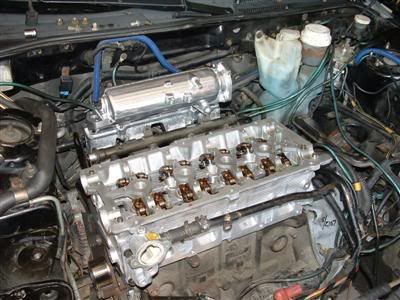 -Install the cams as it say to do it. Make sure they are at TDC and tighten. Again, make sure you follow the patterns and torque settings. And oil them up a lot. Should look like this now. 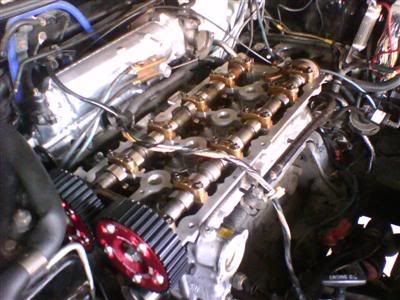 -Follow the instructions on the timing belt. Make sure everything is at TDC. For the tensioner, I used a C-Clamp to compress it. Took 2 of us to do, align the holes up, and get a pin in there. Not as easy as it sounds. Again, just read everything and do what it says. If it's not right, redo it. Look at the cams while installing the timing belt and make sure the lopes that are straight up, are pointing straight up on both sides. Mine was off, and now it's off by one tooth. Good thing I got adjustable gears, because I was able to correct my mistake AFTER installing everything. Don't do what I did. -Make sure everything is tightened to what the book says. Make sure every bolt goes back in. If it was there to begin with, you still need it. -While installed the EGR pipe back in, make sure it is not resting or pushing down on ANY harnesses or electrical connectors. I burned a couple of mine. -Keep all wires and loom away from anything hot or moving. Make sure all hoses are connected and in good shape. When done, you should have something (or similiar) to this... 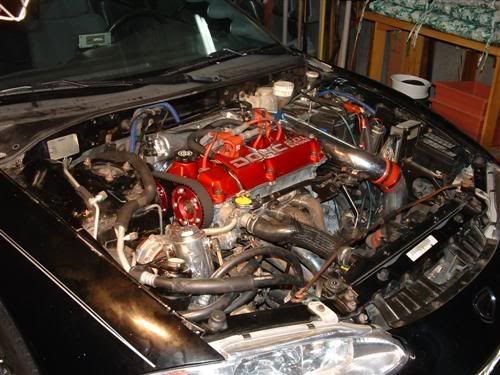 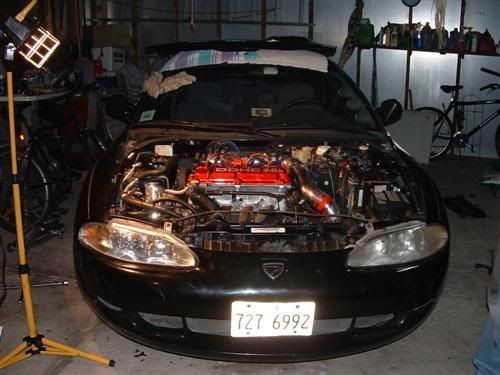 This isn't exactly easy, but it's fun. Took 2 days to complete. Took apart one day, and installed the next day. And that's about it. Please add any tips if I missed any. Thanks for reading.
__________________
2013 Chevy Sonic 1LZ Daily Driver, 1.4L Turbo, 6spd 75 Monte Carlo SBC 400 6.6L, Aluminum heads, Hurricane Intake... 12 Chevy Sonic 1LZ 1.8L - Traded 01 Pontiac Grand Am SE - RIP 95 Eagle Talon ESi-T 5spd - RIP 88 Oldsmobile Cutlass Ciera- RIP 
|
|
#2
06-24-2007, 09:14 AM
|
||||
|
||||
|
Re: 420a Head Swap
ill add as i read :-D
First thing the puller is called a Chrysler bottom pully puller it is a harmonic balancer pully but it is ONLY for a chrysler the original harm. puller wont work. Pritty good write up but you didnt mention there are 2 ways to 2 this. You can pull the IM and head out as 1, if you do this all you have to do is take off the box off the back of the IM and pull off both brackets. Or you can go threw the pain steaking of takeing out all the IM bolts while in the car... you didnt mention you have to take off the altenator and bracket or the PS pump thats all i can think of as now...
__________________
 96 GS - 5 Speed-Sold 1998 Ford F-150 XLT 4X4
|
|
#3
06-24-2007, 09:29 AM
|
||||
|
||||
|
Re: 420a Head Swap
Actually I didn't take off the alternator bracket. Didn't touch anything on the alternator except to take the belt off. Power steering you do.
That was a hard part that I did forget. If you do it all together, make sure all the mounts are unbolts from the IM. These are hard to get to, but are doable. I would say to take the whole thing out all together as we tried doing it both ways, but as one was the easiest. Again, this isn't a full writeup, just some tips to make it easier.
__________________
2013 Chevy Sonic 1LZ Daily Driver, 1.4L Turbo, 6spd 75 Monte Carlo SBC 400 6.6L, Aluminum heads, Hurricane Intake... 12 Chevy Sonic 1LZ 1.8L - Traded 01 Pontiac Grand Am SE - RIP 95 Eagle Talon ESi-T 5spd - RIP 88 Oldsmobile Cutlass Ciera- RIP
|
|
#4
06-24-2007, 10:58 AM
|
||||
|
||||
|
Re: 420a Head Swap
That first pic got printed, stickied, and put with the Playboys, Hustlers, and pictures of Lucky's FD
 . .Overall its a nice writeup, but I am interested in results! How is it? Is she fast? EDIT: Ahhhhhhhhh open deck block! Ahhhhhhhhh!!!
__________________
 Build on hold until I get a good paying job, either in school or once I get out. At that time a full tear down and complete rebuild should be in order. The Purple People Eater will ride again... January 2011 can't come soon enough.
|
|
#5
06-24-2007, 11:41 AM
|
||||
|
||||
|
Re: 420a Head Swap
Quote:
I've yet to push her yet. I'm still getting everything right and making sure that nothing is going to break or fall off. Still driving with a full size fire extinguisher in the car yet just in case. I have to redo the settings on the SAFC to compensate for the better flow and better cams. When I do push it, say on the expressway, it pulls hard at about 4,200k rpm. Have to get the logger out and test/tune everything. That will probably be another writeup.
__________________
2013 Chevy Sonic 1LZ Daily Driver, 1.4L Turbo, 6spd 75 Monte Carlo SBC 400 6.6L, Aluminum heads, Hurricane Intake... 12 Chevy Sonic 1LZ 1.8L - Traded 01 Pontiac Grand Am SE - RIP 95 Eagle Talon ESi-T 5spd - RIP 88 Oldsmobile Cutlass Ciera- RIP
|
|
#6
06-24-2007, 12:50 PM
|
||||
|
||||
|
Re: 420a Head Swap
Did anyone else notice that from the beginning pic of the valve cover being like a ruby red and then once mounted it looks more orange? Or is that just lighting? Anyway that looks hella sweet now. I expected more install pics of you taking shit apart and whatnot like the mounts you were bitching about being impossible, but this is still pretty good for somebody just looking for a few quick tips.
__________________
'92 3000gt SL Zoom Stage 1 Clutch Quote:
|
|
#7
06-24-2007, 01:09 PM
|
||||
|
||||
|
Re: 420a Head Swap
The lighting plays a huge factor in the color of the VC. It's a dark metallic red, but like you said, it looks orange. It need sunlight in order to see the real color. When I clean everything up and finish it up and do a photo shoot, you'll see the real color. It looks hot as hell in person.
And it's not good to keep electronics and break-ables around me when I'm pissed and having problems. They usually get broken then. That's why there's not too many pics. I wish I had taken more.
__________________
2013 Chevy Sonic 1LZ Daily Driver, 1.4L Turbo, 6spd 75 Monte Carlo SBC 400 6.6L, Aluminum heads, Hurricane Intake... 12 Chevy Sonic 1LZ 1.8L - Traded 01 Pontiac Grand Am SE - RIP 95 Eagle Talon ESi-T 5spd - RIP 88 Oldsmobile Cutlass Ciera- RIP
|
|
#8
06-24-2007, 11:31 PM
|
||||
|
||||
|
Re: 420a Head Swap
wow nice, you came a long way man
 . what hp do u plant to reach ? . what hp do u plant to reach ?
__________________
GM FOR LIFE !! NEW 1997 Camaro z28 6 speed illa never going back to import  , but killa alway be nice to any DSM he saw , but killa alway be nice to any DSM he saw looking for 2002 Trans Am LSX UPGRATE 2010 !! 97 Camaro Z28 95 camaro lt1 1992 Pontiac Firebird v6 auto -sold - Pony 1998 Mustang GT 4.6L Manual. Black 1995 Eagle Talon TSI AWD Turbo manual R.I.P 1994 Mitsubishi Eclipse Manual gray -Sold 1997 Mitsubishi Eclipse RS Auto White - Sold
|
|
|
POST REPLY TO THIS THREAD |
 |
|
|


