|
|
| Search | Car Forums | Gallery | Articles | Helper | Air Dried Fresh Beef Dog Food | IgorSushko.com | Corporate |
|
|||||||
 |
 Show Printable Version | Show Printable Version |  Subscribe to this Thread
|
|
|
Thread Tools |
|
#1
 05-05-2007, 10:53 PM
|
|||
|
|||
|
Progress Thread for Repairing the Lower Intake Manifold Gaskets and related items
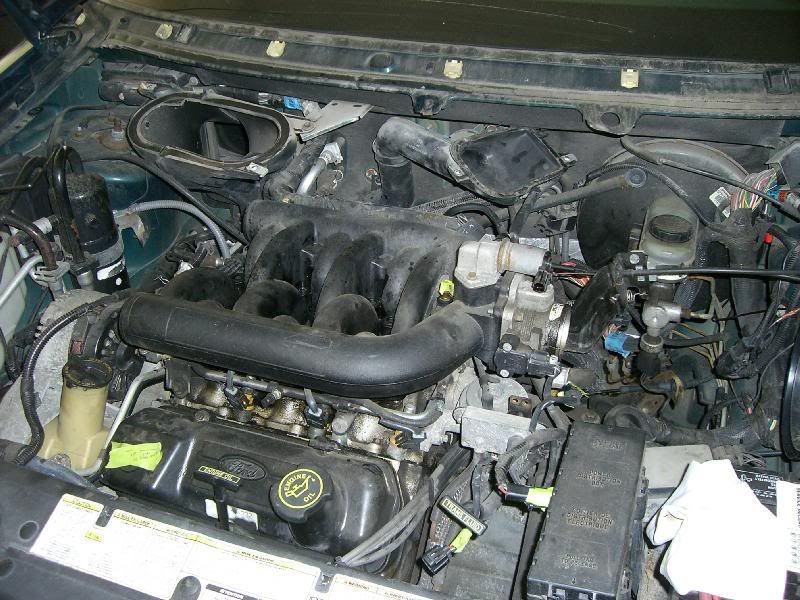
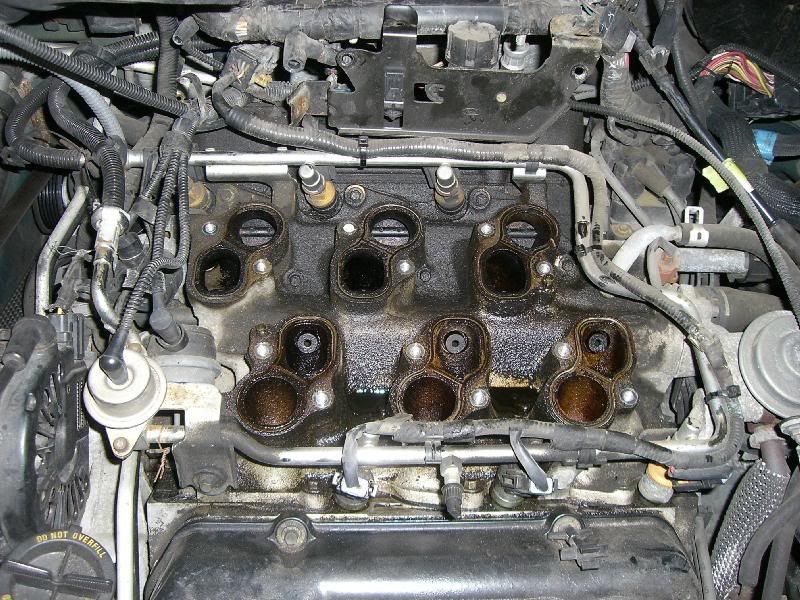
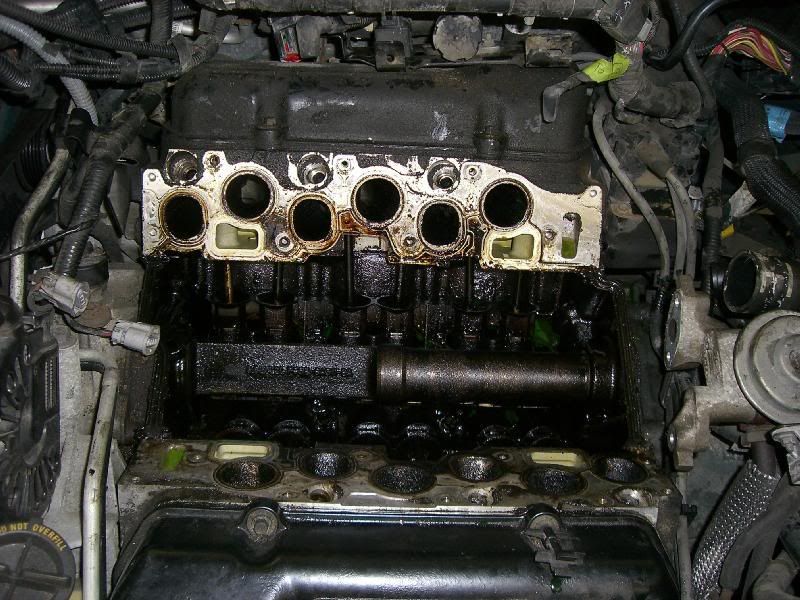
It's a '98 Ford Windstar GL with traction control and ABS. V6 3.8L. My lower intake manifold gaskets is leaking and they leak into my oil, my intake and outside the engine.
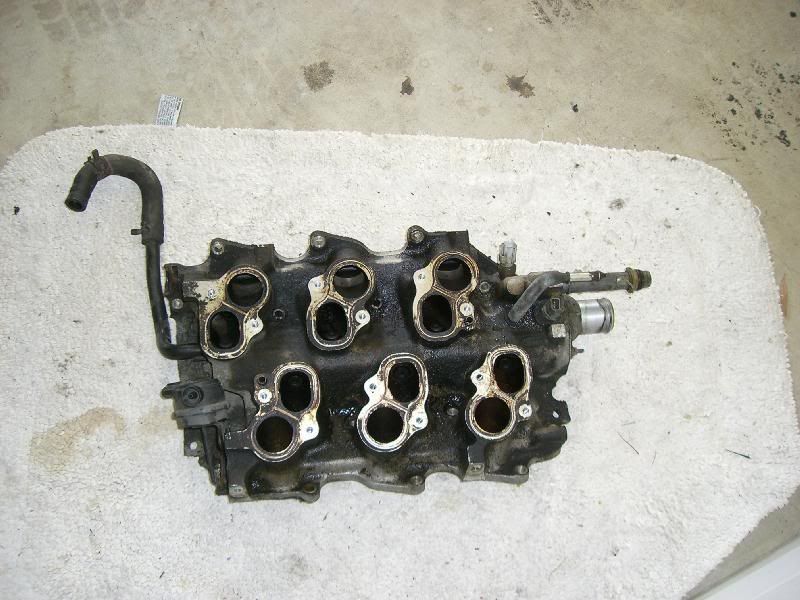
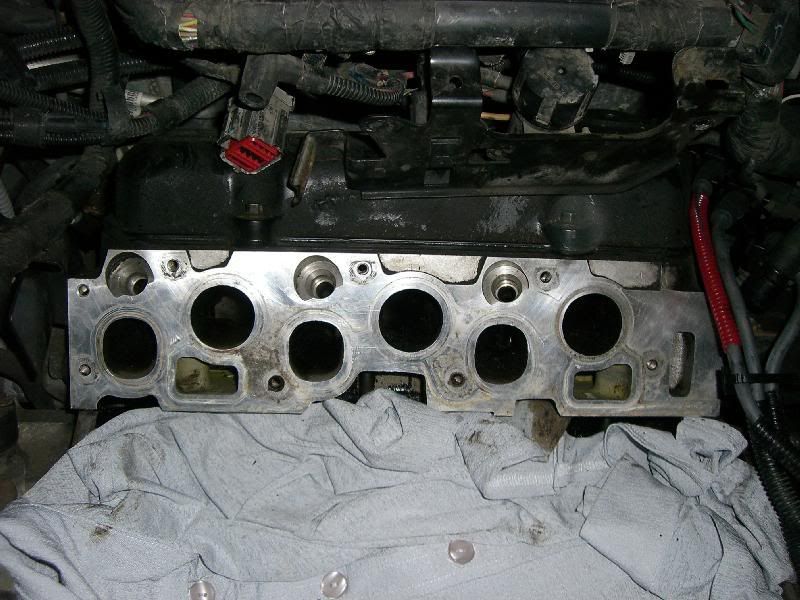
 Ford sucks Ford sucks . Anyway, I'm going to take care of this problem. This thread is to keep you people updated of my progress with photos. . Anyway, I'm going to take care of this problem. This thread is to keep you people updated of my progress with photos.  However, I will be doing this only when I got the time so the project might not be finished in a week's time. However, I will be doing this only when I got the time so the project might not be finished in a week's time.This work received a lot of help from "wiswind" and "busboy" and others, who spent time answering my questions and from their many write-ups on this topic. My goal: 1. replace the lower intake manifold gaskets 2. replace the spark plugs and wires 3. replace the thermostat 4. replace master cylinder Today, I spent a whole day (8 hours) doing the following: 1. take out the cowl with the wiper motor and arm. Now I have a much better working area. see photo. 2. take out the intake rubber tube and electrical connections. label the plugs for easy installation down the road. 3. take out upper intake manifold. Easy. All 8mm bolts. Then I just move it aside on top of the battery with the throttle cable connected. 4. Fuel injectors.  Now since my intake manifold gaskets are leaking coolant outside, there are puddles of coolant on top of the lower intake manifold. And since this situation has been a while (I would guess at least 10k miles. I bought the car 3K miles ago), there are mud, sand, oil and coolant mixtures crap desposting in every niche they could find. Of course, this includes the holes around the fuel injectors. Before lifting them up, you need to clean the area around the injectors. If you don't, then the moment your lift the injectors, the crud is going inside your engine, doing bad stuffs. Now since my intake manifold gaskets are leaking coolant outside, there are puddles of coolant on top of the lower intake manifold. And since this situation has been a while (I would guess at least 10k miles. I bought the car 3K miles ago), there are mud, sand, oil and coolant mixtures crap desposting in every niche they could find. Of course, this includes the holes around the fuel injectors. Before lifting them up, you need to clean the area around the injectors. If you don't, then the moment your lift the injectors, the crud is going inside your engine, doing bad stuffs.  So I spent half an hour, using a full bottle of carb cleaner and couple of rags to clean the shit out. When done, release the injector rail pressure by loosen the black screw on the rail towards the front of the car. Then loossen 4 8mm bolts and lift the lifters. Just lay the rail on the passenger side fender. So I spent half an hour, using a full bottle of carb cleaner and couple of rags to clean the shit out. When done, release the injector rail pressure by loosen the black screw on the rail towards the front of the car. Then loossen 4 8mm bolts and lift the lifters. Just lay the rail on the passenger side fender. 5. Now the lower intake manifold. Three coolant lines, an EGR connection and bunch of vacuum ports need be disconnected and set aside. The U-shape tube on the passenger side of the manifold are very hard to take off. yes, it has quick connects but I can't comfortably stick a vise in there. Space is very tight. Also I would love to mention that "quick connect" on the driver side connecting to the heater hose that "busboy" and "wiswind" and others repeatedly mentioned. I don't have a spectial tool. But I spent half an hour trying to get it off without damaging anything. However, I still broke it.  i think I will do what "wiswind" did: cut the darn "quick connector" and just use a regular hose clamps. Label them, I advise. Loossen the Intake Manifold Runner Control (IMRC) a bit to gain access to the two bolts hiding beneath them. What a design! Now, with all the 8mm bolts off (around 20 of those, 6 of them are long ones, the remaining ones are shorter), lift the lower manifold up. i think I will do what "wiswind" did: cut the darn "quick connector" and just use a regular hose clamps. Label them, I advise. Loossen the Intake Manifold Runner Control (IMRC) a bit to gain access to the two bolts hiding beneath them. What a design! Now, with all the 8mm bolts off (around 20 of those, 6 of them are long ones, the remaining ones are shorter), lift the lower manifold up. 6. Now the fun part.  Take that horrible-looking manifold filled with gunk outside to your garage. Take at least 2 carb cleaners. And clean inside and out. The IMRC butterflies are filled with junk. No wonder they are so reluctant to move and constantly throwing CEL. The gasket surfaces have lotta gunk sticking to them and they are very hard to get rid of. I used a soft cloth and both Acetone and Carb cleaner but it took forever to clean them off. After couple of hours working at it, I just resort to a razor blade. Take that horrible-looking manifold filled with gunk outside to your garage. Take at least 2 carb cleaners. And clean inside and out. The IMRC butterflies are filled with junk. No wonder they are so reluctant to move and constantly throwing CEL. The gasket surfaces have lotta gunk sticking to them and they are very hard to get rid of. I used a soft cloth and both Acetone and Carb cleaner but it took forever to clean them off. After couple of hours working at it, I just resort to a razor blade.  Some of you might not like this idea at all. Yes, it might scratch the alloy surface. But with skills, you can keep that from happening to a minimum. Sure, I did make a few scratches here and there but my finger tips couldn't even feel it so I guess it'll be fine. At least it's better than those gunk sitting there. I can feel those gunk with my finger tips. With the razor blade, my work progressed much faster. But still, it took me 4 -5 hours just to clean the manifold surfaces. Some of you might not like this idea at all. Yes, it might scratch the alloy surface. But with skills, you can keep that from happening to a minimum. Sure, I did make a few scratches here and there but my finger tips couldn't even feel it so I guess it'll be fine. At least it's better than those gunk sitting there. I can feel those gunk with my finger tips. With the razor blade, my work progressed much faster. But still, it took me 4 -5 hours just to clean the manifold surfaces. 7. Spark plugs and wires. With the intake manifolds off, it's relatively easy to work on the plugs and wires. I used the Autolite double platinum. Remember to gap them to 0.054. Mine wasn't gapped right in the first place. It took me a bit less than 1.5 hours to finish all the plugs and wires. Two of the plugs look very horrible with some wet black sh*t covering them. I'm sure the cylinders they used to sit at won't be much better off. The others are fine though. 8.  opcorn: Next week I need to drop by the dealer to get the brake pressure sensor and finish the master cylinder. And will get the van install back. opcorn: Next week I need to drop by the dealer to get the brake pressure sensor and finish the master cylinder. And will get the van install back.I have a few questions: 1. how clean do I need for the gasket surfaces? For the lower side ones on the lower intake manifold, and the top surface on the head, I can't seem to be able to clean them to shiny metal surface. I got all the black carbon build-up cleaned out. But there are areas of yellow and areas of greyish stuffs that I can't get them off. I could barely feel them with my finger tips though. 2. I spent such a long time (4-5 hours) cleaning my manifold 'cause it's MY car. But I'm just wondering, if I have a garage do it, will those guys clean the gasket surfaces that clean? If they also clean the surfaces to be pristine clean, then how could they do that in such a short time? And when I lift my lower manifold, many crap dropped to the crank case. I meticulously pick them up and I also cleaned the crank case. But the shops don't do that right? Won't it hurt the engine very bad if you have sand etc dropping into the crank case? 
|
|
#3
05-06-2007, 08:03 AM
|
|||
|
|||
|
Re: Progress Thread for Repairing the Lower Intake Manifold Gaskets and related items
As to what a shop would do.....I don't know that they would spend the time you did getting things clean....although they will have knowledge of what solvents work at getting things clean.
As far as the razor blades.....I used a razer blade to clean the gasket seating surfaces, before I read the FORD TSB saying not to.... Like you, I was super careful....and it has been fine. I would not worry about a slight discoloration of the metal, just make sure that all the dirt and oily residue is gone before placing the new gaskets into place. I would give the first gasoline the full dose of Berryman's B-12 Chemtool to clean the fuel system, and the valves as you drive the first 1 to 2 tanks of gasoline treated with this product. It DOES work. While working in there....try to limit, as much as possible, how much junk gets into the head part of the intake.....as it will be drawn into the engine right when you start it up. Those passages are layered up with a lot of junk......I soaked paper towels with solvent....and pressed them in....letting them soak.....then pulled them out...and wiped the junk out as best I could. I had one of those Scott's boxes of shop towels that they sell at Home Depot, etc. From looking at the view into the engine under the lower intake manifold, I would recommend a double treatment of Auto RX...... www.auto-rx.com You add it to your oil, drive the specified miles, then change the oil and filter using a non-synthetic oil (I used Havoline), and drive the specified miles. From reading the instructions, most of the junk comes out of the crankcase during the "rinse" phase....after the treated oil has been removed. Then, you change the oil and filter, add another bottle of AutoRX, and do the same thing again. It does a great job at cleaning the engine. Follow the instructions on the bottle.....and it will work. They have instructions on their website....and will answer any questions you may have. I have used this product, although my engine was pretty clean to start with, and I noticed a difference.
__________________
Moderator for Ford Windstar room only Links to my pictures, intended as an aid, not a replacement for, a good repair manual. 1996 3.8L Windstar http://www.flickr.com/photos/4157486...092975/detail/ 2003 Toyota Sienna pictures (not much there yet) http://www.flickr.com/photos/4157486...781661/detail/
|
|
#4
05-06-2007, 10:09 AM
|
|||
|
|||
|
Re: Progress Thread for Repairing the Lower Intake Manifold Gaskets and related items
BTW, where do you put the RTV after you place the lower intake manifold in place? My Haynes manual says to put the gasket (the one on top of the head, with the clips) on top of a thin bead of RTV and put another thin bead on top of the gasket. Plus you need to put another bead at where the head meets the block. I'm a bit confused. I look at the line-shaped gasket with the clips. It has two grooves on it. So do I have to put RTV at the center of that groove?
Last edited by lidation; 05-06-2007 at 10:51 AM.
|
|
#5
05-06-2007, 03:52 PM
|
|||
|
|||
|
Re: Progress Thread for Repairing the Lower Intake Manifold Gaskets and related items
The lower intake manifold gaskets are to be dry fitted.
The only place to put the RTV sealant (make sure it is labeled as sensor safe) is after the lower intake manifold gaskets are in place...and the end seals are in place......just a small dap where the lower intake manifold gasket meets the end seal....which is where the head meets the block. I show in my pictures that the grooves in the lower intake manifold gasket match grooves in the end seal......an just a small dap will seal it up. Putting RTV sealant onto the seating areas of the lower intake manifold gasket can cause the actual gasket sealing surfaces to not sit firm onto the metal....and create the seal that you need. Refer to my picture series on the lower intake manifold to see...
__________________
Moderator for Ford Windstar room only Links to my pictures, intended as an aid, not a replacement for, a good repair manual. 1996 3.8L Windstar http://www.flickr.com/photos/4157486...092975/detail/ 2003 Toyota Sienna pictures (not much there yet) http://www.flickr.com/photos/4157486...781661/detail/
|
|
#6
05-06-2007, 04:09 PM
|
|||
|
|||
|
Re: Progress Thread for Repairing the Lower Intake Manifold Gaskets and related items
Quote:
 Previously I only saw the photos in the first page. lol. Previously I only saw the photos in the first page. lol. Thanks for the graphic illustration! I should have looked at those photos earlier. I didn't know what special tool look like for the heater hose quick connect and I didn't have one. I broke the connector and now I have to cut it and just use hose clamps.  One more question wiswind: in the following photos, how did you clean your crank case that clean? Mine look horrible with a layer of crud build-up on all surfaces. I was thinking about spraying carb cleaners at them but then I'm not sure whether they will hurt my engine. Yours look preistine clean. 
|
|
#7
05-06-2007, 05:17 PM
|
|||
|
|||
|
Re: Progress Thread for Repairing the Lower Intake Manifold Gaskets and related items
To be honest.....it was already that clean.
I have owned the vehicle since just under 38K miles.....in 1999. I changed the oil frequently....and stuck with Mobil 1 synthetic....except when doing the AutoRX......after my picture down in there was taken. That is why I recommended the AutoRX to clean it up. I am not big on the solvent type "motor flush" products.....the fear being that they might break too much free in large chunks....and clog things up. One thing that I am concerned about is the oil pump pick-up screen....which is in the oil pan. Keep an eye on that oil pressure light.....and if it starts coming on when you are driving.......shut it down....and then we will need to think about dropping the oil pan and cleaning that pick-up screen. It is a LOT of work.....so hopefully you will not have that problem. A couple people have posted about their pickup screen getting clogged, which is why I mention it. Their symptom was the oil light coming on when driving, or sometimes, just sitting at idle. Also....I would put a new Motorcraft brand PCV valve in.....and make sure that the PCV lines from the valve to the top of the throttle body are in good shape.....some have posted that the line has collapsed on their vehicles. The PCV system is SUPER important to helping prevent sludge buildup. When working properly, the PCV system on the Windstar is good at doing it's job. As I mentioned, I had the special tool for the quick connect.....and the connector STILL broke apart. I guess that is was so old....and from the heat...it was super brittle..... Right when I was ready to put the lower intake manifold back on......I took a quart of new, fresh motor oil....and bathed things down in that area under the lower manifold....to wash the remaining coolant on down into the bottom of the engine.....of course...be super careful to avoid getting oil onto the nice clean lower intake manifold gasket and the gasket seating surfaces..... The oil will float on the water.....so most of the coolant will be right at the bottom, and come our first when you remove the drain plug. It is clear to me that you had more leakage than I did.....as my leakage was only at the passenger side.....and all into the engine. I also have had the upper intake manifold off a couple of times to clean the EGR ports....and track down a dirty fuel injector......and I cleaned the IMR plates at those times. This was the first, and only time that I had the lower intake manifold off.....and hope that it will not be off again. My pictures are better than my words......which is why I wanted you to give them a look. Now.....when you put coolant back in......I would try to do a couple of coolant flushes and end up with new antifreeze with distilled water. I converted my '96 over to a G-05 type of coolant...... You can now get Zerex G-05 at Autozone.....and it is also available at CarQuest Auto part stores. The G-05 will give you the best of both worlds.....the instant protection that a traditional green coolant gives....and the long-life charactoristics that a "Dexcool" type of non-silicate coolant. Motorcraft "Gold" is also G-05. You don't have to worry about G-05 and traditional green coolant mixing.....if that happens, the G-05 will have the same life as traditional green......2 years instead of 5. I don't plan to leave coolant in for 5 years anyhow.....old habits die hard...... I am not big on using a cooling system cleaner....just a flush....as you have another potential leak point.....the front cover....AKA Timing cover....and that is a Major pain in the rear of a job to do. I caught my timing cover at the seapage stage at least 5 years ago....and was successful in sealing it up with Bar's Stop leak. It looks like your cooling passeges are pretty clean....as were mine.....you will be able to see more when you change out the thermostat. I have the correct orientation of the thermostat in my pictures some place...... I did the thermostat at a different time.....so it is most likely not right with the gasket job. Take special note to make sure that the little "weep" hole in the thermostat body is UP. It may take a bit to "burp" all the air out of the cooling system, so keep an eye on the temperature gauge and shut the engine OFF if it climbs up toward H. Let the engine sit and cool.....add coolant to the radiator and overflow bottle as needed, then idle the engine again......keeping an eye on the temperature gauge. Now that I have the coolant leakage under control.....I have Redline 5W-20 oil in there.
__________________
Moderator for Ford Windstar room only Links to my pictures, intended as an aid, not a replacement for, a good repair manual. 1996 3.8L Windstar http://www.flickr.com/photos/4157486...092975/detail/ 2003 Toyota Sienna pictures (not much there yet) http://www.flickr.com/photos/4157486...781661/detail/
|
|
#8
05-16-2007, 03:02 PM
|
|||
|
|||
|
Re: Progress Thread for Repairing the Lower Intake Manifold Gaskets and related items
Last night, I finally finished putting everything back together (not the cowl yet). I also refilled the coolant and changed the engine oil. Today after work I will fire the engine up and have my fingers cross.
Overall this, project took me around 20 hours altogether. I do things couple of hours every few other days so it doesn't seem too much of hard work for me. But 80% of the time is spent on cleaning stuffs. No kidding. Both my upper and lower intake manifold are DIRTY with mixture of coolant, oil, dirt and sand. I am not that of a perfectionist towards this beater van but I still have to shell out that much time to make an OK cleanliness. For example, cleaning the lower intake manifold bolts alone cost me a full hour. I will keep u posted whether my car starts or not. lol. Hope I didn't leave any nuts or bolts in the cyclinder heads. 
|
|
#9
05-16-2007, 04:10 PM
|
|||
|
|||
|
Re: Progress Thread for Repairing the Lower Intake Manifold Gaskets and related items
Finding some good solvent cleaners to SOAK things in is a good move......and saves a lot of scrubbing.
FORD did come out with some new cleaners that they recommend for removing gasket junk, etc, but I don't know how well they work. Taking the time to get things cleaned up is time well spent......dirt, oil.....the wrong place.....like where the gaskets are supposed to seat.....will cause a lot of time in rework. Again.....be super careful to avoid flexing the IMRC actuators more than you have to. Also....keep a real close eye on the temperature gauge while you work the air out of the cooling system......and an eye on the oil pressure light in case of junk worked loose in the oil causing a clog. (oil issue much less likely...but worth mentioning....just in case).
__________________
Moderator for Ford Windstar room only Links to my pictures, intended as an aid, not a replacement for, a good repair manual. 1996 3.8L Windstar http://www.flickr.com/photos/4157486...092975/detail/ 2003 Toyota Sienna pictures (not much there yet) http://www.flickr.com/photos/4157486...781661/detail/
|
|
#10
05-16-2007, 04:33 PM
|
|||
|
|||
|
Re: Progress Thread for Repairing the Lower Intake Manifold Gaskets and related items
Quote:
I'd be interested to know what better solvents are out there than the carb cleaner. It might save me tons of time.
|
|
#11
06-05-2007, 08:32 PM
|
|||
|
|||
|
Re: Progress Thread for Repairing the Lower Intake Manifold Gaskets and related items
Update after one month and 500 miles of driving and one oil change: the manifolds do not leak a single drop! So it's fixed! Thanks ya'll for the tips and help!
|
|
#12
06-05-2007, 08:40 PM
|
|||
|
|||
|
Re: Progress Thread for Repairing the Lower Intake Manifold Gaskets and related items
GREAT! That is really good news!
__________________
Moderator for Ford Windstar room only Links to my pictures, intended as an aid, not a replacement for, a good repair manual. 1996 3.8L Windstar http://www.flickr.com/photos/4157486...092975/detail/ 2003 Toyota Sienna pictures (not much there yet) http://www.flickr.com/photos/4157486...781661/detail/
|
|
#13
06-05-2007, 09:28 PM
|
|||
|
|||
|
Re: Progress Thread for Repairing the Lower Intake Manifold Gaskets and related items
Good work!
You may want to add Permatex "Gasket Remover" to your chemical arsenals. I find it very effective in cleaning aluminum surfaces.
|
|
#14
06-06-2007, 07:27 PM
|
|||
|
|||
|
Re: Progress Thread for Repairing the Lower Intake Manifold Gaskets and related items
Quote:
|
|
#15
06-07-2007, 07:49 AM
|
|||
|
|||
|
Re: Progress Thread for Repairing the Lower Intake Manifold Gaskets and related items
When I cleaned mine I used Sea Foam in a plastic spray bottle, I think I used 3 cans. Then I finished it off with a can of carb cleaner.
|
|
|
POST REPLY TO THIS THREAD |
 |
|
|