|
|
| Search | Car Forums | Gallery | Articles | Helper | Air Dried Fresh Beef Dog Food | IgorSushko.com | Corporate |
|
|||||||
| WIP - Street Post topics for any "Works In Progress" street vehicles projects in this sub-forum. |
 |
 Show Printable Version | Show Printable Version |  Subscribe to this Thread
|
|
|
Thread Tools |
|
#1
 11-17-2006, 04:18 PM
|
|||
|
|||
|
FUJIMI Mitsubishi Starion-PROGRESS
Hi everyone, it's been a while since I've posted on here. This is the latest project I've been working on. It's suppose to be a replica of my friend's uncle's car from way back in the day. I had started the paint job several months ago (maybe even a year ago) but the project got put on the back burner. I started to work on it again a couple of days ago so instead of continuing where I left off, I decided to strip the paint and start from scratch. I should have it painted by the end of the weekend. The plan is to have it painted in a two tone scheme, white on top with gold on bottom. Not sure what kind of rims will be going on this, but for the most part, it'll be a bone stock model just like the original car. Here are the pics for now:
Stripped-   Primed-   Still needs some clean up work though, there's little bits of "leftover" paint from the previous paint job. Should have some more progress soon...
__________________


|
|
#2
11-17-2006, 04:29 PM
|
||||
|
||||
|
Re: FUJIMI Mitsubishi Starion-PROGRESS
Cool car, my friend had one. We turned up the boost and threw a rod threw his hood, literally!
I never knew this model existed! Should be interesting.
|
|
#3
11-18-2006, 09:43 AM
|
||||
|
||||
|
Re: FUJIMI Mitsubishi Starion-PROGRESS
SWEET.. i had no idea there was a Starion by Fujimi.. you should open up the hood and drop in the Eclipse motor into it..

|
|
#4
11-19-2006, 05:41 PM
|
||||
|
||||
|
Re: FUJIMI Mitsubishi Starion-PROGRESS
good luck!! too bad the model is the early version starion that didnt have the widebody
__________________
Lets enjoy the car life with RPS13!  The 1:1 
|
|
#5
11-19-2006, 06:37 PM
|
|||
|
|||
|
Re: FUJIMI Mitsubishi Starion-PROGRESS
Thanks for the responses guys. If I could find another one of these models at a reasonable price, I'd definitely put the time into making it with widebody styled fenders and try to do the 4G63 conversion. I have an option magazine with that same set up too. It would be very useful as it contains some good reference pics of the engine swap.
Ok. I painted it last night (Tamiya Racing White), wetsanded it very lightly this afternoon and sprayed a few more coats of the white and a couple of coats of clear (Tamiya also). While I waited for it to dry, I assembled the suspension to the chassis. It's typical old style Fujimi quality (has accomodations for an electric motor and batteries) so needless to say it's near garbage in terms of quality and accuracy. Here it is at it's out of box stance:  It did come with spacers to use with the suspension so the pic above is at it's lowest setting. The next pic is with the chassis mounted a little higher on the body. It gives it a real life stock stance in my opinion:  I hope to get it a little bit lower than the pic above. I really don't want to scratch build a new suspension set up so I'll try to fabricate some new mounting points for the chassis and body. Something else I noticed is that it came with some rims that do not have a staggered offset for the rear but it did come with one (1) wide tire. Oh well, no worries. I don't plan on using the rims supplied with the kit. I'm still awaiting pics of the real car so I can finish the paint job and find some matching wheels as well. Here's a few more pics of the progress so far:   
__________________
|
|
#6
11-20-2006, 12:54 PM
|
|||
|
|||
|
Re: FUJIMI Mitsubishi Starion-PROGRESS
Got some more progress done this morning. I masked off the body so that I can paint the lower half gold:
 A couple of outside shots:   Then, I sprayed Tamiya Gold:  After I was done taking this pic, I was ready to put everything away so that I can head off to work but as I reached for the model I knocked it over with the paint still wet. It landed on it's side so the mirror kept the entire side of the car from touching the ground but the corner of the right rear bumper did unfortunately get damaged. I was in a hurry so I didn't take a pic of the damage. I was really upset!! But I left it in the garage to dry so later tonight when I get home, I'll take a pic of the damage and I'll begin the repair work. Shouldn't be too much work. I plan on leaving the mask on and doing some spot sanding/putty work and then a quick shot of the gold. Hopefully, it'll be ok.
__________________
|
|
#7
11-20-2006, 03:11 PM
|
|||
|
|||
|
Re: FUJIMI Mitsubishi Starion-PROGRESS
My friend just sent me this link as a reference for the two tone paint job (still hasn't sent me a pic of the real car):
 So, comparing it to the pic of what I had done for the starion, I have masked the dividing line too high on the body. I guess it's different for the Conquest (I was looking for pics of a two tone Starion and not a two tone Conquest). So I guess the damage on the bumper I created doesn't matter anymore since the paint job itself is incorrect. I'll try repaint it so that the dividing line is lower, but if I can't paint it correctly using more masking tape, I'll have to strip the whole thing again and start over...again. 
__________________
|
|
#8
11-20-2006, 08:35 PM
|
|||
|
|||
|
Re: FUJIMI Mitsubishi Starion-PROGRESS
Just got home from work and peeled the masking off from this morning. Man, if only the scheme WAS correct, this would be perfect:
  Technically, it IS correct...for a Starion. But my friend's uncle's was a Conquest so I guess there's a difference between the two in terms of two tone paint jobs. I hope my plan to correct the paint job works, because I don't want to strip it and start over again. If this model was plentiful, I'd leave this one alone and buy another one. LOL Oh well, wish me luck...
__________________
|
|
#9
11-20-2006, 09:46 PM
|
|||
|
|||
|
Re: FUJIMI Mitsubishi Starion-PROGRESS
This is a rad project!
 Two-tone '80s wedge cars w/ pop-up headlights are the BEST!! 
|
|
#10
11-21-2006, 08:10 PM
|
|||
|
|||
|
Re: FUJIMI Mitsubishi Starion-PROGRESS
Ok, here goes. I just got home from work. I wetsanded the area where the white and gold meet on the body. I then masked the car appropriately.
 Then, I sprayed Tamiya Primer over the leftover exposed gold paint:  And finally, I sprayed the white in light mist coats followed by a few light mist coats of clear:  So now I'm crossing my fingers, hoping it comes out clean when I peel back the masking tape. I'm going to wait until the paint is dry so maybe I'll peel it off before I go to sleep or tomorrow morning. In the mean time, I'll get started on the interior, hope to have some more progress pics soon.
__________________
|
|
#14
11-22-2006, 11:55 AM
|
|||
|
|||
|
Re: FUJIMI Mitsubishi Starion-PROGRESS
wow. i never knew there was a kit of that car.
hehehehe if i find one, i'd make it into the one that jacky chan and that big guy rode in cannonball run 2. LOL!
__________________
olly olly oxen free
|
|
#15
11-22-2006, 01:36 PM
|
|||
|
|||
|
Re: FUJIMI Mitsubishi Starion-PROGRESS
Quote:
Quote:
Actually, I have no clue as to what the wheels are. I could've swore I had seen them on ebay as an accessory set. The model actually included wheel covers that look as if it is suppose to represent a 3-piece rim with the spokes of the rim being in the shape of the Mitsubishi "Tri-Diamond Star" (goes over the rims that are included). My guess is that they were too lazy to put some time into making a new rim so they used the ones in the pics above as a base and made wheel "covers" instead. Here's a pic of the covers:  Kinda cool retro feel, I might use them on something else in the future but for this model I think I'll actually try my hand at some scratchbuilt rims. The rims that were on the original car look like this:  I'll get to that later though. Here are some pics I took last night: 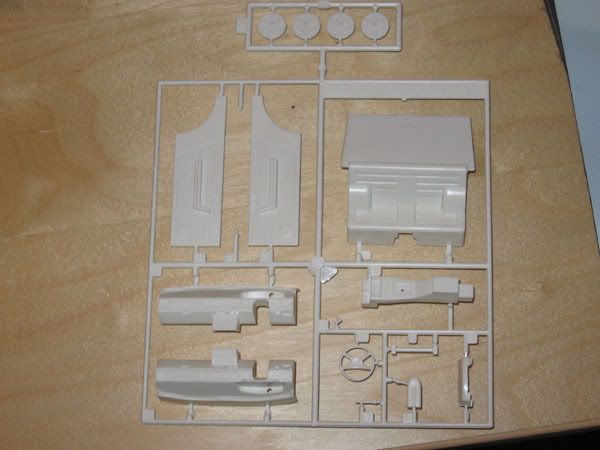  As expected, the interior is not so great. I tried to find some pics of Starion/Conquest interiors and found that the rear seat back is not as wide as the seat portion itself. The lower half tapers inward with the side panels curving in towards the seat back. It's sort of difficult to see:  Well to make things worse, I hadn't even noticed the difference in the width of the rear seat and seat back so I immediately went to work on removing the "protruding wheel wells" that stick out past the seat (What was Fujimi thinking?!):  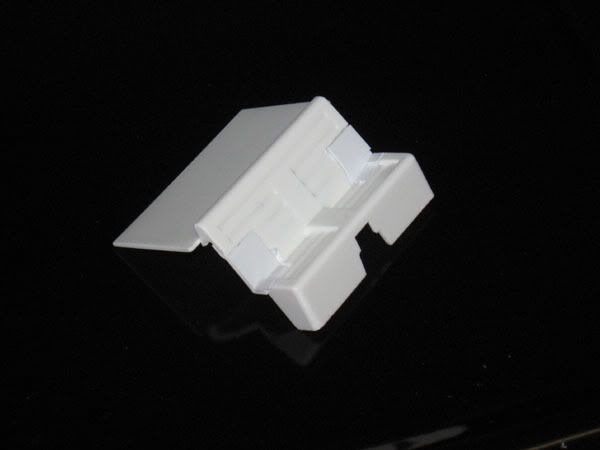  Then I realized the difference and decided to just glue it in place on the chassis. After that, I realized the chassis didn't have a smooth floor. More work for me I guess. I also noticed on the instructions that the door panels are glued to the body and not the chassis JEEZ!! So in a nutshell, I have a whole lot more work than I ever wanted to do for the interior. My plan of attack is to correct the rear seats and compensate for the door panels to be attached to the chassis. If I had built it per the instructions, there would be about .2 inches of a gap on either side of the rear seat back to the side panels. Maybe it'll make more sense when you see the pics so here we go:   That's as far as I had got last night, hopefully I'll have most of the interior completed and ready to paint in the next couple of days. Till then, Happy Turkey day!!!
__________________
|
|
|
POST REPLY TO THIS THREAD |
 |
|
|