|
|
| Search | Car Forums | Gallery | Articles | Helper | Air Dried Fresh Beef Dog Food | IgorSushko.com | Corporate |
|
|||||||
| WIP - Motorsports Post topics for any "Work In Process" motorsports vehicles in this sub-forum. |
 |
 Show Printable Version | Show Printable Version |  Subscribe to this Thread
|
|
|
Thread Tools |
|
#1
 03-31-2006, 11:41 AM
|
||||
|
||||
|
WIP: Tamiya 1/20 Ferrari 312T3 (1978)
Hello everyone,
Here is my attempt at a work in progress of the 1/20 scale Ferrari 312T3 from 1978. The car was driven by Carlos Reutemann and Gilles Villeneuve.  No doubt you will have been following Robrexs work on this model with some interest. If you havent seen the thread yet, go and look at it now as it is fantastic. Before I go any further I would like to thank both Robrex and JayKay for their help with reference pictures. Two nice guys who represent what AF is all about. My plan is to do a WIP for the rest of us. I will be using the basic kit: 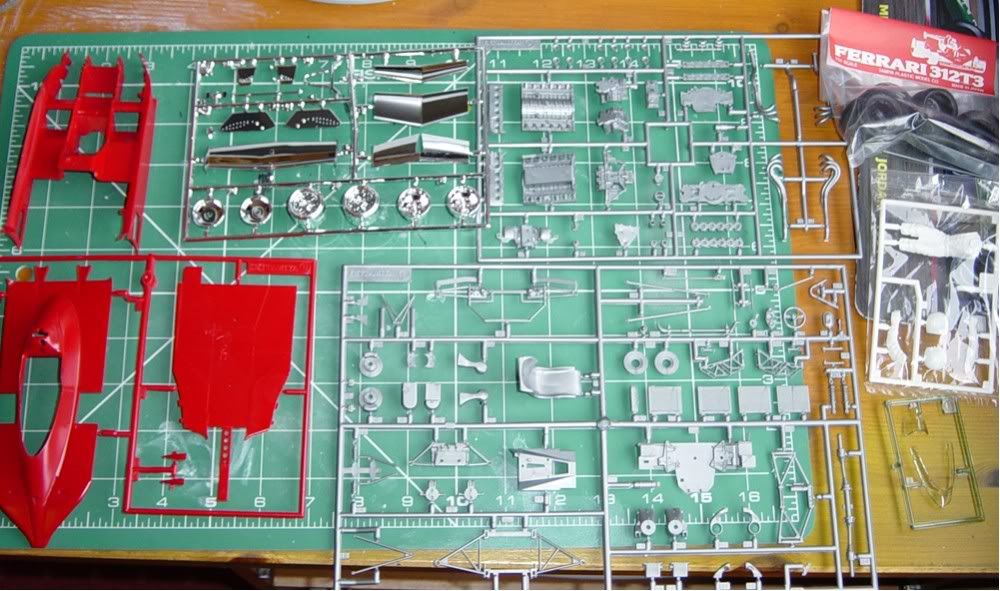 plus the AcuStion Grade Up PE kit: 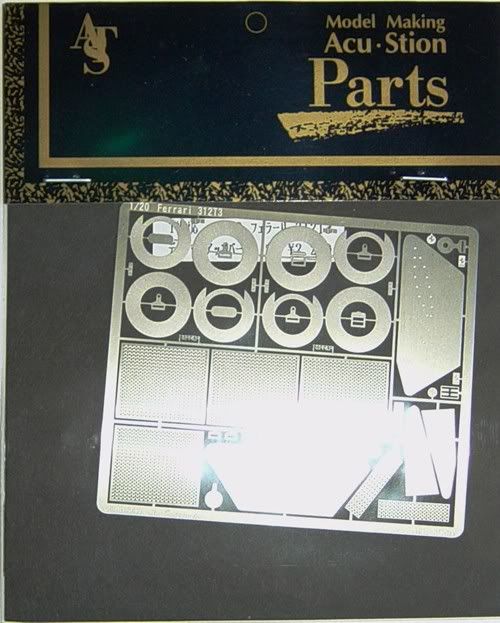 plus the Indycals decals (as my original decals are cream instead of white: 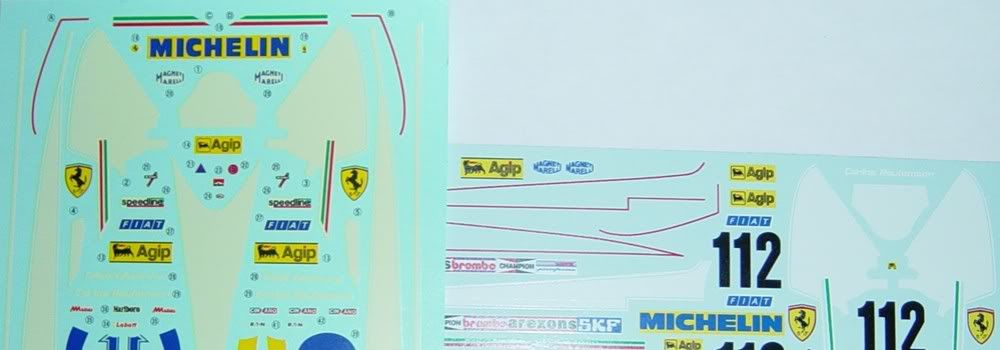 I plan to guide you through the build in a linear fashion following the steps in the manual. I dont normally follow the order so this is new to me, but it should help you guys follow it better. Ok, so less talk and on with the show. 
|
|
#2
04-02-2006, 09:31 AM
|
||||
|
||||
|
Re: WIP: Tamiya 1/20 Ferrari 312T3 (1978)
Okay, lets start with Step 1… seems reasonable J
Here is a scan of the manual for this step so you can follow. 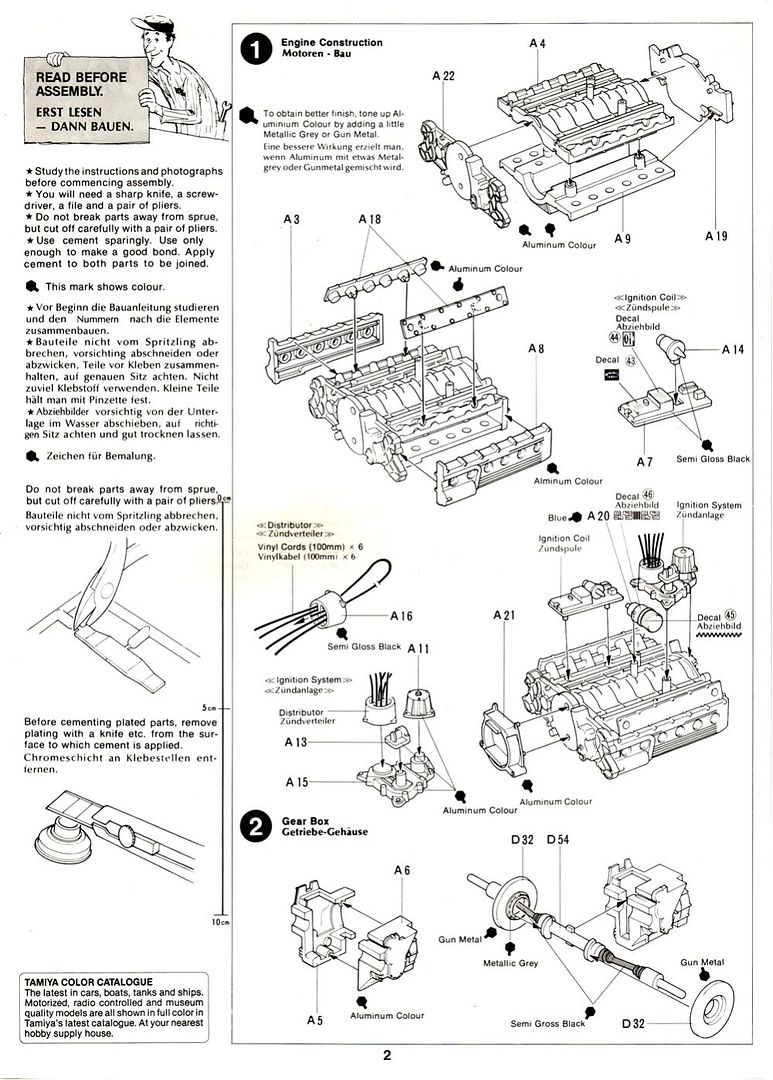 The first thing to do was to prepare the parts. My technique for this is: (1) remove from sprue; (2) sand and shape; (3) wash; (4) attach 0.4mm wire somewhere discrete; (5) prime with white primer (aerosol); (6) use TS-xx where possible. 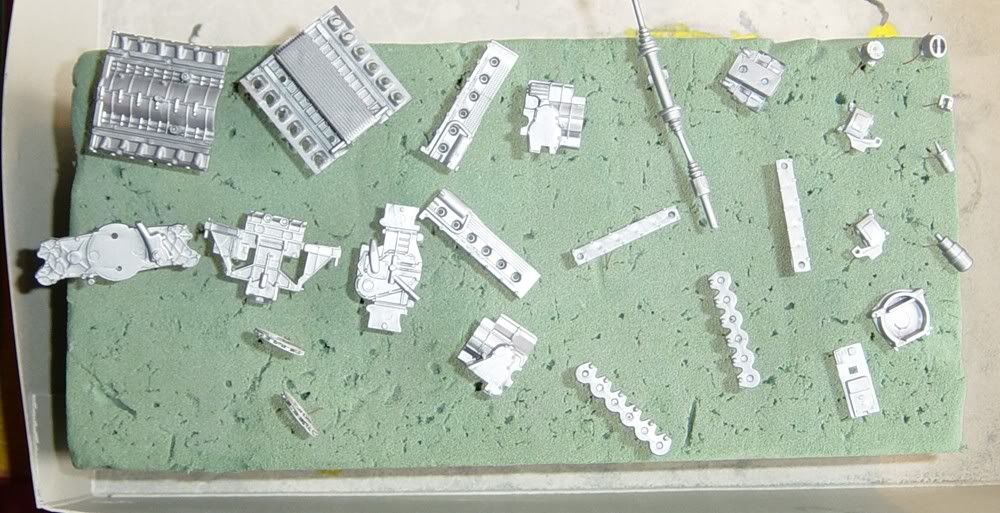 Here is step 1a. I used the TS aluminium spray, X-18 thinned as a wash, and XF-16 to dry brush. 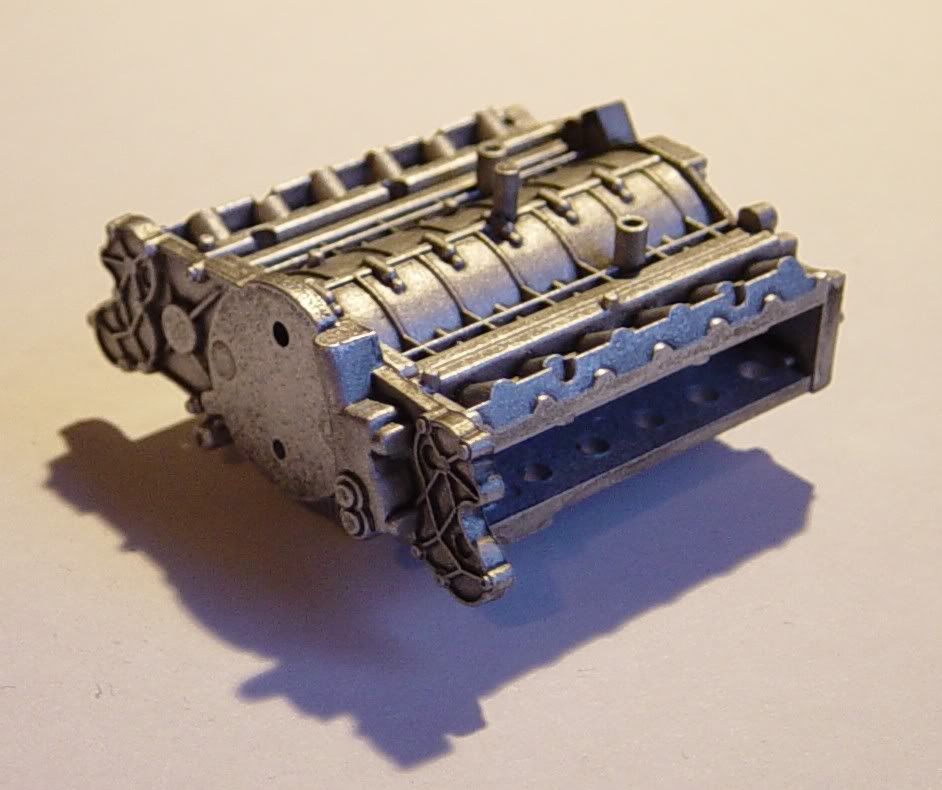 Here is step 1b with the cylinder head cover attached. The Ferrari logos are PE. 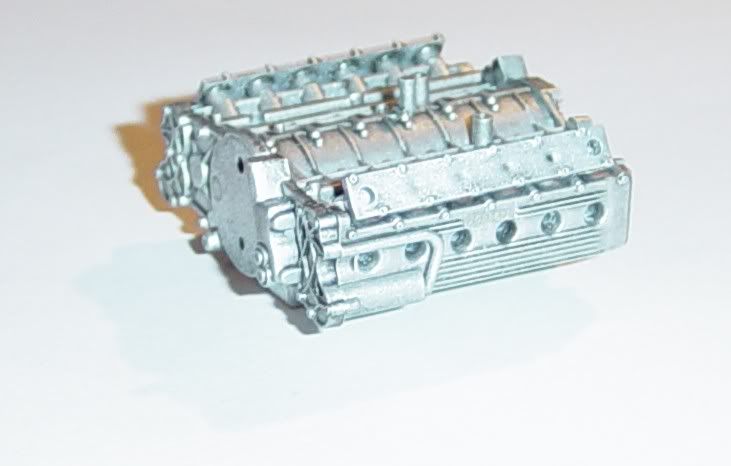 Next up, is the ignition coil 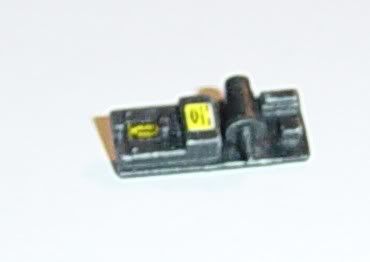 Then the dizzy cap sub-assembly 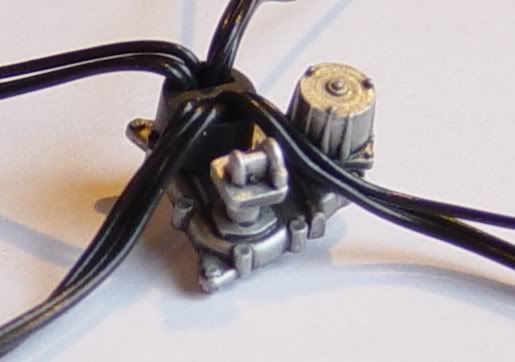 And finally, here it is all together 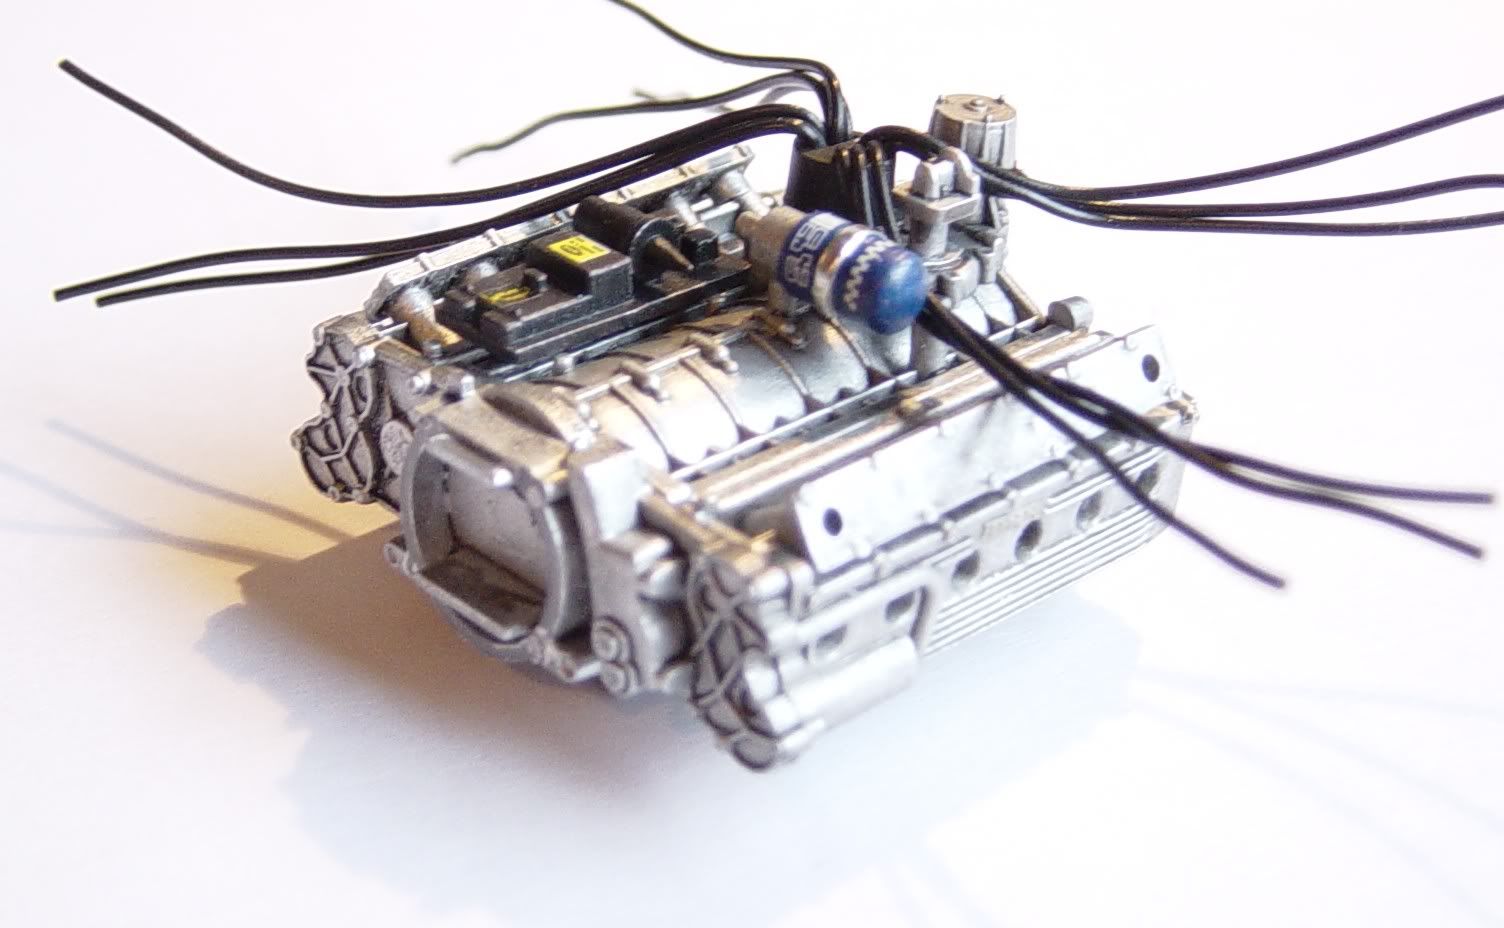
|
|
#3
04-02-2006, 09:32 AM
|
||||
|
||||
|
Re: WIP: Tamiya 1/20 Ferrari 312T3 (1978)
Step 2 is the sub assembly of the gear box and drive shaft.
First up is the simple task of gluing together the two hemispheres of the gearbox, like so: 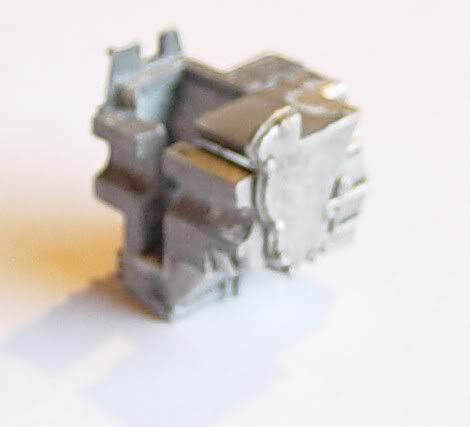 Apologies for the out of focus shot on that. Next up it’s the drive shaft. The original D32 pieces have had the brake discs removed to make way for PE discs. 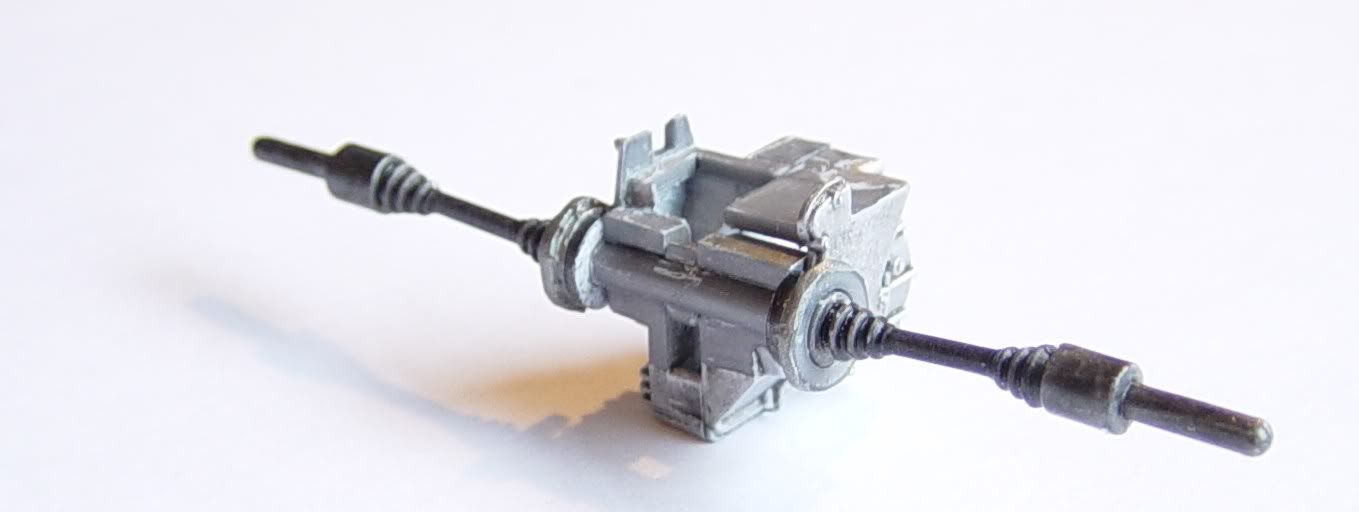
|
|
#4
04-02-2006, 09:33 AM
|
||||
|
||||
|
Re: WIP: Tamiya 1/20 Ferrari 312T3 (1978)
Next up, Step 3.
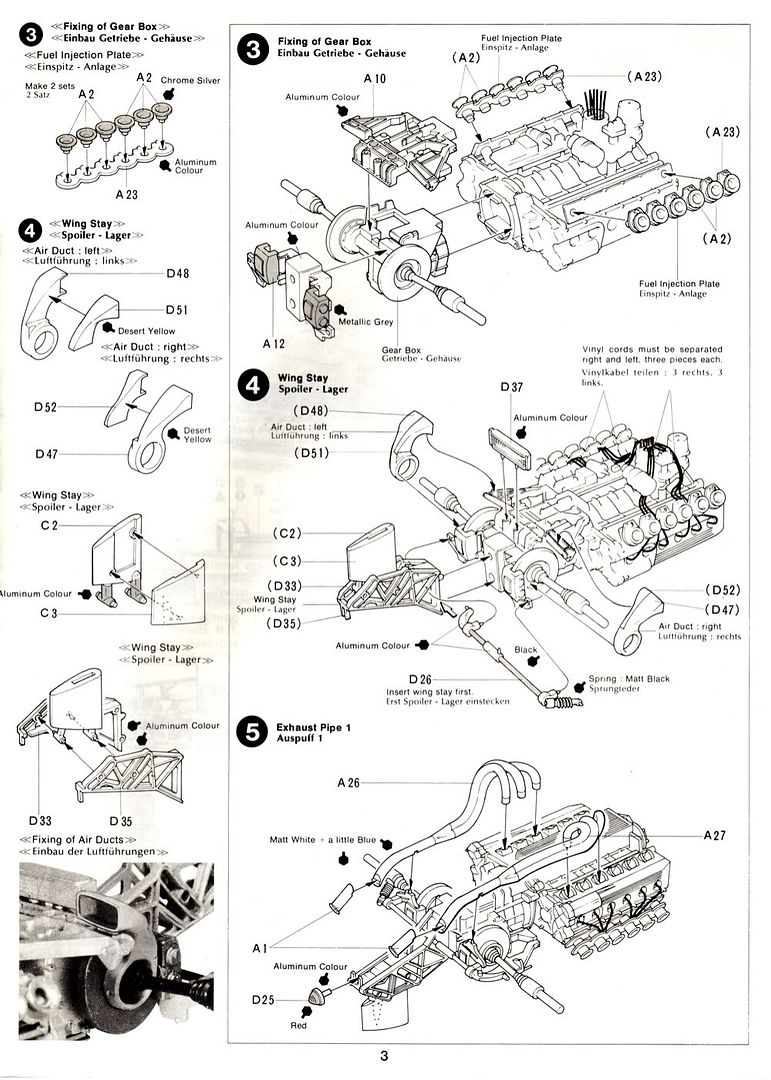 Step 3 sees the attachment of: 1) the fuel injection plate with the inlet values; 2) rear of gearbox (I separates part A12); 3) brake discs; 4) brake callipers; 5) And A10, which serves to support the the suspension. 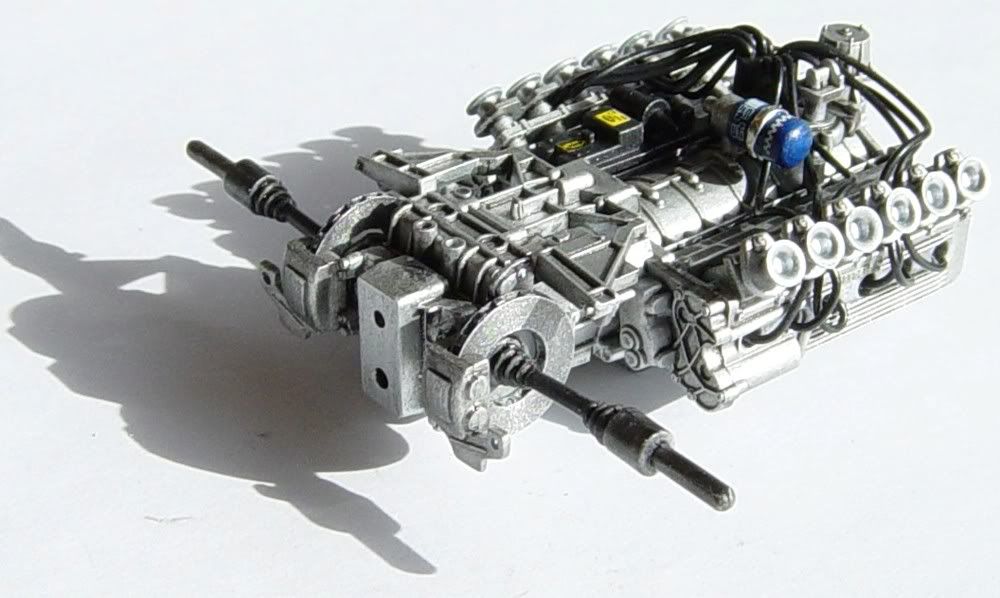 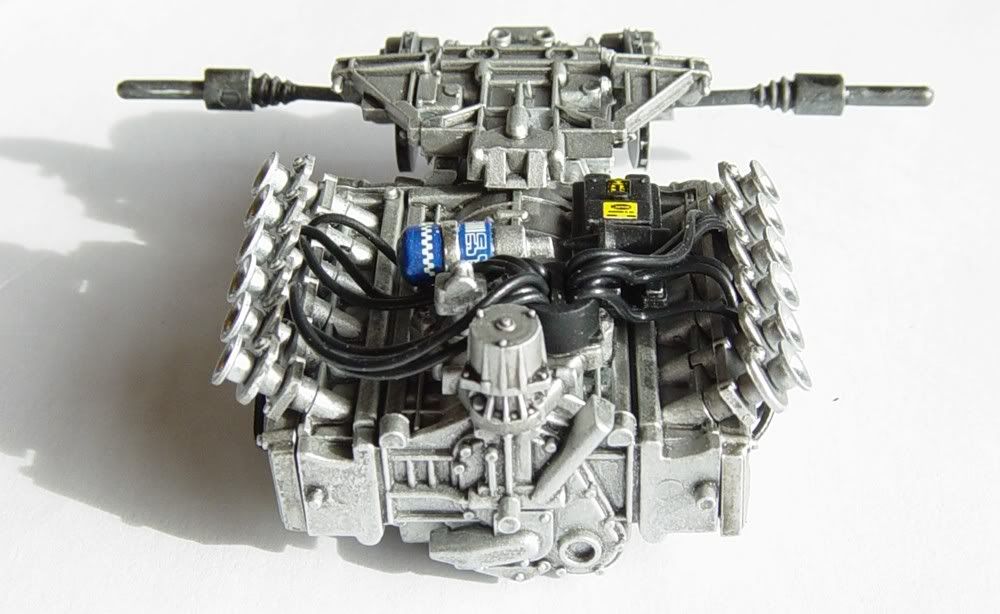 Comments here would be: 1) I used the original decals again on the blue piece (A20). It looks like an oil filter but its in the wrong place so I am not sure what it is. Anyway, the Indycals decal set only has one of the decals in it (45) and doesn’t have a (46) so rather than have one cream and one white, I went for matching instead. The silver band on this item is chrome Bare-Metal foil. 2) I sprayed the inlet values with a new aerosol (to me) called Plasti-kote Project Paint Fast Dry ENAMEL (E5408 CHROME EFFECT). I tried it out on a spare bit of sprue and it’s a much better effect that TS-chrome silver. However, it does rub off, so I will have to see how it reacts to clear. 3) The brake discs are very fiddly to construct, as they need to have venting added. Not done this before, so tried my luck with the number boxes off the sprue which are the right thickness (minus the number). Anyway, this is very tricky as I used superglue and you only get one shot. The result is variations in the gaps, which in places looks like Shane McGowans teeth (out of the Pogues). J So I just lined up the best places of the disc as visible and I will try another method on the front. 4) I separated A10, and now wish I hadn’t. The problem is that so much of the suspension attaches to this part and a small difference here is going to be compounded as I progress. Oh, well, you live and learn. Thanks for looking! Billypee
|
|
#5
04-02-2006, 09:35 AM
|
||||
|
||||
|
Re: WIP: Tamiya 1/20 Ferrari 312T3 (1978)
Apologies to those who left feedback on the duplicate of this thread. I worked out how to delete a duplicate, but unfortunately deleted the wrong one! Anywho, I have replaced my content. Kind regards,
BillyPee
|
|
#7
04-03-2006, 06:24 AM
|
||||
|
||||
|
Re: WIP: Tamiya 1/20 Ferrari 312T3 (1978)
Excellent step-by-step thread!
|
|
#8
04-12-2006, 05:58 AM
|
||||
|
||||
|
Re: WIP: Tamiya 1/20 Ferrari 312T3 (1978)
STEP 4
The first sub-assembly in step 4 are the air ducts (D48/D51 & D47/D52). These were glued together before painting and filled with CA glue (yes, I’m impatient). Colour-wise, the air ducts are different in the reference pictures (depending on the race) and the recent pictures of the cars show semi-gloss black ducting. For what it’s worth, the instructions specify desert yellow. Also, I have seen Robrex’s excellent fibreglass effect too. Hmm, decisions, decisions. I wanted mine to stand out from the all-encompassing-aluminium-ness of the engine so I opted for a base of TS-16 Yellow, mellowed down with a heavy wash of X-9 Brown, before a little dry-brushing with X-8 Lemon Yellow.  The next sub-assembly was the rear wing stay. Parts C2 and C3 are on the pre-chromed sprue. I decided to get rid of the chrome as: (1) it looks a little toy-like; and (2) when I replace parts like wing end-fences I won’t be able to get an exact match. Mr. Muscle made light work of the removal. Again I used the chrome paint I mentioned before, but this time I decided to try clearing over it. Well, the paint doesn’t rub off which is a good thing, but the clear definitely dulls the chrome effect. However, on balance, it is preferable to clear over these parts (especially if they are going to be man-handled in order to be fitted.) 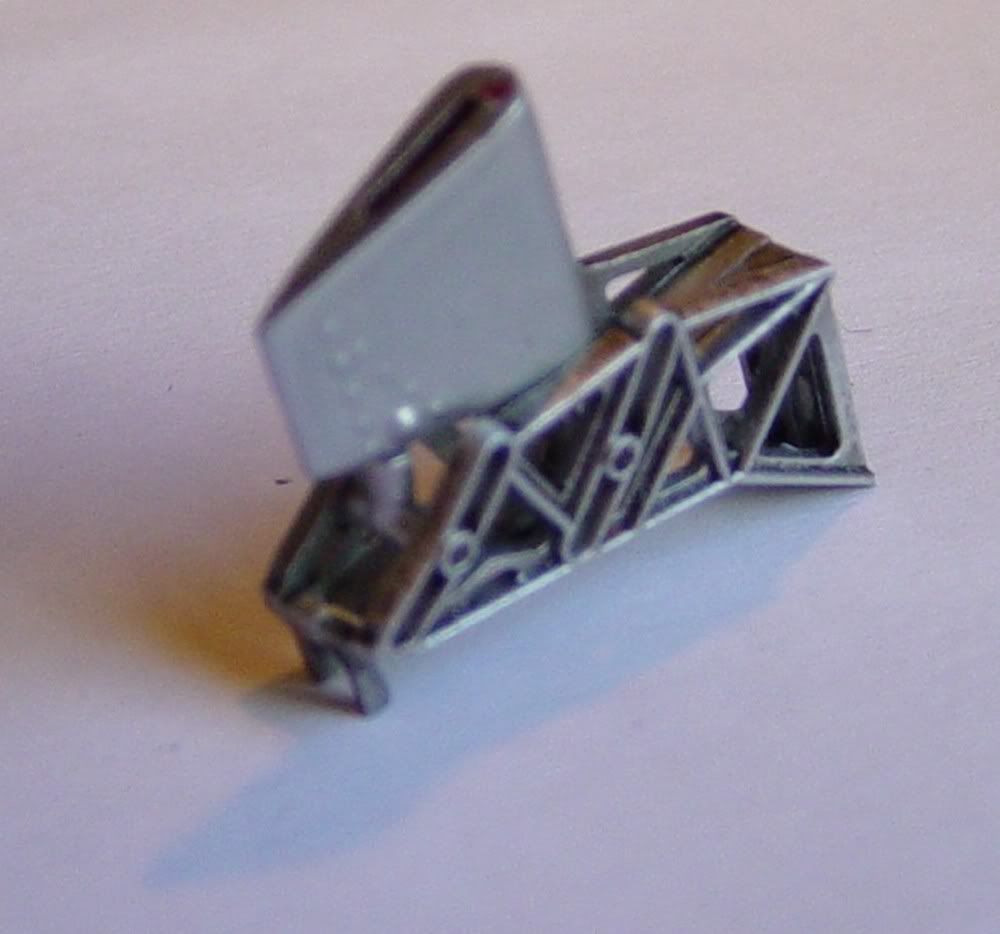 Finally, here is Step 4 completed. 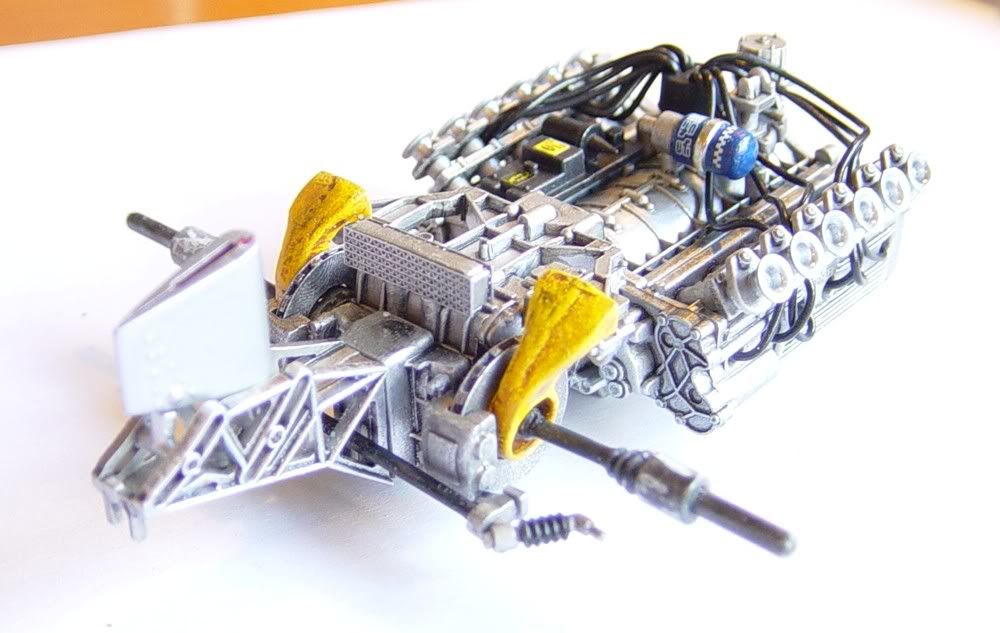 What I would say at this point is that I regret separating the rear callipers (A12) into three pieces, and the brake discs (D32). Whilst it might help with realism and detail, it certainly creates a head-ache as nothing fits together quite right. I think that in future I will take more care about which items I modify. You live and learn, and I have learnt that you get away with minor size differences on some parts, and others you cannot. On a different note, you will notice that the radiator for the gear-box oil (D37) now sports PE grills, which are a big improvement. More to follow soon. BillyPee
__________________
On the workbench: Completed WIPs: Completed Models Gallery:
|
|
#9
04-12-2006, 06:05 AM
|
||||
|
||||
|
Re: WIP: Tamiya 1/20 Ferrari 312T3 (1978)
STEP 5
Step 5 is broken into two tasks. Fitting 2 of the 4 exhaust parts and the rear light that is used in wet-weather conditions. I modified the original rear light by removing the part of it that is to be painted red. I took a piece of clear sprue from my FW11 parts box and made a new lens. I backed this clear plastic with bare metal foil and painted the part X-27 clear red. The foil increases the shine of the lens and gives it an almost ‘hard-boiled sweet’ look. 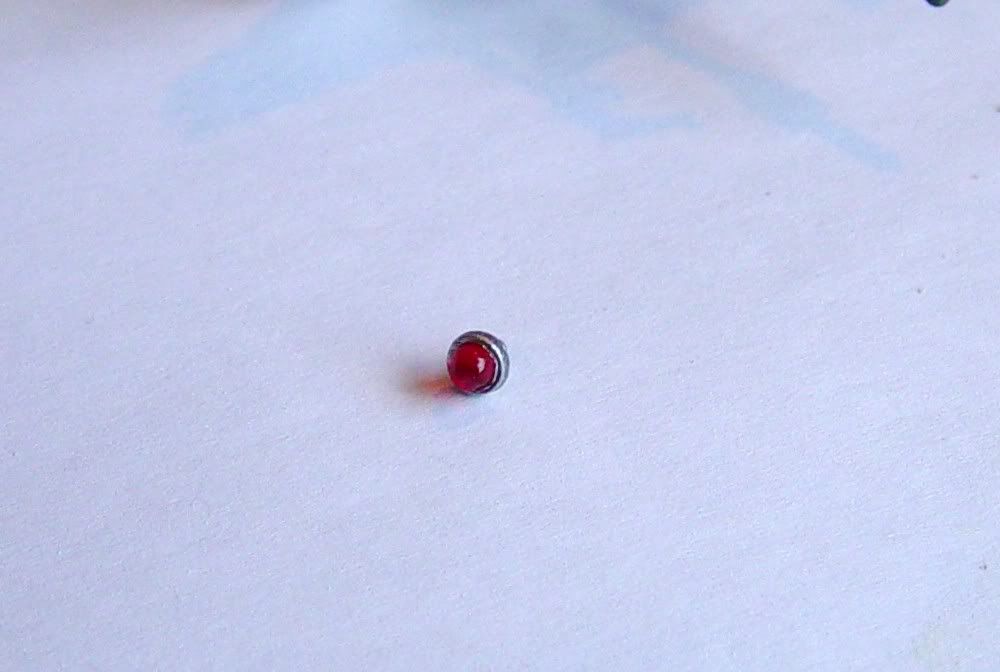 I glued the end pieces of the exhausts before painting and again used CA as filler. The exhausts were painted white and washed with black, then blue, and then dry brushed with white again. This resulted in the exhaust building up a texture which although I didn’t intend looks good.  Thanks, BillyPee
__________________
On the workbench: Completed WIPs: Completed Models Gallery:
|
|
#10
04-12-2006, 06:12 AM
|
||||
|
||||
|
Re: WIP: Tamiya 1/20 Ferrari 312T3 (1978)
STEP 6
Before starting step 6, here is the instruction page for it and steps 7 and 8. 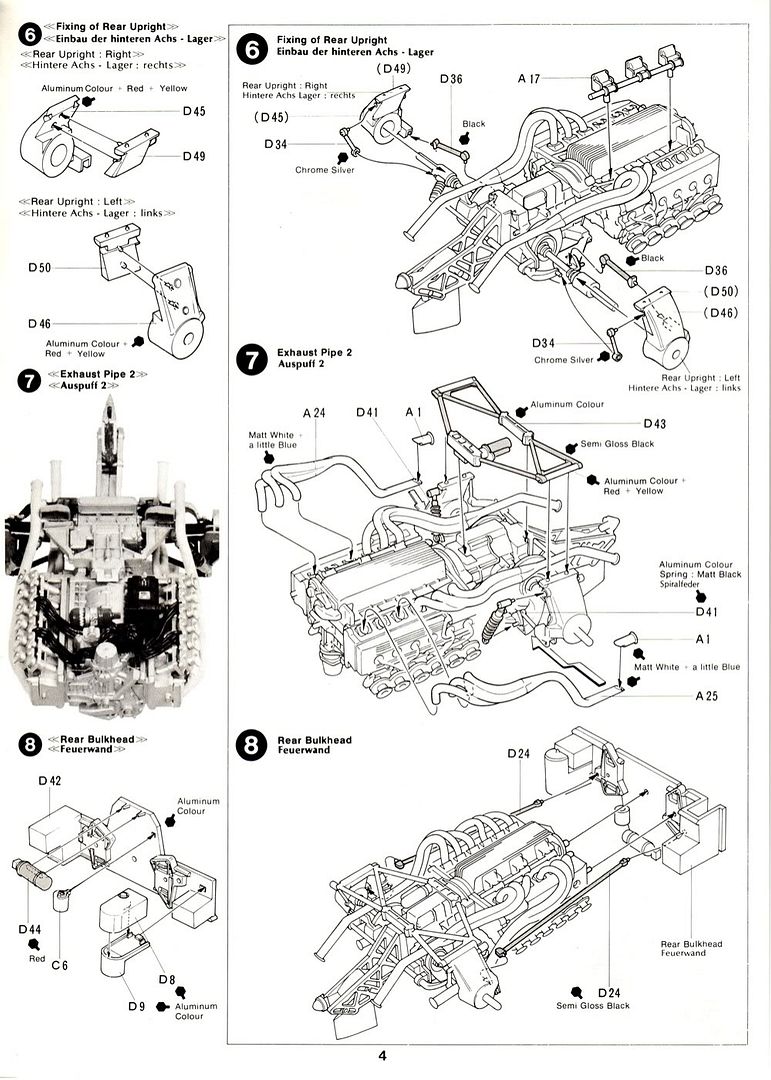 There is a sub-assembly of the rear uprights to tackle first. Again, these were glued and CA was used as filler. The instructions call for Aluminium + Red + Yellow. I decided to use X-31 Titanium Gold instead. 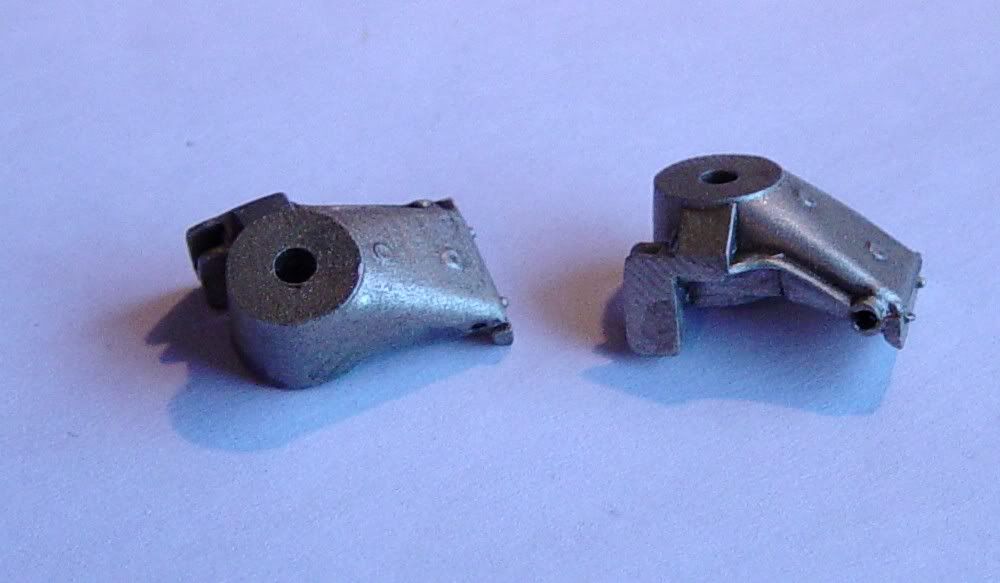 The connectors on the rear anti-roll bar (D34) were chromed. Not much else to say really, except apologies for the focus. 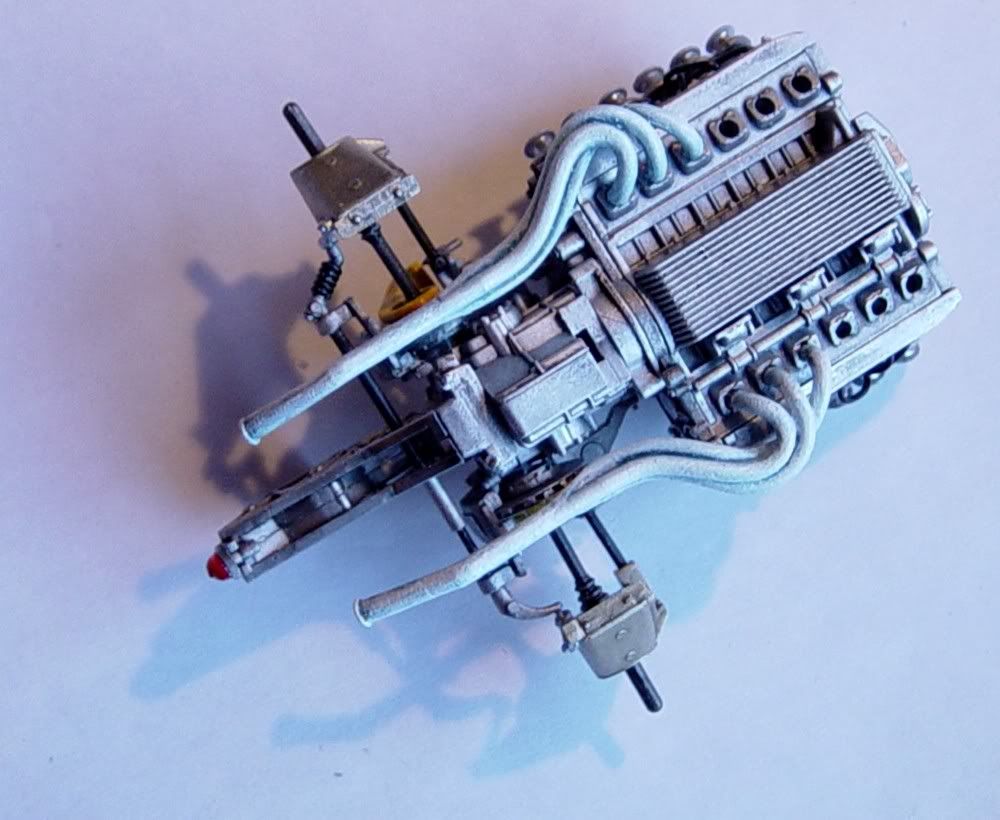 Thanks, BillyPee
__________________
On the workbench: Completed WIPs: Completed Models Gallery:
|
|
#11
04-12-2006, 06:21 AM
|
||||
|
||||
|
Re: WIP: Tamiya 1/20 Ferrari 312T3 (1978)
STEP 7
Next up, I attached the rear shocks and suspension arms. I modified the stock item shocks (D41). 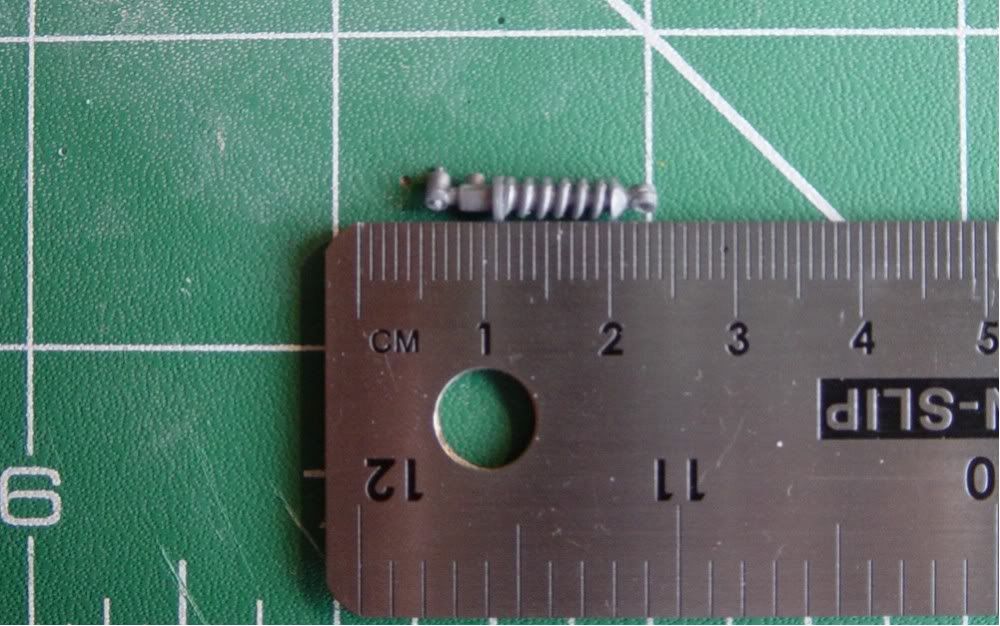 I used 1.5mm brass rod inside 2.5mm brass tube and made the spring out of 0.4mm brass wire. 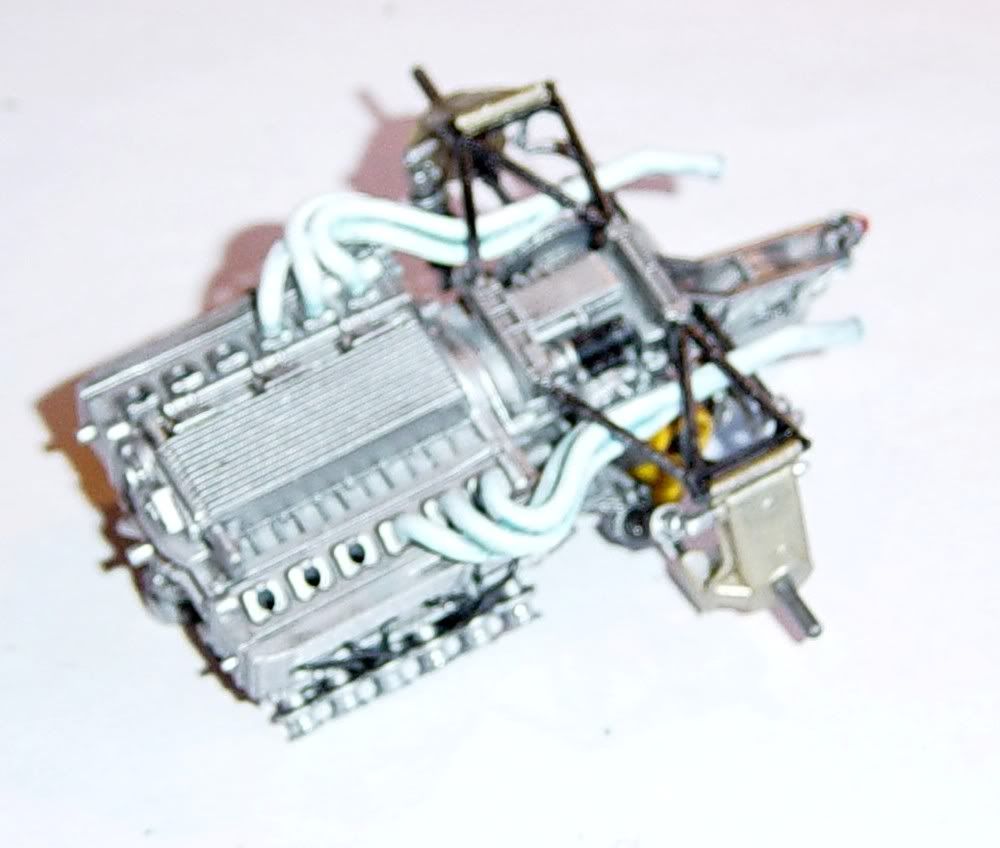 At this point I should have fitted the other two exhaust pieces but I forgot L Apologies for the focus on this shot (not in Step 6) oops :-) Thanks, BillyPee
__________________
On the workbench: Completed WIPs: Completed Models Gallery:
|
|
#12
04-12-2006, 06:23 AM
|
||||
|
||||
|
Re: WIP: Tamiya 1/20 Ferrari 312T3 (1978)
STEP 8
Finally, for this update, step 8. The first sub assembly is the rear bulkhead. I split the first extinguisher (D44) so I could paint it better. I applied bare metal foil to the straps too. The tank (C6) was also modified. I removed the original screw cap and replaced it with a pin which I painted separately its not the same shape as the original, but it looks good. 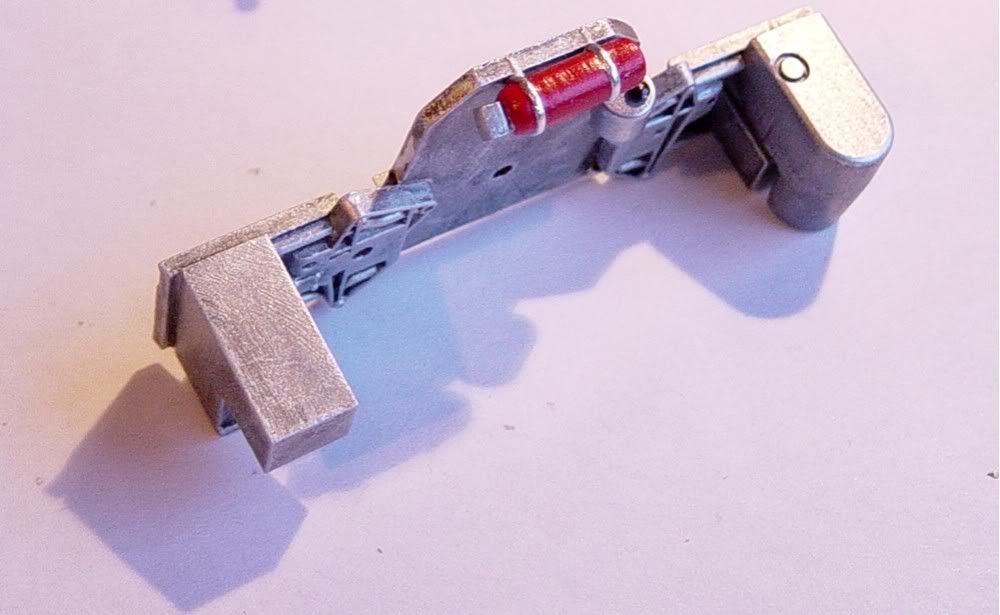 Here you can see step 8 completed (but minus two exhausts which I forgot to attach in step 7). 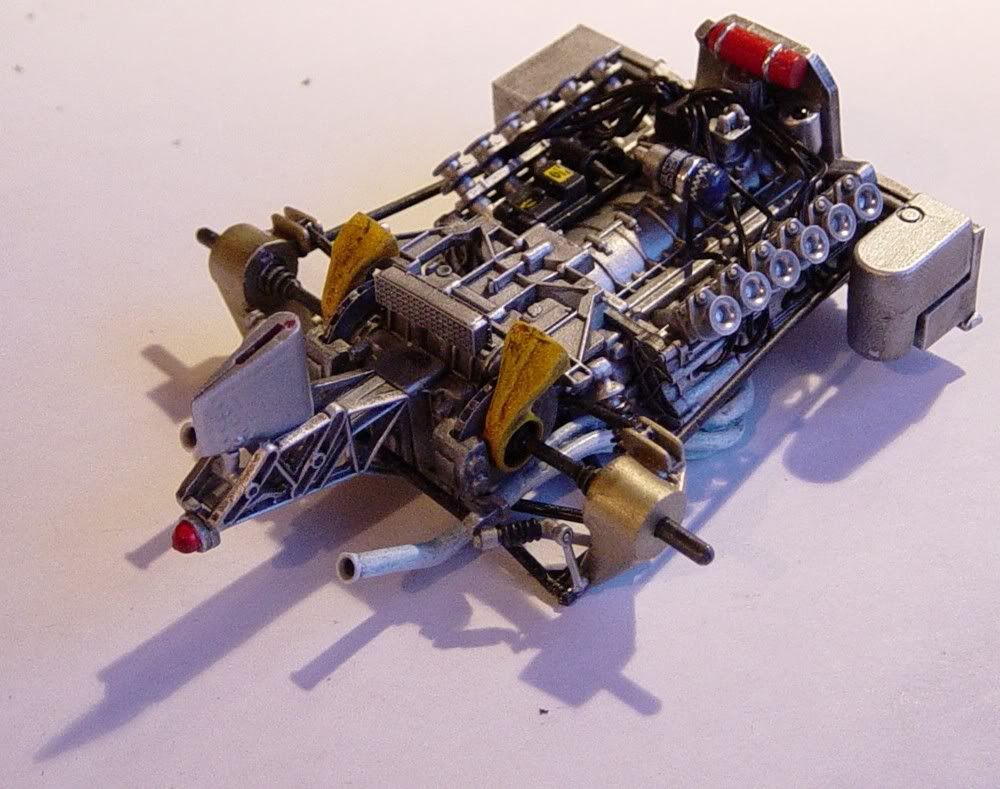 And finally, here is the model complete up to Step 8. 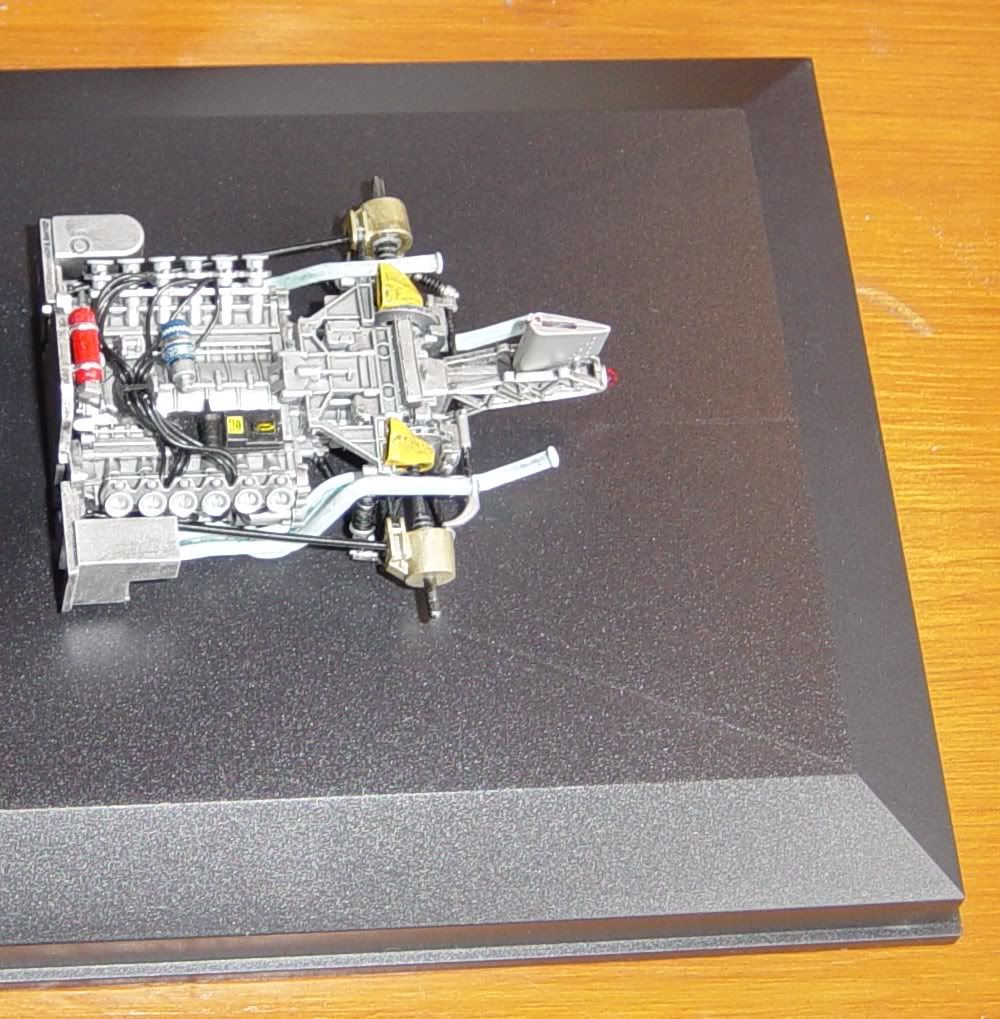 Hope you like these updates. It will be a week or two before I have anymore. Thanks and kind regards, BillyPee
__________________
On the workbench: Completed WIPs: Completed Models Gallery:
|
|
#13
04-17-2006, 02:51 PM
|
||||
|
||||
|
Re: WIP: Tamiya 1/20 Ferrari 312T3 (1978)
Decided to take Robrex's advice concerning decals and have ordered a new set of the Tamiya decals. Will be a week or so before the WIP moves on. In the meantime here is an update. The painting is 95% done, just waiting for decals and then I will post some piccies.
Here is the rear wing to keep you guys interested. It is now chromed and looks very good. As you can see I have used the PE endplates and also pinned in the top wing with Sakatsu bolts. The bottom wing was glued in place with Tamiya Craft Bond. IMHO the value of using PE is nowhere better seen that on endplates as the thickness of stock items really does show up. All the best, Bill 
__________________
On the workbench: Completed WIPs: Completed Models Gallery:
|
|
#14
04-30-2006, 08:33 AM
|
||||
|
||||
|
Re: WIP: Tamiya 1/20 Ferrari 312T3 (1978)
Well, F1Specialties are out of the decals... and I am not gonna get the clearview car just for the decals as I am much too pikey for that. I have used the IndyCals instead and they are nice to put on. I have damaged some of them tho' so I have had to order another set. :-( At least they are only 8 bucks.
__________________
On the workbench: Completed WIPs: Completed Models Gallery:
|
|
#15
04-30-2006, 08:34 AM
|
||||
|
||||
|
Re: WIP: Tamiya 1/20 Ferrari 312T3 (1978)
STEP 9
Step 9 sees a new page in the instruction manual, as shown below: 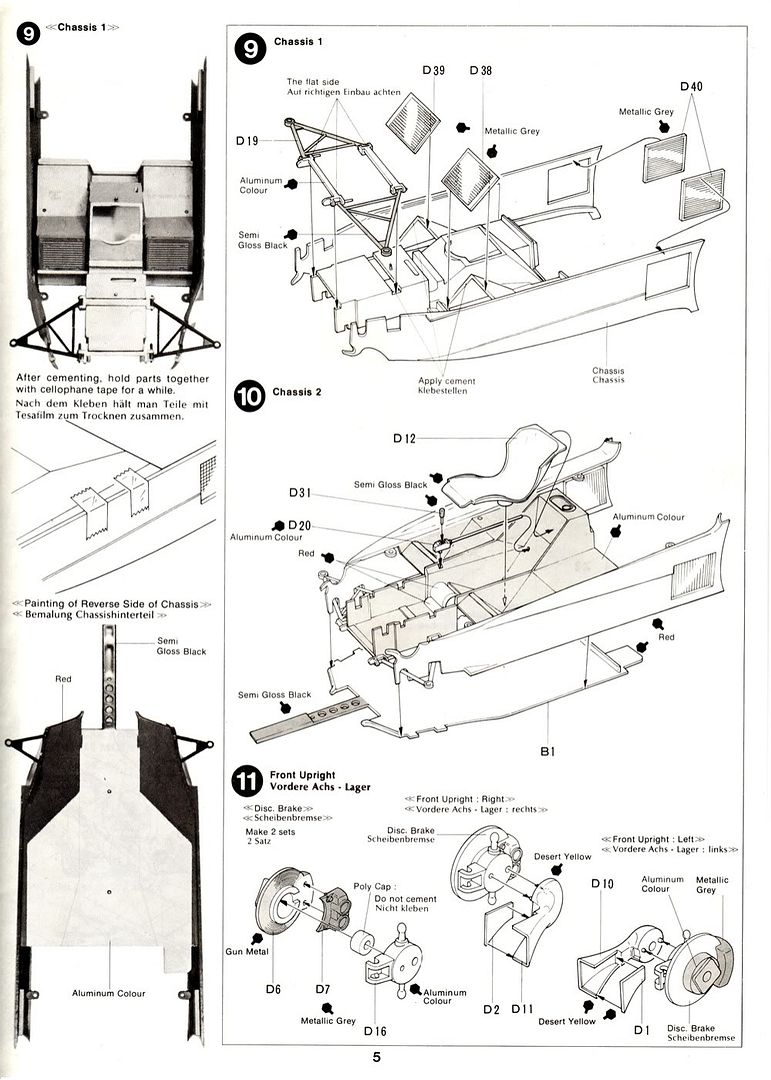 With the engine complete the work progresses to the chassis and sees the attachment of radiators and front lower suspension. This step involves body colour parts which all have to be painted at the same time. Although this is out of sequence with the step, here is a picture showing the body colour parts. The colour is Tamiya’s Italian Red (TS-8) on a base of Halford’s White Primer. 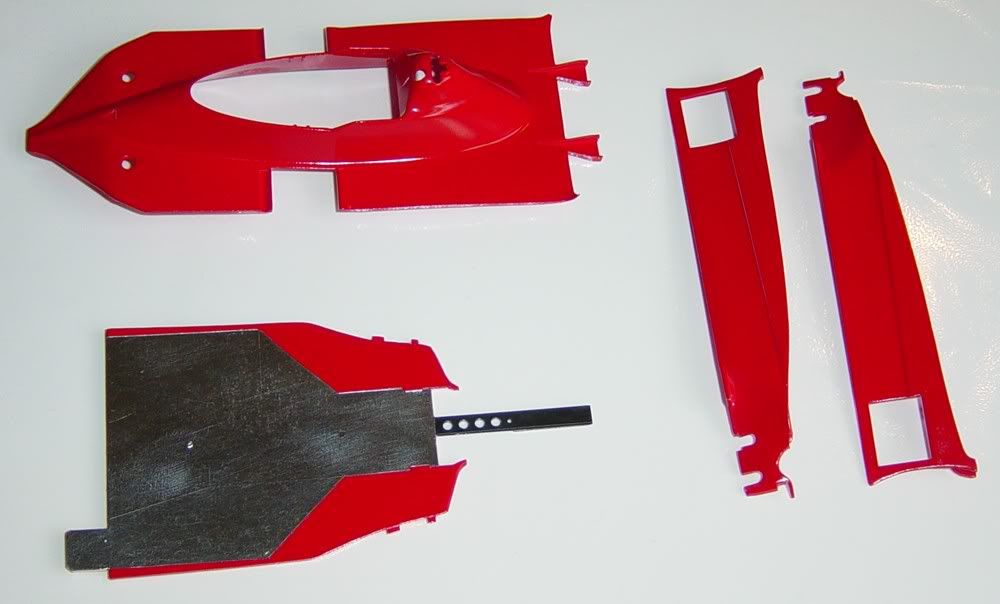 You will notice that I have removed the side pods from the chassis to ease the painting process. Also, I have drilled the holes out where the front shock-absorber tops are accessed. N.B. These don’t line up, so if you are finicky then you will need to fill and relocate these—but for me they are fine! 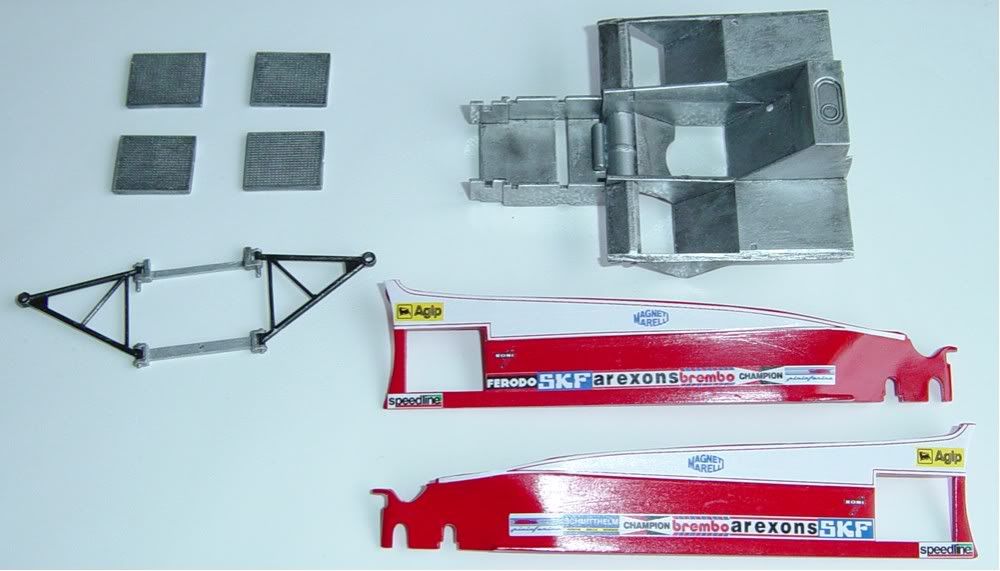 In the picture above you can see that the side pods are now decaled. Note that there should be a thin white decal that runs along the bottom of the side pod. Unfortunately this is missing from the IndyCals decal sheet. The radiators are faced with the AcuStion PE parts. Below is the completed Step 9 shot (although the side pods have not been attached yet. 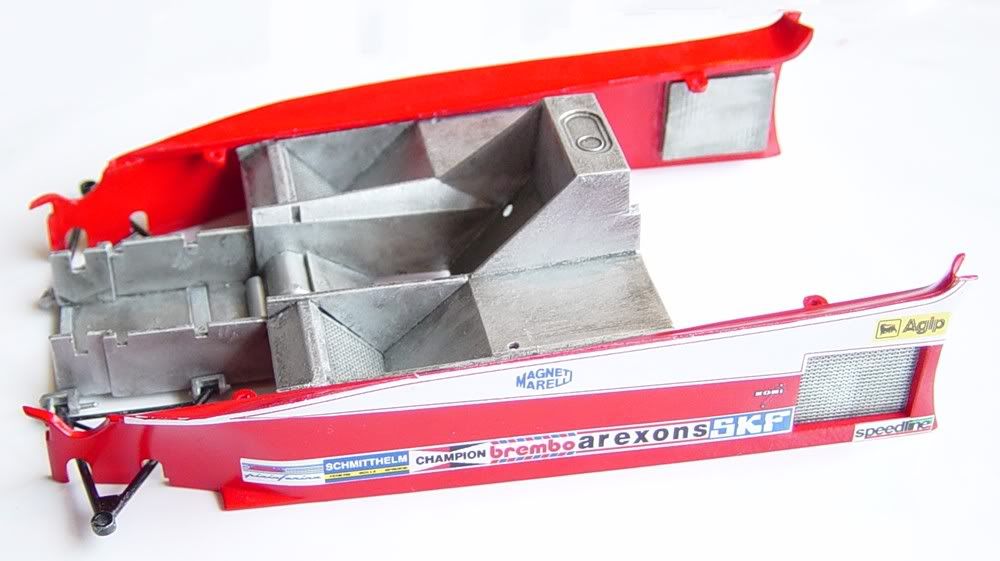 My thoughts on separating the side pods: Again, its like the other mods I have made. The painting is easier but this is outweighed by the difficulty of re-fitment. Given the choice again, I would mask. Thanks for looking. BillyPee
__________________
On the workbench: Completed WIPs: Completed Models Gallery:
|
|
|
POST REPLY TO THIS THREAD |
 |
|
|


