|
|
| Search | Car Forums | Gallery | Articles | Helper | Air Dried Fresh Beef Dog Food | IgorSushko.com | Corporate |
|
|||||||
| WIP - Motorsports Post topics for any "Work In Process" motorsports vehicles in this sub-forum. |
 |
 Show Printable Version | Show Printable Version |  Subscribe to this Thread
|
|
|
Thread Tools |
|
#1
 02-05-2006, 04:35 PM
|
||||
|
||||
|
Eighties Contest Entry: 1981 Renault 5 Turbo
Hi guys,
Im a newbie to the board and was recommended from the also excellent F1M Forum. My main subject area is WRC and F1 and Ive been lucky enough over the last couple of years to get to together the entire Tamiya F1 releases(well... all except 3) and most other 1/20 & 1/12 F1 and just about all the decent 1/24 WRC stuff that is available (I have a very understanding other half yes!) - however I am on the lookout for the Modelers RS200 and Delta S4 and also the new Metro 6R4 though! Anyway I have just finished the Tam 1/20 F1 Wolf using the Red and white Theodore colours, the model is featured at hrmodeler.com and modelersite.com. It was the turn of a WRC project and my latest work is the little Renault 5, I got some cracking pictures at Goodwood last year and also a whole host from friends at F1M recently so I decided to open up the bonnet and boot to show all its insides! (seemed like a cracking idea at the time  ) )I will keep you all updated when I work out how to add attachments! Sean 
|
|
#3
02-05-2006, 05:19 PM
|
||||
|
||||
|
Re: WIP - Tamiya Renault 5 Turbo - opened up!
Welcome to AF
 Will be looking forward to seeing some pics. Will be looking forward to seeing some pics.  Moved to the Motorsports In-progress section.
|
|
#4
02-05-2006, 05:42 PM
|
||||
|
||||
|
Re: WIP - Tamiya Renault 5 Turbo - opened up!
Hello Sean,
welcome here ! I will be watching this thread with good attention, I am modifying the kit into a Gr. B version... Quote:
Phil
|
|
#5
02-06-2006, 03:00 AM
|
||||
|
||||
|
Re: WIP - Tamiya Renault 5 Turbo - opened up!
Guys,
bear with me, having problems uploading pics for some reason, Im following the instructions to a T but nothing is uploading, I'll get the pics up as soon as - promise! Sean
|
|
#7
02-06-2006, 05:49 AM
|
||||
|
||||
|
Re: WIP - Tamiya Renault 5 Turbo - opened up!
OK - photobucket to the rescue, gave up with the uploads on here!
so here goes - I started with the initial shell, a brand new blade in the modeling knife and half an hour later the one piece shell is now in three pieces, not as difficult as I thought it would be however I chickened out cutting the doors open, maybe on another one later!   I also removed the centre section of the rear engine cover, no point spending hours creating a motor and then hiding it away eh!  ...more to come!
|
|
#8
02-06-2006, 06:04 AM
|
||||
|
||||
|
Re: WIP - Tamiya Renault 5 Turbo - opened up!
OK - now I've made a big hole in the front I'd better look at what it reveals! Both inner arches needed extending which was done with some plastic card and lots of sanding. This was a bit touch and go as there was not alot of room once the shell was in place.
 With the wings in place and sanded I built the bulkhead again from plastic card and tried to keep it as close to the original as possible, I had to make a few 'artistic licence' alterations as the arches in the kit are way too big compared to the original but I did not want to get into completely removing these and scratchbuilding new ones so I had to make best of the space I had.  Once all in place I think it looks ok, it leaves plenty of room for all the additions & plumbing in the front. The bulkhead just needs a piece adding to the top which I will add once its completed and inplace. 
|
|
#9
02-06-2006, 06:14 AM
|
||||
|
||||
|
Re: WIP - Tamiya Renault 5 Turbo - opened up!
The rear engine bay was next to suffer the cutting knife, I removed the surround plastic around the engine although again I did not want to take too much and make the chassis too weak at the back but enough to show the engine block as a separate unit and not moulded in. This kit is also designed by Tamiya to be motorized (whats all that about?????... as if we would want to let them zip around the floor when finished) so I had to removed the areas which were to incorporate the motor mechanisms.
 Having removed the sections for the motor and cogs I built a new inner arch and also built the suspension housings either side. There is not alot more I can do with this area until I can find an engine doner (still searching if anyone has an old Esci Renault kit please get in touch!)  ...more to come!
|
|
#10
02-06-2006, 06:36 AM
|
||||
|
||||
|
Re: WIP - Tamiya Renault 5 Turbo - opened up!
Now for the fun bit, after priming the whole floor pan and spraying white (Halfords Appliance White) I made a start on adding all the stuff inside the front! Just about everything so far has been either scratched or adapted from the spares box. Battery & Radiator are adapted and the strengthening bars are from assorted spares carefully cut to size. Battery tray and holder are from spare photo-etch sprue.
   After adding lots of plumbing and electrical cabling from the battery etc the bay currently looks like this, I decided to leave it there for now however there are still a few small additions to go in but I wanted to turn my attentions to the interior. 
|
|
#12
02-06-2006, 08:57 AM
|
||||
|
||||
|
Re: WIP - Tamiya Renault 5 Turbo - opened up!
Looking good!
And you could always get a cheap Heller renault 5 turbo for the engine, it's hardly a work of art though....
__________________
Projects: DAF Turbotwin X1, Escort Cosworth, Tamiya 206+Fujimi Cooper=Mini WRC. I'm slow.
|
|
#13
02-06-2006, 09:03 AM
|
||||
|
||||
|
Re: WIP - Tamiya Renault 5 Turbo - opened up!
Before I go on I have just realised that I didnt put 80's contest entry in the title of the theard - OOOOOOPS!
Rally Raider - can you please include this in the competition please! If it means changing the title of the thread fire away! ...anyway more of the model... I dont think I showed a finished pic of the the cut-out floor plan and motor in the rear so here she is;  then onto the dashboard - this was primed and then handpainted. Its nice not to have to worry about C/F detailing back on these older cars - just good old vinyl and plastic which means plain colours. I did add a small amount of dry brushing to the matt black panels just to lift the details slightly, the the dials were picked out extremely carefully and once dry a good dollop of Humbrol Clearfix in each clock gives a great effect of a dial, especially when its surrounded by a matt colour as in this case. As per my reference pics I added a couple of switches to the right of the steering column, the dash was drilled and I added the switches by using some small pieces of wire, there is also a larger red switch or light that sits next to the speedo which I assume is either a start switch or high revs warning light, also required was another large clock and another bank of switches that sit in front of the co-driver the switches being made as before and the clock was adapted from another kit.  The seats were then sprayed their respective blue and red which although is a bit odd looks great I think, these again were weathered to give a worn in look. A small fire extinguisher was added in front of the passenger seat again as per references. I am not including the figures with the kit and for the co-driver you are given a small map to place in his hands - having seen a mesh pocket on another rally car that sat just behind the seats (Lancia 037 I think) I took the liberty of adding a small mesh pocket on the divider between the seats and the rear engine, this is to hold the spare pace notes and maps etc. I also added the bottom seat belts made from the MRM set, on top of the belt's locking mechanism I added a red release button which was made by using an extra thick small drop of red enamel careafully keeping its shape to a circle.  ...more in a sec.
|
|
#14
02-06-2006, 09:16 AM
|
||||
|
||||
|
Re: WIP - Tamiya Renault 5 Turbo - opened up!
...next update,
only a couple of pics to add and thenwere upto where I am now... As I had opened up the rear parcel shelf the holes for the roll bar had to be moved, this meant extending the bar, as you can see in the pics all it took was a small addition and this will be covered with padding as per my reference pics so it will be hidden from sight - (promise you wont tell anyone!) a further cross member was added to the centre of the bar just behind the seats (Tamiya seemed to miss this off for some reason!) I then added a small foot rest for the co-driver (some ref pics had this others didnt) made from some drilled v.thin plastic card.  The roll bar in my references is shiny metal which makes a change from the usual black - this pics I have show very different cages inside, there is further protection to be added around the drivers yet. I cannot finished the seatbelts until I fix the roll bar down, which cant be done until the engine is built - so that is the next step. I am also waiting for the S27 and Acu-stion etch sets to arrive along with my decals for the 1981 Monte so no further progress can be made on the shell - however the one remaining task I could get on with was to hinge the bonnet and hatch.    more to come...
|
|
#15
02-06-2006, 09:42 AM
|
||||
|
||||
|
Re: WIP - Tamiya Renault 5 Turbo - opened up!
next update...
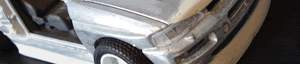
my last update until more progress is made... and still waiting for the my etches and decals (cmon HLJ!!!!) When I decided to open the bonnet and boot I thought 'oh I'll just hinge the two open' oh yeah, as easy as that eh! hmmmmm, a bit of a hint and tip here have a good look at where you can add hinges before deciding to do this!!!!! Anyway I have managed it, my digi camera is pants at doing really close up pics even with the Macro facililty on so I'll include a couple however I will try and explain how I did it. I managed to work out that the bonnet hinges at the point on the main shell where both the headlamp surrounds sit (great!), I drilled a small hole into the side of each headlight, just the right diamter to accept a small metal pin, I couldnt use plastic here as it would not have been strong enough to hinge the bonnet. I wanted the metal wite to be tight however I re-inforced it the CA-glue. This was then inserted into each headlight but only just to say into the back of the light, once this was set I covered the hole from the headlight side with filler and it cannot be seen at all once the headlight lenses are in place! I then added plastic card to each side of the underside of the bonnet where the pin would be inserted into, I then cut a small curve into this using a small drill, this would allow the pin to sit in one end and then when the bonnet is opened it would slide to the other (this can be seen in the pics below). This worked an absolute dream... for the first side but oh how fiddly it was to get the other side in place, I could only attach the pin to the other headlight with the bonnet in the closed position and the first few attempts didnt work however as you can see in the pics with a little taking a part and starting again on the remaining side I finally achieved what I wanted. I will also be added a bonnet rest as you can see from the temporary one in the picture this will be attached inside the bay as per reference pics. (phew! hope I havent lost you all!)   I've gotta get on with the boot next and hopefully this will be alot simpler. I'll post pics when I get it done! Sean
|
|
|
POST REPLY TO THIS THREAD |
 |
|
|