|
|
| Search | Car Forums | Gallery | Articles | Helper | Air Dried Fresh Beef Dog Food | IgorSushko.com | Corporate |
|
|||||||
| Car Modeling Share your passion for car modeling here! Includes sub-forum for "in progress" and "completed" vehicles. |
 |
 Show Printable Version | Show Printable Version |  Subscribe to this Thread
|
|
|
Thread Tools |
|
#1
 05-13-2005, 01:17 AM
|
||||
|
||||
|
Tutorial: Making a Rollback Ragtop
First off i would like to say that i am -Sk8er6811- and if it is possible i would like it to read SidewayzS15 for my subcase and hinge tutorial. Thanks.
This tutorial is going to be applied to a mini cooper. I chose this because the roof is separated already and it was something i wanted to do on one for awhile now. Before we begin you are going to need some materials consisting of... 1. Krazy Glue (Or other type of C/A) 2. A piece of clothe 3. paperclips or sewing pins 4. Fabric glue 5. Square Brass tubes, though circular ones will work as well. The diameter or width of the opening of the hole should be just smaller than a pin head. 6. Sharpie 7. Dremel (Xacto will work too) 8. Your choice of putty Step 1: First decide how big you would like your rag top opening to be. After you have decided draw it on to the roof with a marker. After marking it cut the area out with your dremel, or slowly scribe the lines with a knife to leave the opening. Step 2: Cut the tubing to the length of the hole and make sure it fits snugly in the cutout. Do not glue it in yet. Step 3: Using a thin cut off wheel, carefully cut a channel in the tubing. After the channel is cut test fit again, and glue it into place. Step 1, 2, and 3 pictures:  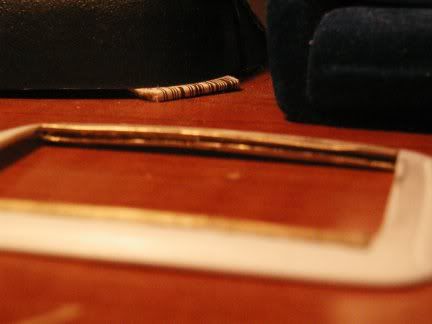 Step 4: Cut a piece of clothe to fit in the hole, make sure you make 2 pieces, one for the top and one for the bottom. Step 5: Cut paper clips that span the width of the tubing you have glued in. Make sure it is not from edge to edge, if it is, it might be a pressure fit which can lead to the tubes breaking or the top getting stuck when sliding back. Step 6: Glue 1 paper clip at each end of the clothe, then make 1/2 inch intervals and glue other paperclips at those marks (you might need to adjust the measurement depending on hole size and scale) Note: Make sure you use fabric glue, I have found other glues go through the fabric, and leave hardened glue spots on the good side  Step 4, 5, and 6 picture: 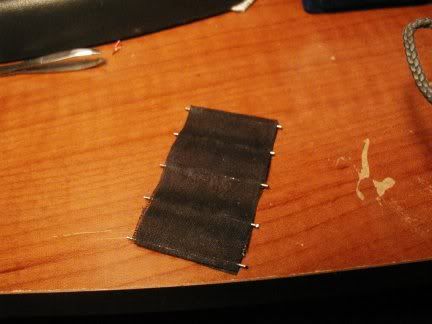 Step 7: Test fit the rag top now, since the tubes are glued in, if there is no opening under the roof, enter on a slight diagonal, and straighten out, do this for each paperclip. Once you get it in place, roll it back and see how it looks   Step 8: After test fitting, remove the clothe carefully, being sure your not going to loosen or break the glue joints. Then apply putty to the seem where the tube meets the roof, and sand smooth. After that prime paint and apply to your build. Here is a picture of it opened and closed 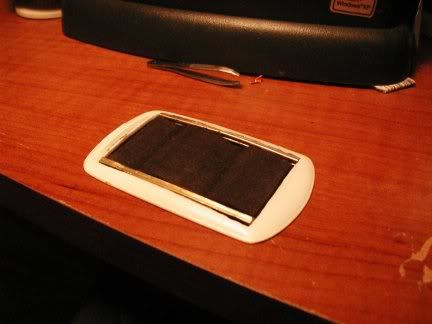 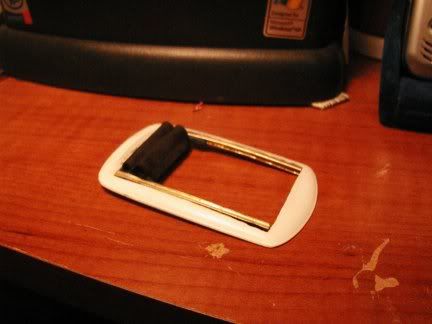 Give me some feedback, and if you have any questions, feel free to ask, hope this helps 
__________________


|
|
#2
05-13-2005, 01:22 AM
|
||||
|
||||
|
Re: Tutorial: Making a Rag Top
Great tutorial, but if I have one comment it's that you should change the name of the tutorial. "Ragtop," at least to domestic car fans, is another word for "convertible," so I had assumed this was a convertible you were making until I saw it. I believe I've seen this roof referred to as "panoramic"... or heck, even "big sunroof"

__________________
   
|
|
#3
05-13-2005, 01:32 AM
|
||||
|
||||
|
Re: Tutorial: Making a Rag Top
O yea forgot about that. Im renaming it to roll back ragtop
 Edit: It won't let me edit it, people will find out eventually, also thanks for the positive feedback
__________________
|
|
#4
05-13-2005, 02:42 AM
|
||||
|
||||
|
Re: Tutorial: Making a Rag Top
Excellent tut dude....might have to try that this weekend on a scrap kit.
Later, WIDE
__________________
My name's Troy, use it if you like. If you're a Buddist, you go to Tibet....If you're a speed freak you go to the Salt Flats 351 clevo....aussie muscle 
|
|
#5
05-13-2005, 03:07 AM
|
||||
|
||||
|
that's really cool!! Super tutorial, great thinking. Thanks
I'm working on a Cooper myself at the moment and was thinking "what can I do to it to make it different from all the others" and that's exactly what came to my mind too. The seperate roof part just begs for it. Thanks for making my life easier )stevenski
|
|
#6
05-13-2005, 07:29 AM
|
||||
|
||||
|
Re: Tutorial: Making a Rag Top
I'll probably never have the need to use this tut, however, respect for posting it up! Looks good!!
__________________

|
|
#7
05-13-2005, 07:53 AM
|
||||
|
||||
|
Re: Tutorial: Making a roll back ragtop
Title changed.
__________________
http://public.fotki.com/tonioseven/
|
|
#9
05-13-2005, 11:48 AM
|
||||
|
||||
|
Re: Tutorial: Making a roll back ragtop
u read my mind, i was thinking of how to do this just last night for my vw camper, im planning on having a full length sun roof
__________________
Christmas Project- Beetle Cabriolet Diorama  "seven straight summers, critics might not admit it, noboddy in rap did it, quite like i did it. if u did it i dont it before you, if got it i had it got mad at it and not want it no more..." Jay-Z the gift and  the curse the curse
|
|
#10
05-13-2005, 01:42 PM
|
||||
|
||||
|
Re: Re: Tutorial: Making a roll back ragtop
Quote:
__________________
|
|
#11
05-14-2005, 02:13 PM
|
||||
|
||||
|
Re: Tutorial: Making a roll back ragtop
Ha, thats really cool. Great stuff Sidewayz
__________________
~Josh~ OldUser:IImportSupra Do You Have a Car that Goez Sideways? 
|
|
#12
05-15-2005, 03:18 AM
|
||||
|
||||
|
Re: Tutorial: Making a roll back ragtop
This is great!! I was actually going to do this to a wrx kit:-/....I wouldn't otherwise, but there are extras. It's gonna suck I know. Great how to! Thank you.
Frank X.
|
|
|
POST REPLY TO THIS THREAD |
 |
|
|


