|
|
| Search | Car Forums | Gallery | Articles | Helper | Air Dried Fresh Beef Dog Food | IgorSushko.com | Corporate |
|
#1
 05-14-2013, 10:04 AM
|
||||
|
||||
|
Lexan Installation
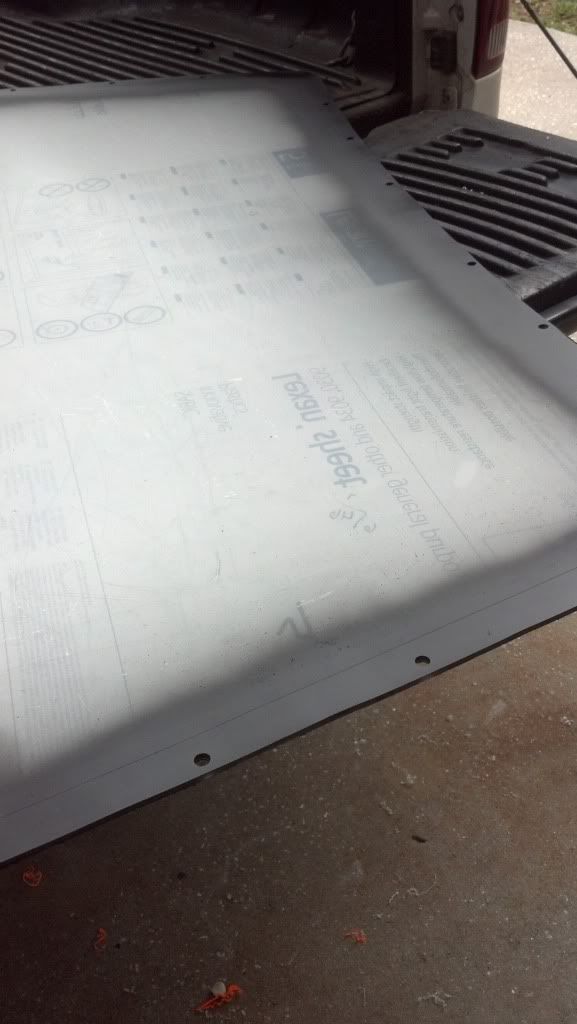
So, I'm kind of proud of my windshield installation and wanted to share. I could never get the glass windshield to fit properly, so I scrapped it in favor of a piece of 1/4" Lexan.
First I used aircraft style captured nuts (1/4" X 28 ) that I got from Pegasus Racing and riveted them around the perimeter. I figured I might want to remove the windshield at some point without having to drill out rivets. Next, I used 1/2" self-adhesive foam weatherstrip.  [/IMG] [/IMG] I then used the glass windshield as a template and cut the Lexan with a skill saw. I used a belt sander to dress the edges. Using a tape measure and a Sharpie, I marked out a 1" border on the PVC cover, with a 2" border on the bottom. I used an Exacto blade to trim away what I marked, then painted it (on the back) with black Krylon. [/IMG]This is what it looked like when I pealed the rest of the PVC cover off, after the paint dried.  [/IMG] [/IMG]I used button head machine screws with black rubber washers underneath, and this was the result- 
__________________
Mark W. Panoz GTRA, Chassis #10 
|
|
#3
05-15-2013, 02:33 PM
|
||||
|
||||
|
Re: Lexan Installation
Quote:
__________________
Brian B. Panoz GTRA - LS1 swap in progress #4 Z06 - NASA ST3/TT3
|
| The Following User Says Thank You to Cobra4B For This Useful Post: | ||
Panoz60 (05-15-2013)
| ||
|
#4
05-15-2013, 02:55 PM
|
||||
|
||||
|
Re: Lexan Installation
First you shame me with your immacualte rebuild of "Dad's Panoz", then you make me feel stupid because of my lack of computer skills. Why don't you just come by and kick me in the nuts? (Laughing out loud)
Yes Brian, thats a lot better. I USED to be able to do that on the previous version of photobucket, now something wierd is happening. Anyway...thanks!
__________________
Mark W. Panoz GTRA, Chassis #10
|
|
#5
05-15-2013, 03:00 PM
|
||||
|
||||
|
Re: Lexan Installation
Trick is to just look at the code and do it manually. I just quoted your post and then manually edited the links. It had a bunch of extra crap in there. You just want the URL for the image between the image tags i.e. the [img] [/img].
Good idea on the riveted on captured nut things. I was going to use nutserts, but these look like a much better option for doing stuff in the plastic. EDIT - If you're using photobucket it already gives you one option with the IMG tags around the url. You don't have to add them again, nor do you have to use the forums "insert IMG" icon thingy. If you do that you'll have extra sets of img tags wich cause it to fail. Just past the url with IMG tags into the text area and you're good to go.
__________________
Brian B. Panoz GTRA - LS1 swap in progress #4 Z06 - NASA ST3/TT3
|
|
#6
05-15-2013, 03:26 PM
|
||||
|
||||
|
Re: Lexan Installation
self lock nut plates.... I chose the 1/4-28's. The only issue was the holes for the rivets were too small, so I spent a bit of time on the drill press, but it all worked out in the end.
https://www.pegasusautoracing.com/pr...roduct=MS21047 PS, I would order the machine screws from them too. I couldn't find them at my local Ace Hardware, and could only buy them in bulk from Fastenal. https://www.pegasusautoracing.com/pr...sp?Product=631 Ace Hardware did have the self-adhesive weather strip. It gav the lexan a soft mating sruface and kept the edges nice and flat between each fastener.
__________________
Mark W. Panoz GTRA, Chassis #10
|
|
#7
05-16-2013, 07:38 PM
|
|||
|
|||
|
Re: Lexan Installation
Quote:
Kel.
__________________
Kel M Panoz GTRA #17 New Zealand
|
| The Following User Says Thank You to NZGTRA17 For This Useful Post: | ||
Panoz60 (05-21-2013)
| ||
|
#8
05-17-2013, 07:59 AM
|
|||
|
|||
|
Re: Lexan Installation
One thing I tried that I really like is a "limo" tint across the upper part of the windshield. really cuts down on the sun in the eyes. It is surprising how far down you can come with it and not interfere with your field of vision. I figured out how far by sitting in the seat and marking the low point allowing for a little margin for looking ahead on down hills. It came down almost 12 inches at the lowest point at the pillars. I don't see why it couldn't be done using the black paint on the inside surface.
Mike
|
|
#9
05-21-2013, 08:10 PM
|
||||
|
||||
|
Quote:
__________________
Mark W. Panoz GTRA, Chassis #10
|
|
#11
05-22-2013, 03:54 PM
|
|||
|
|||
|
Re: Lexan Installation
I'm sure that driver height, seat and mounting and high banks all have to be factored in. I'm 5' 11" and have the the original GTRA seating. I've had it on Barber, TWS and TMS and it is highly effective. The limo tint is not 100% blockage, but I've never been close to having to try to look through it. TWS has 23 degree banking on the oval, but we do not incorporate that into the 2.9 mile road course. It does have some nice elevation changes as does Barber. TMS incorporates turns 3 and 4 in their long road course. It has 24 degree banking and wasn't an issue. Folks who want to try a banner out could probably experiment with tape.
I wear glasses and a clear face shield. I don't like sun glasses or tinted shields as I have problems seeing the PI screen and the rear view screen. That maybe why I like the limo tint banner so much. Mike
|
|
#12
05-23-2013, 07:58 PM
|
||||
|
||||
|
Re: Lexan Installation
I suppose its something I'll get used to when I actually get the car out on the track, but the seating position for me is awkward. I'm 6'2". I have a custom built UltraShield Containment road race seat. I mounted it right on the floor. The seat that came in the (school) car was on mounts well up off the floor and my head/helmet was hitting the roof. Now the steering wheel position, shifter position, and pedals are all very comfortable, but I have a hard time sensing where the front of the car is. Its like I'm sitting in the back seat of my old car. I'm sure its something inherent to the Panoz, Vettes and Vipers. Of course, I haven't raced any of those (yet) I'll adjust/adapt, but it just feels foreign to me, as if I should be sitting further forward. Anyway.....
__________________
Mark W. Panoz GTRA, Chassis #10
|
|
#13
05-23-2013, 09:09 PM
|
||||
|
||||
|
Re: Lexan Installation
Not really an issue w/ the Vette (very low hood line, great view), somewhat with a Viper (higher hood line, but very cramped inside). The Pano had a very very high hood/fender line that just takes getting used to, but it has tons of room inside. With the seat on the floor I have issue with my elbows hitting the the left "shelf" and tunnel when steering. With the seat higher in the correct position for my dad I have more arm room, but the steering wheel is a little low.
If I were setting the car up 100% for me I'd actually raise the steering column and make it more horizontal.
__________________
Brian B. Panoz GTRA - LS1 swap in progress #4 Z06 - NASA ST3/TT3
|
|
#14
06-13-2013, 02:23 PM
|
|||
|
|||
|
Re: Lexan Installation
Nice job, but it flexes a lot and I predict will crack around the screws and break free... sorry.
Alsd this retention will not pass tech in most bodies. You could add the required retention clips (metal covers that hold the window in). The orginal design allows the glass or Lexan to "float" in the windshield space depending on air flow and car flex which is pretty extreme. We broke several glass windows trying to hold them in too tight and swapped to Lexan with supports. Good luck hope it works. Looks pretty. Kevin
|
|
#15
06-13-2013, 11:11 PM
|
|||
|
|||
|
Re: Lexan Installation
Mark, Kevin makes a very valid point. The amount of screen movement will depend on screen thickness and car speed & wind direction.
If you have enlarged the holes in the screen that the fasteners pass through this will help prevent cracking out from the holes (i.e. 5/32" hole through the lexan for a 1/8" fastener etc). I did lots of canopy work on aircraft a few years back and that was the trick to stop them cracking post panel replacements. I have found my screen moves around a lot over the course of an endurance race. We often have to reposition or replace the foam pads under the retainer clips on the screen as they work their way out. Kel.
__________________
Kel M Panoz GTRA #17 New Zealand
|
|
 |
POST REPLY TO THIS THREAD |
 |
|
|