|
|
| Search | Car Forums | Gallery | Articles | Helper | Air Dried Fresh Beef Dog Food | IgorSushko.com | Corporate |
|
|||||||
| WIP - Street Post topics for any "Works In Progress" street vehicles projects in this sub-forum. |
 |
 Show Printable Version | Show Printable Version |  Subscribe to this Thread
|
|
|
Thread Tools |
|
#1
 12-16-2011, 08:03 AM
|
||||
|
||||
|
Mopar´s Project
Hi fellas! The Brazilian "Small Dreams" Forum (www.small-dreams.com/Forum) was running an e-group with the SHOW CAR subject. Unfortunately, I missed the deadline, but I´ll keep my WIP.
So, I decided to enter with this "double Mopar" project. The intention is reproduce this shot:  But first, let´s begin with the lower one. It will be a Dodge Dakota with the front clip from a Dodge magnum so, I called it Dagnum (exactly like 1:1 real pickup project showed in all magazines few years ago) 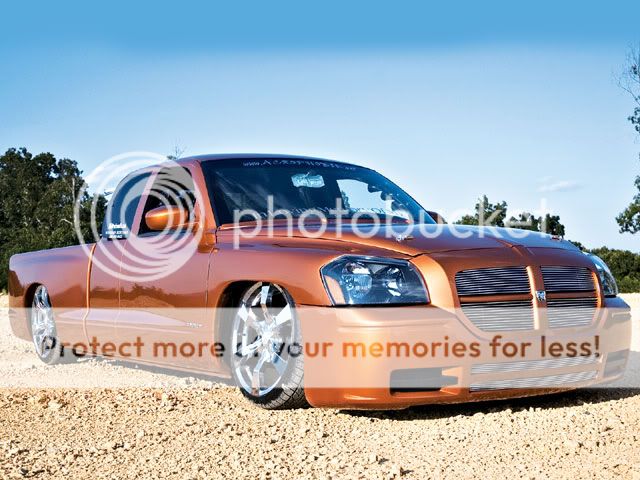 The material      The paint schema will follow the paint schema from Slixx´s decals sheet of 2007 Gary Selcizi Oakley 4X Champion Charger Funny Car Decal First step: change the front and align the hood       Then, little work on the interior (tunnel) , putty in all holes (shaved style), new floor, new rear inner fenders, primer to see what still needs more attention and a little modification on the wheels. (sorry for the bad quality pics)                More putty in the rear lights (it will be like the Caddy´s Fleetwoody vertical) and rear door. More engine test and new firewall       A pause for the cause: my prince, my life, my everything: his first steps into the modeling! A little extra help for Daddy!  Is he awesome or what?? So, the next step was little registered by photos, but in terms of project´s forward it was huge: THE STRUCTURE!! Drew the chassis in paper and did some fit tests. Then, went to the plastic and cut it all!!!   To certified that all pieces will fit right, I glued this main peace with white glue (this is responsible for join rear and front parts) It´s hard to view, but it is there rsrsrsr  And I just put others pieces together until the chassis design get done       Here, the next steps:  Green and red: suspension arms Black: air bags Brown: support bar (to fix the shock absorbers) Yellow: shock absorbers Orange: gas tank Blue: air compression Pink: air tank (this will be the only unit that will be positioned above the bed. All other will be under the bed Well, more photos of the chassis   Did the opening in the floor to receive exhaust components and for the suports of the chassi (in red)  And the first test fit of the engine and chassi (niiiiiiiiiiiceeeeeeeeeeee geometry hum???)  New rear lights space and new "bed" beeing preparaded...          ... and the new parts for rear suspension    In order to start the front suspension, it is needed to know exactly where the engine must be fixed    FRONT SUSPENSION: the parts (thanks Boss for the resin A-arms)  A-arms sectioned and drilled   Well, this is the result after 3 hours of cutting, filling, sanding, testing, etc etc.    I have started to think in the color....... in order to match the sheet decal graphics, I shall use any color with beige, brown or even gold tone. And searching in my stock, I have found these:   Still need to decide. Almost all colors could match, but 4 of them are closer (red circle) Well, besides the color, I figured out that the hood edge is not matching with grille shell.  So, I put some putty and also have started to make the hood ledge   Now, just wait all get dry and start to sanding... This is an effort to bring more realism to the hood: the internal structure...         (red lines to provide better view of the new pieces)             New inner fenders (and its pins)    Little work in the booth´s rear panel  The new gas pipe (since I have altered the nozzle fuel to the tailgate)  And the new line on the rear (made with scriber and a tape as guide)  Working with the wheels. Made all holes to put ScaleHardware´s rivets    Little finish toutch...   Finalizing the front grille   PRIMER TIME!!!!!!           Thanks and sorry for the long post! Comments are welcome! 
|
|
#3
12-16-2011, 11:57 AM
|
||||
|
||||
|
Re: Mopar´s Projetc
TOP NOTCH.. for sure!!
|
|
#4
12-16-2011, 06:02 PM
|
|||
|
|||
|
Re: Mopar´s Projetc
Wow...makes my stuff look pretty shabby!
|
|
#9
01-01-2012, 10:58 PM
|
|||
|
|||
|
Re: Mopar´s Project
That's cool! I really like where this is going. Awesome build. You guys in Brazil can do it!
__________________
It ain't cool 'till your wife hates it. Imagine a world without Alabama Recent builds: Rocket Bunny FR-S and stock BRZ Toyota bB Bro-style Civic K20 powered SiR converted EK WIP I build slowly and poorly. 
|
|
#11
01-03-2012, 04:23 PM
|
||||
|
||||
|
Re: Mopar´s Project
All of you guys...Yours words make me happier and more committed to the project. Really really thanks.!!
_________________________ Christmas´s update: Unfortunately it happened what I was afraid ... the entire front modification resulted in a hood fitting problem and alignment of the headlights did not matched as well. Big Lens and a huge gap  So, extra help from my fella styrene  Test to check the fitment and little work on the front grid  These extra little styrene pieces over the lens took the hood fitment to a wrong place. So I had to sand a little more in the front and the result was this.Now I have to replace with epoxy putty. Stay tune for more updates. Thanks for looking. 
|
|
#12
01-04-2012, 09:23 AM
|
|||
|
|||
|
Re: Mopar´s Project
Not only amazing work but you document it very well too...keep it up!
|
|
#14
01-05-2012, 06:40 AM
|
||||
|
||||
|
Re: Mopar´s Project
Ô prego, vai terminar esse ????????????????????????
 cara, mais uma aula do excelente plastimodelismo brasileiro. trampo de primeira. vê se termina essa, caramba vou acompanhar
__________________
_________________ ●ЦΣLDΣЯ●VΛLΘИ9Θ● VZ Team ©
|
|
#15
01-14-2012, 03:31 PM
|
||||
|
||||
|
Re: Mopar´s Project
Amazing work!!
Can't wait to see how this turns out. It is fun to help guide little hands that are just getting into modeling (and everything else!)
|
|
|
POST REPLY TO THIS THREAD |
 |
|
|


