|
|
| Search | Car Forums | Gallery | Articles | Helper | Air Dried Fresh Beef Dog Food | IgorSushko.com | Corporate |
|
|||||||
| Car Modeling Share your passion for car modeling here! Includes sub-forum for "in progress" and "completed" vehicles. |
 |
 Show Printable Version | Show Printable Version |  Subscribe to this Thread
|
|
|
Thread Tools |
|
#1
 01-31-2011, 08:52 PM
|
|||
|
|||
|
carbon fiber help - complicated shape
before I get stoned for not checking the FAQs and tutorial, I actually have gone though all of them here, in SPC and at Brian's model car site. the tutorials always looks so easy
 I tried the masking tape template method and I just can't seem to cover this item properly without warping the carbon decal pattern. I hope you guys can give me an advice if this piece can actually be covered in a one piece carbon fiber or am I better of splitting it up into 4 pieces or so? thanks in advance! I tried the masking tape template method and I just can't seem to cover this item properly without warping the carbon decal pattern. I hope you guys can give me an advice if this piece can actually be covered in a one piece carbon fiber or am I better of splitting it up into 4 pieces or so? thanks in advance!part in question is the Aston Martin DBS rear diffuser: 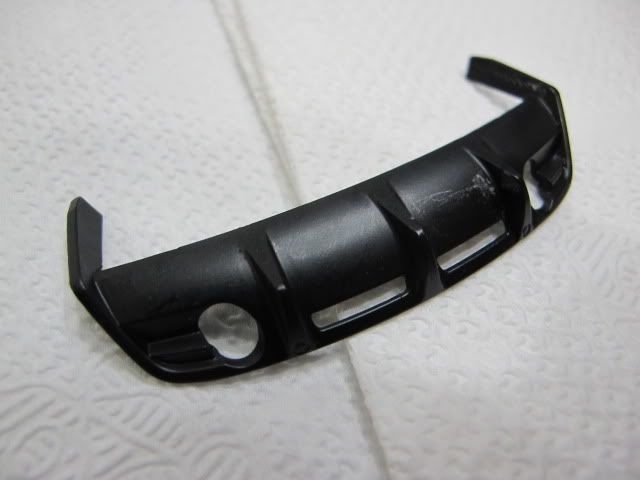 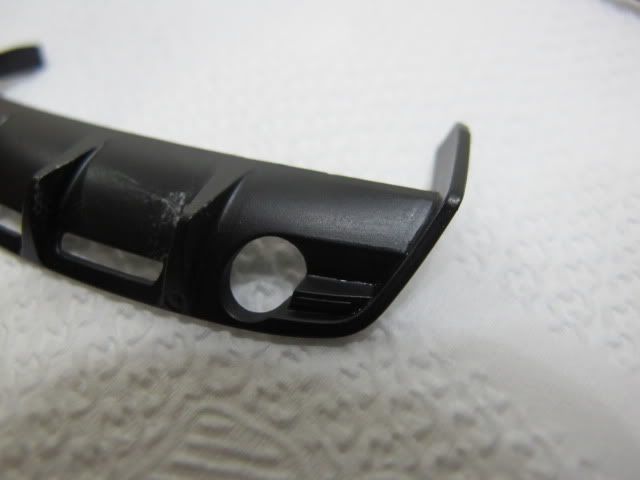 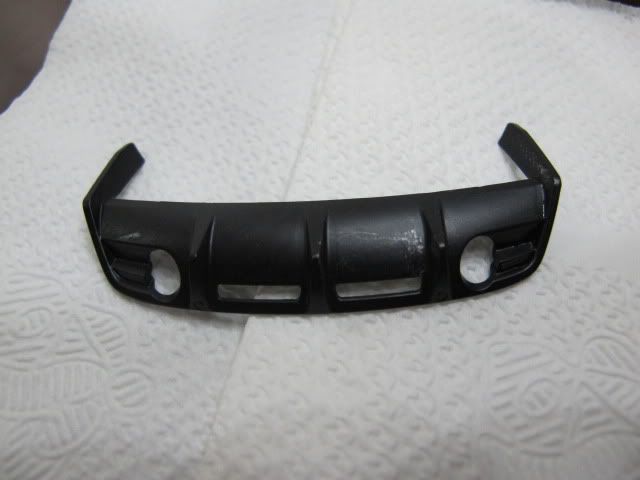

|
|
#2
01-31-2011, 09:07 PM
|
|||
|
|||
|
Re: carbon fiber help - complicated shape
I'm not experienced enough with CF, and want to start getting more experience, and CF parts like the DBS rear diffuser. I don't know how the pros do it! I can barely get my Scalemotorsport CF to lay down on any surface during my practice runs! I'm baffled.
|
|
#3
01-31-2011, 09:14 PM
|
|||
|
|||
|
Re: carbon fiber help - complicated shape
I'm with you BVC500, I'm doing okay with big flat surfaces like car hoods but with a complex shape like this, no success. i've already wasted a ton of carbon fiber decal. I've tired museum collection, crazymodeller and scalemotorsports hi definition carbon fiber. no luck on all 3.
|
|
#4
01-31-2011, 09:40 PM
|
|||
|
|||
|
Re: carbon fiber help - complicated shape
I do think with this part, you'll have to do the winglets ( or vertical pieces?) separately, then maybe one piece for the areas between the winglets, and another piece for the sides, being careful to line up the pattern.
My question is: for the winglet, do you attach one side first, let it dry, then do another side, etc.? B/c I have a hard time getting all sides to stick at the same time.
|
|
#5
02-01-2011, 01:14 AM
|
|||
|
|||
|
Re: carbon fiber help - complicated shape
looks like multiple pieces is the way to go. you would definitely need to let one part dry before putting on another one. I'm just worried that microsol will make the first decals wrinkle again.
|
|
#6
02-01-2011, 06:46 AM
|
||||
|
||||
|
Re: carbon fiber help - complicated shape
Here you can find pics and description how I did it (about in the middle of the page):
http://www.automotiveforums.com/vbul...1053906&page=3 On the next page you will find all of the shapes I have cut for the interior. You have to cut multiple pieces of the decal to cover all of the shapes. Last edited by Macio4ever; 02-01-2011 at 08:18 AM.
|
|
#7
02-01-2011, 08:14 AM
|
||||
|
||||
|
Re: carbon fiber help - complicated shape
One piece? Noooo.
 Decal film simply does not have the ability to warp and bend around a highly complicated 3D part like this. Decal film simply does not have the ability to warp and bend around a highly complicated 3D part like this. If I decided I absolutely had to have this part covered in CF decal, there would be a dozen or more individual decal pieces. (It would be a monstrous effort.) Macio's method is the correct and time honored way of going about it. Stick some high quality masking tape (Tamiya tape or similar) to the part, and use it to make pattern shapes for the decals. To make this thing look like carbon fibre, I personally would paint it black, and then lightly airbrush over it with gunmetal. Clearcoated with lots of clear gloss, it would have the color and appearance of CF, but not the weave pattern. But for a part like a diffuser that doesn't get much light anyway (under and behind the car), a bright obvious decal weave pattern is probably going to look overstated anyway.
__________________
PHOTOBUCKET SUCKS
|
|
#8
02-01-2011, 08:25 AM
|
||||
|
||||
|
Re: carbon fiber help - complicated shape
MPWR speaks the truth. I see min 13 pieces (complicated) but rather 17 simpler shapes to cover this part. I would estimate at least 2-3 hours to get it right plus time for clear coating.
I personally would go for it but it is a personal choice.
|
|
#9
02-01-2011, 11:33 AM
|
|||
|
|||
|
Re: carbon fiber help - complicated shape
Quote:
Ditto! Damn these exotics and their use of carbon fiber!
|
|
#11
02-01-2011, 12:31 PM
|
||||
|
||||
|
Re: carbon fiber help - complicated shape
Quote:

__________________
PHOTOBUCKET SUCKS
|
|
#12
02-01-2011, 12:40 PM
|
||||
|
||||
|
Re: carbon fiber help - complicated shape
I also use alot of water also to keep the decal from wrinkling and getting overlaps on the decal, and just very carefully let it stick to the part. takes me alot longer to do parts, the bumper he has mentioned will prolly take me 5-6 hours to do
__________________
Steve
|
|
#13
02-01-2011, 12:55 PM
|
||||
|
||||
|
Re: carbon fiber help - complicated shape
The way I see it, you'd have the main bumper as one-piece and then seperate pieces for each blade of the diffuser. Lining up the weave would be a pain though. Alternative method to MPWR's painting suggestion is to paint it with a black base, then lightly spray silver/gun metal through a pair of tights stretched over the part. Should give a subtle patterned effect.
__________________

|
|
#14
02-01-2011, 01:26 PM
|
||||
|
||||
|
Re: carbon fiber help - complicated shape
Quote:
 ...assuming you've got something still up there to split... I agree with the "lottsa pieces" lobby. Probably impossible to do with one piece and still look nice. I started this DBS kit a few weeks ago (and then stalled after getting the body in colour :s) When I finally get to this diffuser, I am definitely not going to be covering it in CF because I just don't want to spen the money time and effort on this part of the build But as Maciek rightly says, it's all about personal choice and what floats your boat in a given project.
__________________
Guideline for happy modeling: Practice on scrap. Always try something new. Less is more. "I have a plan so cunning, you could put a tail on it and call it a weasel" - Edmund Blackadder
|
|
#15
02-01-2011, 03:39 PM
|
|||
|
|||
|
Re: carbon fiber help - complicated shape
Quote:
^^ you could do this, and then place CF decal only to the areas which 'show' (upper/vertical surfaces), leaving the lower (less visible areas) painted, then clear coat the whole together, for even texture (smooth) surface effect...possibly tint the clear, to blend the transition for effect
|
| ||||||||||||||||||||||||||||||||||||||
|
POST REPLY TO THIS THREAD |
 |
|
|


