|
|
| Search | Car Forums | Gallery | Articles | Helper | Air Dried Fresh Beef Dog Food | IgorSushko.com | Corporate |
|
|||||||
| WIP - Motorsports Post topics for any "Work In Process" motorsports vehicles in this sub-forum. |
 |
 Show Printable Version | Show Printable Version |  Subscribe to this Thread
|
|
|
Thread Tools |
|
#76
 12-06-2006, 05:58 AM
|
||||
|
||||
|
Re: WIP: Tamiya 1/20 Jordan 191
Fabulous job you're doing Billypee, and the pictures are great.
Looks like a nice bunch of goodies from RB Motion, I might have to check those guys out.
__________________
 

|
|
#77
12-06-2006, 06:21 AM
|
|||
|
|||
|
Re: WIP: Tamiya 1/20 Jordan 191
BillyPee
Put the CF on the pushrod ( that's the name of the vertical piece ) of the front suspension but tone it a bit down with very thin matt black ( or matt black mixed with matt clear ) so the difference is not too big to the semi gloss suspension arms. The pushrods ( they connect the wheels/uprights with the dampers ) were the first suspension parts the F1 teams made in CF. They have to take loads in more or less just one direction unlike the other arms and thus were easier to calculate and handle i guess. It took a while until the full suspensions were made in CF. For a time the teams would also get back to metal arms for the Monaco GP as they wouldn't disintegrate immediately upon contact with the walls and rather bend a little. These days i guess they have mastered that problem too and stay with CF all the time.... Good job on the Jordan! Jaykay
|
|
#78
12-06-2006, 07:40 AM
|
||||
|
||||
|
Re: WIP: Tamiya 1/20 Jordan 191
Cheers Captain Mark.
Quote:
All the best, BillyPee
__________________
On the workbench: Completed WIPs: Completed Models Gallery:
|
|
#79
12-06-2006, 09:02 AM
|
||||
|
||||
|
Re: WIP: Tamiya 1/20 Jordan 191
Nice work Billy.You could try using a different pattern CF decal than the one on F1M.com.The one he has used on that model seems to have more of a bold weave pattern.Tamiya smoke is sometimes good for toning stuff down a bit.Keep up the progress on your model it's looking really good.
__________________
Steve Noble
|
|
#80
12-06-2006, 09:47 AM
|
||||
|
||||
|
Re: WIP: Tamiya 1/20 Jordan 191
Quote:
I haven't posted in this thread yet but have to say what a wonderful job you are doing, this kit is very near the top of my to do list again. I built it when I first got back into modelling but want to do it some justice, much like you are doing. As for the CF, I think the new Hi-Def would work great for you. The weave is very subtle and, in my opinion, more representative of the Uni Directional (UD) fibres that the teams would use for this kind of piece. The brake ducts however should definitely be twill weave as shown on F1m. Keep up the good work and I look forward to seeing more. Lee
__________________
The Willster....
|
|
#81
12-07-2006, 05:59 AM
|
||||
|
||||
|
Re: WIP: Tamiya 1/20 Jordan 191
Hi guys,
Thanks for the advice. I have the Hi Def decal sheet. However, if you look on Gurney Flap, you can see that the pushrod is definitely a twill weave. I plan to use the same twill I have been using but just tone it down with smoke. Thanks, Bill
__________________
On the workbench: Completed WIPs: Completed Models Gallery:
|
|
#82
12-11-2006, 05:47 AM
|
||||
|
||||
|
Re: WIP: Tamiya 1/20 Jordan 191
Hello everyone,
Just a small update to keep you all interested. All the parts that I showed you primed in the last update now have, at least, their base layer of colour paint applied. The majority of the parts are black and for that used Halford's Satin Black straight from the can. It's a really good match for X-18, and goes on just great... one of those paints that looks to heavy and wet once applied and then dries a lovely semi-matt and reveals all the detail. However, I have managed to complete a few of the non CF parts, so here is a couple of photos to share my observations. First up, the exhaust system. The instructions say to mix X-11 (Chrome Silver) with X-6 (Orange) in a 1:1 ratio. So I thought I would and see what that gave me... the answer... gold. It is very similar to X-12 Gold Leaf. I know from the reference photos that the exhaust needs to look essentially brown but I applied the mixture anyway. In order to tone down the gold, I gave the exhaust a very heavy wash (hardly thinned down) of Citadel Color Brown Ink. This combination results in a lovely "bronze statue" sort of finish... very nice if you are modelling a bronze statue but not if you are trying to model the exhaust system of an F1 car  . So I applied a third layer to the exhaust, this time Gun Metal from the Tamiya Weathering System. I rubbed this on quite heavily with the foam applicator and it produced a finish that looks 99.9% the same as the reference photos (I couldn't believe my luck). It also adds some much needed texture too. The photograph makes the finish look more glossy that it is in real life, most likely due to taking it in-doors using a cheap flash and some halogen lighting. Bottom line, I will be doing future 'brown' exhaust systems this way. The only thing that remains is to add some blue for heat stress... but thats on order from HLJ so will have to wait. . So I applied a third layer to the exhaust, this time Gun Metal from the Tamiya Weathering System. I rubbed this on quite heavily with the foam applicator and it produced a finish that looks 99.9% the same as the reference photos (I couldn't believe my luck). It also adds some much needed texture too. The photograph makes the finish look more glossy that it is in real life, most likely due to taking it in-doors using a cheap flash and some halogen lighting. Bottom line, I will be doing future 'brown' exhaust systems this way. The only thing that remains is to add some blue for heat stress... but thats on order from HLJ so will have to wait.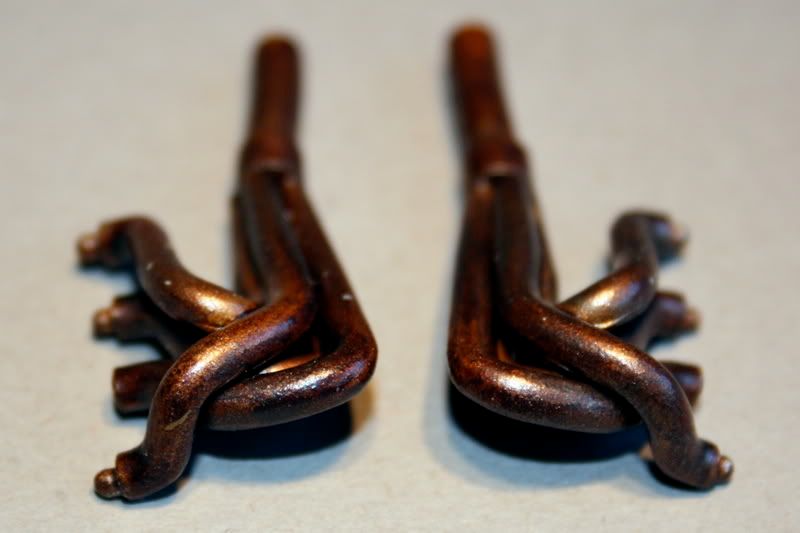 I have also completed the 4 brake disk and caliper assemblies. As you guys know, the all-in-one assemblies on most of Tamiya's F1 line up suck. I "umm-ed and arr-ed" about using after market replacements or scratching something better myself but eventually decided that the kit stock items would do (given the level of detail on other parts of the car and the fact that I will be displaying this kerbside). The callipers are painted in X-31 (Titanium Gold), the centre of the discs at X-12 (Gold Leaf) the disc surfaces are X-10 (Gun Metal), and the disc edge is XF-66 (Light Grey). All washed with Citadel Color Black Ink thinned down quite a lot. Once dry, it was lightly rubbed with the Silver from the Tamiya Weathering System. I used the F1 Specialities blue heat sensor decals on the callipers... these needed to be cut to shape. You will also notice that I drilled the ventilation holes in the edge of the disc and applied the blue and pink heat sensor paint. Overall, I am actually very impressed with how these came out considering that they are the stock items. 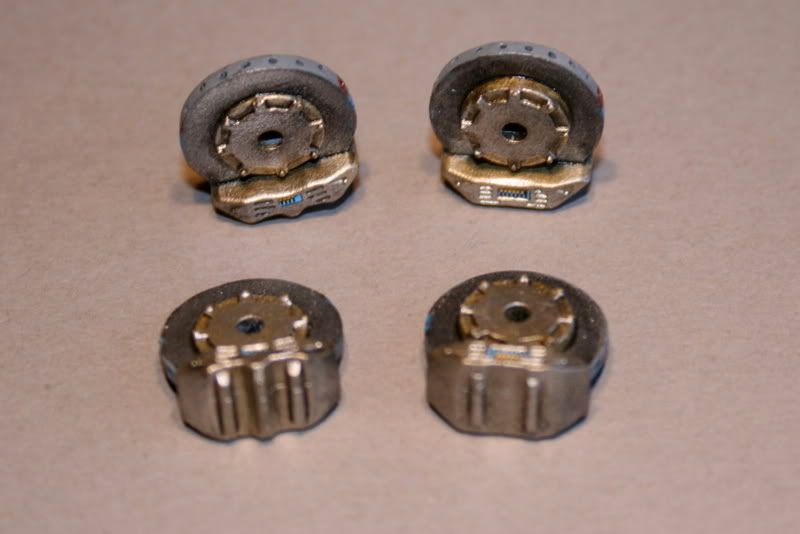 Your comments are most welcome. Kind regards, BillyPee
__________________
On the workbench: Completed WIPs: Completed Models Gallery:
|
|
#83
12-11-2006, 02:35 PM
|
||||
|
||||
|
Re: WIP: Tamiya 1/20 Jordan 191
My comment : WOW. Looks absolutely stunning.
One question though: How on earth do you get your brushed paintjobs looking so good ? Lately I've been having severe difficulties brushpainting Tamiya colors. I stir the colors quite some time, so I guess they're mixed well enough. But for instance the X-12 gold is a royal pain. The paint is like peanut-butter thickness, so I have to thin it. But if I thin it, it doesn't cover in one layer. So I paint a second layer, no problem. Yes problem, because when I paint the second layer (often a week after the first - I'm a slow builder) the first layer dissolves and than that's that...  In the end I get it to look acceptable, but I do have the feeling that there is an easier way. Sorry to got OT here, but I thought I'd ask. Regards,
|
|
#84
12-11-2006, 03:22 PM
|
||||
|
||||
|
Re: WIP: Tamiya 1/20 Jordan 191
Quote:
|
|
#85
12-11-2006, 04:18 PM
|
||||
|
||||
|
Re: WIP: Tamiya 1/20 Jordan 191
DerXL/Ant Phillips,
Good question. So X-12 if you just paint un-thinned goes lumpy. So you must thin it quite a lot in order to get a smooth finish. This is fine as long as you have prepared the plastic and primed first. For example, the calliper assemblies were filed and washed in soapy water (filing lets the paint bind and the clean gets rid of the mould release). Then I use a spray can of primer, in this case a grey primer... first coat a light mist, second coat to fully cover. Then it is sanded lightly to get rid of any high points in the primer. Then its simply a couple of coats of thinned X-whatever... unless you are painting bolt heads, you MUST thin your X-paint. Use a large brush with a point rather than going for a small one... it holds more paint and the tip of the brush is just as small. Everything else is just practice. Hope that helps, and thanks for the comments. BillyPee
__________________
On the workbench: Completed WIPs: Completed Models Gallery:
|
|
#86
12-11-2006, 05:28 PM
|
||||
|
||||
|
Re: WIP: Tamiya 1/20 Jordan 191
Looking real good Billy.Exhausts look nice.I always use Tamiya or Humbrol enamels for all my brush painting work.I find the Tamiya Acrylics are fantastic when sprayed,but when I've tried in the past to brush paint with them I end up taking off the paint that I've already applied.They seem to dry too fast.The enamels dry slower and are a lot easier for brush painting as they flow out and leave no brush strokes.The gold enamel in particular is much better than it's acrylic equivalent.With the brake assembly in question.I would usually spray the entire thing in the colour of the centre hub part with Tamiya acrylic.Then hand paint the brake disc surface with X10 or XF56 enamel.Then paint the brake caliper by hand with the appropriate enamel colour X12 or X31 etc.Then touch in the nuts with X11 enamel using a cut off cocktail stick instead of a brush.
__________________
Steve Noble
|
|
#87
12-12-2006, 04:46 AM
|
||||
|
||||
|
Re: WIP: Tamiya 1/20 Jordan 191
Quote:
As of last week I am the proud owner of a Tamiya HG Airbrush (thanks for the recommendation and thanks to MediaMix Hobby for the service) so I can start experimenting with parts in terms of what to paint with bristles and what to paint with air. I haven't used Tamiya enamels, only acryilics, so dont have an opinion on them. I find that thinned acrylic paint over a primed part goes on lovely... it needs a second coat, but that can be applied within about 15 minutes so is no big deal. Whenever I have used the acrylics without thining them first (trying to do things quickly and rush) then I agree the paint dries quickly and lumpy and the second coat only serves to remove the first  . My solution was to prime and thin, which has the added benefit of preserving much of the detail in the plastic. . My solution was to prime and thin, which has the added benefit of preserving much of the detail in the plastic.I'm also averse to doubling up my paint collection with an acrylic and enamel version, and using a bristle brush means I can work in the warmth and indoor lighting conditions without a trip to the garage. Thanks again for the pointers, BillyPee
__________________
On the workbench: Completed WIPs: Completed Models Gallery:
|
|
#88
12-12-2006, 06:06 AM
|
||||
|
||||
|
Re: WIP: Tamiya 1/20 Jordan 191
Quote:
__________________
Steve Noble
|
|
#89
12-12-2006, 06:18 AM
|
||||
|
||||
|
Re: WIP: Tamiya 1/20 Jordan 191
Quote:
. Justing popping out for lunch and going to pick some up. Really looking forward to developing air-brush skills. Hoping to make myself a spray booth (something small and cheap) so that I can use it in the house. Been researching it on the web and there seems to be plenty of info... looking forward to the Christmas break so that I can really get up to speed with it all. Wanna get this Jordan finished first though.Thanks as always, Bill
__________________
On the workbench: Completed WIPs: Completed Models Gallery:
|
|
#90
12-12-2006, 07:29 AM
|
|||
|
|||
|
Re: WIP: Tamiya 1/20 Jordan 191
Quote:
|
|
|
POST REPLY TO THIS THREAD |
 |
|
|


