|
|
|

|
|
| Search | Car Forums | Gallery | Articles | Helper | Quality Dog Food | IgorSushko.com | Corporate |
|
| Latest | 0 Rplys |
|
|||||||
| WIP - Street Post topics for any "Works In Progress" street vehicles projects in this sub-forum. |
 |
 Show Printable Version | Show Printable Version |  Email this Page | Email this Page |  Subscribe to this Thread
|
|
|
Thread Tools |
 04-10-2007, 10:44 AM
|
#61 | |
|
AF Enthusiast
Thread starter

Join Date: Oct 2004
Location: H.B., California
Posts: 3,667
Thanks: 18
Thanked 109 Times in 104 Posts
|
Re: Orange 7 WIP
Well, actually it would be 8, not 9, but 7 is so much more "me". And 8 & 9 go into 360 so easily... I think I used a 1/16 inch two flute. I'd probably go to 1/32 inch to make one in 1/24 scale. (Be sure to buy those in bulk...)
The kit's master cylinder, (it still needs a decal that I haven't made yet )  |
|

|

|
|
04-10-2007, 10:51 AM
|
#62 | |
|
AF Enthusiast
Thread starter
Join Date: Oct 2004
Location: H.B., California
Posts: 3,667
Thanks: 18
Thanked 109 Times in 104 Posts
|
Re: Orange 7 WIP
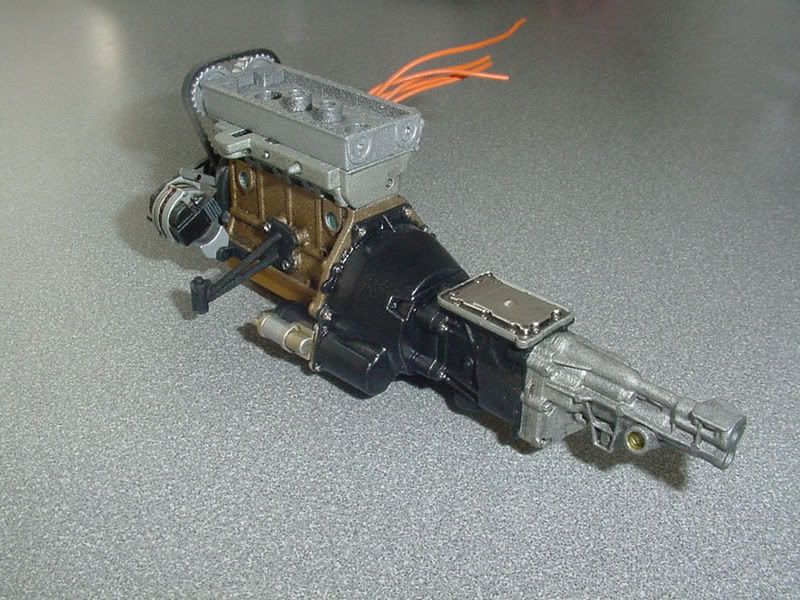
The transmission is mated to the engine and is ready to be installed into the frame
 |
|
|
|
|
|
04-10-2007, 11:46 PM
|
#63 | |
|
AF Enthusiast
Thread starter
Join Date: Oct 2004
Location: H.B., California
Posts: 3,667
Thanks: 18
Thanked 109 Times in 104 Posts
|
Re: Orange 7 WIP
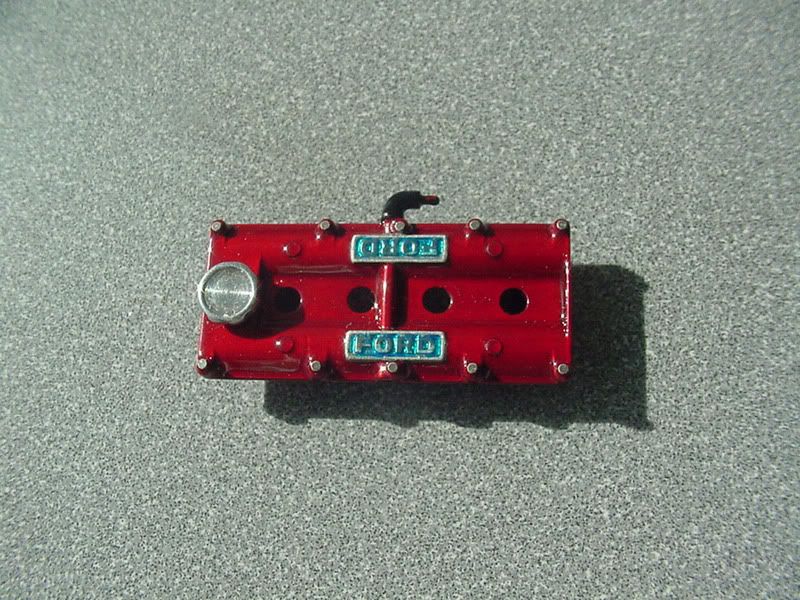
The cam cover is done except for a decal I still have to make for the machined aluminum oil cap. Tamiya Clear Red was sprayed over silver for the color, the Ford emblems were BMFd and the detail painted with Tamiya Transparent Blue. SMS PE bolt heads from sheet #8117 round out the detailing.
 |
|
|
|
|
|
04-11-2007, 09:51 AM
|
#64 | |
|
AF Enthusiast
Thread starter
Join Date: Oct 2004
Location: H.B., California
Posts: 3,667
Thanks: 18
Thanked 109 Times in 104 Posts
|
Re: Orange 7 WIP
The engine assembly is in the frame and the header has been heat stained with Tamiya Clear Blue, Red and Orange. I used the lacquer paints, decanted and airbrushed with a Tamiya/Iwata airbrush.
 |
|
|
|
|
|
04-11-2007, 04:21 PM
|
#65 | |
|
AF Enthusiast
 Join Date: Jul 2005
Location: Cheshire, Connecticut
Posts: 872
Thanks: 0
Thanked 1 Time in 1 Post


|
Re: Orange 7 WIP
Is that last picture the model, or a reference shot?!
__________________
 
|
|
|
|
|
|
04-12-2007, 10:10 AM
|
#66 | |
|
AF Enthusiast
Thread starter
Join Date: Oct 2004
Location: H.B., California
Posts: 3,667
Thanks: 18
Thanked 109 Times in 104 Posts
|
Re: Orange 7 WIP
Yep...
I finally have some of the (nearly) finished body parts to show... Like most models, I prepped the body parts and painted the base color very early in the build. The nose is painted (Tamiya Orange TS-12) and has lipstick applied in the form of SMS CF decals. Maybe a dozen individual pieces of decal. I used the Hi Def pattern and clear coated it with two part automotive urethane clear.  Once the clear was dry, SMS #1012 C/F was applied to the interior of the nose. I started with one large piece and worked my way out with smaller tailor cut pieces. It took about two or three days of putting a few pieces of decal on, saturating them with Mr. Mark Softer and letting them dry in the window. Not a tough job, just one that takes a while.  |
|
|
|
|
|
04-13-2007, 09:25 AM
|
#67 | |
|
AF Enthusiast
Thread starter
Join Date: Oct 2004
Location: H.B., California
Posts: 3,667
Thanks: 18
Thanked 109 Times in 104 Posts
|
Re: Orange 7 WIP
Back to the frame...
The upper frame and firewall assembly is done. This one assembly usually takes a lot more time than one would think, while it did go quicker than my earlier ones, still this time was no exception, at least it is well engineered by Tamiya. The master cylinder now has its custom made Scale-Master decals on it. The foot/pedal box cover and the heater box were covered with SMS HiDef C/F. I machined a couple fittings for the heater hoses.  |
|
|
|
|
|
04-13-2007, 11:16 AM
|
#68 | |
|
Not A Hoarder!

Join Date: Jun 2003
Location: Englewood, Colorado
Posts: 2,240
Thanks: 0
Thanked 19 Times in 19 Posts
|
Re: Orange 7 WIP
Sweetness!
__________________
SCCA 7, The lost Z Contest entry thread: Mystery? Beetle + Boxster = Bugster, P.T. Panel:click here Diablo Roadster: click here, & Porsche C2 Cab |
|
|
|
|
|
04-16-2007, 10:16 AM
|
#69 | |
|
AF Enthusiast
Thread starter
Join Date: Oct 2004
Location: H.B., California
Posts: 3,667
Thanks: 18
Thanked 109 Times in 104 Posts
|
Re: Orange 7 WIP
The steering wheel is done
Another fun to make accent for this project...
The rubberized grip effect was made with Faux Fabrix, applied as the can says. I used three light, but full coats. The spoke section is aluminum, also from the kit, but decaled with SMS carbon fiber decal #1020. The center/horn button is an aluminum piece I machined; it was tinted with Tamiya Clear Orange. The bolts on it are photo-etched units from SMS PE sheet #8117. The decal in the very center is from the kit. 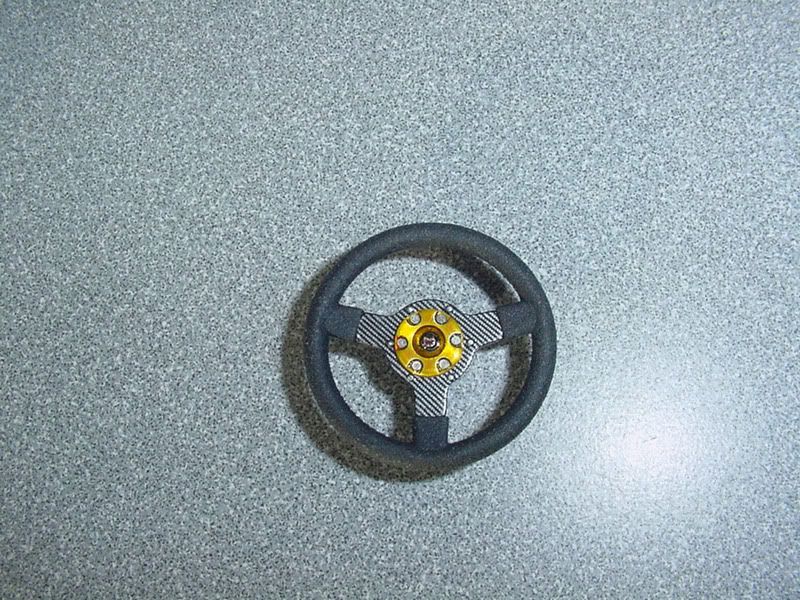 |
|
|
|
|
|
04-16-2007, 12:04 PM
|
#70 | |
|
AF Enthusiast
Join Date: Oct 2004
Location: Schweinfurt
Posts: 1,229
Thanks: 1
Thanked 13 Times in 13 Posts
|
Re: Orange 7 WIP
Sweet build!
|
|
|
|
|
|
04-16-2007, 12:10 PM
|
#71 | |
|
AF Enthusiast

Join Date: Jun 2005
Location: Céroux-Mousty
Posts: 506
Thanks: 11
Thanked 5 Times in 5 Posts
|
Re: Orange 7 WIP
Incredible work!
 Jamme
__________________
WIP: LaFerrari Tamiya 1/24 |
|
|
|
|
|
04-16-2007, 12:11 PM
|
#72 | ||
|
AF Enthusiast

Join Date: Dec 2004
Location: Germany
Posts: 3,431
Thanks: 28
Thanked 80 Times in 74 Posts
|
Re: Orange 7 WIP
Quote:
Great built so far, this photo looks like the real thing
__________________
Micha       
|
||
|
|
|
|
04-17-2007, 10:14 AM
|
#73 | |
|
AF Enthusiast
Thread starter
Join Date: Oct 2004
Location: H.B., California
Posts: 3,667
Thanks: 18
Thanked 109 Times in 104 Posts
|
Re: Orange 7 WIP
Here is the radiator and oil cooler assembly. Kit parts and decal with couple machined aluminum details on the top of the radiator to replace what I sanded off during clean up. Easier for me to do it that way, and adds just a little more metal
 |
|
|
|
|
|
04-18-2007, 10:49 AM
|
#74 | |
|
AF Enthusiast
Thread starter
Join Date: Oct 2004
Location: H.B., California
Posts: 3,667
Thanks: 18
Thanked 109 Times in 104 Posts
|
Re: Orange 7 WIP
The interior panels are finished.
 The dash is pretty much finished too. You can see how the decal pattern is similar to the molded dash pattern. Not an exact match, but once it is all put together I think it will work well considering how little of the side panels are visible. It is much darker looking in person so the contrast is really lower than the photos show. 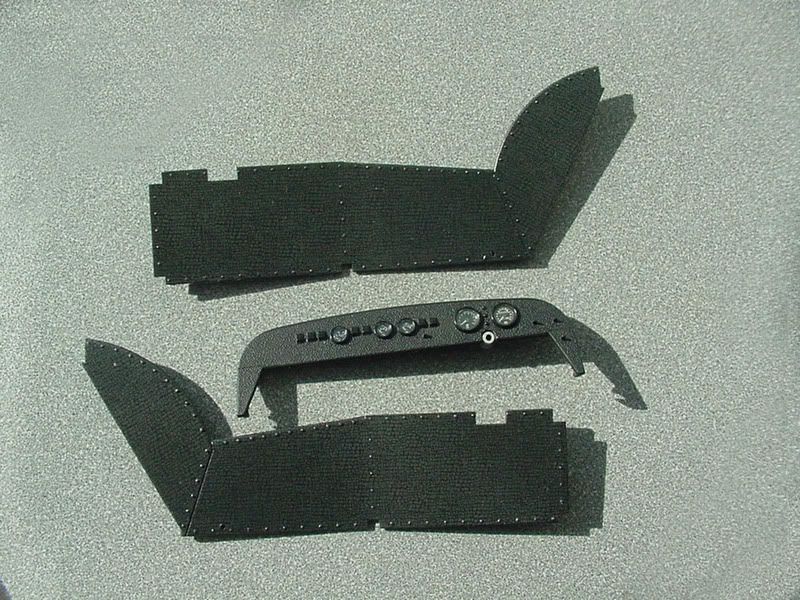 And I finally made the decals for the coolant and oil caps  |
|
|
|
|
|
04-18-2007, 11:01 AM
|
#75 | |
|
AF Fanatic

Join Date: Dec 2004
Location: Up the creek with no paddle
Posts: 5,889
Thanks: 7
Thanked 16 Times in 15 Posts
|
Re: Orange 7 WIP
I feel a bit of a masochistic following this thread - but I want more !
Great work 
__________________
Guideline for happy modeling: Practice on scrap. Always try something new. Less is more. "I have a plan so cunning, you could put a tail on it and call it a weasel" - Edmund Blackadder |
|
|
|
|
|
|
POST REPLY TO THIS THREAD |
 |
|
|


