|
|
| Search | Car Forums | Gallery | Articles | Helper | Air Dried Fresh Beef Dog Food | IgorSushko.com | Corporate |
|
|||||||
| WIP - Street Post topics for any "Works In Progress" street vehicles projects in this sub-forum. |
 |
 Show Printable Version | Show Printable Version |  Subscribe to this Thread
|
|
|
Thread Tools |
|
#46
 01-16-2008, 08:07 PM
|
||||
|
||||
|
Re: Corvette Summer Stingray in 1/25 scale
No you dont need to read it all over use the get the '69 corvette coup kit from revell.
Here's where I'm at now, I have poured the tope to the body and ran out of rubber. Then I got some diff-type to get the job done.An then I jumped on the dash and seat work. here's are all the pics. (You know I have used over 4 cans of rubber to do this resin kit; and I still need more.  Once it wan dry and all the tape that was the base was removed, I then brushed on the R to R release. An let dry  The sec. layer of rubber came out pink in color.  Wile we wate for that to dry. I got the one seat ready for molding. First I need to tell you all why there is only one seat! When I was work ing on both seats I ran out of the Half round styrene strip. An I used the next size up from that thinking it would work. It did not so I thought use the first seat that came out well and mold it to finsh this build.  The seats in the car from the move had a long sides the reach up to the head rest. So I had to make my seats look like them. I cut the top corners off the old seats to build up that web back look.   I filled and sanded.  thin picked the best one.  An added adjuster nobs.  Now the dash has been sanded sins this pic. I'm just trying to get it shooth (It's hard to work on this dash)  I have set up the one seat for it's mold. 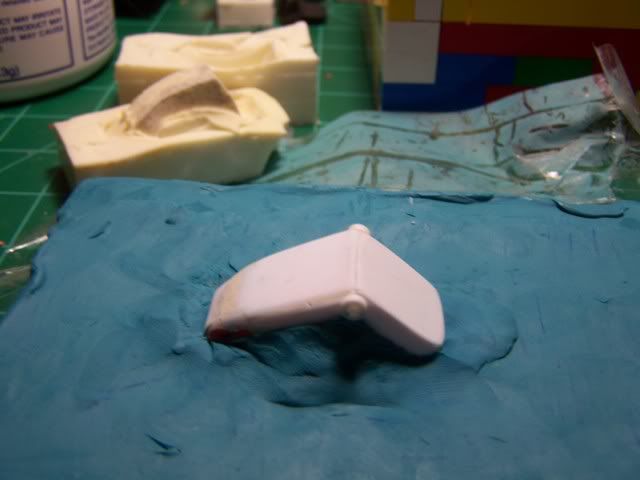 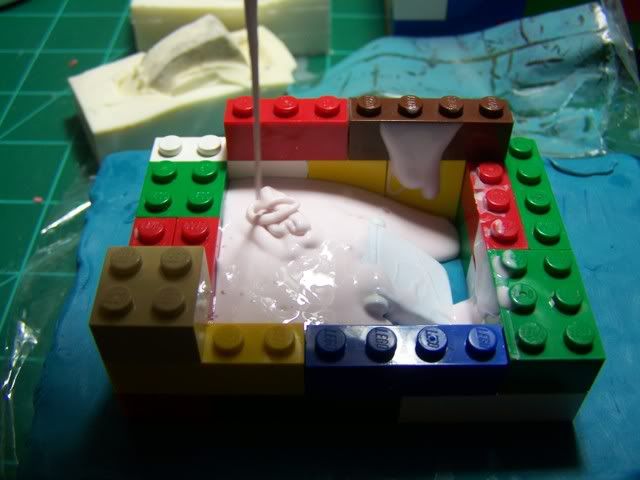 Next I will set up for the dash mold. (Oh ya I removed the footpedel's) I wll put them on the floor with DM photo etch parts. You know that that pink mold stuff has not dryed yet it's getting there just slow!!!! any way here's the kit you will need. 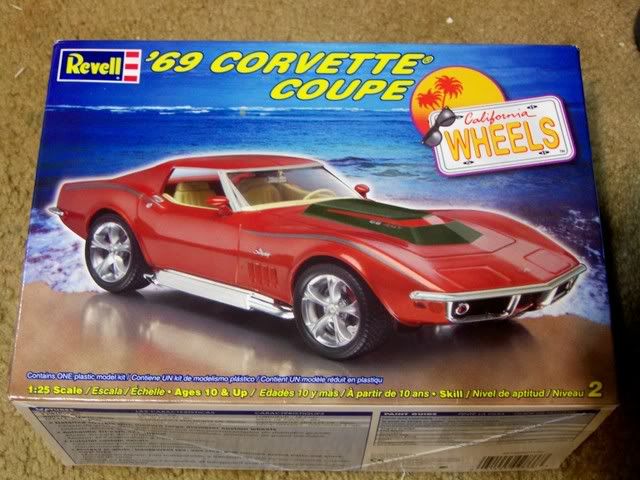 Stock # 2866
__________________
Oops I didn't see you down there sorry for running you over!  http://s162.photobucket.com/albums/t248/White_r34/ Last edited by white_R34; 01-17-2008 at 01:30 PM. 
|
|
#47
01-20-2008, 01:12 PM
|
|||
|
|||
|
Re: Corvette Summer Stingray in 1/25 scale
On a right hand drive car, the pedals are arranged the same as on a left hand drive car. No matter which side of the car the steering wheel is on, it's clutch -> brake -> gas from left to right.
Otherwise, looking great! I can't wait to see how the cast comes out, and the final products.
__________________
It ain't cool 'till your wife hates it. Imagine a world without Alabama Recent builds: Rocket Bunny FR-S and stock BRZ Toyota bB Bro-style Civic K20 powered SiR converted EK WIP I build slowly and poorly. 
|
|
#49
03-21-2008, 09:23 PM
|
||||
|
||||
|
Re: Corvette Summer Stingray in 1/25 scale
When I get my builds done.
Well now I have some time I will work on the cars till the 5th of next month. Ok I have the cast's of the dash bord's and seats.   Now I've just gottin the parts sanded off and will paint the interior tub, to night and post new pix tomorrow. I thought the T-top looked a bit bad so I re-made it.  Here I'm showing you some old images, I have just gottin the bodys sanded and will start that paint job tomorrow along with posting new pix of the finished chassis & engines.  Here are the chassis painted and the engines. Oh I have casted some new valve covers and I had to plate them as well.    I must say the platting came out well on the parts, you will see later. I'm going to work on this project late to night so I can post more pix for you all to look at. Now I do have one (BIG) Problem, I still have no idea of how I will flip the nose up. That's is the one big thing that has made me come close to quiting. But I will get these cars done, "flip nose or not". Oh one last thing I'm going to use (PE) Photo-Etched parts in the interiors., but Not a full amount in both. (Just some in one) And more in the mane car (The Red One) Ok new finished engine pix.   Ok I know have the interiors close to there end. I have yet to place the foot pedels and 4 point seat belts. Once that's done the interiors will be done. Oh I used a MCG (PE)set for the mane cars steering wheel.   A closer look. 
__________________
Oops I didn't see you down there sorry for running you over! http://s162.photobucket.com/albums/t248/White_r34/ Last edited by white_R34; 03-22-2008 at 11:23 PM.
|
|
#50
03-26-2008, 12:36 AM
|
||||
|
||||
|
Re: Corvette Summer Stingray in 1/25 scale
I'm sorry for the back to back post as If I wat till some one post. I would have to keep starting new threads to keep going so I'm at the end of this build any way. An again I'm sorry for having to do this. Here's what I have done to day.
I have all the seatbelts done (Sorry for the ruff look of the seats). You know I keep finding things to fix and I'm sick of that. I had to go back and fit the side pipe holes then add to the T-Top and now I'm goin go to have to build on to the fire wall. Well see for your self.  The side pipe holes are to long.   I filled the space in:  Then went back a put the engine on the chassis and use a Alum.Tub for my drive shaft.   Once I got the side holes fixed I built the headlights.   I don't know what I would do with out those putty tools.  I added to the T-top on both cars and on the gray one I made a new lower windscrean brace.   Ok now both engines are on there chassis. An it's time to do a test fit to the body with the interior.  Well well looky there some thing I need to fix now or add on to. Oh well the price I have to pay to make it look good I guess.  Well now that all I realy need to do is the fire walls I will start on the paint jobs tomorrow. Oh just one thig I need to tell you all in the move the stolen car that was re-painted gold did not have a gloss finish on it. It's was more like a Gold base cote and the flames where hand painted on Pin stripe style. I still can get it in my head how to make the part that will let the nose or hood flip up. Any of you got any Ideas? Here's some shots of the finished bodys with the hood up on one.   Oh and onw last thing I found the kit that has the right type of wheel. I just can't find the kit any where elsa othere than ((Evil-Bay)) aka E-Bay.  Here's some shots of the real car. 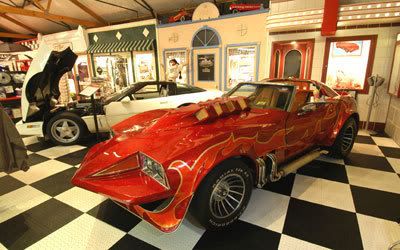  I know some of you remmber at the start of this build I thought I was the first to build it and I had the BIG head about it. Well my head is getting bigger once again I now see that Im not the first I'm the 4th to build the car. But I am the first to build Two of them at the same time and I'm the only one that has done and showed the engines. No one any where elsa has done the gold version. So my head is back BIG once again.
__________________
Oops I didn't see you down there sorry for running you over! http://s162.photobucket.com/albums/t248/White_r34/
|
|
#51
03-26-2008, 09:55 AM
|
|||
|
|||
|
Re: Corvette Summer Stingray in 1/25 scale
It's great car (if you like the 70's look). Your model looks good, however, why oh why did you rush the casting of the seats and dash without cleaning them up. The copies look so rough it detracts from all your good work so far.
__________________

|
|
#53
03-26-2008, 01:08 PM
|
|||
|
|||
|
Re: Corvette Summer Stingray in 1/25 scale
Gotta give you loads of props and my personal repsect for that scratchwork on the front end!
Not realy my taste but its realy REALY well done  Also the engine detial is outstanding 
|
|
#54
03-26-2008, 04:40 PM
|
||||
|
||||
|
Re: Corvette Summer Stingray in 1/25 scale
Big Kahuna Your right about the interiors I'm working on a quick fix now. Yes I'll be making a Resin body kit after I'm done.
__________________
Oops I didn't see you down there sorry for running you over! http://s162.photobucket.com/albums/t248/White_r34/
|
|
#55
03-27-2008, 10:19 AM
|
|||
|
|||
|
Re: Corvette Summer Stingray in 1/25 scale
Still great work man. What you have done looks fantastic.
I loved the movie when it came out(although I was about 8 or so.)
__________________
|
|
#56
03-29-2008, 02:41 PM
|
||||
|
||||
|
Re: Corvette Summer Stingray in 1/25 scale
Hay Big Kahuna I was looking at the move last night an I see that the interior and the seats are not all in a leather look so I went back and Flocked the seats and sanded the front part of the dash all I have to do now is paint it.
 I also went back over the head lights to make them look the right way. On the Real car the lights sit back pass the side turn lights So I added on to them and made them thicker and know I will mold them.   Ok I have the Fire Wall caps built now it's time to paint them.  I was look in through my spare tire box to get some tires that fit the wheel's I'm using as the one you have seen in the images I have posted are to big and I only have the one set. See the small gap around the outer edge of the wheel:  I tryed AMT truck tires and don't like the look.  ((AHHHHH))!!! found a two sets I like and there both Good Years. I don't know what kit they come from yet. I will let you all know once I find that out. Oh I also made some resin copys of the wheels so both cars will have the same look.  Ok I do a lot of paint jobs I don't know why this one is hard for me but this is the two ways I could do the job you all let me know if you think I'm on the right track. Ok My paint job styles. I can paint the mane car that will be the red one. 1. You can paint the body Met. Gold base, Let dry then mask the flam images off and paint a clear candy red over the Met. Gold base pull off the mask, let dry all of it dry. Re mask the edge of the flam and put your airbrush on fine setting and paint around the edge of the mask with clear Orange and then a Clear cot over it as your last step pull off the las mask and that is it for that way. 2. You can paint the body witha Met. Gold base let dry., Next paint over the Met Gold wht clear candy red Let dry. Mask the flam images on the now dry Cl.red. Paint the Met Gold over the red let dry and re mask only the edge of the flam paint around the edges of the new masked places with Cl. Orange pull off and put on a Clear cot over it. So you all tell me what you think. Oh and as for the Stolin car from the move it was just painted a solid Gold color and that will be the first one I do. Here's the Red I want to use over the Met gold base on the Red vette. This is a project that I used the same paint job tha I will use on my vettes. Gold Base: 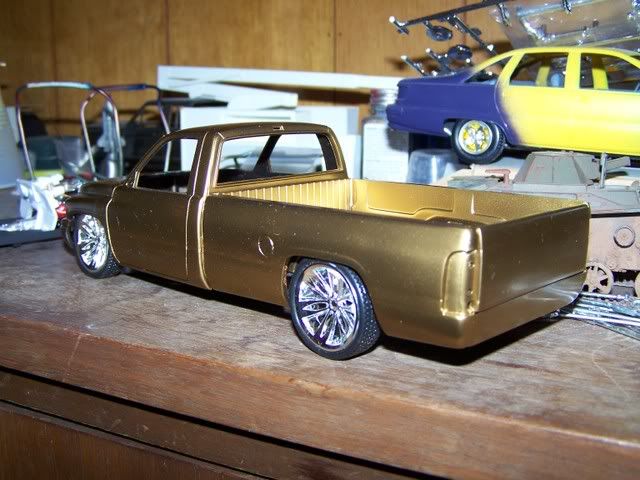 Clear Tamiya Red over the Gold Base: 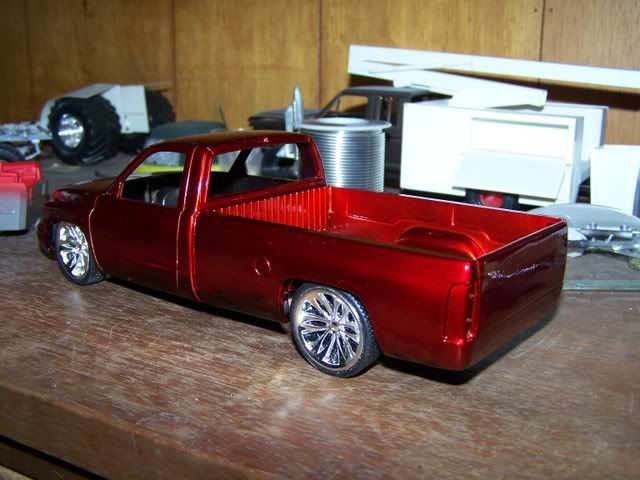 The paint I want to use for this paint jobs are:  So you all tell me what you think about how I should pait the red one, I will paint the gold one first as it's paint job is the easy one to do.  Oh and one last thing befor I let you all go I will have to plate the T-Top base as I don't think trying to wrap foil around it will work well so I'm going to use Alclad II Chrome ALC 107.  The next images will be of the full rolling finished chassis and the painted bodys. I need to get to work on the paint jobs right now. "Later"
__________________
Oops I didn't see you down there sorry for running you over! http://s162.photobucket.com/albums/t248/White_r34/
|
|
#57
03-30-2008, 12:03 AM
|
||||
|
||||
|
Re: Corvette Summer Stingray in 1/25 scale
I love the clear red over the gold....... thank you i didnt think of that thats the right color i was looking for.......... better than any other other i seen
|
|
#58
03-30-2008, 12:42 AM
|
||||
|
||||
|
Re: Corvette Summer Stingray in 1/25 scale
I have no idea how you're gonna do that paint job, but if you pull it off it will be incredible. Would decals help out? Well, I guess I'd try painting it too - you gotta suffer for your hobby
__________________
Mark R
|
|
#59
03-30-2008, 06:33 PM
|
|||
|
|||
|
Re: Corvette Summer Stingray in 1/25 scale
Get one of THESE and cut some very THIN tape for pin striping.
Now, here's how to go about it: First, paint both cars gold (as you stated the "stolen" version was not shiny, right?) Next, lay out the pinstripe tape that you cut with your parallel cutter on the gold paint. WARNING! if the gold paint is not a lacquer based, or some kind of durable single stage paint, the tape will mess up the finish of the gold, so a clear coat may be necessary for the tape to work on the gold finish.* Then, mask the body where the lighter red will be by laying some good masking tape right over your pin stripe mask work, and VERY CAREFULLY cut the tape to expose the area that will be dark red. Now, spray the dark red, let it dry for an hour or until it can be handled VERY LIGHTLY! carefully score the red paint where the top layer of tape and your pinstripe tape meet to prevent the paint from pulling up when you lift the tape. Now is the tricky part. you have to mask off the dark red in order to spray the lighter red. you obviously don't want to just stick some tape on your freshly painted dark red paint, so you will have to let it dry.....for a LONG time, at least a couple days. Perform the same steps in masking for the light red as you did when you masked for the dark red. Spray your light red, let it tacky up and remove all your tape. finally, clear coat, wetsand, clear coat, wetsand, clear coat, buff, and shine, wax after a few weeks/months. end result should look very good. I don't have any pics of the bike that I did (hiyabusa(sp?)) but I used the exact colors you have there, and it turned out A-MAZE-ING. sorry for the LONG post, but I felt it necessary since you are going into such detail with these, you should not just settle for decals....Barris did it with paint, so should you. lol -Ken edit* the scenes in the movie with the "STOLEN" car were likely filmed when the car was going through paint stages, and the fancy red paint was applied after the car was then "recovered" I don't think Barris made more than just the one "Corvette Summer" 'Vette.
__________________
There is a very fine line between "hobby" and "mental illness." 
|
|
#60
04-04-2008, 07:46 PM
|
||||
|
||||
|
Re: Corvette Summer Stingray in 1/25 scale
Rsxse240 Sorry man I just got back in here to read what you put up yesterday and I had dont the paint job on the gold car. To day I have done the paint job on the othere gold flacked car. I wanted to show you all the red car first then the gold one. But here's where I am at right now.
Oh it's going to be a lot of images hope you all don't have dile up. First I painted both bodys Gl-Black as I will be using pale gold from Alclad II and that stuff is some what clear.  Ok I want to do my T-top init's chrome look first.   I know I know why did I do that? I can that's why, I'm good like that LOL  Both car tops were done that way. Now time for the gold paint jobs.   To keep going on that I pulled the hold mask off one car and put in on the othere.  Ok now for the ((Flack job)) I'm using micro flacks from Pegasus Hobbies: http://h1070012.hobbyshopnow.com/pro...p?prod=PGH1075  mixed with testors High Gl-Clear. for the red car's paint job. As for the gold car I hand painted the flames on, with a Loew Cornell #10/0 JS Mid Liner paint brush.  I used a heavy flack paint job on it:   Now the plane gold car stays the way it is, till I put on the flame pin-stripes.  Ok now to make my flame stencil put the shapes on the same type of vette and layed my clear HOK mask over it and trace over the lines and cut them out and put them on the flacked car. Oh and now at this time I have already pin-striped the othere car.   Once I pulled off the asking I see that there are a lot of paint bleading on the edges so I had to fix that quick.    Ok how I fixed the paint bleeds I used X-20 tamiya thinner and a Q-tip I dipped the Q in a cap and I didn't let it get to full of thinner and like an Eraser I just rubbed off all the blers.   I then went back and hand painted the edges to clean it up a bit.   I think It looks good so far. Now for all my stolen car work in images only. I started with the hood first. I did the name on the door the best I could.        I'll post more work as soon as some one replys.
__________________
Oops I didn't see you down there sorry for running you over! http://s162.photobucket.com/albums/t248/White_r34/
|
|
|
POST REPLY TO THIS THREAD |
 |
|
|


 American Muscle.... Nothing else...


