|
|
|

|
|
| Search | Car Forums | Gallery | Articles | Helper | Quality Dog Food | IgorSushko.com | Corporate |
|
| Latest | 0 Rplys |
|
|||||||
| WIP - Motorsports Post topics for any "Work In Process" motorsports vehicles in this sub-forum. |
 |
 Show Printable Version | Show Printable Version |  Email this Page | Email this Page |  Subscribe to this Thread
|
|
|
Thread Tools |
 01-04-2006, 09:38 AM
|
#46 | |
|
Banned
Join Date: Apr 2003
Location: Ma$$h0le
Posts: 306
Thanks: 27
Thanked 10 Times in 8 Posts
|
Re: Progress - Tamiya Ferrari 312T3
Incredible.
|
|

|

|
|
01-05-2006, 03:27 PM
|
#47 | |
|
AF Fanatic

Join Date: Dec 2004
Location: Up the creek with no paddle
Posts: 5,889
Thanks: 7
Thanked 16 Times in 15 Posts
|
 Ahhhhhhhhhh! How do you DO that!! 
__________________
Guideline for happy modeling: Practice on scrap. Always try something new. Less is more. "I have a plan so cunning, you could put a tail on it and call it a weasel" - Edmund Blackadder |
|
|
|
|
|
01-09-2006, 10:01 PM
|
#48 | |
|
AF Enthusiast
Thread starter

Join Date: May 2003
Location: Sunshine Coast, AUSTRALIA
Posts: 2,218
Thanks: 16
Thanked 8 Times in 8 Posts
|
OK, I have a question?
What colour Tamiya Spray should I do the car in? TS8 Italian Red or TS49 Bright Red??? I'm leaning towards TS8 over a white base?? Thanks
__________________
Rob 
|
|
|
|
|
|
01-09-2006, 11:46 PM
|
#49 | ||
|
AF Enthusiast
 
Join Date: Mar 2004
Location: Calgary
Posts: 1,071
Thanks: 0
Thanked 0 Times in 0 Posts
|
Re: Progress - Tamiya Ferrari 312T3
Quote:
__________________
    |
||
|
|
|
|
01-10-2006, 01:35 AM
|
#50 | |
|
AF Regular
Join Date: Feb 2005
Location: Newcastle
Posts: 209
Thanks: 0
Thanked 1 Time in 1 Post
|
Yeah, I think ts-49 is for 1997 and onwards, so ts-8 would be the best choice.
The car is coming along really well. But then, that's to be expected isn't it. |
|
|
|
|
|
01-10-2006, 03:48 AM
|
#51 | ||
|
AF Regular
Join Date: Sep 2005
Location: Kenwick.Perth
Posts: 120
Thanks: 0
Thanked 1 Time in 1 Post
|
Re: Progress - Tamiya Ferrari 312T3
Quote:
yes the TS8 is the errari red recommended for early cars. TS49 is for lots of modern cars/bikes as its a more flero / tv friendly colour. Rod. |
||
|
|
|
|
01-10-2006, 04:42 AM
|
#52 | |
|
AF Enthusiast
 
Join Date: May 2004
Location: UK
Posts: 824
Thanks: 0
Thanked 0 Times in 0 Posts
|
Re: Progress - Tamiya Ferrari 312T3
How did I miss this one?! Great work so far
 Have you seen the IndyCals decal sheet for this car? A vast improvement over Tamiya's offering: http://www.indycals.com/Decals/78Ferrari312T3.html |
|
|
|
|
|
01-10-2006, 05:13 PM
|
#53 | ||
|
AF Enthusiast
Thread starter
Join Date: May 2003
Location: Sunshine Coast, AUSTRALIA
Posts: 2,218
Thanks: 16
Thanked 8 Times in 8 Posts
|
Re: Re: Progress - Tamiya Ferrari 312T3
Quote:
__________________
Rob
|
||
|
|
|
|
01-10-2006, 10:58 PM
|
#54 | |
|
AF Newbie
Join Date: Jan 2006
Location: paris
Posts: 1
Thanks: 0
Thanked 0 Times in 0 Posts
|
Re: Progress - Tamiya Ferrari 312T3
Master Robrex,
1st time for me on this forum to follow your amazing build. For sure, most of what you're doing is far too advanced for my skills but i'm very eager to know how you're making those mesh air intake covers. Maybe i could get some inspiration from your lessons and hopefully improve my models. So please... |
|
|
|
|
|
01-12-2006, 03:34 AM
|
#55 | |
|
Authorized Vendor

Join Date: Oct 2005
Location: Vicenza - veneto de rassa
Posts: 3,910
Thanks: 6
Thanked 47 Times in 41 Posts
|
truly truly inspiring love's job
 some little question: -1 wheels nuts: milled or electronic switch nuts? I try purchase some but is too bigger. -2 vel. stacks grill (how to?  it's warformed styrene grid? awesome. it's warformed styrene grid? awesome.all the weork is awesome too, each time i move my eyes I discover new sweets! fantastic
__________________
 gio gio
|
|
|
|
|
|
01-13-2006, 02:05 AM
|
#56 | ||
|
AF Enthusiast
Thread starter
Join Date: May 2003
Location: Sunshine Coast, AUSTRALIA
Posts: 2,218
Thanks: 16
Thanked 8 Times in 8 Posts
|
Re: Progress - Tamiya Ferrari 312T3
Quote:
-2 I will make a 'how to' on the intake mesh....soon, I promise! I'm driving myself crazy trying to replicate the rivets on the chassis at the moment....3rd time in the paint stripper!!!! thankyou everyone for the encouragment and nice comments!
__________________
Rob
|
||
|
|
|
|
01-13-2006, 03:33 AM
|
#57 | |
|
AF Enthusiast
Join Date: Aug 2005
Location: where "sky grey" is a colour
Posts: 822
Thanks: 3
Thanked 32 Times in 29 Posts
|
That is very good stuff robrex.....again :-)
I'm happy to see your putting the photos to good use! For the tool to mount the wheelnuts: Take a plastic rod and drill it out to the wrench width size of your hex rod in the lathe. Then put the hex rod in the drill chuck and drive it into the plastic rod. That will make a nice internal hex shape and you have a plastic tool that doesn't scratch your wheel nut:-) Keep it on! In addition to the mesh cover tutorial i'd like to see one for the trumpets as well btw!!! Haven't figured out how best to make those yet:-) |
|
|
|
|
|
01-15-2006, 01:32 PM
|
#58 | |
|
AF Newbie
Join Date: Aug 2003
Posts: 53
Thanks: 0
Thanked 1 Time in 1 Post
|
Re: Progress - Tamiya Ferrari 312T3
I know this update is lacking a bit of explanation for work completed so if you have any questions just ask?
Great work. I too am interested in a how too regarding the intake trumpets, and also what you are using for the small scale exhaust pipe and clutch springs? Thanks |
|
|
|
|
|
01-22-2006, 01:37 AM
|
#59 | ||||
|
AF Enthusiast
Thread starter
Join Date: May 2003
Location: Sunshine Coast, AUSTRALIA
Posts: 2,218
Thanks: 16
Thanked 8 Times in 8 Posts
|
Re: Progress - Tamiya Ferrari 312T3
Quote:
Quote:
Quote:
 I just use the centre bit which has a nice bevel already perfect for the trumpets. Once done I made another tool with the correct curve and part each one off. I hope that helps? Moving on to the build update. The chassis was a real pain trying to get the right effect of both polished aluminium and also the rivets. First though, I seperated the side skirts from the chassis. 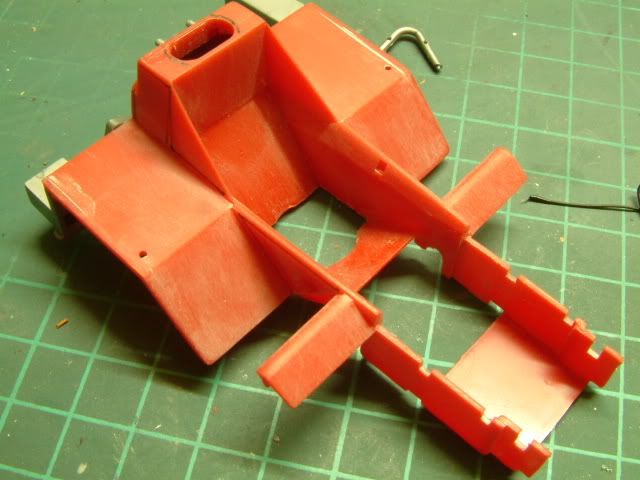 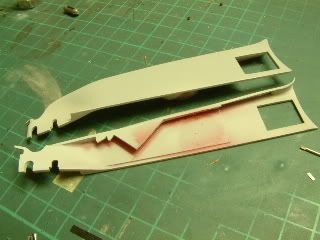 Next I primed the chassis and drilled the location holes for the numerous rivets!! (this was very time consuming!). I then individually glued glitter pieces in each location which was a great tip given to me by a local club member! He uses this technique to fantastic effect on military models! 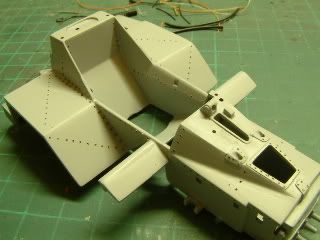 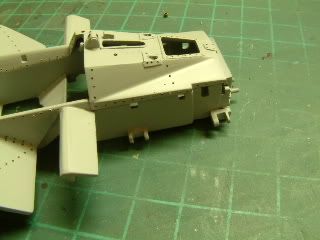 Finally I cut apart all the suspension components then started putting it all back together. The front brakes were given the treatment like the rear ones. 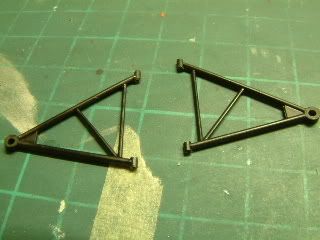 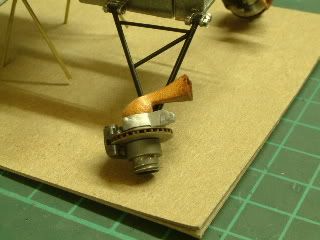 I covered the seat in MFH adhesive leather and put in the PP seat belts. 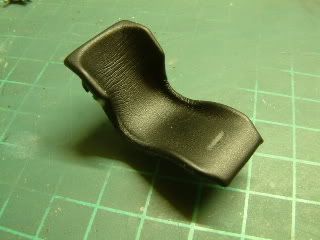 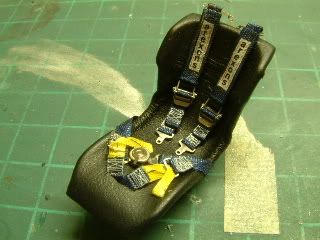 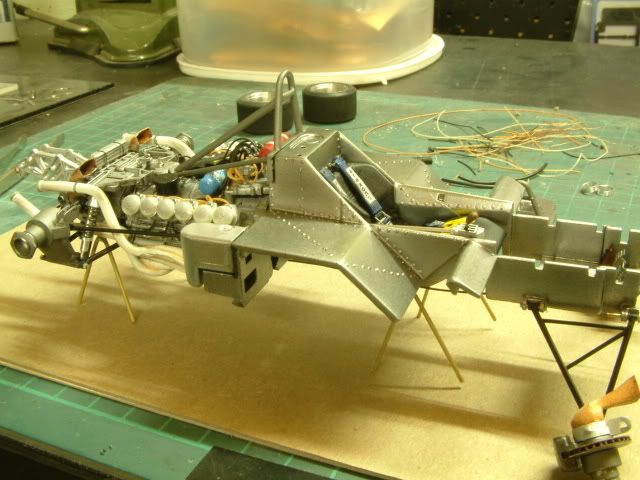 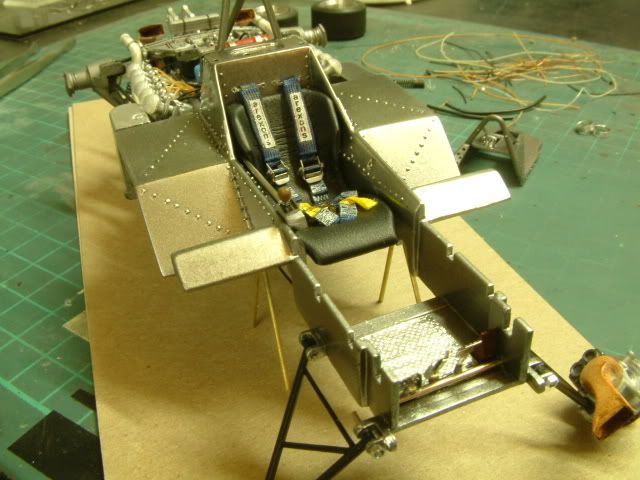 That's all for now Thanks
__________________
Rob
|
||||
|
|
|
|
01-22-2006, 02:00 AM
|
#60 | |
|
AF Enthusiast

Join Date: May 2005
Location: Canberra
Posts: 608
Thanks: 0
Thanked 39 Times in 38 Posts
|
Re: Progress - Tamiya Ferrari 312T3
Rob, everytime you post another update I think 'unbelievable it can not get better than this" then you go and post an even better one. You could stop right now with the car posed as if being built in the workshop and it would be incredible.
|
|
|
|
|
|
|
POST REPLY TO THIS THREAD |
 |
|
|


