|
|
| Search | Car Forums | Gallery | Articles | Helper | Air Dried Beef Dog Food | IgorSushko.com | Corporate |
|
|||||||
| WIP - Street Post topics for any "Works In Progress" street vehicles projects in this sub-forum. |
 |
 Show Printable Version | Show Printable Version |  Subscribe to this Thread
|
|
|
Thread Tools |
|
#32
 05-05-2006, 04:59 AM
|
||||
|
||||
|
Re: Topless Trio: 365GTS/4 Daytona
Beautiful, simply beautiful work on those details. Can't wait to see more.


|
|
#33
05-05-2006, 05:01 AM
|
||||
|
||||
|
Re: Topless Trio: 365GTS/4 Daytona
I don't want to be the one who complains Steve but Fram filters are orange
 I know, I sell them Fantastic work on letters, they look like real ones.
|
|
#34
05-05-2006, 05:11 AM
|
|||
|
|||
|
Re: Topless Trio: 365GTS/4 Daytona
Steve, many thanks for the explanation!
Paul
__________________
Paul  '67 Amazon 122S B20 o/d Estate & '61 A-H Sprite Mk2 948cc
|
|
#35
05-05-2006, 08:50 PM
|
||||
|
||||
|
Re: Topless Trio: 365GTS/4 Daytona
Hey klutz!!!!! AWESOME work! I have a question about the brake booster. Or rather the "plumbing" next to it. Did you use brass music wire or something else? I really like the looks.
Look forward to your next update! Chris
|
|
#36
05-05-2006, 11:33 PM
|
|||
|
|||
|
Re: Topless Trio: 365GTS/4 Daytona
When you said 6th build, you meant 6000th right? You have some serious skills. BTW where are the naked chics? Stupid Joke but it had to be made. Keep up the good work.
|
|
#37
05-06-2006, 01:47 AM
|
||||
|
||||
|
Re: Topless Trio: 365GTS/4 Daytona
Many thanks again,Gentlemen.
It's 7.30 Saturday morning an I am posting this while I am drinking my morning coffee sitting at a sidewalk table of a Paris cafe. Parked opposite me is a black Lotus Elite. It doesn't get much better than this at 7.30 a.m. Anyone want to join me and bullshit about modelling, the world cup or even world peace?  Sasa, I love you man!  I know they are orange. Would you believe me that even though I surely didn't get the color 100% (probably not even 80%) correct, the photo really distorted the color? Honest!! BTW, send me your company logo and I'll put a "Supplies by Sasa" decal on the next ones  The plumbing was done with 0,2 or 0,3 mm brass wrapping wire. There will actually be a foto of the spool in an upcoming post so you'll see it there. Thanks again and à bientôt! Euro Disney here I come!!
__________________
Guideline for happy modeling: Practice on scrap. Always try something new. Less is more. "I have a plan so cunning, you could put a tail on it and call it a weasel" - Edmund Blackadder
|
|
#38
05-06-2006, 01:52 AM
|
||||
|
||||
|
Re: Topless Trio: 365GTS/4 Daytona
Quote:
I just had my morning coffee in sunny Zagreb (does anyone know where it is ) and oposit of me I had 1988 Zastava Yugo in ...hmmm it was probably white before rust eat it up Man I would love to join you right now. Have a nice weekend.
|
|
#39
05-06-2006, 02:23 AM
|
||||
|
||||
|
Re: Topless Trio: 365GTS/4 Daytona
I'm in
 Thanks for the gentleman, as you know isn't appropriate in my case  Thanks for the breackfast in your thread, when you come back we'll have a dinner on mine BTW I'm having my coffee in (quetly) sunny vicenza an in my side I've my WIP rododendron and azaleas, luckly no crappy cars around  and I'm wondering Superklutz in his supersuit taking his coffe after a long nightly mission (Pigalle?). Have fun my friend. and I'm wondering Superklutz in his supersuit taking his coffe after a long nightly mission (Pigalle?). Have fun my friend.Quote:
__________________
 gio gio
|
|
#40
05-14-2006, 02:50 PM
|
||||
|
||||
|
Re: Topless Trio: 365GTS/4 Daytona
Thanks for your support so far.
Time to move inside the car. The Daytonas interior was never really very interesting or beautiful IMO - Enzos boys quite rightly concentrated their efforts into much more important areas such as 12 cylinder engines and a beautiful (again, my opinion) body shape. Also, this was a 70s car and the Daytona shows it! Boxy areas stuck together with sparse - dare I say haphazard? - placement of very utilitarian switches. I guess the leather work was its saving grace Fujimi do a pretty good job here but nowhere near the level they showed in the engine mechanicals so Im glad that I picked up the Acustion PE set, as this helped add some nice detail in a couple of areas. Overall the interior is giving me a lot of headaches not least because interior is my least favourite part of the process and it is going to be very visible in an open top. On top of that, I want to try and do something nice because Bad and Ugly surely will! The first thing I wanted to try was opening the air vents. There are 4 of them and they are big-time visible! I considered drilling them out and making new ones as MPWR did in his F50 but, as the song goes, you gotta know when to hold em and know when to fold em so I decided to try first to scribe away the plastic between the grills. If I f**ked up then I still had the other method in reserve although I dont know what I would have done if I screwed hat up too! My Hassegawa scribing tool, Try-tool scribers, miniature sanding sticks and lots of swear words and it got there. 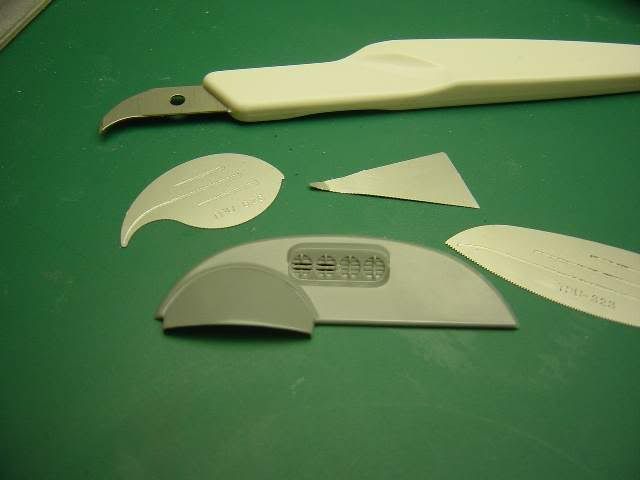 Next up was the dashboard. The Fujimi decals here are bloody awesome! sharp, detailed and well registered and the Acustion set includes a great PE fascia the only thing missing was glass .so I added it using clear plastic packaging. The basic strategy was to make a sandwich of styrene backing, decal with dials, clear part and then PE facia. First I transferred the basic shape to styrene. 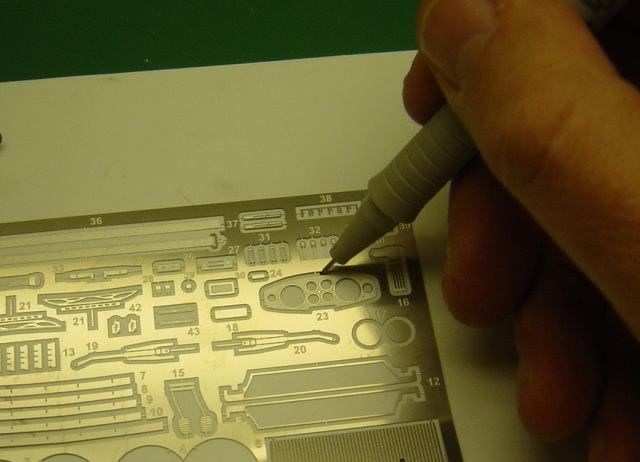 Next was to clean and prepare a piece of clear plastic and transfer the shape to this also.  The parts of the sandwich minus the decal  This is a test fit with decal and glass in place. This is actually hard to photograph well to get the true effect of the glass. 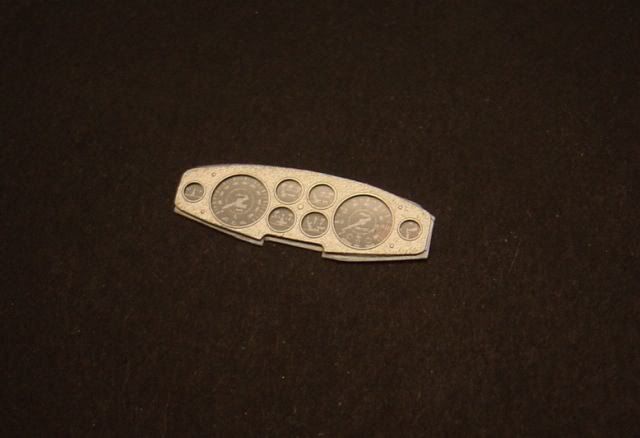 Completed dash with other PE parts attached. 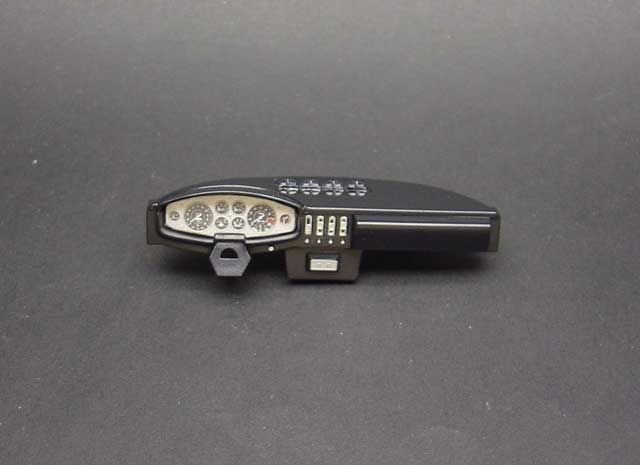 and the detailed centre panel 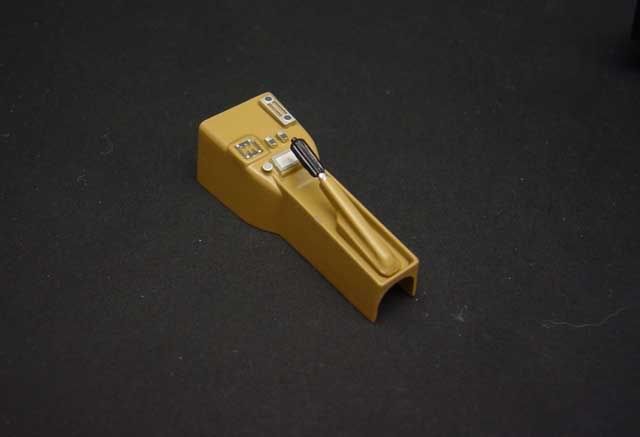 The Fujimi seats are probably one of worst parts in the kit relatively speaking with big pin marks in the back and questionable accuracy. Looking at reference pictures the seat itself seems to be "off" and the headrest is molded on. Changing the physical shape of the seat is something that Gio could do but not me so I decided to concentrate on detailing the headrests. This was my reference picture: 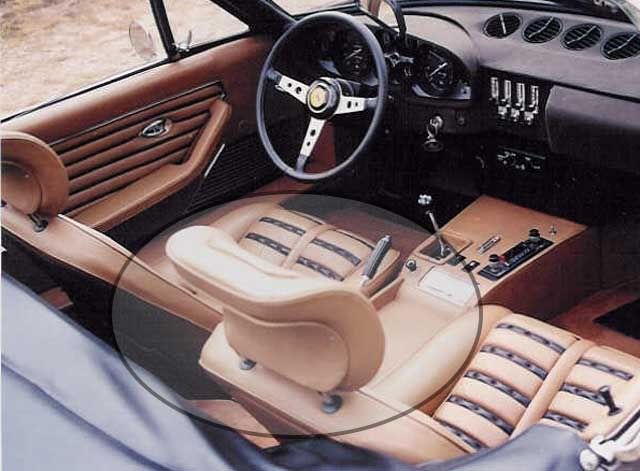 As you can maybe see, not only are the headrests on metal rods but there is also clearly a kind of double back to the headrest which I felt was worth trying to replicate. Here you can see the seat separated and primed. The second back was made by transferring a masking tape template to some sheet styrene, cutting it out and shaping it with warm fingers around a paintbrush handle (hi-tech or what?! ). Here are the same parts painted in XF dersert yellow and glossed over with Microscale satin (Vallejo satin is better than this stuff INHO!). The little white rings are slices of drilled out styrene rod which will be sharpie penned black and used to simulate the plastic washers on seat and headrest attachment points. 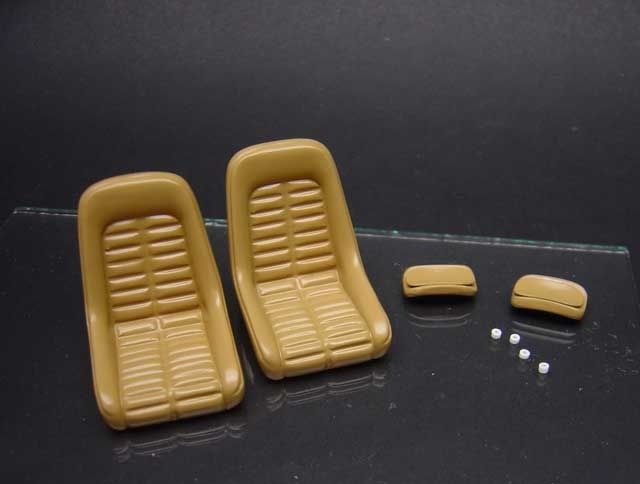 Finished seats. Still need to be washed and if I can source appropriate hardware, I will add seatbelts. 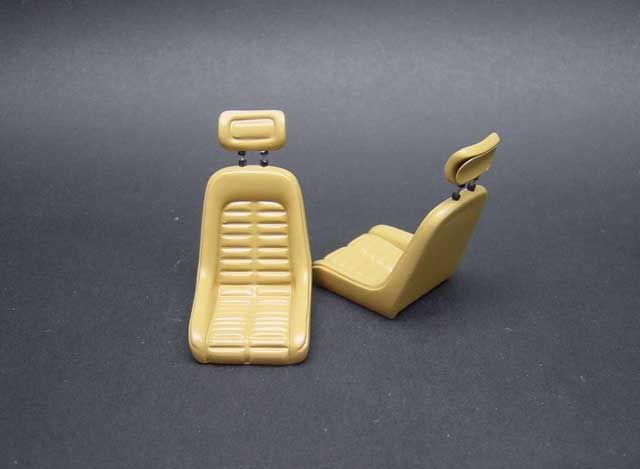 The interior was flocked using white glue method. It was after cursing about this that I had the idea to use double sided tape instead. Too late for this model but I applied the MPWR 1.1.3.0 upgrade to my flocking how-to to make some detailed floor mats. Note that the color of the mats is slightly different to the floor? This is almost certainly to the difference in color of the backing material worth noting if you ever think about flocking your models with this method. Make sure that the floor plan and mat backing are similar in color (unless you are using contrasting color scheme).  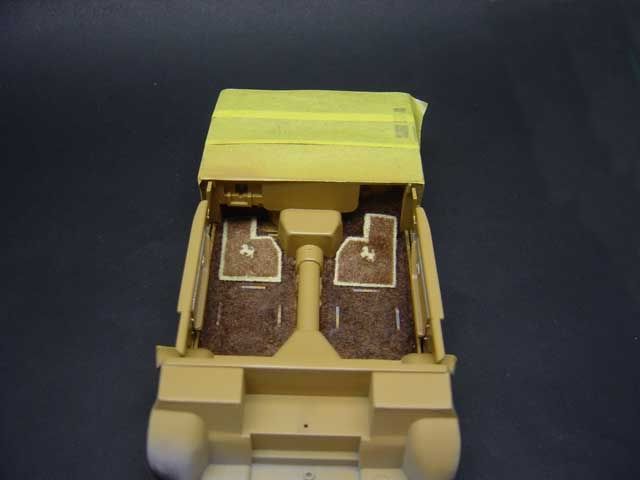 Door panels. The Fujimi parts are pretty faithful replicas of the original. This was my reference picture. 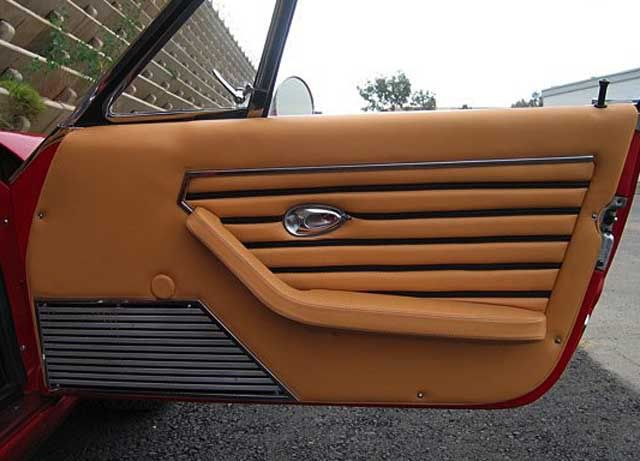 I assumed however that the round disc above the speaker grill is a blanking panel for a manual winding access point and I tried to replicate by using sheet styrene and my belt-hole puncher to cut out an appropriate disc. 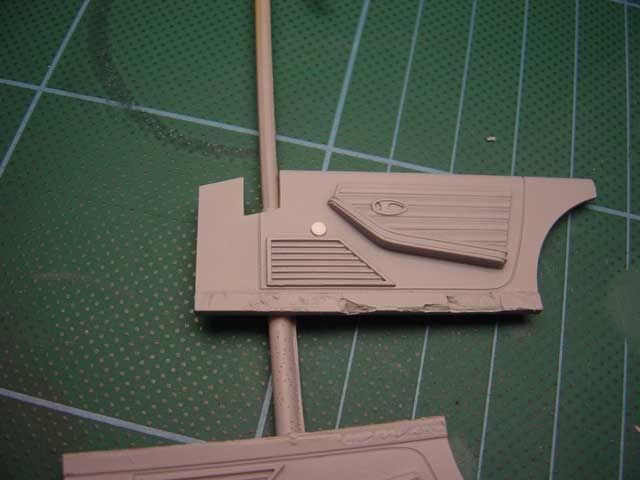 The panel was painted up, BMF applied and screw heads were made out of slices of thin solder and then detail painted with Humbrol Metalcote. BTW the massacre you can see at the bottom of the door panels comes from using too strong glue during test fitting grrrr! Fortunately, after reassembly this is not visible. 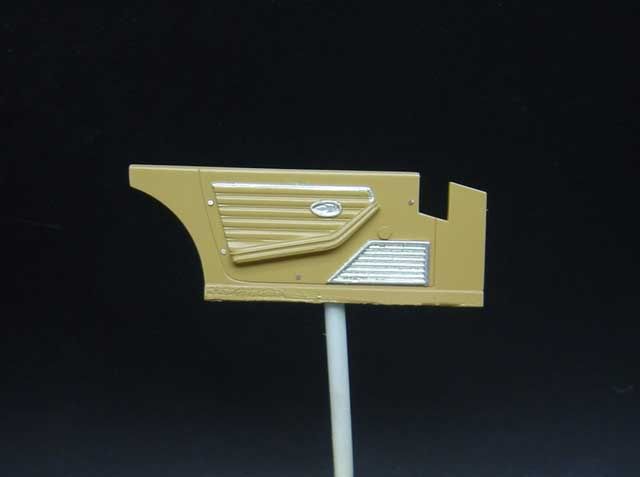 For and extra touch of detailing, I added door lock knobs. These actually work in as much that you can decide to have the locked down position or the open up position 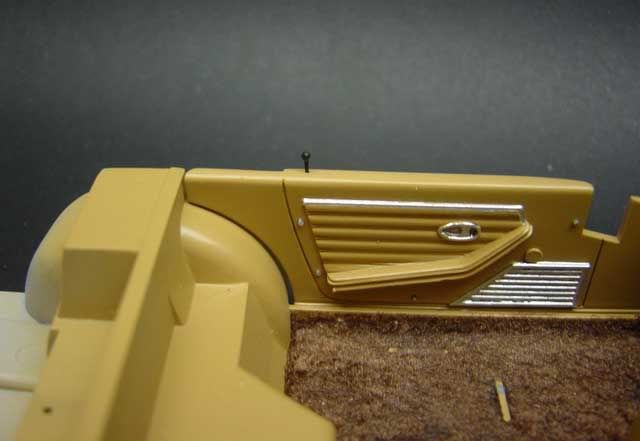 Still to do: Detailing the steering wheel, gear lever, seatbelts, soft roof, pedals etc. Thanks for looking and Id appreciate and advice on painting/shading the PE parts on the centre console. Just apply a wash? Use enamels? And BTW, I was too chicken to try and go for the 2-tone leather look   Stevenski
__________________
Guideline for happy modeling: Practice on scrap. Always try something new. Less is more. "I have a plan so cunning, you could put a tail on it and call it a weasel" - Edmund Blackadder
|
|
#42
05-15-2006, 03:01 AM
|
||||
|
||||
|
Re: Topless Trio: 365GTS/4 Daytona
holy spagetti westerns, batman!! the "good" guy is at his lab again! talk about an update. wow, you are doing some great top notch work here. the dash is a superb detailing lesson and came out great. what really caught me off guard was the excellent floormats. and you say you dont like doing interiors, wish I didnt like 'em either cause I would love mine to come out like this. super work, Dr. Klutz.
btw, who's hands are in the pics? they arent the hands of a modeller but those of a brain surgeon. lol. excellent work here, Steve.
__________________
  
|
|
#43
05-15-2006, 07:20 AM
|
|||
|
|||
|
Re: Topless Trio: 365GTS/4 Daytona
Amazing project, keep up the good work!
|
|
#44
05-15-2006, 09:56 AM
|
||||
|
||||
|
Re: Topless Trio: 365GTS/4 Daytona
Steve I find out the time to study well your job just now: amazing, I love the job on dashboard&consolle, you're still doing a masterpiece, great great job so far.
__________________
gio
|
|
|
POST REPLY TO THIS THREAD |
 |
|
|