|
|
| Search | Car Forums | Gallery | Articles | Helper | Air Dried Fresh Beef Dog Food | IgorSushko.com | Corporate |
|
|||||||
| WIP - Muscle Car / Hot Rod Post topics for any "Works In Progress" Muscle Car-Hot Rod vehicles projects in this sub-forum. |
 |
 Show Printable Version | Show Printable Version |  Subscribe to this Thread
|
|
|
Thread Tools |
|
#16
 01-09-2007, 11:46 AM
|
||||
|
||||
|
Re: 1969 Firebird 'mild' custom--bringing new life to an absolutely lousy kit
Indeed? I knew very little about the actual production of kits, other than the basic molding process. I didn't realize this kit was so old--my father might even have built it as a kid, when it was a new model of a hot new car! So, I guess I have to give AMT a break; it just seems that they present it as a little more than it really is, with a gaudy new box that makes it seem newer. As for getting a '68 Firebird from Revell--if I really loved this car and had bought it because it was so cool, well I would probably pull out all financial stops to make it perfect. But since it was a gift, and I just consider it a "fairly cool" muscle car, well... I won't ever compromise my modeling standards, so this will certainly be my best kit to date. My newest build always will be. But I'm not going to break the bank on it. Maybe just lose my mind...

__________________

|
|
#17
01-09-2007, 11:27 PM
|
||||
|
||||
|
Re: 1969 Firebird 'mild' custom--bringing new life to an absolutely lousy kit
Believe it, 924, AMT's been producing kits since the 50's!
You see, for year's AMT (and their direct competitors Johan and MPC) made their bread and butter with so-called "Annual" kits. These were basic kits of the hot cars of the new model year, that were released every year (the annual period stretches from about 1959 until 1980). These kits were all remarkably similar, with metal axles, simplified engine bays (and no engine bays in the beginning), shallow interiors, but really nice bodies, and there's a reason for that. During that same period, it was customary at dealerships to hand out to potential buyers built promotional models of the car they just drove. AMT, Johan, and MPC were all top producers of these "promos", and to make a further bit of money off the molds, they produced simple kits out of them. AMT did have a premium model range that was better detailed called the "Trophy Series" that debuted in the late 50's to compete with the better detailed premium Revell kits, and also cash in on the customizing trend. These kits had opening doors and/or trunks, tons of options, and lots of spare parts. Some of AMT's most celebrated kits, their 1949 Mercury, 1958 Chevy Impala, 1953 Studebaker Starliner, and 1940 Ford Coupe all came out of the Trophy Series. It really wasn't until the late 80's that AMT started producing kits with an emphasis on accuracy and detail on a regular basis. This trend really started with their 1966 Chevy Nova and was led by their tooling department head John Mueller, whose tenure ended in the early 2000's (the last kit his team tooled up was AMT/Ertl's 1961 Ford Thunderbird Sports Roadster). However, when Racing Champions purchased Ertl, they downsized the entire tooling department, including John Mueller - who then went to Polar Lights to head up development of the 1965 Coronet and 1964 GTO kits - and proceeded to churn out crap like the Fast & the Furious kits and their hopelessly inaccurate Escalade EXT. So now you know all the faces of AMT. Simple outdated annual kits. Fun but long in the tooth Trophy Series kits. Beautiful John Mueller kits. And steaming turds from Racing Champions. Hopefully, though, now that Racing Champions has absorbed Playing Mantis (Polar Lights' parent company) this means that John Mueller is now in the tooling department again and all is right with the universe.
__________________
Proud Owner/Operator of Haven Raceway and Hobby!
|
|
#18
01-10-2007, 12:02 PM
|
||||
|
||||
|
Re: 1969 Firebird 'mild' custom--bringing new life to an absolutely lousy kit
I knew AMT (Aluminum Model Toys) was old; I also knew about the promo models--my dad had two, since his grandfather worked at one of the earliest dealerships in my area. I'm guessing that models like the 1962 Chevy Impala (which shows the side view of the kit on a sort of grid on the box side), is one of the good older kits from the 80's--at least I think it is good. Also nice is a considerably newer kit, the 1996 Firebird. However, I have some of the newer kits which are crap as well. I tend to stick with Revell if possible for American kits, but they have their junk as well...
__________________
|
|
#19
01-10-2007, 08:43 PM
|
||||
|
||||
|
Re: 1969 Firebird 'mild' custom--bringing new life to an absolutely lousy kit
All right, an engine update--and the unveiling of my current scratchbuilding masterpiece
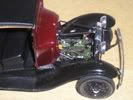
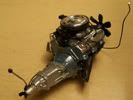
 Here is another look at the not-so-great fitting engine. As I have been informed, this is an old kit, so I can't really bash on AMT anymore (darn, it was kind of fun  ), but I will state factually that the oil pan doesn't fit at all. See for yourself: ), but I will state factually that the oil pan doesn't fit at all. See for yourself: Fortunately, a little Tamiya Basic putty fixed this problem.  Remember last time when I showed you this uninspiring part which, sadly, does not resemble a Firebird front cover/water pump? 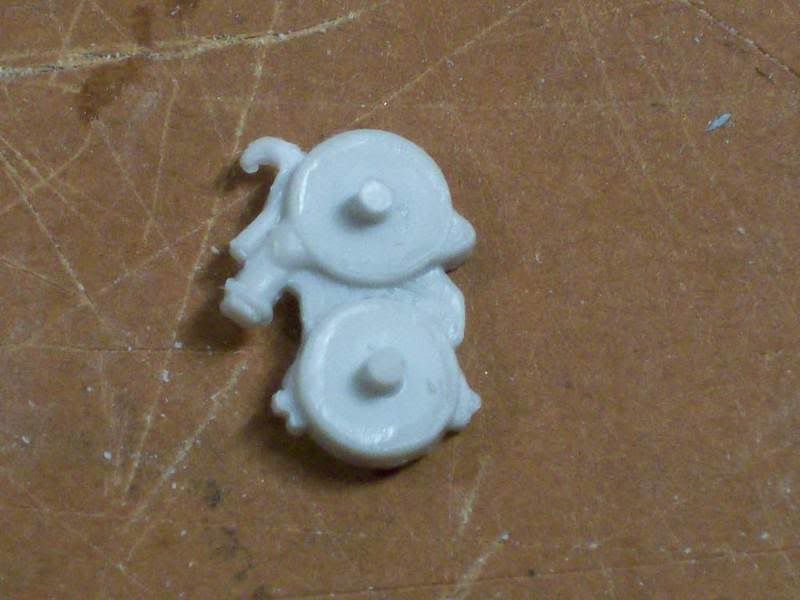 Well, here's what I did about it. This was a learning process in itself; therefore, these parts aren't entirely accurate. But what you can see when I am done is pretty much right. First, I scratched a new timing cover. This is one of the inaccurate parts--I used a large catalog as reference for this, and built a Chevy small-block timing cover. Pontiac covers, however, are cast with the engine, and therefore don't have the bolts that I put on. But they look really cool anyway.   The bolt heads are just .010" sheet plastic cut in a hex shape. Here is the beginning of the water pump.  After my auto-enthusiast father informed me about the way Pontiac motors are made, I put the parts on like this:  I removed my upper bolt-heads (although the lower ones should be gone too) and put the water pump passages on--according to Dad, these were cast together with the front cover in one big panel. As yet, I still haven't removed the bolt heads, but I'll probably do that before painting. They weren't too hard to make, so I think I can bear to remove them Quite a bit more scratchbuilding later, I got this as a result. I was pleased.   The little loop is the lift eye; I used sheet plastic for the bolt "bosses" (the ridges where the bolts go through) and contoured them to the water pump surface with a file. The bolt heads are more styrene. The brown thing sticking out at the bottom left in the first picture is a piece of copper wire to which the radiator hose will attach. While stuff dried, I started messing with the cylinder heads. Here are the spark plug holes:  I also added these details (bolt holes and a round indent) after I noticed them on the end of the right head in a reference picture. I'm not sure about the left head, so I didn't touch it; besides, the alternator hides it.  Here are the heads installed, and the start of my water pump drive sprocket.  I finished the water pump (except for the pulley) with the strength ribs around the sprocket. A fine piece of work--much better than that flat, detail-free part that AMT provided!  The transmission was my next target, while I gathered (and continue to gather) ambition to build some pulleys.  It's times like these when I really envy people like MPWR, with his lathe--usually I just find his parts very realistic, but somewhat unneccessary--but in this case, it would make life much, much easier. Oh well, I'll just have to exercise my plastic-working skills on this one. Anyway, the gearbox. It's times like these when I really envy people like MPWR, with his lathe--usually I just find his parts very realistic, but somewhat unneccessary--but in this case, it would make life much, much easier. Oh well, I'll just have to exercise my plastic-working skills on this one. Anyway, the gearbox.For those who were a little annoyed by my bashing of AMT, I'll give them credit for this one--the transmission is quite realistic and detailed. But that doesn't mean I'll leave it alone  . Here are the kit parts. . Here are the kit parts.I removed the molded-on shift levers and drilled some holes. I plan to add shift linkage--just haven't got around to it yet. Here are the parts together: I also plan to build the shifter mount and stick the shifter right through the floor pan, as on a real car. Here is the kit console.  Here's my cut-out hole. I know it's rough, but it will be covered by the shift boot, so no worries. You won't see it.  Anyway, I was doing some test fitting, and I discovered that, for some strange reason, the transmission is considerably too short!  The shifter comes down on the driveshaft, not the transmission tailshaft. Clearly, this would not do. My first revision was to add some material to lengthen the tailshaft. The shifter comes down on the driveshaft, not the transmission tailshaft. Clearly, this would not do. My first revision was to add some material to lengthen the tailshaft.Next, I added a spacer to the backside of the transmission. This is before putty/filing. Here is the completed tranny--well, complete except for shift linkage and shifter assembly. So, not complete at all. But long enough.  Now, for the part I'm all excited about. Usually, when I scratchbuild, I'm never quite satisfied. I can always see details I missed or simply didn't have the capacity to build, or I don't feel that the part is realistic enough. Even my best efforts to date are generally just "good" or perhaps "great" in my eyes, but never "perfect." Until now. Here is the carburetor AMT provides in the kit. Not good, but not bad either; it has a fair level of detail. However, that detail is not accurate, and the carburetor is generally a kind of blob.  I planned to add linkage, choke, and other details to it anyway, and upon seeing what I was given, I thought... "Maybe I can just build a new carburetor. After all, I have that old Rochester Quadrajet laying here. It would make a good reference, since it was used on cars like these." So I grabbed my metric ruler, Exacto knife, mechanical pencil, and styrene, and set to work making a new carb for the old 'Bird. First, I made the baseplate (three pieces of plastic).  Next up was the main body.  Then, the top plate:  Now that the core of the carburetor was complete, I started the peripheral details, such as the choke/linkage:  After seeing how well this was going, I decided to make the air cleaner removable, so that one could see the detailed carburetor after the model was complete. So, I added a rod for mounting the air cleaner (it will be shortened after I modify the cleaner and know exactly how it will sit), and some top details--the choke and air flaps (and some bolts). You can also see the fuel filter housing and the large fuel line nut.  Here is the other side, showing the throttle levers.  All the rods are .13mm (or should that be ,13mm? I'm not sure) wire (it is silver colored, and I don't know if it's silver or aluminum. It was once part of the braided material in a TV Coax cable). Up to this point, I was pleased with the carburetor. It looked realistic (and I should certainly hope so, since I was building it directly from the real thing). But when I added paint, I went from pleased to downright delighted. I was amazed at how realistic this looks! I hope you feel the same way.  The paint is a mix of Testors steel and gold enamels, to replicate the brownish anodized coating these carburetors had. The base plate is supposed to be bare aluminum, but after years of use, it turned a steel color, so I painted it steel as well. Also steel is the main flap on top, the throttle lever, and the fuel line nut.   I hope you agree with me that this is really a great part--I'm sure you can see how excited I am about it. It's my current masterpiece--the one I would post as my signature if I could get a smaller version of the picture...  I guess I could try cropping, and hope it would be small enough. I guess I could try cropping, and hope it would be small enough.Anyway, there's the new carb. I'm sure it will look great in this classic car's roomy engine bay. A few more details for this post--first, the alternator. I don't know if was an alternator or still a generator, but one way or the other, the kit part is mediocre.  I'm not sure what that extra piece sticking out the back is, but it needed to go. I also tried to scribe some lines in to replicate the cooling vents. Not very convincing, but oh well. Before I go on I will strip the chrome.  Sorry if the picture seems a little pixelated. My "cool new camera" doesn't have as great of a Macro as I thought, so I had to zoom in pretty far to get it to focus while still being able to see the part. Maybe it's just batteries--it seemed to work better before. Here is the distributor. I'm sure you can see how it used to look, so this is after my modifications. I added the shaft housing (which is also how it mounts), the vacuum advance/retard servo, and of course drilled holes for plug wires.  And, a peek at what might be posted next time: the kit intake manifold. All I can say is that it needs some detailing . Thanks for looking! I'm starting to like this car (not necessarily this model, though  ), so I'm excited to make it come to LIFE!! (Figuratively speaking, of course). Comments and criticism/suggestions/information from knowledgeable people welcome--nay, encouraged--as usual. ), so I'm excited to make it come to LIFE!! (Figuratively speaking, of course). Comments and criticism/suggestions/information from knowledgeable people welcome--nay, encouraged--as usual.Alex
__________________
|
|
#20
01-10-2007, 09:21 PM
|
|||
|
|||
|
Re: 1969 Firebird 'mild' custom--bringing new life to an absolutely lousy kit
You are doing a great job with your scratch building. The timing chain cover and water pump turned out awsome. I was wondering why you went with the chevy set up and not the pontiac. I like the idea of a removable air cleaner to show off that rochester. A job like that needs to seen, not hidden. I'm learning a lot about scratch building just by looking at your pictures, keep 'em commin'.
|
|
#21
01-10-2007, 09:30 PM
|
||||
|
||||
|
Re: 1969 Firebird 'mild' custom--bringing new life to an absolutely lousy kit
Man that's a heck of a lot of work for the carburetor--I would've just used one from another kit

__________________
   
|
|
#22
01-15-2007, 11:23 AM
|
|||
|
|||
|
Re: 1969 Firebird 'mild' custom--bringing new life to an absolutely lousy kit
Awesome work! I am stunned by your scratchbuilding. Great work!
__________________
It ain't cool 'till your wife hates it. Imagine a world without Alabama Recent builds: Rocket Bunny FR-S and stock BRZ Toyota bB Bro-style Civic K20 powered SiR converted EK WIP I build slowly and poorly. 
|
|
#23
01-15-2007, 12:15 PM
|
||||
|
||||
|
Re: 1969 Firebird 'mild' custom--bringing new life to an absolutely lousy kit
great work!
__________________
My name is Russell, feel free to use it. I'd rather be hated for Who I Am than be loved for Who I Am Not
|
|
#25
01-22-2007, 09:37 PM
|
||||
|
||||
|
Re: 1969 Firebird 'mild' custom--bringing new life to an absolutely lousy kit
Well, I'm back after a long reprieve of being busy. But I do have a little work to show. Still no paint, but hey, first things first!
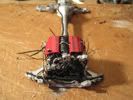
I tackled the pulleys that I was whining about last time. Here is the harmonic balancer, that goes behind the crank pulley:  And here it is, installed on its crankshaft.  You'll notice that I removed those bolts from the timing cover, making it truly cast-on-looking. Here is my crankshaft pulley. As I have discovered, the shaft is too short; the pulley sits too close to the engine. So, I'll probably glue a spacer onto the back of the pulley. Many crank pulleys have a center that is set away from the belt surface by three little metal legs, but I didn't want to get too complicated, or make the pulley sit too far away. Still needs a little work, but here's the current stuff.  And, the water pump pulley. I know it looks like a blob, but it's actually quite precise. A little paint will help; it's hollow, though, just like a real one. The tapered center part is a curved piece of .010" sheet plastic, rolled into a cone-like tube.  Here is the water pump pulley mounting shaft. Not great, but completely invisible when the pulley is on.  Next, I tackled the air cleaner. I decided not to do the Ram-Air, so it's just a regular style air cleaner. But this is what AMT has--an open-element, custom style air cleaner.  I considered building the air intake tube, covering the pleated part of the filter, and doing some detailing, but then I found this in my spares:  It's from a 1970 Monte Carlo. It's almost just like the factory Pontiac part. First, I ground off the existing carb mount and put a flat circle of plastic over the ground-up mess, then built a little carb mount that sits perfectly on my scratchbuilt carb.  Then, I added a strip of plastic around the edge (the Pontiac part has such a metal lip) and moved the heat tube valve. I also hollowed out the intake tube end.  Moving on to the intake manifold I showed last time, I removed the solid pieces of plastic and opened it up a bit. I also drilled a hole toward the front for the coolant-operated vacuum switch.  AMT kindly failed to include an oil filter, so I built this simple flat mount. Looking at a real 1967 'Bird in my Dad's shop, I saw a similar part. I don't know how accurate it is; since it's not too late to change, anyone who knows differently should definitely let me know.  I also added the missing oil pan bolts from where I sawed off that bad starter. The three bolts at the bottom left are the ones I added (from .010" sheet plastic).  I also added and integrated (with putty) these four tranny flange mounts. This is where the transmission bolts to the engine in the real car. The putty looks globby, but it's really sanded/filed to shape. Paint will fix the look. As I fiddled around, I discovered something else: the pin for mounting the engine is in the wrong place! The engine sits a scale 6 inches too far forward in the bay! (Probably part of my tranny problem). Removing the pin and sliding the engine to the proper place posed a couple of problems--the first were these pins (which shouldn't have been there anyway).  I cut them off. Then, the tranny tunnel that I had built turned out to be still too shallow. I redid it.  I also discovered that part of my fit problems were in the fact that the tranny tailshaft was too high up. I cut off a bit of tranny and moved the tailshaft more toward the middle, lined up with the crankshaft.  I also found out that the subframe rails that I added were interfering with my firewall. Notches fixed that.  Looking at my chassis, I realized that I'd never photographed these: the little, triangular upper A-arm mounts. (The A-arms mount at an angle off horizontal, so these are for one side of the arm).  Looking at my reference photos, I saw that these needed to be added around the upper A-arm slots: I made arches of plastic, then integrated them with putty.  My photoetch kit arrived! This is for the 1968 Firebird (there is no kit for the '69), but it has the necessary Firebird scripts and emblems, "400" emblems, keys, keyrings, window cranks, brake release lever, pedals, mirror, wire looms, radio and heater control faces, vents, and front Pontiac emblem. Also included are some gauges; the speedometer and tachometer will work for this model.  Back to the radiator core support. I also discovered that it mounts way too far forward, so I test-fitted it in the proper location, closer to the fenders. One nice thing about this kit is that there is really no difficulty involved in moving the entire engine or radiator around. There's just plenty of free space to do it. It fits fine, except for those same subframe rails. I notched it, just like the firewall. Also note the little tab that remains on one side. I already cut one off; I just left the other one long enough to show you that it was there. Odd and unneccessary.  And, my final installation for the day: the battery (only because it mounts on the core support). I forgot to photograph it before modifiying, so here is what I removed: It was unrealistically tall.  Thanks again for looking! Hopefully I'll get some more exciting, more colorful pictures soon. I'm starting to overcome this kit Alex
__________________
Last edited by 924_CarreraGTS; 01-01-2008 at 08:35 PM.
|
|
#26
01-23-2007, 10:15 AM
|
|||
|
|||
|
Re: 1969 Firebird 'mild' custom--bringing new life to an absolutely lousy kit
I'm very impressed with you attention to detail and referencing a real firebird. Everything I see so far is very correct except for the timing chain cover, which you already stated is a chevy style and not very correct.
 You still have a ton of work ahead of you and I can't wait to see what you come up with next. I have several firebird models and was never able to find a photo etch kit but now I know they are out there somewhere. Looks like I have some unfinished detailing to do. You still have a ton of work ahead of you and I can't wait to see what you come up with next. I have several firebird models and was never able to find a photo etch kit but now I know they are out there somewhere. Looks like I have some unfinished detailing to do. Keep up the good work. Keep up the good work.
|
|
#27
01-23-2007, 03:06 PM
|
||||
|
||||
|
Re: 1969 Firebird 'mild' custom--bringing new life to an absolutely lousy kit
The photoetch kit is by Model Car Garage. I bought it from the website www.scaledreams.com. This site seems odd, because it requires you to manually enter the part number and price (there is no "Add to Cart" feature), and then figure shipping and the total, but I have bought several things from there without a problem, and the shipping is very fast!
__________________
|
|
#28
01-24-2007, 02:26 PM
|
||||
|
||||
|
Re: 1969 Firebird 'mild' custom--bringing new life to an absolutely lousy kit
OK, this is an important question from the builder. What spoiler did the stock Firebird 400 have? Was it the ducktail type? (If so, I will have to scratch build one, as the kit part is no good), or is it the deck type used on the Trans Am? The kit includes a good representation of this spoiler. Was it an option on the stock car? I have seen pictures of a non-Trans Am with this spoiler, so I think it might be.
Also, where is the voltage regulator located? All the pictures I have show it on the firewall, but the 1967 Firebird that I looked at had it on the radiator core support. Did Pontiac move it for '69? Or was the '67 screwed up (this particular car had been messed with). Or, am I looking at the pictures wrong? Where is it?? Any answer to these questions would be nice ASAP because I am primering tonight, hopefully, and need the spoiler. Thanks. Alex
__________________
|
|
#29
01-24-2007, 02:48 PM
|
||||
|
||||
|
Re: 1969 Firebird 'mild' custom--bringing new life to an absolutely lousy kit
Quote:
__________________
|
|
#30
01-24-2007, 03:02 PM
|
|||
|
|||
|
Re: 1969 Firebird 'mild' custom--bringing new life to an absolutely lousy kit
Quote:
 The firebird had an option of the ducktail spoiler. The trans am had the deck spoiler that was standard. The firebird had an option of the ducktail spoiler. The trans am had the deck spoiler that was standard.According to my '68 pontiac service manual the voltage regulator is located on the driver side of the core support at the top.
|
|
|
POST REPLY TO THIS THREAD |
 |
|
|


