|
|
| Search | Car Forums | Gallery | Articles | Helper | Air Dried Fresh Beef Dog Food | IgorSushko.com | Corporate |
|
|||||||
| WIP - Motorsports Post topics for any "Work In Process" motorsports vehicles in this sub-forum. |
 |
 Show Printable Version | Show Printable Version |  Subscribe to this Thread
|
|
|
Thread Tools |
|
#137
 07-23-2003, 07:52 PM
|
|||
|
|||
|
Phil, the interior is stunning.
 Have a hundred questions for you though  What did you use to make the tie-down for the spare tire? All the fittings on the tunnel, which ones are actually kit and which ones are after market/ home made. For the after market ones, which manufacturer's items did you use? Thanks. Ray
__________________

|
|
#138
07-23-2003, 09:42 PM
|
||||
|
||||
|
Quote:
All the stuff on the centre tunnel is kit parts with the exception of the mobile phone. Just added some wiring (elastic actually) with a bit of detail painting and drybrushing. I built up the join between connector and wire with glue and paint to represent the rubber sealing grommet. The spare wheel straps are painted newspaper, I usually use Tamiya tape (as I did with the seat belts) but the strap had to double back on itself so needed to be painted on both sides. The centre ring is a PE part off the S27 Lancer set intended for the bonnet pins. The ratchet/tensioning/locking thingy-ma-jig (can't remember what it's called  - it's on the tip of my tongue!) is pieced together out of leftover PE bits from an M&A Corolla and 2000 template set. Looks a big improvement over my previous attempts to model the tiedowns, if I do say so myself. - it's on the tip of my tongue!) is pieced together out of leftover PE bits from an M&A Corolla and 2000 template set. Looks a big improvement over my previous attempts to model the tiedowns, if I do say so myself.Still raining 
|
|
#140
07-24-2003, 12:09 AM
|
||||
|
||||
|
Back again, is good to be home from work modeling
 Found a problem when I test fitted the body to the chassis. Namely very large gaps visible in the wheel wells. Ive not seen a Tamiya kit as bad in this area before. Probably made worse by my raising of the suspension, at tarmac height it would be less noticeable. So I had to find a way of fill the gap in. Ive seen may people do this on AF and elsewhere by making an insert for the wheel well, so decided to give it a try. Made them up and test fitted them to a second Evo VII bodyshell I have. Here are the prototype inserts for the front 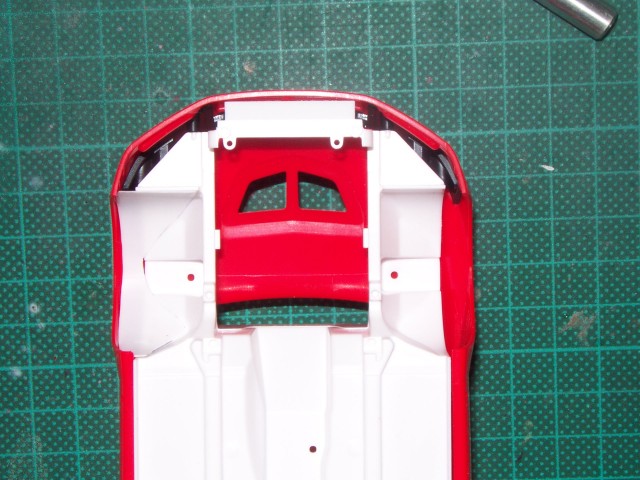 and rear  Here is the difference it makes. First the front, looking back without the mask  and with.  Next the rear without  and with.  If anybody building an Evo VII would like a copy of the templates for the wheel arch inserts let me know and Ill scan them.
|
|
#141
07-24-2003, 12:29 AM
|
|||
|
|||
 Wow, that's one nice evo. Could you give me a link for that yellow carbon fiber? I was thinking about doing a rally car, but then I looked at your's and now I'm going to do one for shure. I might do the lancer too but I am a suby freak so, I'm thinking of doing the subaru 01 wrc. Wow, that's one nice evo. Could you give me a link for that yellow carbon fiber? I was thinking about doing a rally car, but then I looked at your's and now I'm going to do one for shure. I might do the lancer too but I am a suby freak so, I'm thinking of doing the subaru 01 wrc.
__________________
Current project: Nissan Skyline GT-R V-spec II "Speed costs money, how fast do you want to go?"
|
|
#142
07-24-2003, 06:12 AM
|
||||
|
||||
|
Quote:
You could also try Scale Motorsports Kevlar which has an even more detailed pattern.
|
|
#143
07-24-2003, 05:00 PM
|
||||
|
||||
|
Thats is looking amazing. Its the best rally I have seen, period.
__________________
Ryan If your new to the AF modeling forum please read this : AF modeling FAQ Current Project: Tamiya Porsche Boxster Special Edition
|
|
#144
07-24-2003, 09:42 PM
|
||||
|
||||
|
Here is the scan of the wheel arch inserts.
 They're probably not needed if the original ride height and tarmac wheel/tyres are stuck with. Make two mirrior images for left and right. Fit them after the chassis has been fitted into the bodyshell. Will need some CA glue or strong double sided tape to hold in place. Mika's Lancer is now finished. Completed pictures here
|
| ||||||||||||||||||||||||||||||||||||||
|
POST REPLY TO THIS THREAD |
 |
|
|


