|
|
| Search | Car Forums | Gallery | Articles | Helper | Air Dried Fresh Beef Dog Food | IgorSushko.com | Corporate |
|
|||||||
| WIP - Street Post topics for any "Works In Progress" street vehicles projects in this sub-forum. |
 |
 Show Printable Version | Show Printable Version |  Subscribe to this Thread
|
|
|
Thread Tools |
|
#92
 09-05-2013, 12:11 PM
|
||||
|
||||
|
Re: Ferrari 288GTO Revell + Fujimi 2 in one 1/24
So sorry! Long time no see... I'm still alive. ...Ha? You don't care about me but only worrying about GTO...? Yes, it's still ongoing.
Today's post is about the seats. 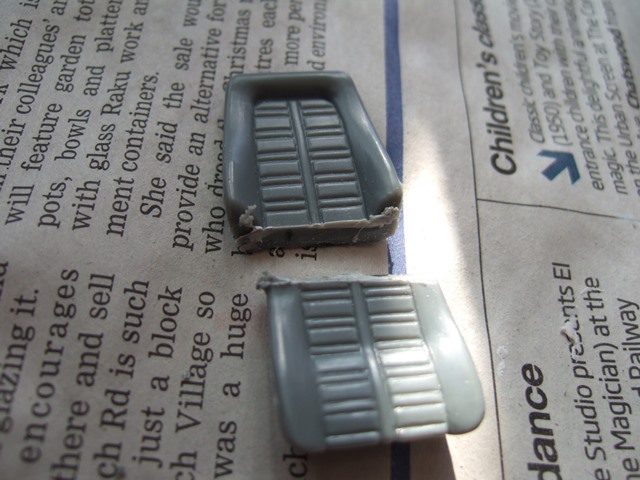 I prefer the side curve of Fujimi's than Revell's, but both sheets were not sexy enough. I cut Fujimi's seat in two... 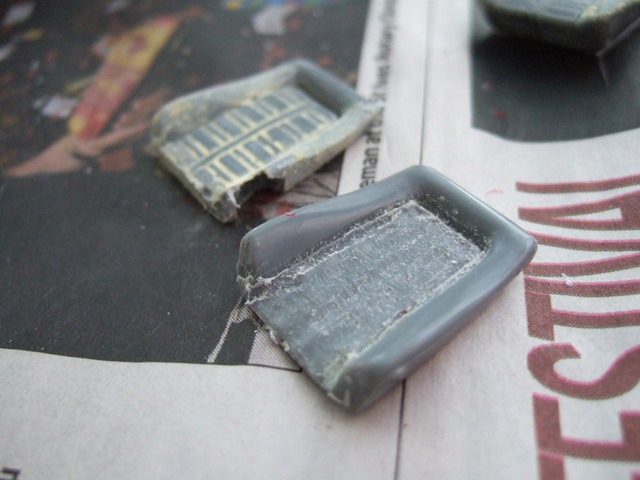 Then dug it. Don't care what you can see over there with crack. I dug the hole and put a magnet to hold the door, but the plan was cancelled for some reason. 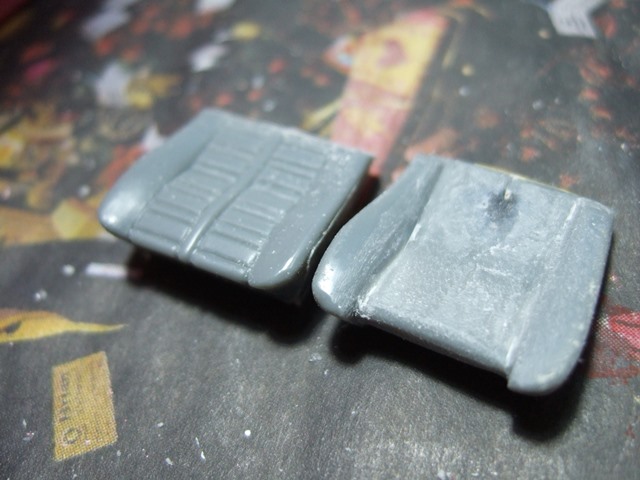 Lower too, I dug.  Centre part was from 0.5 plastic paper, bended in hot water. 8 cells were drawn by pencil, .You can easily draw them freehand.  Ever Green's 1.5mm half round was just fit!! Thanks for making it easier! 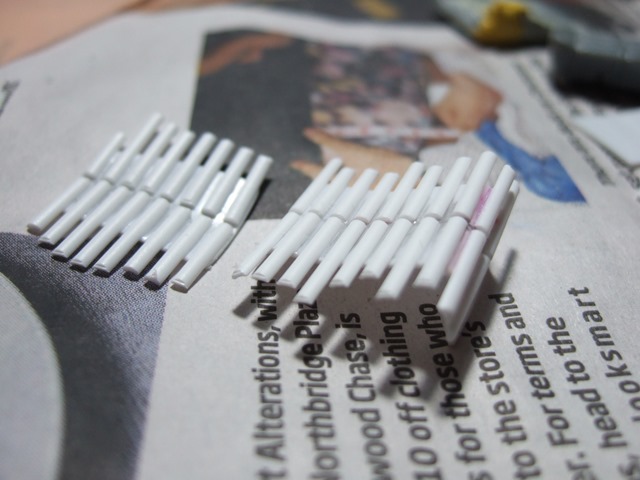 Looked like money bugs. 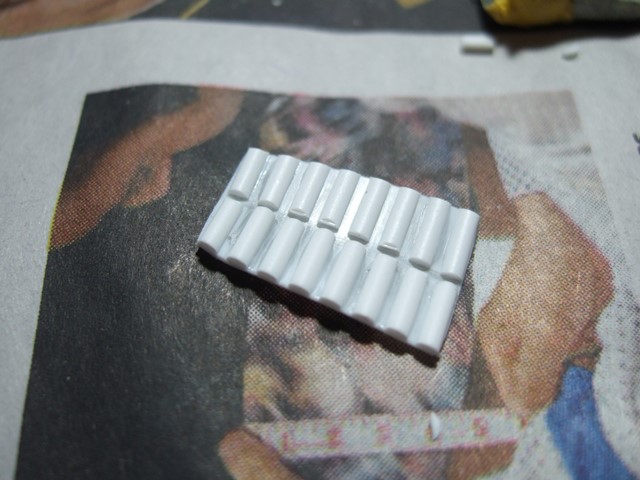 Then both sides were cut. Still a bit too much rounded. 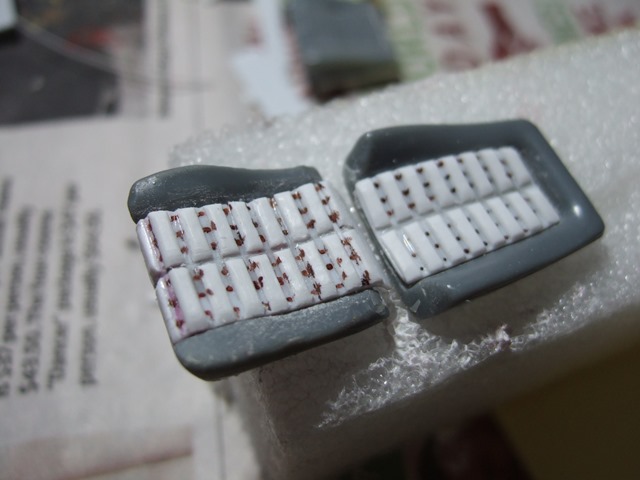 Top of cells were sanded, and the grommet were marked and drilled (0.5mm) later.  I used Nitto's insulating tape for black ribbons. It shows good textures! (I can say it doesn't has to be Nitto's). 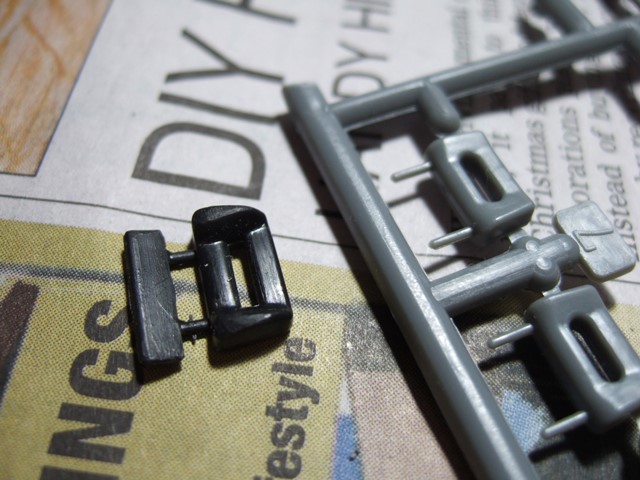 Only the head rests were from Revell's box (on the left). Fujimi's; on the right, were not sexy at all... 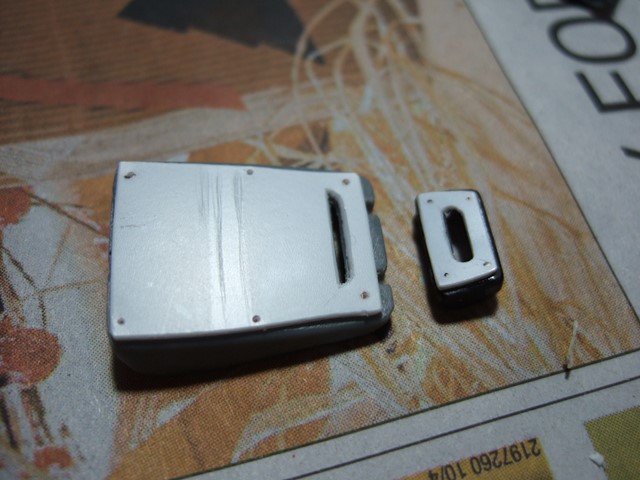 The back panels were from 0.5mm plastic papers.  The seam lines were 0.3mm plastic strings, adhered by normal plastic glue. 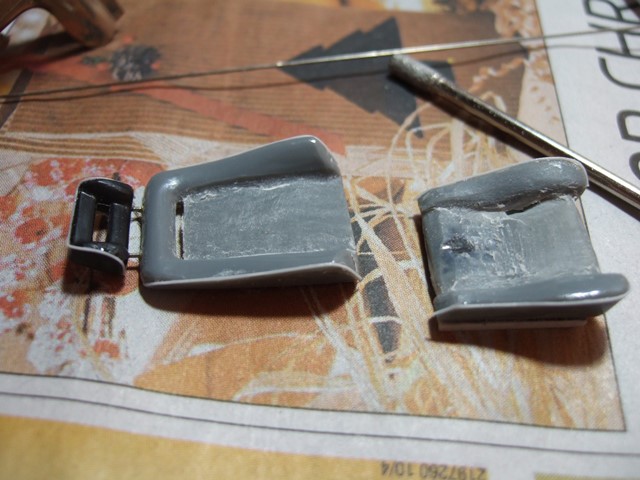 Head rests were jointed by 0.3mm brass rods. Middle of the seats were dug deeper fitting the centre parts.  Centre parts were painted in flat red. The surfacers were applied on outer ones. 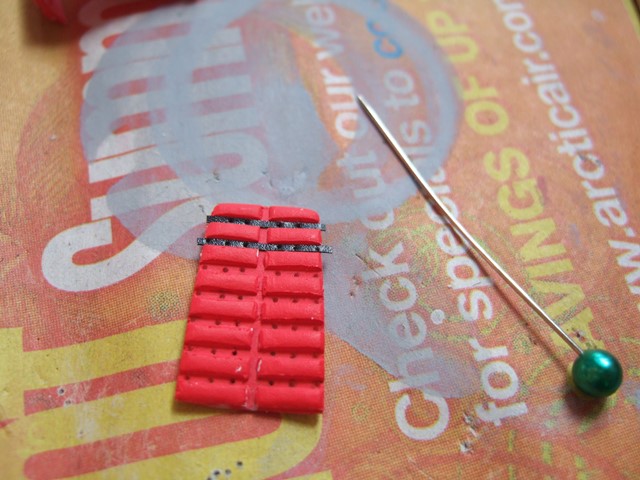 Using needles, the grommet holes were made. 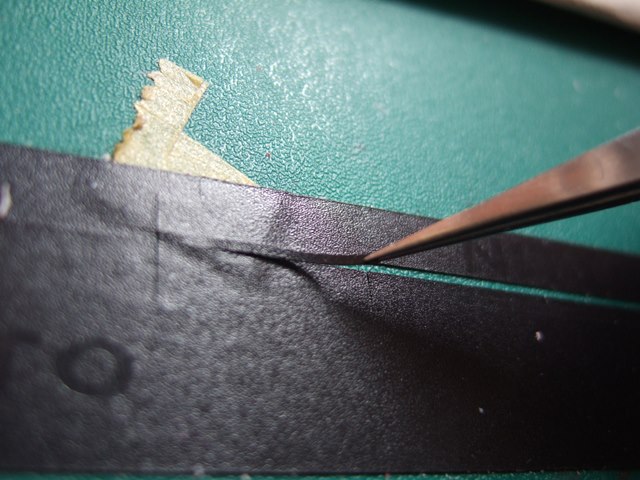 I cut many ribbons in other width, then choose and fit into each grooves.  Looking good to me.  Sides were painted in flat black (could be semi-gross black, but I had only flat black paint marker; don't need to care too much  . .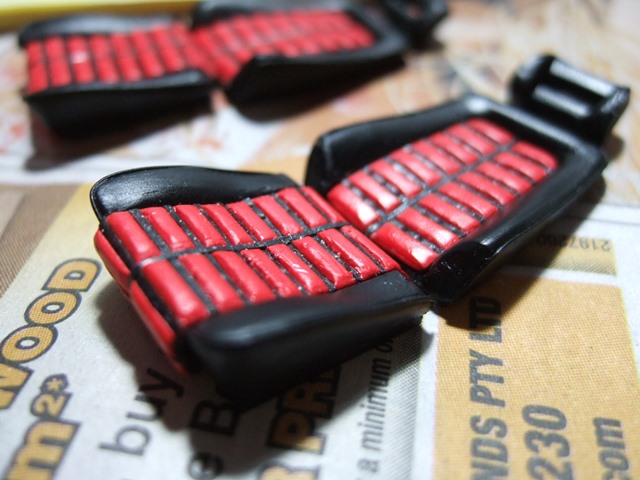 The outer ones were painted in semi-gross black + Tamiya splay SP-63 NATO black. Mixing ratio was about 50:50.  It was hard to adhere upper and lower parts because of the lack of the places to glue. I held my breath and applied the normal glue for plastic in tiny area and propped the seats up against camera (if not camera it was no prob but there it was).  Stays were not sexy neither. I attached 0.5mm plastic papers on top. 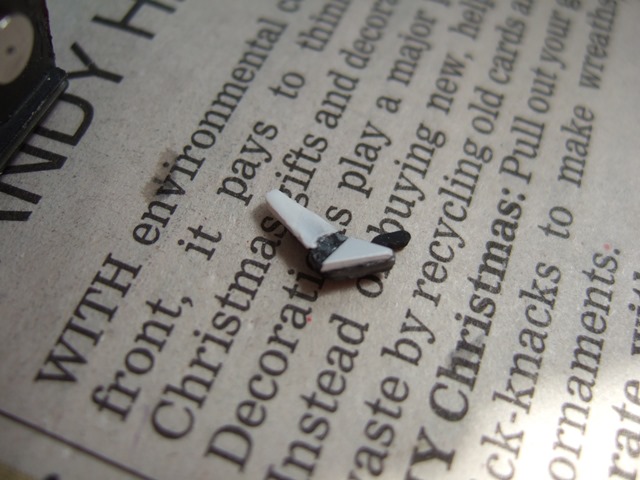 The top part was sanded to fit to the upper seat part. Another 0.5mm plastic paper was attached to fit to lower part of the seat. I adjusted one by one struggling with my old eyes (following picture). I am sure I am getting presbyopia. 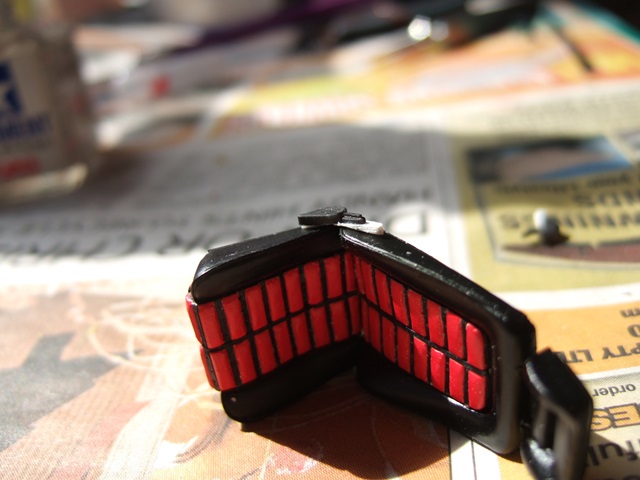 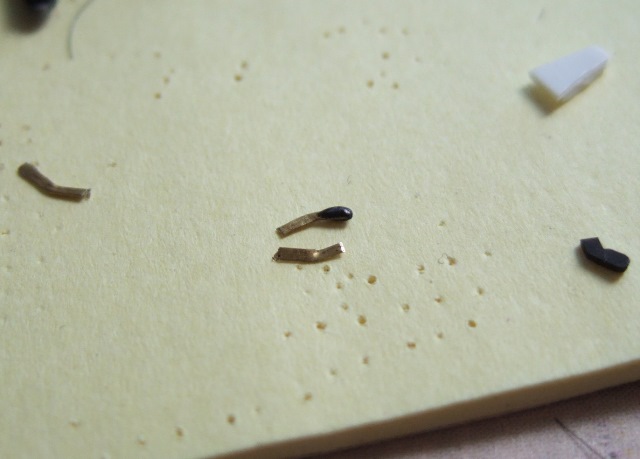 Another source of headache. I flattened the 0.3mm brass rod, bent and the black CA glue was applied on one side. 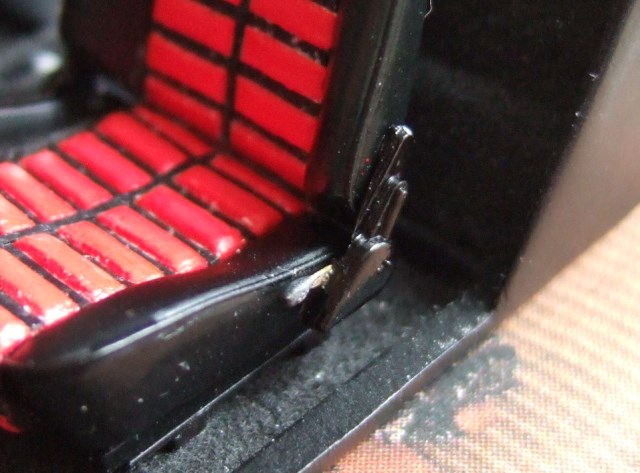 Yes, it was lever handle. 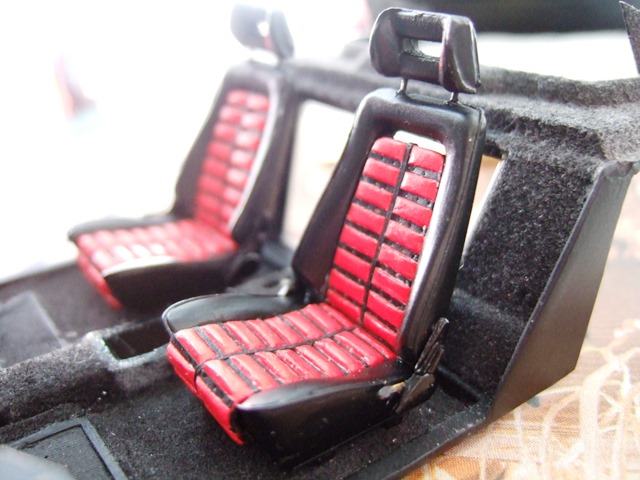 Now I can say my GTO's seats are sexy enough.  They are sexy too seeing from the back  Sorry, the picture is not good enough. Sorry, the picture is not good enough.That's all for today. ...? ....Don't say "how's it going with the body!" I'll finish polishing it this weekend so I'll report about it later. To be honest, I struggled so much to adjust the color on each panels because I painted separately (you can say I was stupid). But now the problem was solved and overcoated by clear. See you after!! (Not too long)
__________________
Umihito We can learn from mistakes. 

|
|
#94
09-08-2013, 02:01 PM
|
|||
|
|||
|
Re: Ferrari 288GTO Revell + Fujimi 2 in one 1/24
your attention to details on this build is just amazing. looking forward to more updates!
__________________
olly olly oxen free
|
|
#95
09-20-2013, 07:30 PM
|
||||
|
||||
|
Re: Ferrari 288GTO Revell + Fujimi 2 in one 1/24
Quote:
Quote:
Quote:
Quote:
__________________
Umihito We can learn from mistakes.
|
|
#96
09-20-2013, 07:38 PM
|
||||
|
||||
|
Re: Ferrari 288GTO Revell + Fujimi 2 in one 1/24
Hi,
Finally here comes the body paint report (It's not the final job on my GTO, though). Last time I think I told I had been struggling to adjust the colors on the panel. I should have combined all the panel such as bonnet, doors and rear hood on the main body then air-brushed. But before doing so, I needed to paint the hidden parts such as inside the door or inside the front bonnet and I thought it would be a troublesome work... but, BUT, now I strongly think I should. I took too much time to adjust the colors. I tried to overlay 3-4 times to adjust especially the color between the door panels and the body without success. If I didn't have the air-brush, I couldn't pile the color up so many times. Then I tried in this way. 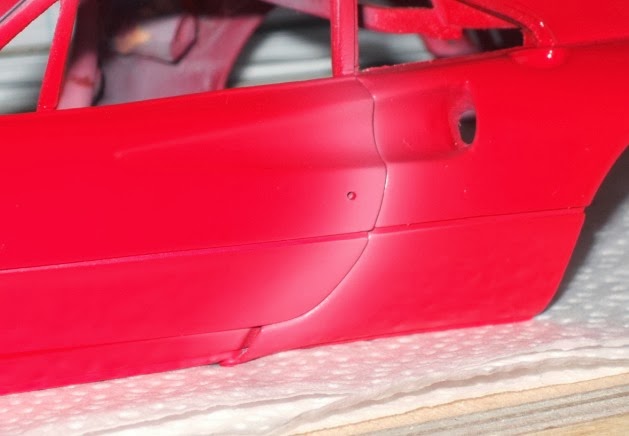 Lightly white overlaid on the joint... 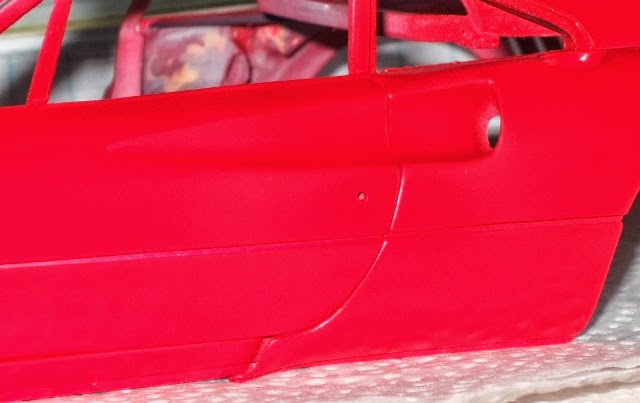 Then overlaid the body color. Well, I was relieved. I spread the body color just a little bit more later on. 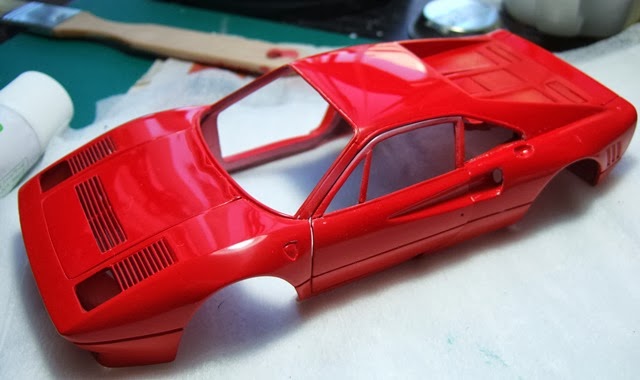 The color recipe was Tamiya Spray Italian Red 25% : Tamiya Spray Blight Red 75% (+ a bit of Gaia Color Rosso corsa, but I think it doesn't matter if it was not added if you don't have it). Then clear coated with Gaia EX-Clear (if I couldn't buy it, I would use Tamiya Spray "Clear"). After 4-5 days dry out, I sanded up the rough surface with #1500 Tamiya finishing paper then clear coated again, then after 4-5 days dry out I polished with Soft-99 fine compound (for real cars), then Tamiya Coarse compound - Fine compound, Finishing compound. 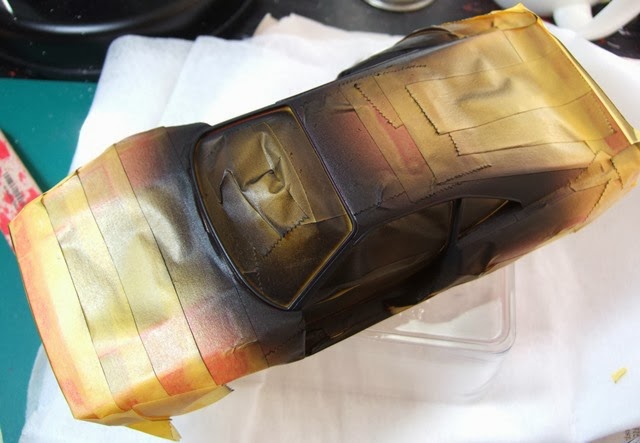 I don't like this job, but masking should have taken place. I air-brushed the Tamiya Spray Semi-gross black. I couldn't use enamel based color because I needed stronger surface to glue the window. 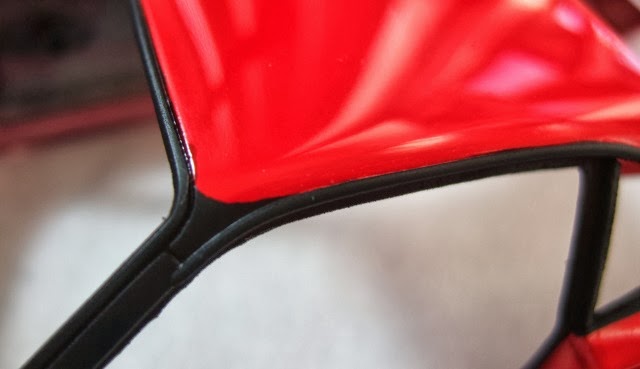 So I said I didn't like masking.... 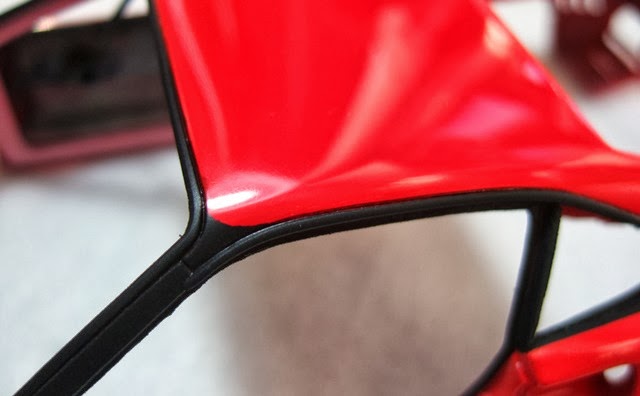 No worries, I have strong weapon. The "Gundam Marker" gray (GM02; from Mr. Hobby Japan). By just tracing, I could see it's better. But be aware, the Gundam Marker doesn't seem to be enamel based but lacquer based (editing: after this post I found it is alcohol based, so it may not harm the lacquer based paint, maybe). If you failed, you need to scrub with compound applied on the tip of toothpick...like I did after this photo. Still some more retouches were taken place. 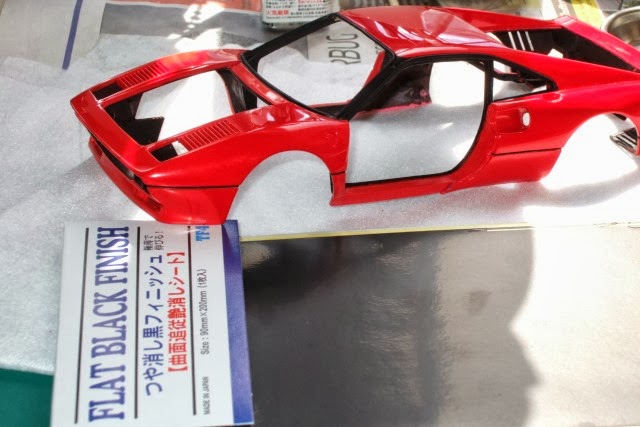 The black lines on body-sides. I cut them from Hasegawa's Flat Black Finish. I love it!  Now I feel numbness on my hands doing these tiny job. Cut from Hasegawa's modelling mesh 23 (hexagonal, medium size) then metal primer and semi-gross black were applied. 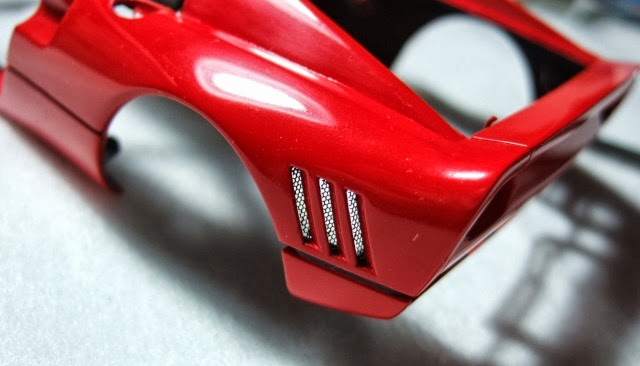 I used Konishi's "Aqua linker bond" to set those... I really think it's easier said than done! I'm sure I'm training myself to be patient and calm. 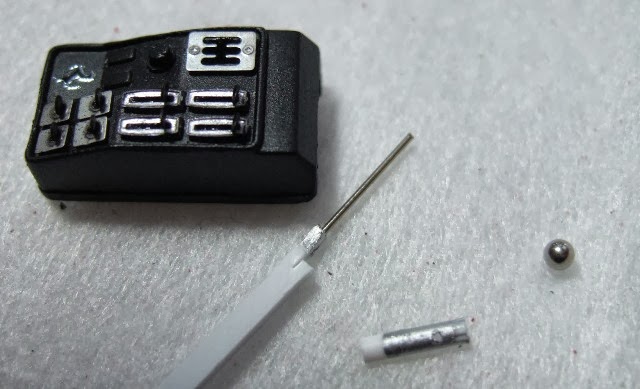 Then suddenly move to centre console. Mainly I used the etching parts from Fujimi's box. I dug hole under the sift cage. Nickel silver 0.5mm rod for the sift lever, the base were the combination of Evergreen's 1.5mm half round and square shaped plastic rod. The head was... I'm not sure but one from after market aluminum parts. 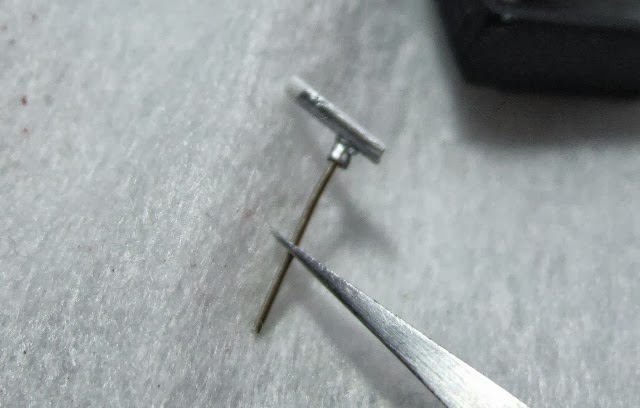 Ready to be set. 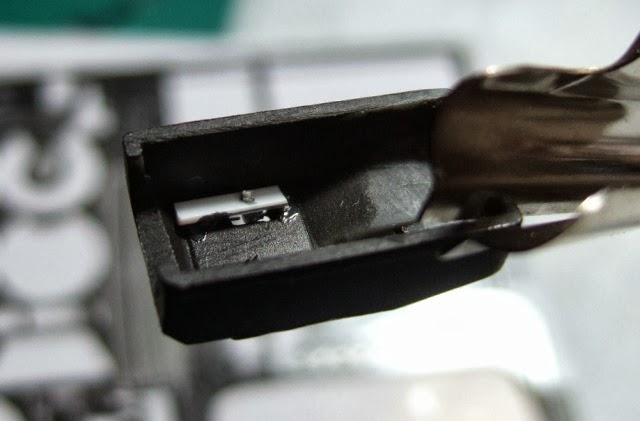 Adhered from the back of console.  I feel I did as much as I could on this console. ...Oh, I need to fill up the hole for side lever brake (lower right on the photo), because I found it should be offset to the driver's seat. I'm almost there, way to go!!!!
__________________
Umihito We can learn from mistakes.
Last edited by Umihito; 09-24-2013 at 09:31 AM. Reason: Sorry, Konishi's bond's name was "Aqua linker". And The "Gundam Marker"'s color was gray (GM02; from Mr. Hobby Japan).
|
|
#97
09-21-2013, 04:16 AM
|
||||
|
||||
|
Re: Ferrari 288GTO Revell + Fujimi 2 in one 1/24
Some really great detailing here - loving this build.
|
|
#98
09-23-2013, 01:40 PM
|
||||
|
||||
|
Re: Ferrari 288GTO Revell + Fujimi 2 in one 1/24
Great job, as always!
I really like the results you have acheived with that Gundam marker and Flat Black Finish. I've never heard of Flat Black Finish before - is it a self-adhesive film, similar to BMF? I think I should get some.
|
|
#99
09-24-2013, 08:35 AM
|
||||
|
||||
|
Re: Ferrari 288GTO Revell + Fujimi 2 in one 1/24
Quote:
Quote:
__________________
Umihito We can learn from mistakes.
|
|
#100
09-24-2013, 09:23 AM
|
||||
|
||||
|
Re: Ferrari 288GTO Revell + Fujimi 2 in one 1/24
And, for Gundam Marker, I actually used gray color, sorry. It was "Gundam color GM02" detail Liner. The website says it's alcohol based and it "may sometime" melt the paint! But so far, my GTO's body is safe. Don't trace too much (I know you won't, from your experience
 ). I will also try "Gundam Marker GP01 Mechanical Drawing Sharp Pencil 0.3mm", it is said that we can erase it with rubber (eraser), I don't have it though, I ordered one on eBay now!! ). I will also try "Gundam Marker GP01 Mechanical Drawing Sharp Pencil 0.3mm", it is said that we can erase it with rubber (eraser), I don't have it though, I ordered one on eBay now!!
__________________
Umihito We can learn from mistakes.
|
|
#101
09-26-2013, 11:32 AM
|
||||
|
||||
|
Re: Ferrari 288GTO Revell + Fujimi 2 in one 1/24
Hi, today's Sydney was soooo windy, that was 100km/hour, according to TV news! I was too afraid my house would be blown away with my GTO... oh, now my GTO is the first priority, I realized.
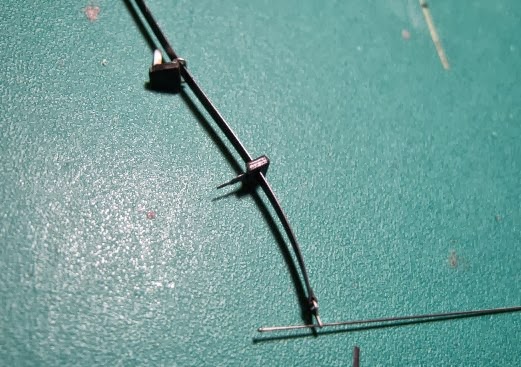 The seat belts. Combinations of after market seat belt metal fittings, Fujimi's parts, nickel silver rods, insect pin #0 and Nitto's tape. I prefer Nitto's tape for the seat belts than any other materials including satin ribbons so far, because Nitto's tape has enough softness thinking of its scale; 1/24. 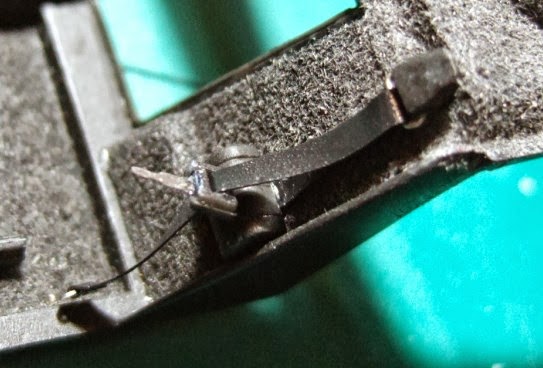 Setting these was very irritating task again. I'm under training to be calm.  Another tiny tiny task. Flattened 0.3mm nickel silver rod, 0.3mm plastic paper and polished 0.3mm nickel silver rod. 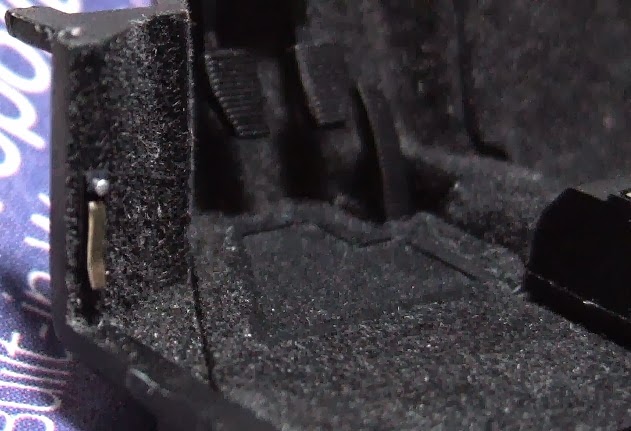 That tiny thing was set left front side of the driver's seat. It's front bonnet open lever. 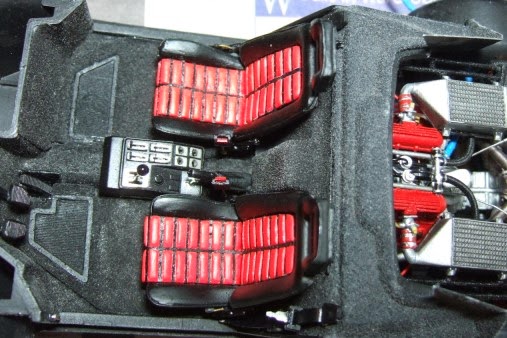 Now I think I did enough for the interior. Oh, I didn't mention about seat belt holder in centre. It was mainly from Fujimi's box but 0.3mm plastic paper painted in red was applied; release buttons. And it's stays were replaced by 0.5mm nickel silver rods. Side brake handle was adhered offset to the driver's seat. The hole for it was filled up with putty and overcoated by the same powder and color.  Then rear combination ramps. I picked Hasegawa's 328GTB's ramps, because of their correct shapes. I dug hole in centres of ramp parts then the clear orange (and red) was airbrushed from the front, with lacquer based color. Centre parts were replaced with 2mm Tamiya's plastic beams. I set the beam on motor tool and polished on top.  Some may say it'd be painted from the back, but in my opinion the real one is solid clear orange (or red) parts, they are in their color from the front.Then masked and semi-gross black was airbrushed. 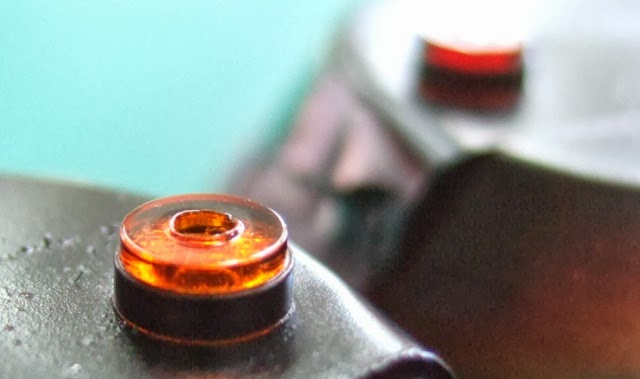 I airbrushed the clear colors fairly thickly. 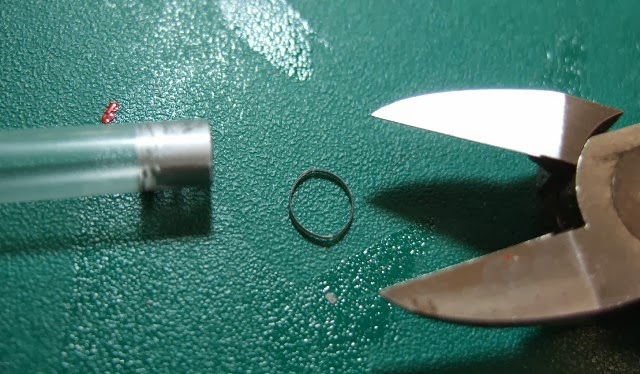 The straw was cut and painted in silver... 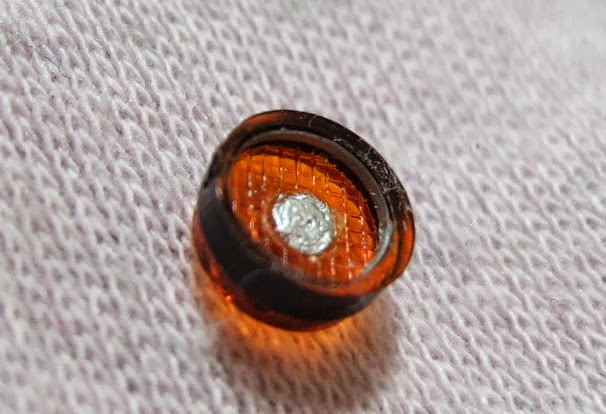 Then set inside the rims from the back, because I didn't like to see through black color in clear orange (red as well). The centre plastic beam were painted in silver from the back and inserted. 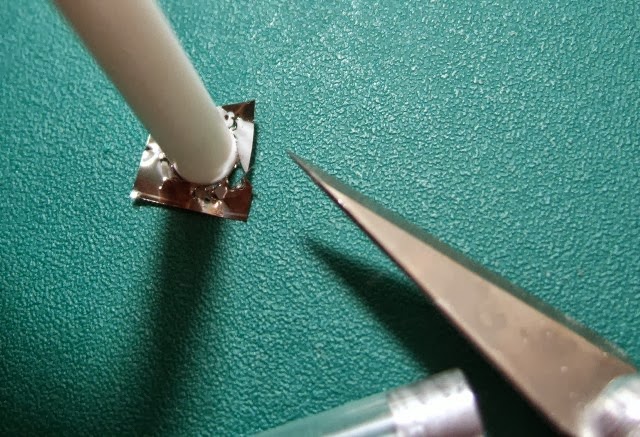 Then Hasegawa's Mirror Finish was cut in circle. I found Evergreen's rod (one in the "associated" pipes and rods) is almost the same size. I pushed the rod onto the Mirror Finish and cut outside.  Then set from the back.  Right one was the treated one, left one was not. Please say, right one looks better!!! 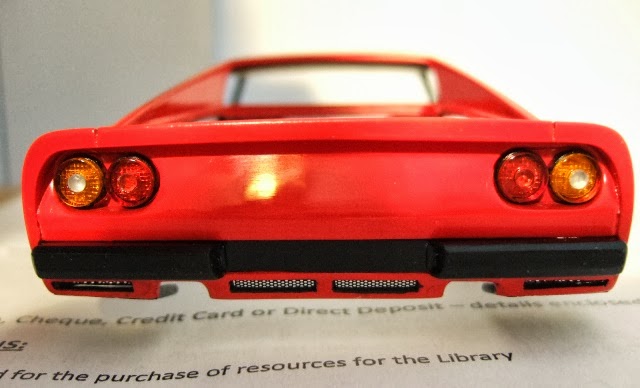 The rear combination ramps and meshes were glued with Aqua-Linker (Konishi Bond's). Mmmm.... I need to treat the gap between body and the side meshes. 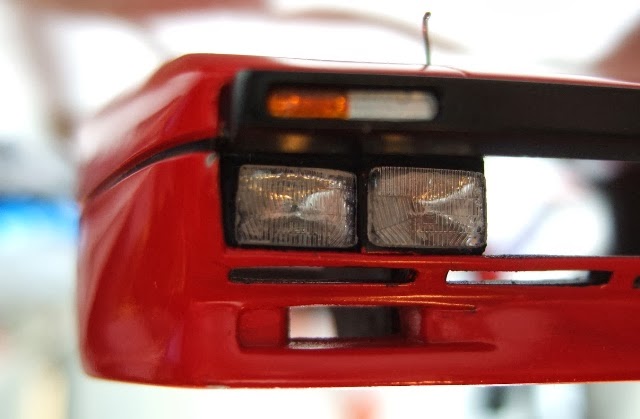 I choose Hasegawa's Mirror Finish on the back of driving ramps. Yes, looks like mirrors. The lenses were from Modeler's light lens sets. (Modeler's no longer exists, but I believe we can find similar one). 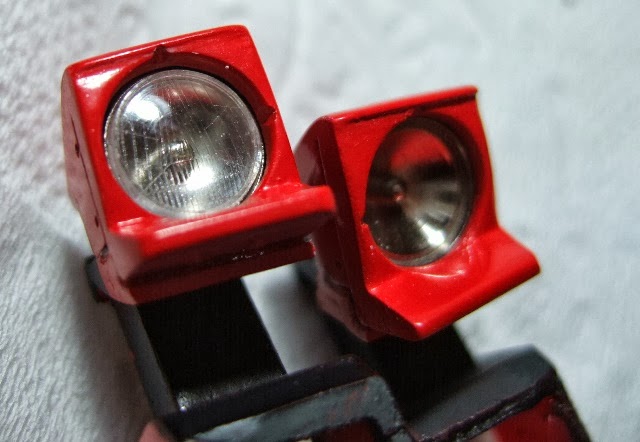 The head right glasses were from Fujimi's 330P4 (I ordered the spare parts, I'll make 330P4 someday, surely), and the bases were Sakatsu's aluminum parts, I think I mentioned it in the post I made before. 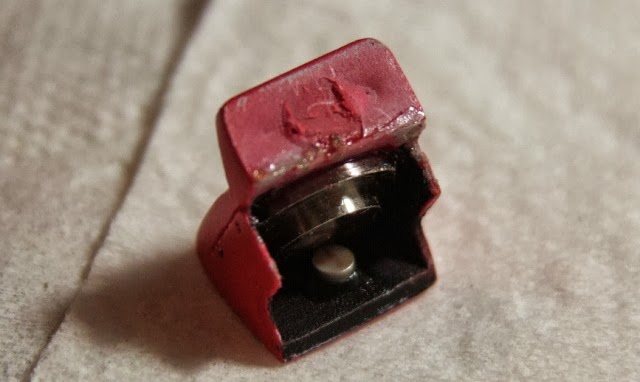 How many magnets I've used in this built?? But I'm sure this will make it easy to open. 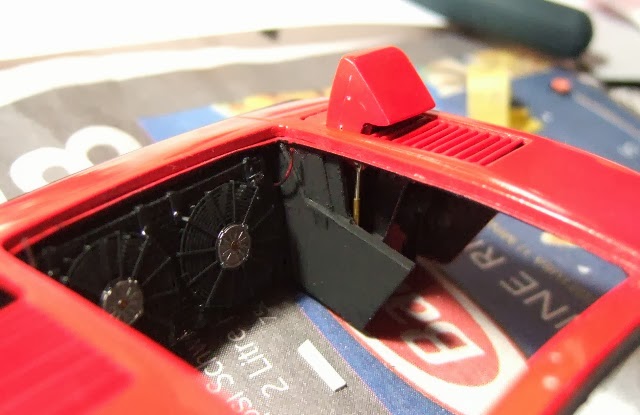 Light units were successfully placed to the body. Of course it could be closed! 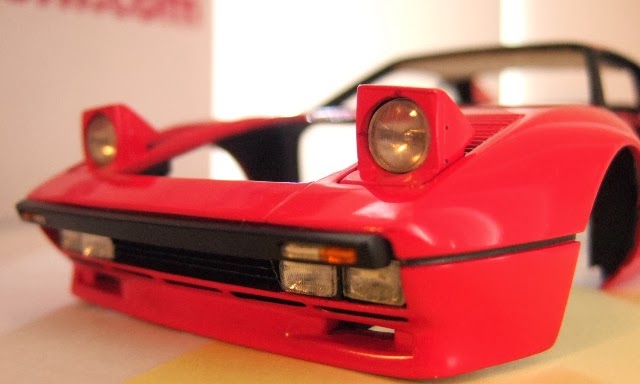 The photo-etched front grill (from Fujimi's box) was also set. Now I can feel this is GTO's face! Just some more things to do to finish!! (The windows fitting will be big job, though) See you soon
__________________
Umihito We can learn from mistakes.
Last edited by Umihito; 09-26-2013 at 12:08 PM.
|
|
#102
09-26-2013, 02:03 PM
|
||||
|
||||
|
Re: Ferrari 288GTO Revell + Fujimi 2 in one 1/24
Beautiful! Just one little mistake. The holes for headlamp adjustment must be from the same side on both headlamp cases.
 http://fotki.yandex.ru/users/mikhail...o/view/582176/
__________________
Best regards, Mikhail   
|
| The Following User Says Thank You to stratos75 For This Useful Post: | ||
Umihito (09-26-2013)
| ||
|
#103
09-26-2013, 07:30 PM
|
||||
|
||||
|
Re: Ferrari 288GTO Revell + Fujimi 2 in one 1/24
Quote:
 It's kinda hard to fix it from now but... yes, I will refill it, mask and repaint. Thank you so much, I've never noticed it. But once again, I'll see if some of GTO's have same arrangement as mine (maybe no). It's kinda hard to fix it from now but... yes, I will refill it, mask and repaint. Thank you so much, I've never noticed it. But once again, I'll see if some of GTO's have same arrangement as mine (maybe no).
__________________
Umihito We can learn from mistakes.
|
|
#104
10-01-2013, 08:35 PM
|
||||
|
||||
|
Re: Ferrari 288GTO Revell + Fujimi 2 in one 1/24
PLEASE SOMEONE, HELP!!!
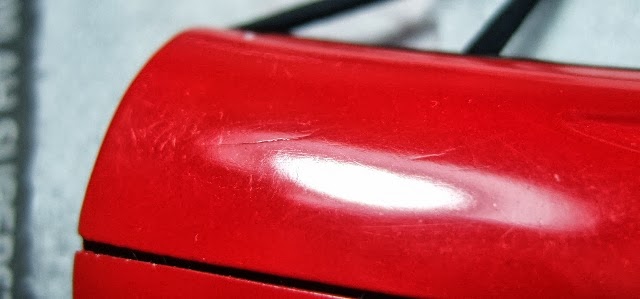 There appeared clacks (I should say I'm lucky I found these only on this door). But the problem is, I treated these clacks before polishing (as following pictures) 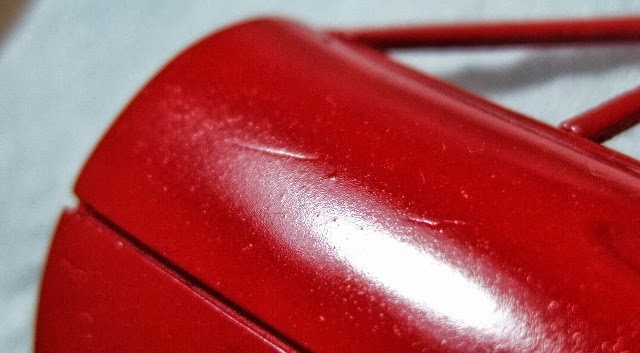 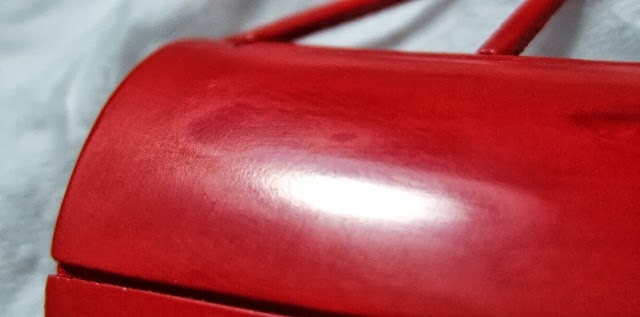 Sanded out and... 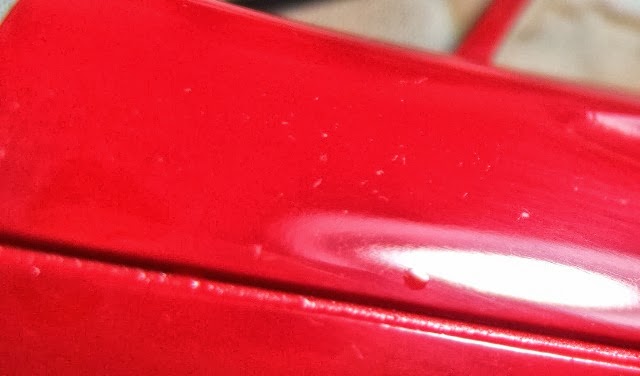 Clear coated and after 5 days of hot, dry condition I polished, indeed. (don't worry about the water drop on this picture). It seemed to be fixed at that stage, completely. BUT AFTER 2 WEEKS OF TIME, HERE COMES THE CLACKS AGAIN!!  If someone, experienced this kind of prob, please tell me why and how to recover it.....!! I think I'll clear-coat, sand and polish again, BUT I suspect the clacks to come up again. If there are problems with lacquer based clear, should I try urethane clear??
__________________
Umihito We can learn from mistakes.
|
|
#105
10-01-2013, 09:28 PM
|
|||
|
|||
|
Re: Ferrari 288GTO Revell + Fujimi 2 in one 1/24
what kind of paints again did you use? it might be a delayed reaction between the color layer

__________________
olly olly oxen free
|
| ||||||||||||||||||||||||||||||||||||||
|
POST REPLY TO THIS THREAD |
 |
|
|


