|
|
| Search | Car Forums | Gallery | Articles | Helper | Air Dried Beef Dog Food | IgorSushko.com | Corporate |
|
#212
 05-17-2010, 07:09 PM
|
||||
|
||||
|
Re: Jordan 191
Somehow I missed this thread. I'm glad I did though because because I've been able to enjoy the uninterupted progress for the past half hour.
Genius! Jay you are in every way the master model maker.
__________________
CHRIS... Catch me on FACEBOOK http://www.c1-models.com http://www.facebook.com/C1Models 
|
|
#213
05-23-2010, 11:55 AM
|
|||
|
|||
|
Re: Jordan 191
Weathers still pretty crap here in northern Germany so Im having more modelling time during the bank holiday :-) I spent a lot of time on fiddling with wires and hoses. Not much to show in terms of pictures but I wanted to get them pretty accurate to the original. Thats quite tricky because you cant just use shrink tube like on the real car.
Anyway heres what I did. I started by making the electronic boxes mostly from renshape and some etched parts.  They were then painted and detailed and mounted on the sidepods. I also scratch built all the wiring using wires from various manufacturers and electronic connectors that I turned from aluminium. Some of the shrink tube is replicated from actual thin shrink tubing but mostly its black Plasti-Dip applied with a brush. Heres the wire loom for the left sidepod prior to installation. 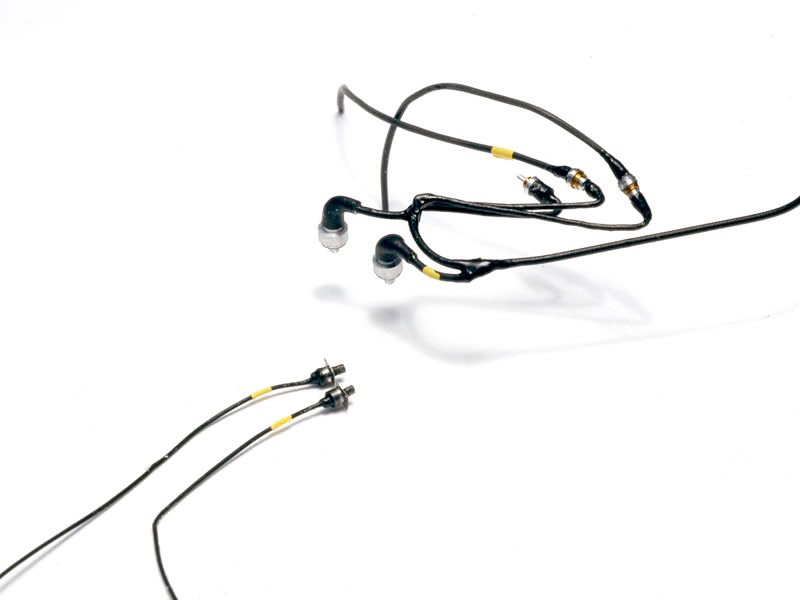 In the next picture all the parts are installed already. It took quite some time and I had to be really careful not to break stuff off or mess everything up with too much glue 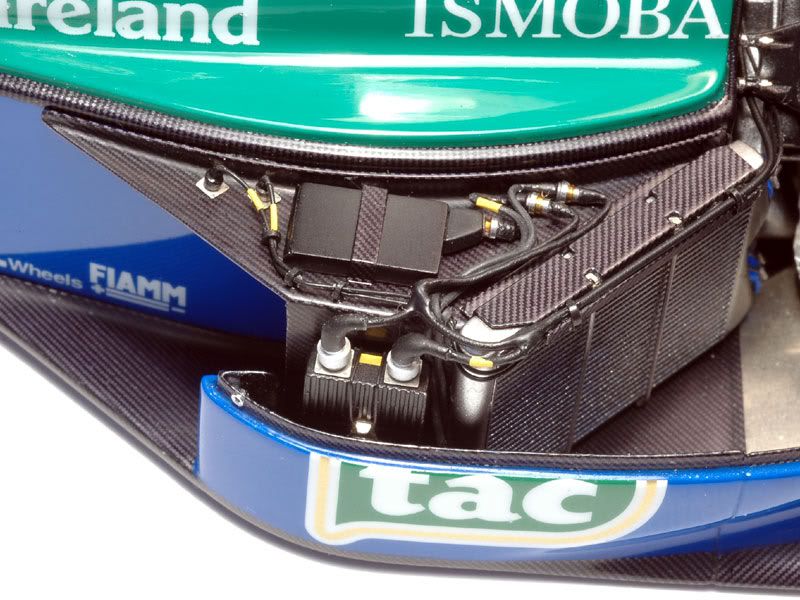 Another view from a lower angle. The yellow markings on the wires are bits of decal. 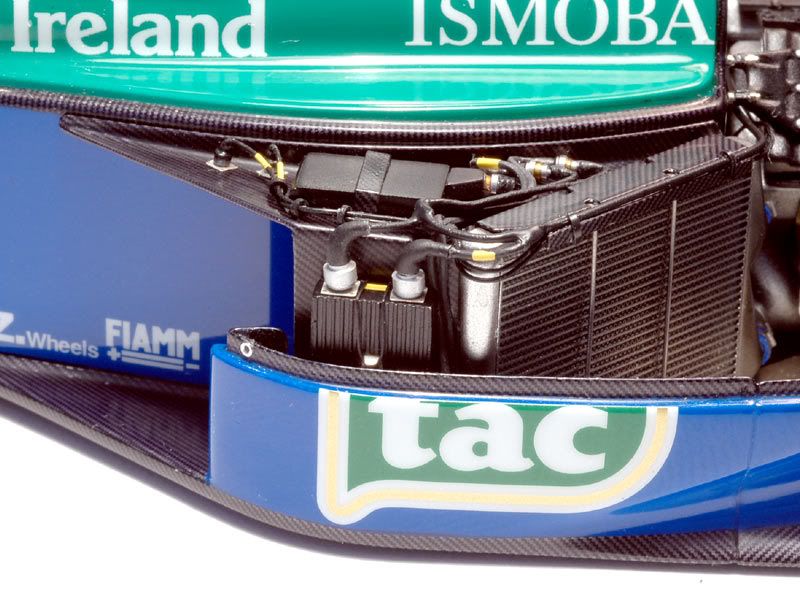 The right sidepod is less cluttered. It was tricky nevertheless. Besides my own machined fittings I used some by R.B.Motion. I just restocked them. I will need quite a few more in the coming steps :-) 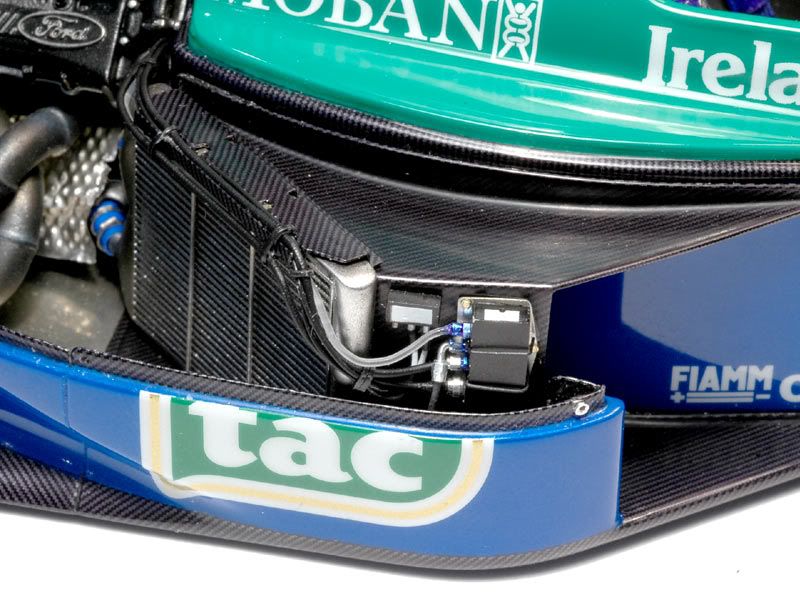 Now I just hope I wont knock these parts off the sidepods all the time with the cowling. I already had serious trouble with it before mounting the parts Looks like there will be more wires in the next update see you for that and thanks yet again for your comments!
|
|
#214
05-23-2010, 02:53 PM
|
||||
|
||||
|
Re: Jordan 191
Gorgeous JayKay! My first thought is that the pictures with the harness installed were reference pics! Great work, thanks for such great inspiration.
__________________
-Mike AF Director of Media / Photographer  [email protected] | AutomotiveForums.com | Flickr Gallery
|
|
#216
05-30-2010, 04:42 AM
|
|||
|
|||
|
Re: Jordan 191
Heres a bit more progress with more wires :-)
First up is part of the ignition system. I had cut off the round blobs from the cylinder heads long ago. These were too small and wouldnt have had the space to connect cables. So I built a new more detailed distributor cap from styrene rods ( already primered in the picture ). Since there are more cars in my stash with Cosworth HB engines I made some resin copies. For the wires I used black 0,4mm wire from Hiro and added the L-shaped plugs made from more styrene rods and wire. 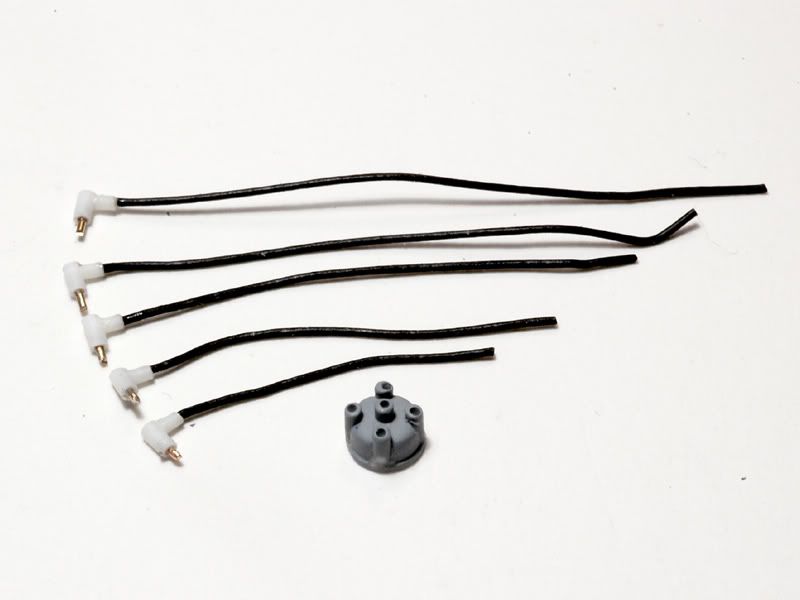 After painting the distributor caps were put on etched base pieces and glued to the engine. Then I could connect the wires. Btw if you ever use that Hiro wire check your glue with it first. That stuff tends to not stick to anything!? It took me some time in places until the super glue worked 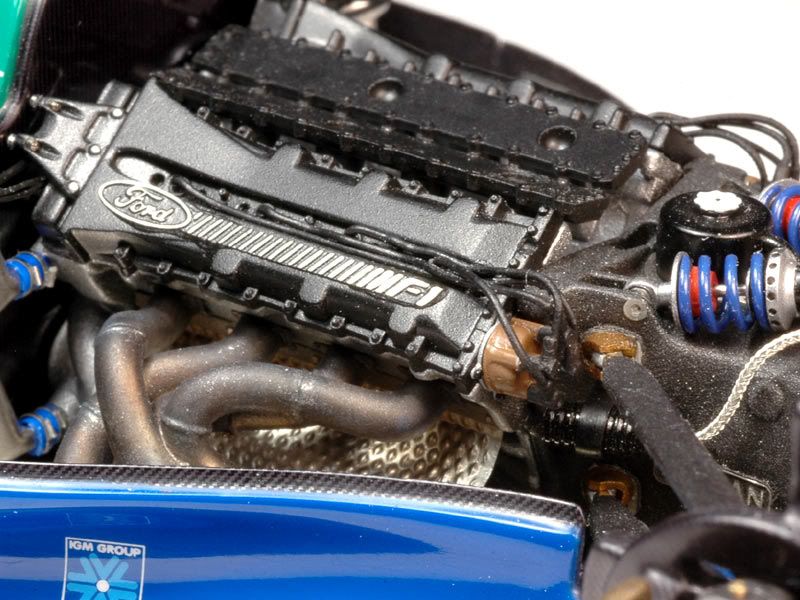 The next piece is a bit of an odd one. Its a little tank for the engine. I dont know what it does but it seems to be a Cosworth HB standard thing. The thing is, its nowhere to be seen in the Perfect Manual. However in the F1Modeling Schumacher Special theres a picture of it from the Spa Race. That kind of tank can also be found on the Benettons of the following years. I kinda have doubts about that detail pic the more I look at it. It looks like a Jordan 191 but then there are a couple of things that are different from the other reference I have. Anyway I decided to build the thing. Its a nice detail :-) I turned it from aluminium and added the detailing from parts I made myself and some R.B.Motion fittings. The wire to the right is wrapped with some Bare Metal Foil insulation. 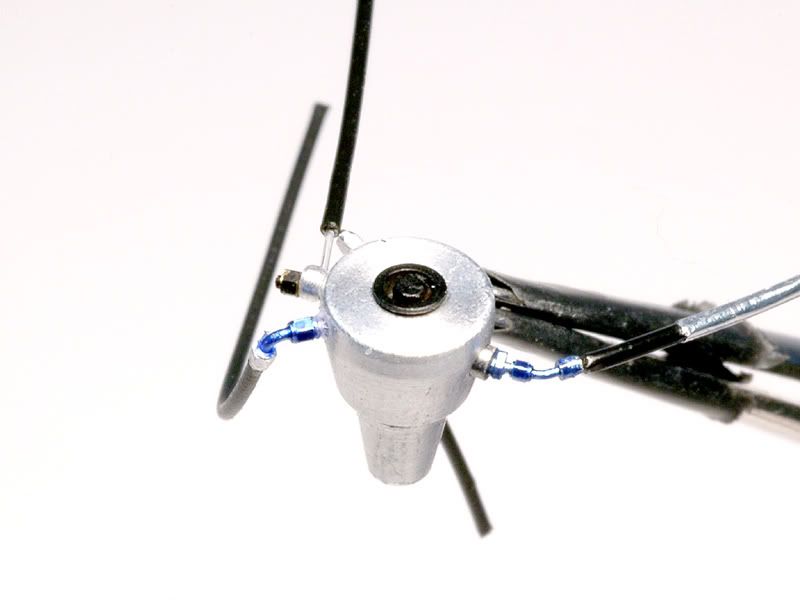 ...and here are two pictures with the tank installed: 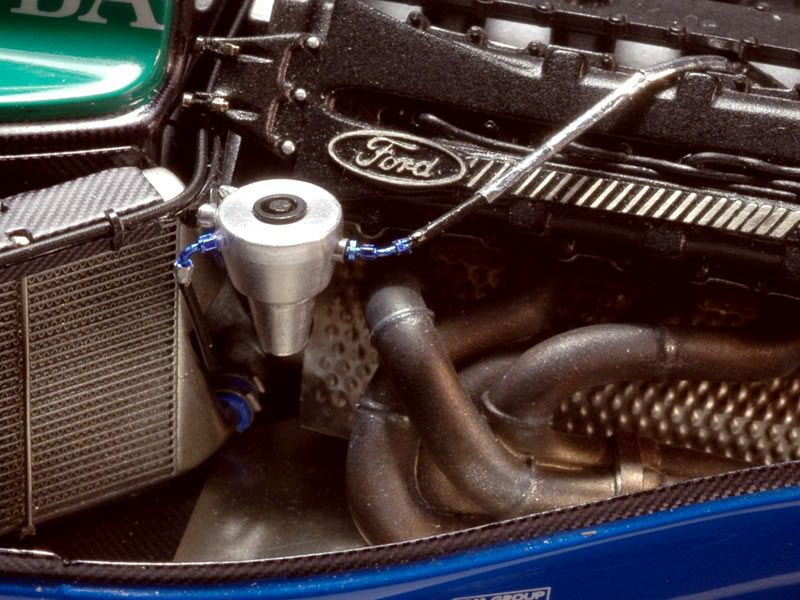 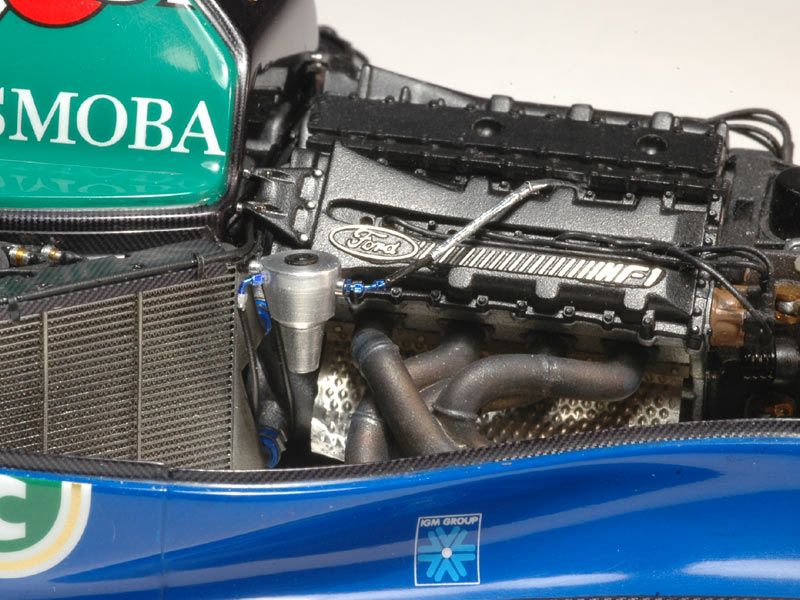 Thats it for now already. See you for more from the electrics and plumbing department next time :-)
|
|
#217
05-30-2010, 07:44 AM
|
||||
|
||||
|
Re: Jordan 191
Quote:
__________________
 gio gio
|
|
#219
05-31-2010, 03:31 PM
|
||||
|
||||
|
Re: Jordan 191
its made to watch and stare.its a top build
|
|
#220
05-31-2010, 04:47 PM
|
|||
|
|||
|
Re: Jordan 191
The silver cylinder is a swirl pot assembly. It is for removing the air from the fuel if the pickup or pump is disturbed. Helps provide consistant fuel pressure and volume under extreme circumstances.
|
|
#221
05-31-2010, 08:20 PM
|
||||
|
||||
|
Re: Jordan 191
What else can you say, but, my god that looks real. It does, it really looks like the 1:1 counterpart, amazing. Your definetly at the top
__________________
 It's Not wheather you Win or Lose, its how you look while you play the Game
|
|
#223
06-01-2010, 08:03 AM
|
||||
|
||||
|
Re: Jordan 191
Hi jaykay, I want to rob a little bit of your time.
About this point: I primed the parts and painted them Alclad Highly Polished Aluminium over a gloss black base. The radiator mesh is divided in two layers. The lower or inner layer has the typical zigzag pattern. This part received a wash to bring out the pattern a bit more. The overlay part just has a very thin horizontal grid. This was painted Alclad HPA as well to blend in with the painted radiator body. As a result the radiator mesh has more depth than a typical aftermarket etching part. Mine are also finer but they are really fragile and tricky to handle :-) In the picture you see a finished assembly on the left side and the radiator on the right is awaiting the second layer etched part in front of it. 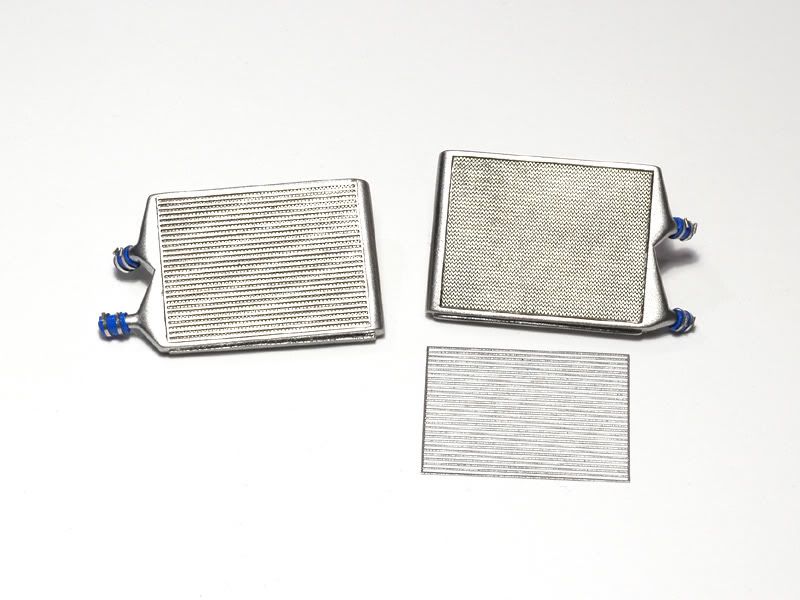 can you post an immage of the patterns you created to make a radiator like this? Or a more closely image? I want to copy them  . Thanks. . Thanks.I like your mind: the ways you can find out to solve the problems are very impressive and every time surprising. Thanks you to share your experiences with us.
|
|
 |
POST REPLY TO THIS THREAD |
 |
|
|


