|
|
| Search | Car Forums | Gallery | Articles | Helper | Air Dried Fresh Beef Dog Food | IgorSushko.com | Corporate |
|
|||||||
| WIP - Street Post topics for any "Works In Progress" street vehicles projects in this sub-forum. |
 |
 Show Printable Version | Show Printable Version |  Subscribe to this Thread
|
|
|
Thread Tools |
|
#31
 08-07-2008, 01:05 AM
|
|||
|
|||
|
Re: Porsche 356a 1500gs Carrera Speedster
Thanks to you all for your kind comments on my model. To stick the parts on the popsicle sticks I used regular 3M two side mounting tape. For those taking their time following the build of this model, I have to tell you guys that I have it more advanced than in this pictures but I haven't had the time to take the pictures and show it. I will try to do so in the weekend.
Thanks again! Quote:

|
|
#32
08-13-2008, 05:08 PM
|
|||
|
|||
|
Re: Porsche 356a 1500gs Carrera Speedster
This is a quick update of what Ive done so far. As you guys will see, the engine of this model has taken so much time to add some important details that doesnt come with it. I had used more the time to build, instead of build and take pictures. Most of these pictures are about the complete build of the engine. To me it has been more a date with automotive history than the time that I had spent building this plastic model. I say this because, see all those components and look through pictures in books and the internet, had made me think about the greatness of the German engineers at Porsche through more than 50 year already.
Here we go . In this first picture we can see bits of brass tubing that I trimmed to size in order to be used as the venturi tubes inside the carburetor stacks. 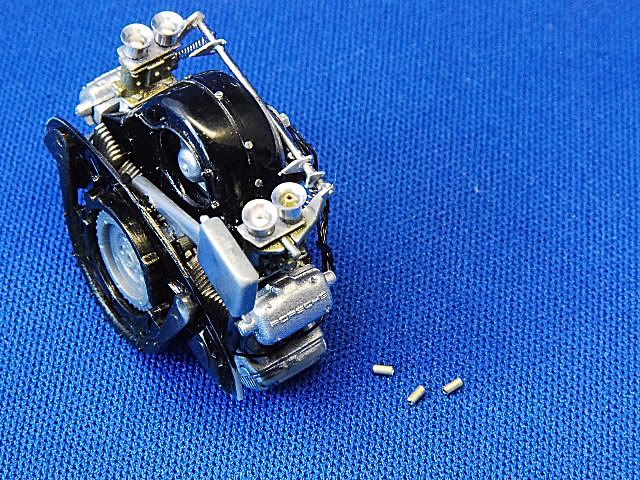 An overview of the whole carburetors assembly. 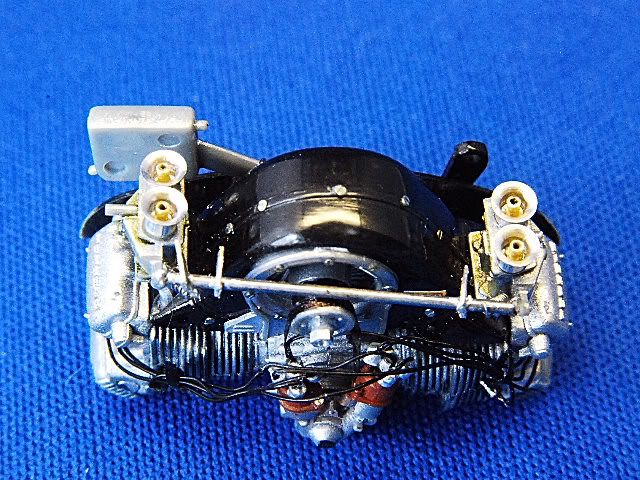 The distributors were detailed with some photo etch bolt heads from Model Car Garage. The spark plugs were made of 1mm plastic rod from plastruct and painted silver. 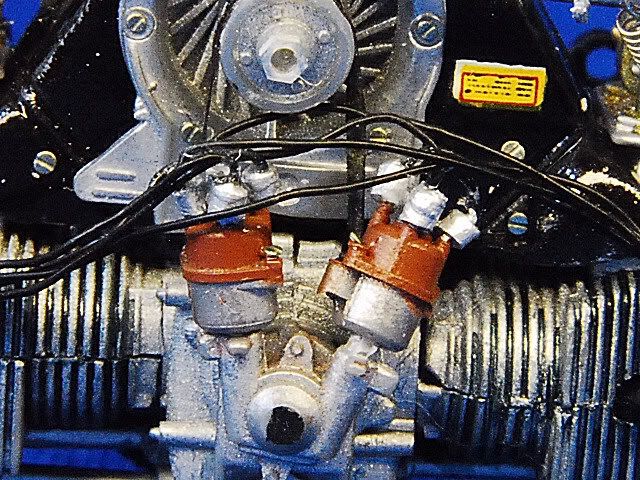 The enclosure were the alternator lives was detailed with the same photo etch bolt heads. A piano wire was added in order to substitute the plastic part of the kit were that represent the rod that holds the springs of the linkage in the carburetors. Plastic from Plastruct was also used to make the throttle linkage knobs. 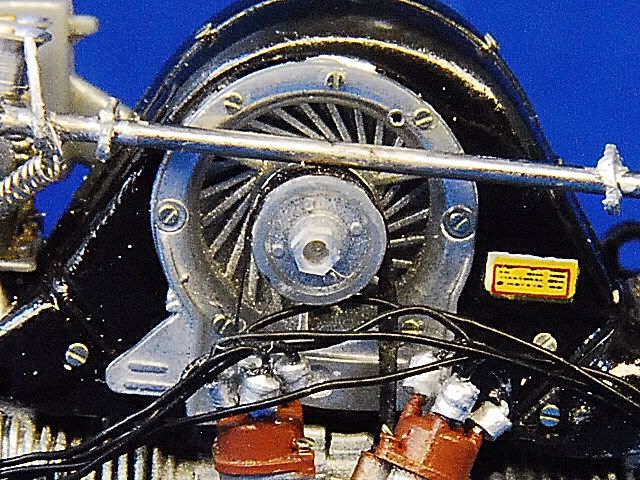 A close-up of the carburetor with a spring from Detail Masters connected to the linkage. I gave the carburetors a light gold paint wash to show the light gold tint these parts shows. 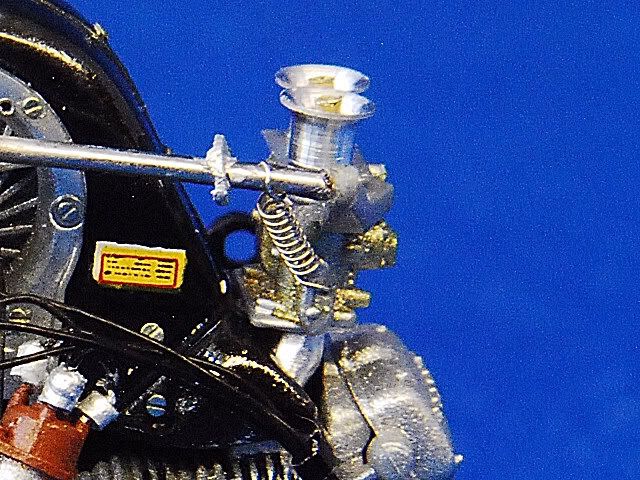 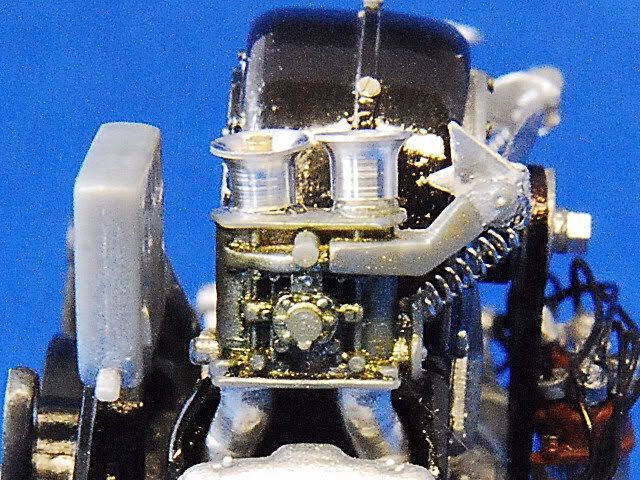 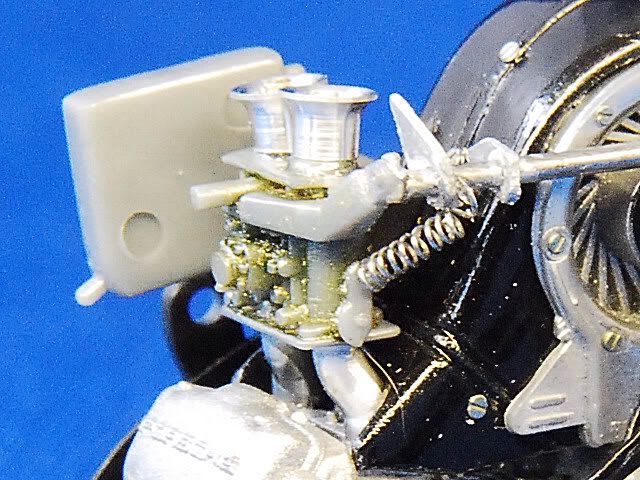 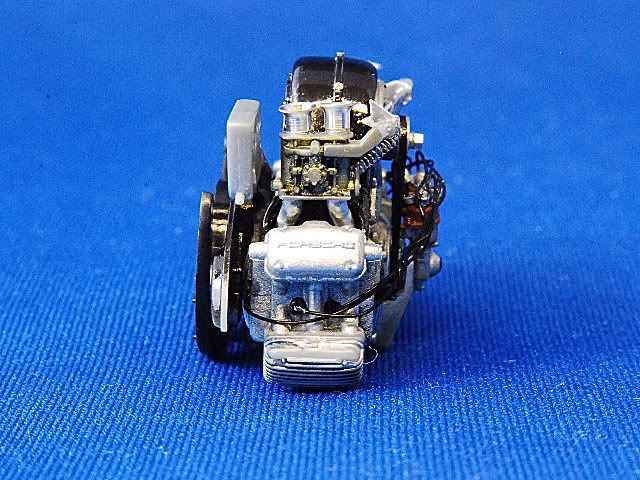 A general view of the front of the engine with all the mentioned components already in place. 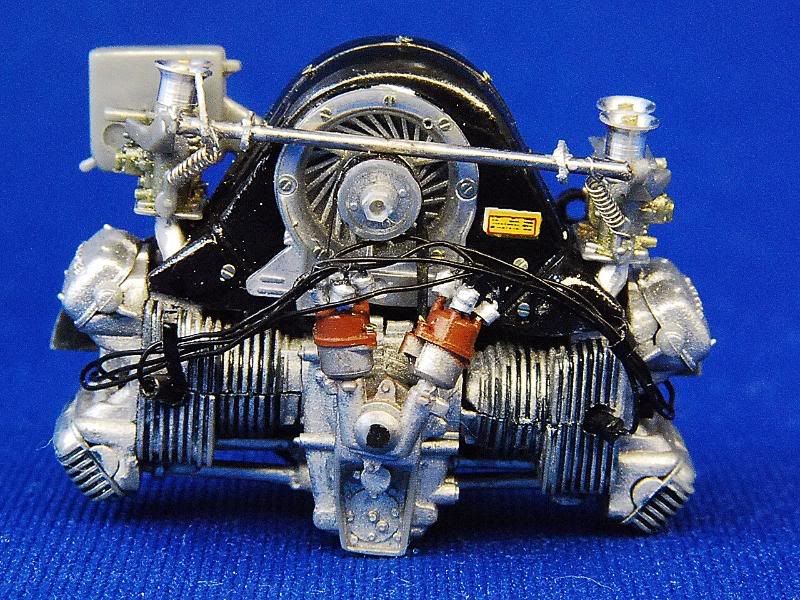 Although it wont be seen when completed the engine is assembled and installed in the model, this model even includes a flywheel. This is one of the few models that include this part. The pistons also are included but, like the flywheel, it wont be seen when is mounted on the model. 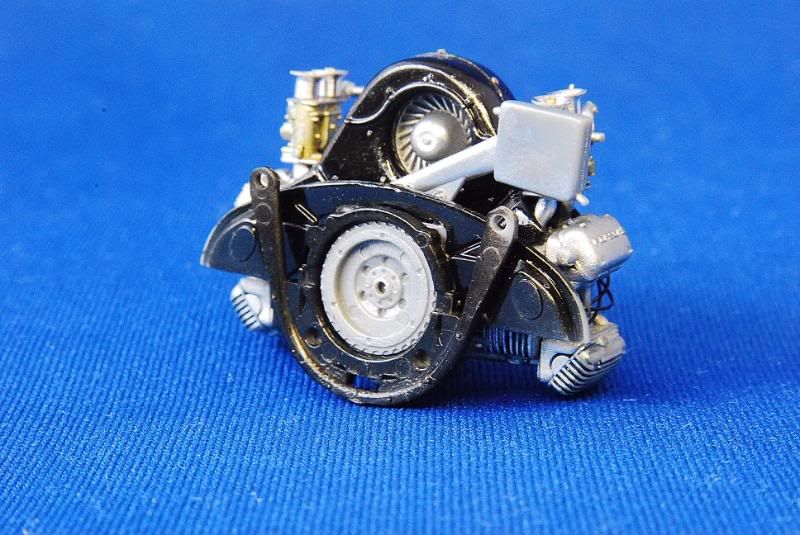 To give a little more of depth and detail to magnificent lines of the engine, I gave it a black wash using The Detailer Black wash all over. Here we can see both a close-up and the bottom of the engine showing the depth of the parts lines. 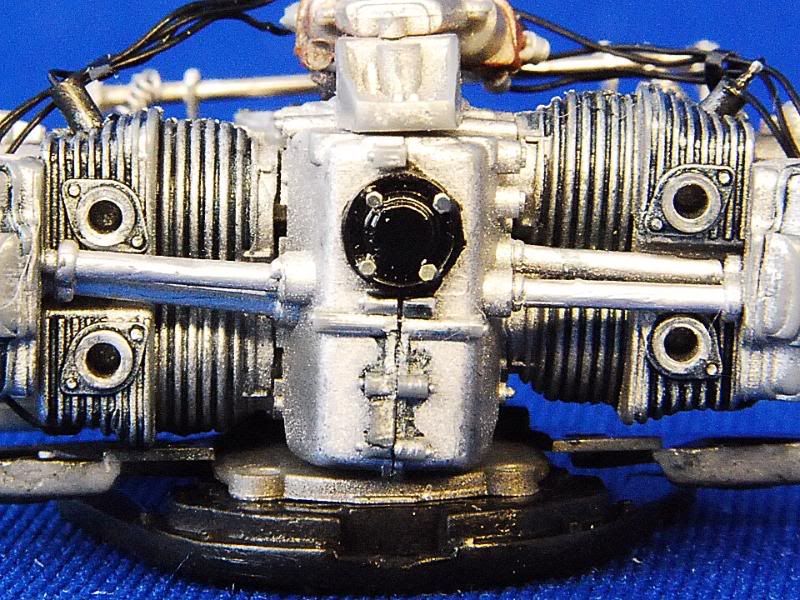 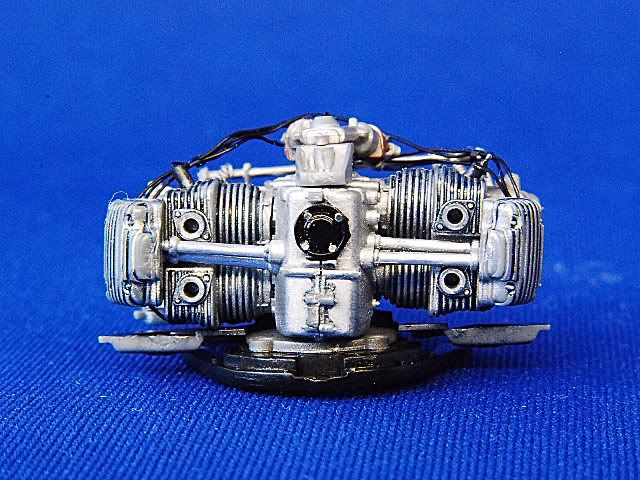 At this stage the muffler was installed. I though to give it a metallic look, but, looking to pictures, I saw that that the real part has a flat light gray paint all over that looks more to a primer coat. Actually, this gray color that can be seen here, its the thin Gunze Sangyo Mr. Surfacer 1000 primer. I think of it, not just only for the primer job this product will do, if not, because of how thin it is and for the perfect light gray color it will show. I also made the muffler exhaust tips from aluminum tubing. 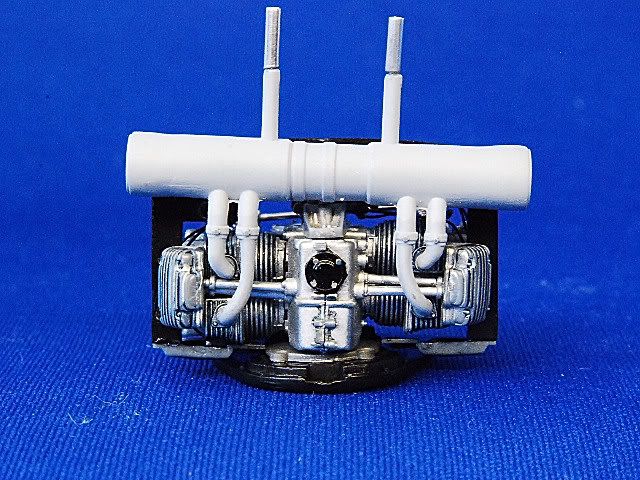 Here we can see a general view of how it looks everything together. One can think these are a lot of parts in order to get this engine completed right, but, at the end one will end with a historic and accurate beautiful engine. 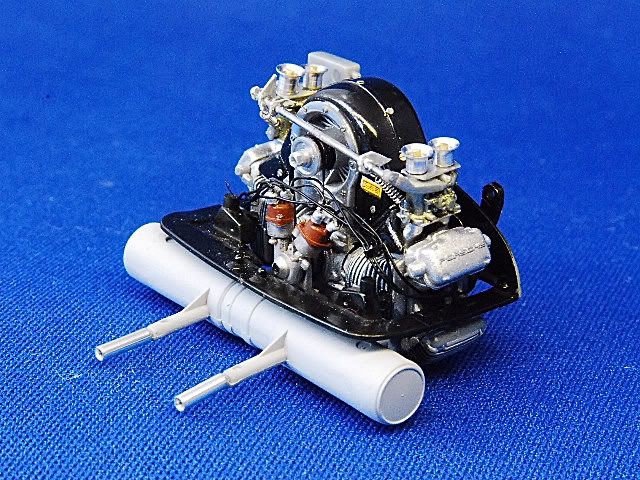 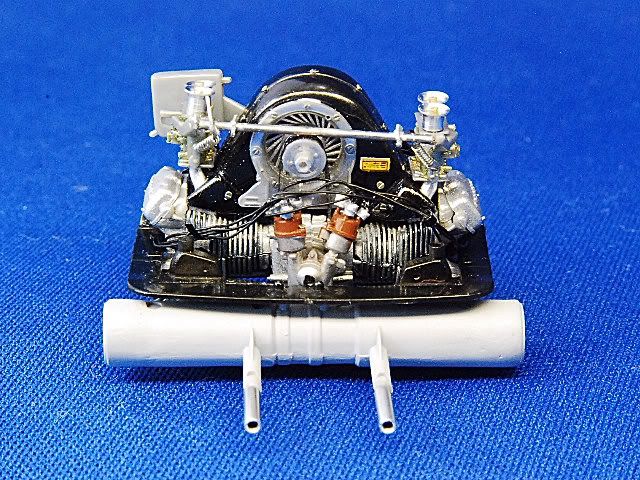 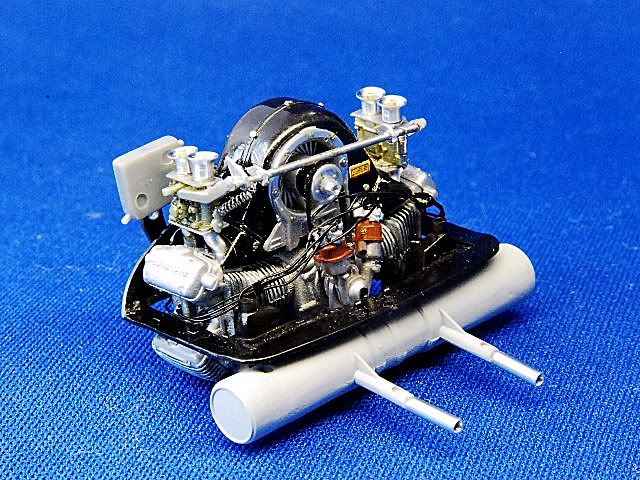  I hope you guys like this
|
|
#34
08-16-2008, 11:56 AM
|
|||
|
|||
|
Re: Porsche 356a 1500gs Carrera Speedster
Here again, just for a brief update on the build of this Porsche model car. It's not much, but, is a very important stage on the completion of the engine.
Like the engine block, it also has been weathered with the black The Detailer product and some Bare Metal Foil that has been added at the CV boots for a little more of realism. Here are the pictures... Here are some overall pictures of the transaxle... 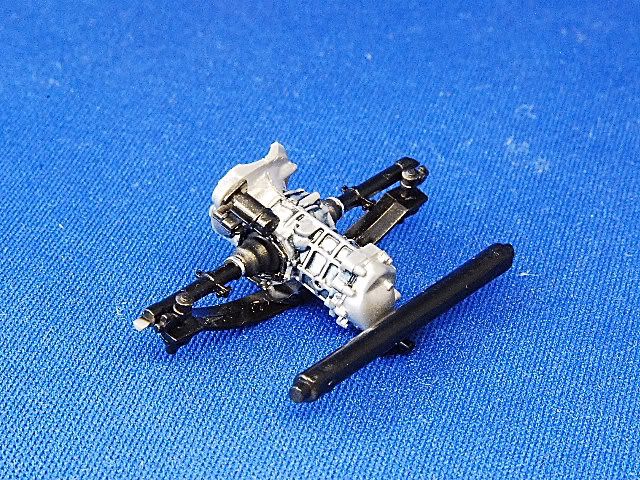 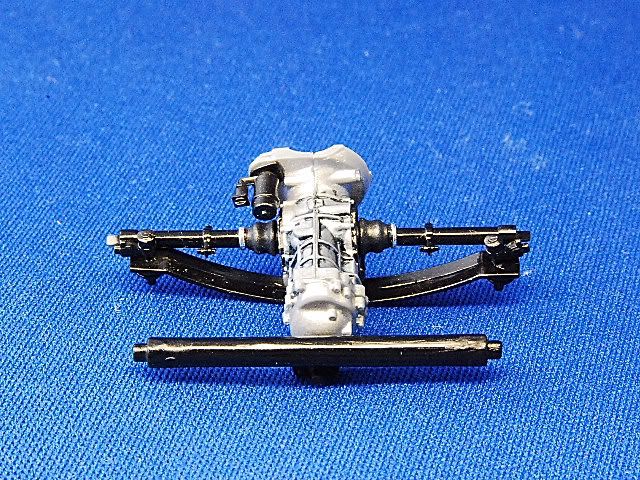 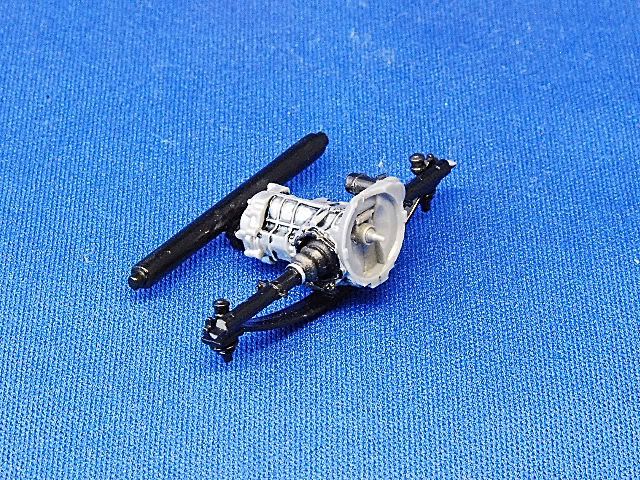 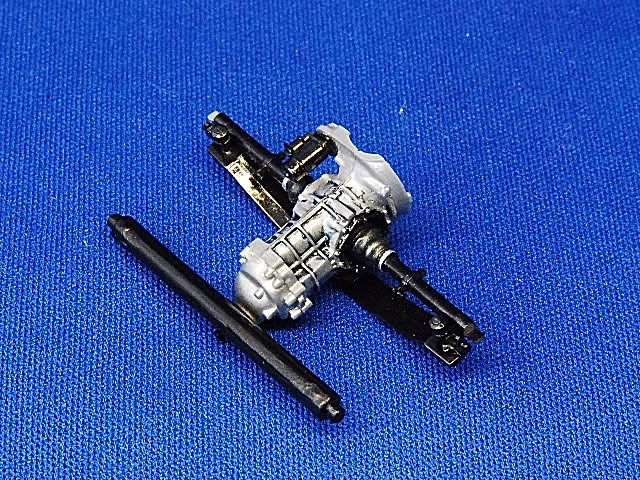 Let's go closer... 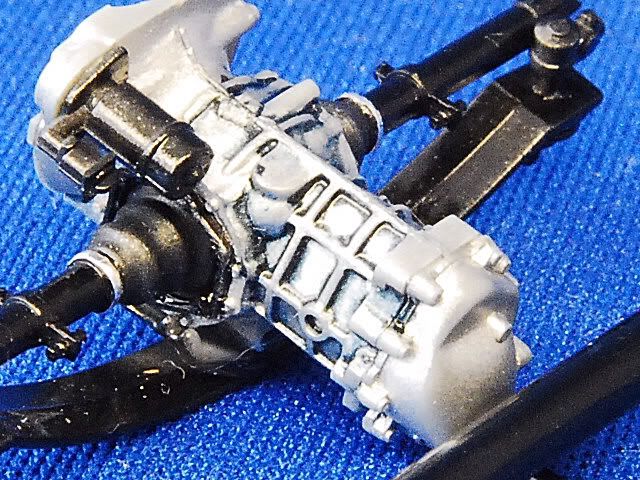 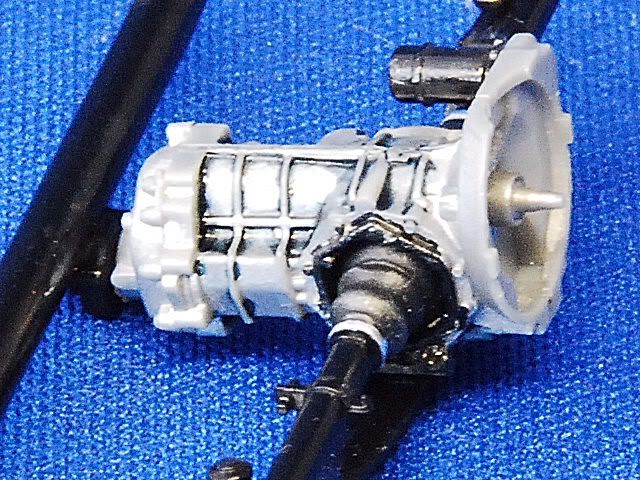 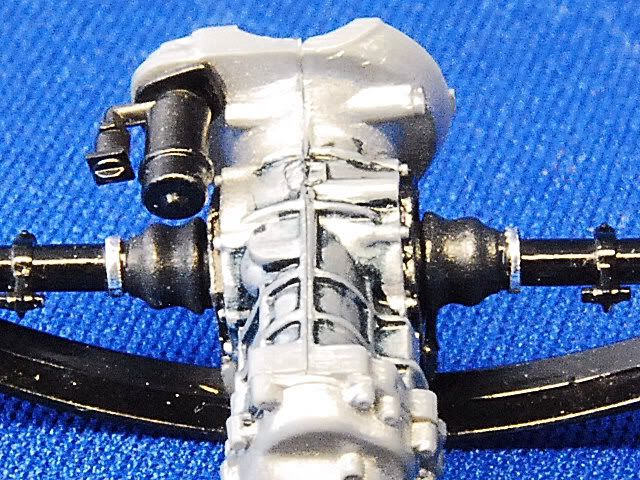 Enjoy'em
|
|
#35
08-17-2008, 05:40 AM
|
||||
|
||||
|
Re: Porsche 356a 1500gs Carrera Speedster
Wow, that is a great looking engine !
__________________
Latest progress: Ferrari F40 LM Fujimi 1/16 and Porsche 959 Fujimi 1/16 Finished: 1940 Ford pickup and Lotus Super Twelve 
|
|
#36
08-25-2008, 08:19 AM
|
|||
|
|||
|
Re: Porsche 356a 1500gs Carrera Speedster
Here's just a quick look to see how engine and transaxle looks already in place in the chassis.
It fits pretty well, quasi Tamiya way. Now, it just need a few wires and nuts in order to detail up the brake lines. 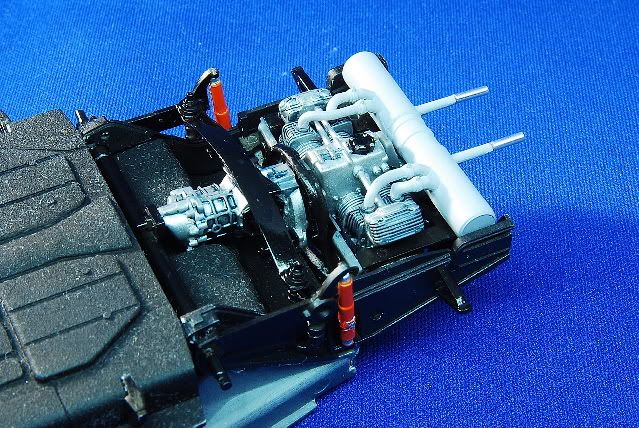 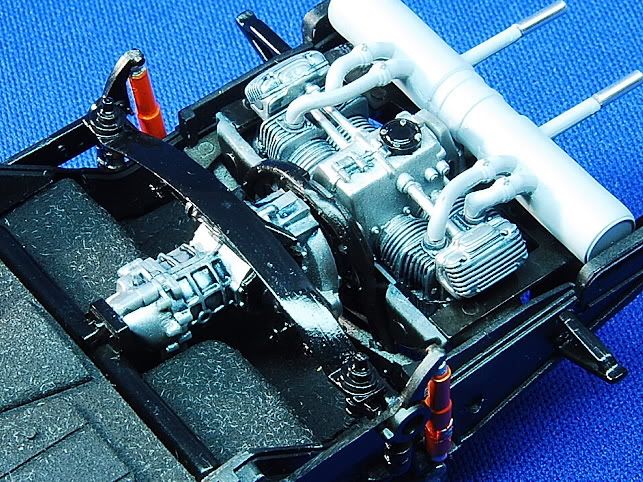 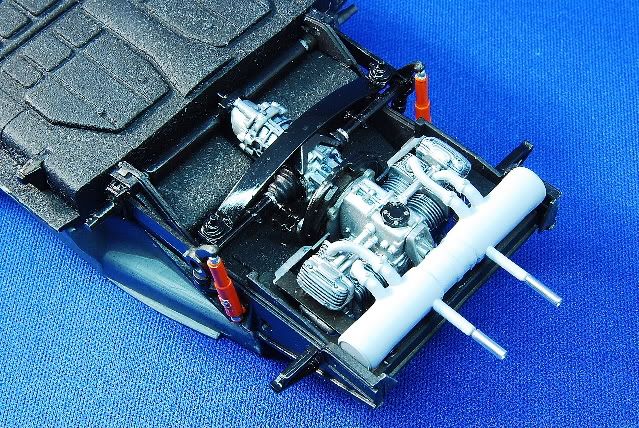  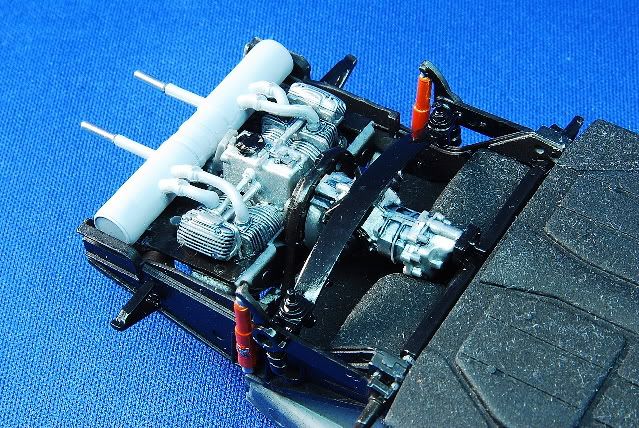  Also, it can be noticed the computer generated classic Koni shocks decal on the shocks, this couldn't be missed. 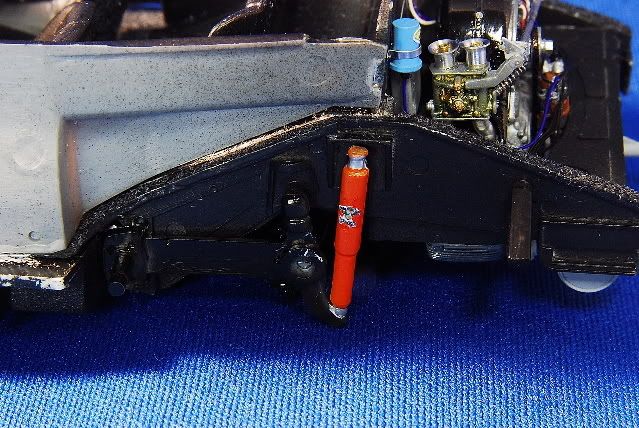
Last edited by Porsnatic; 08-25-2008 at 09:03 AM.
|
|
#37
08-25-2008, 09:04 AM
|
|||
|
|||
|
Re: Porsche 356a 1500gs Carrera Speedster
The remarkable Porsche 356 Fujimi engine, one of the best ever produced in plastic, allows plenty of room to make some improvements. The only sad notice is that most of this extra parts added won't be noticed when the model is completed. Let's see what happened....
I started adding the 3 wires for the alternator into one bigger engine wrap. 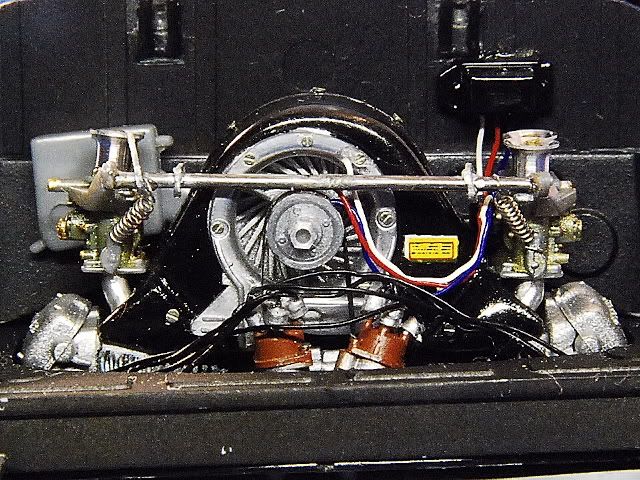  Here it can be seen the voltage regulator with it's computer generated decal, and the Mr. Model coil, also with a Bosh comp. genr. decal. Both coil and regulator were detailed with photoetch bolts from Model Car Garage. 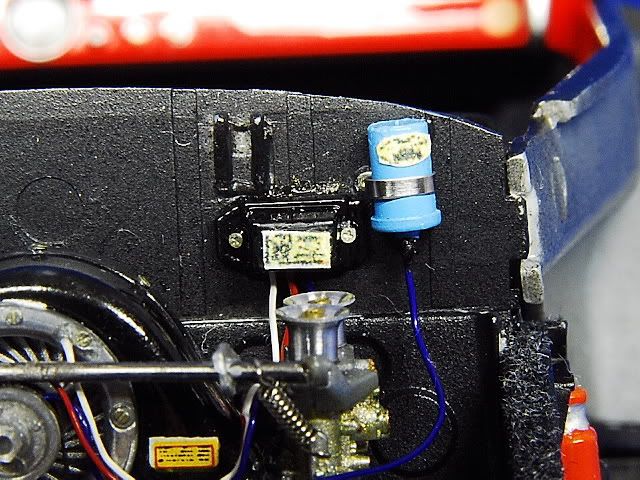  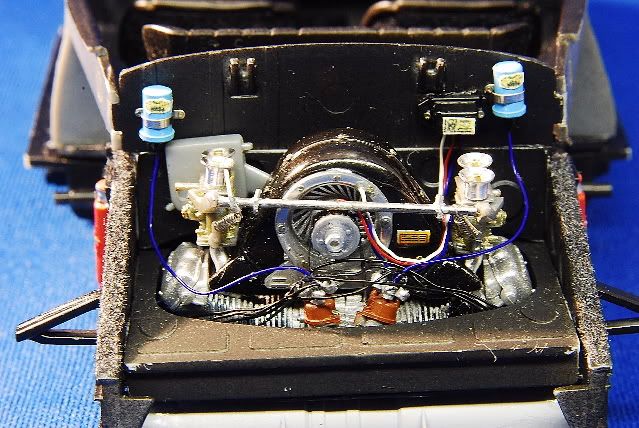  It's almost a joke to me that, after so much hours just on this area, everything looks so easy. Thanks for watching!
|
|
#39
10-14-2008, 06:09 PM
|
|||
|
|||
|
Re: Porsche 356a 1500gs Carrera Speedster
Again, back on track! It's not much, but, I have something. I had to scratchbuilt the rear brake lines system in order to get it correctly.
In this two first closeup pictures we can see some of the components used, like R&B Motion nuts, Plastruct plastic rods, Pro-Tech braided line, wire, and Bare Metal. 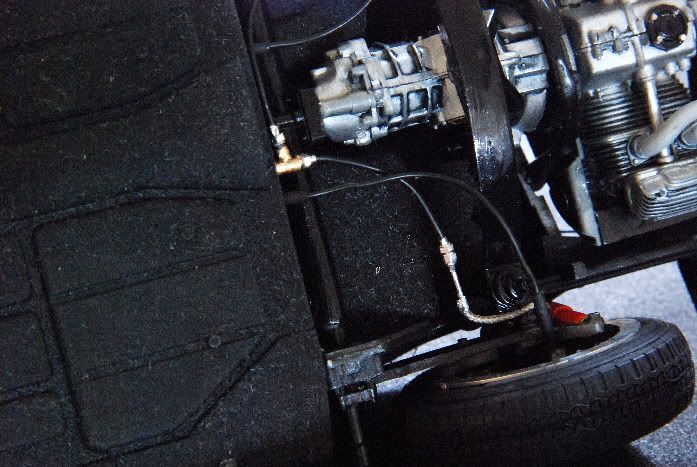 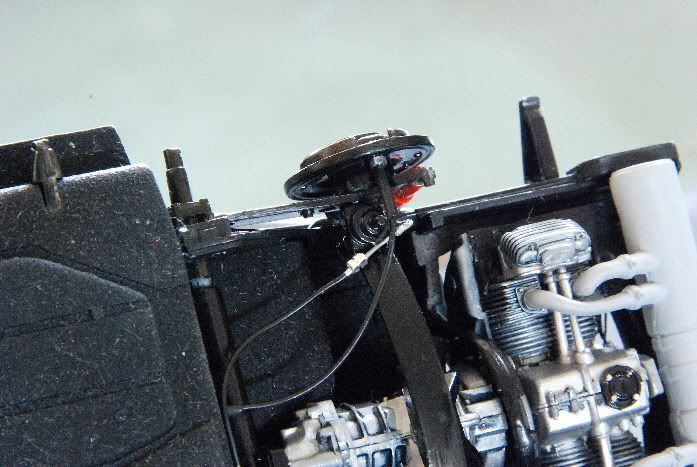 Here, some overall views of the completed system. This gave me some hard time putting this brake system together,but, at the end I like how it looks. 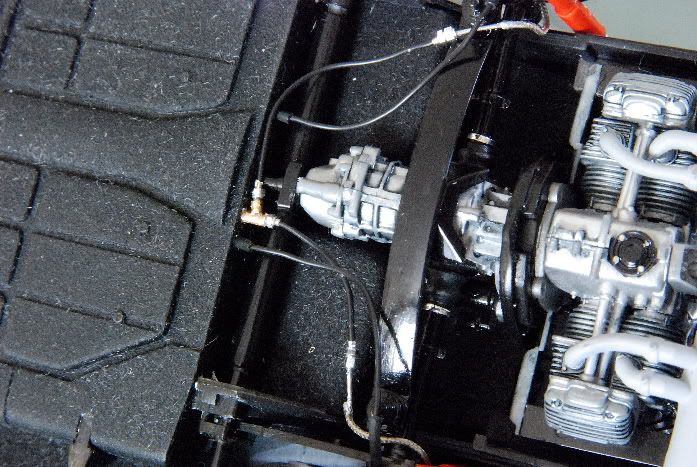 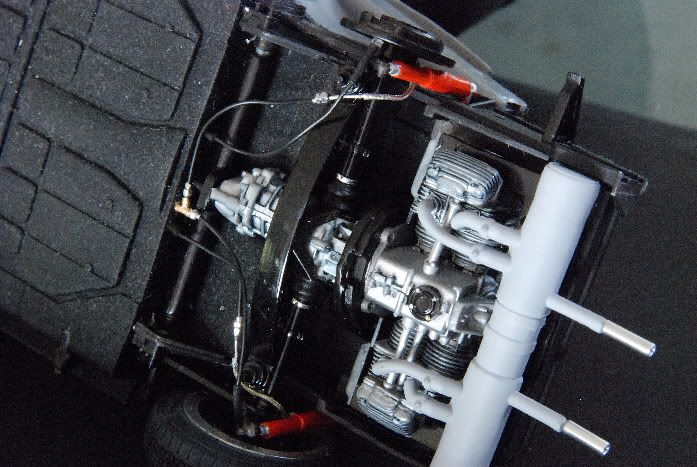 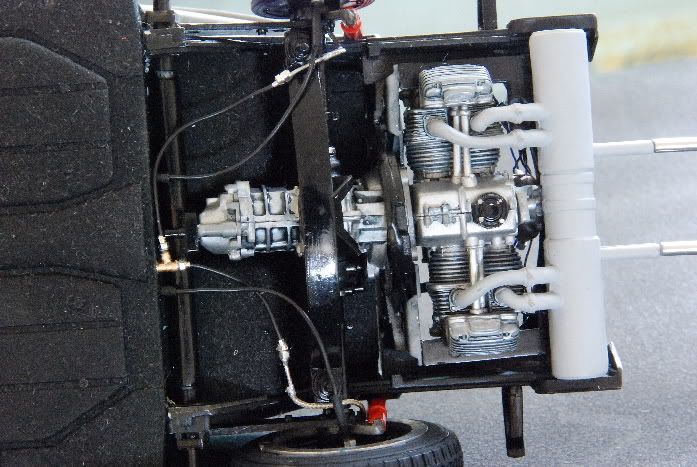 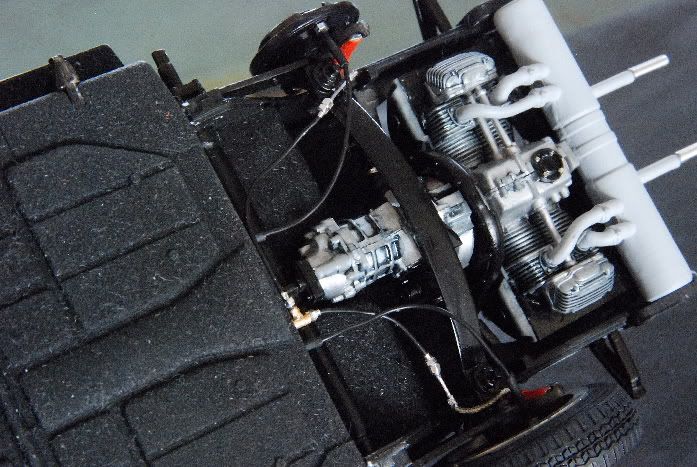 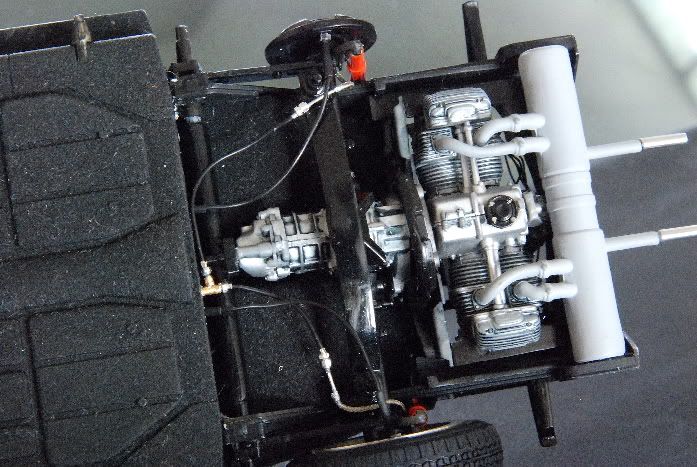 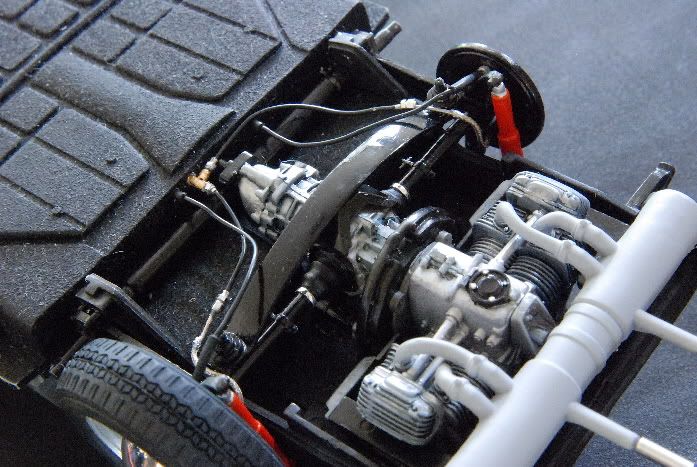 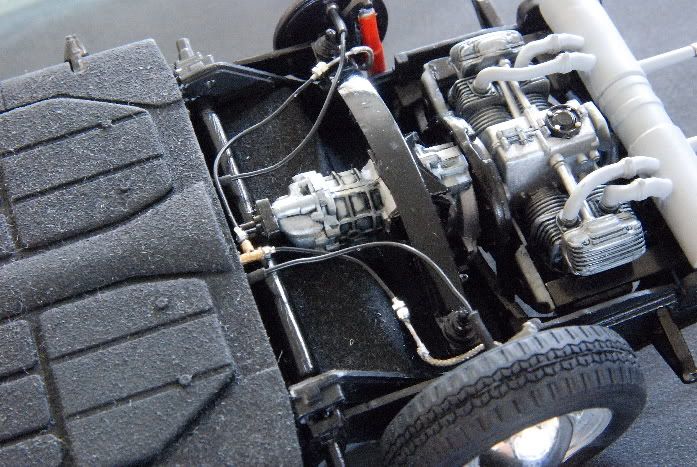 That's all folks for now!....I hope to get this completed in the next two days.
|
|
#40
10-14-2008, 10:53 PM
|
||||
|
||||
|
Re: Porsche 356a 1500gs Carrera Speedster
Outstanding work on the brake plumbing

__________________
Guideline for happy modeling: Practice on scrap. Always try something new. Less is more. "I have a plan so cunning, you could put a tail on it and call it a weasel" - Edmund Blackadder
|
|
#41
10-15-2008, 01:59 AM
|
||||
|
||||
|
Re: Porsche 356a 1500gs Carrera Speedster
It's amazing how some of the close ups are a bit scary, but the overall effect is awesome. Great imagination and work!!
__________________
Mark R
|
|
|
POST REPLY TO THIS THREAD |
 |
|
|


