|
|
| Search | Car Forums | Gallery | Articles | Helper | Air Dried Fresh Beef Dog Food | IgorSushko.com | Corporate |
|
#16
 08-05-2008, 08:57 AM
|
|||
|
|||
|
Re: Front Sway Bar
Excellent info. Interesting that Dex-Cool doesn't seem to be the culprit. I've run Dex-cool since I've owned my car and apart from replaceing my UIM gasket, I've had no issues. I just follow the advise to keep air out of the system and flush my coolant system much sooner than the recommended 5 year or 100,000 mile point. My coolant never gunks up so apparantly, the advise has been beneficial.
__________________
1997 GPGT 3.8 Dark Teal Metallic. 222000 4 door sedan No Mods 
|
|
#17
08-05-2008, 07:23 PM
|
||||
|
||||
|
Re: Front Sway Bar
Bob, were the GM gaskets you had in there the metal redesigned ones? Were the fel-pro replacements metal? Just curious....
__________________
-2000 Grand Prix GTP 170,000mi (daily driver) -2000 Olds Alero 100,000mi (soon to be DD with gas at $3.45/gal) -1997 Chev K1500 4x4 115,000mi (Natalie's truck [nans_grandprix]) AF "2.0" Community Guidelines Conservative Victory 2012!!! "I'll Keep my Guns, Freedom, and Money. You can Keep the Change!" ----->>>>> Did You Know? <<<<<-----
|
|
#18
08-05-2008, 09:48 PM
|
||||
|
||||
|
Re: Front Sway Bar
Quote:
__________________
'08 Pontiac Grand Prix GXP (Dark Slate Metallic) - LS4 5.3L V8 '02 Oldsmobile Alero GL2 - LA1 3400 V6 '99 Buick Regal LS - L36 Series II 3800 V6 '03 Honda CR250R MX - 2 Stroke 250cc '97 Pontiac Grand Prix GTP - L67 Series II 3800 V6 Supercharged (Sold) Timeslip 08/12/06 AF Community Guidelines
|
|
#19
08-06-2008, 08:50 AM
|
||||
|
||||
|
Re: Front Sway Bar
Why did you decide aginst GM metal framed ones? Again just wondering... (maybe you know something I dont)
I feel like I'm going to have to do a LIM gasket job here soon. I've got a little steam from the dipstick tube and a very minute loss of coolant (about an inch below the filler neck every month). Oil looks fine on the dipstick and when it comes out. So, I dont know. Maybe a similar problem to yours. Car runs great, plugs changed a couple months ago, none were contaminated with coolant. So i'm thinking LIM gaskets...
__________________
-2000 Grand Prix GTP 170,000mi (daily driver) -2000 Olds Alero 100,000mi (soon to be DD with gas at $3.45/gal) -1997 Chev K1500 4x4 115,000mi (Natalie's truck [nans_grandprix]) AF "2.0" Community Guidelines Conservative Victory 2012!!! "I'll Keep my Guns, Freedom, and Money. You can Keep the Change!" ----->>>>> Did You Know? <<<<<-----
|
|
#20
08-06-2008, 09:16 AM
|
||||
|
||||
|
Re: Front Sway Bar
The local GM dealer that I do business with did not have them in immediate stock. Plus lately over the past few years GM/Delco farms stuff out to other manufacturers so you have to question the quality. For example the AC Delco oil filters are not made by Delco but by Champion Labs based on the cheapy Ecore design. So I guess you can say it is a loss of confidence. FelPro has a proven track record when it comes to gaskets, especially if you worked with the GM 3100/3400 engines. The GM revised LIM gaskets were terrible and people had re-occurring issues.
It probably wouldn't hurt to do a tear down and replace the LIM gaskets, of course along with the supercharger gasket and o-rings. I did all of my GTP intake gaskets a few years ago. Several months ago I replaced the SC gasket but I had my blower S ported not due to any issues.
__________________
'08 Pontiac Grand Prix GXP (Dark Slate Metallic) - LS4 5.3L V8 '02 Oldsmobile Alero GL2 - LA1 3400 V6 '99 Buick Regal LS - L36 Series II 3800 V6 '03 Honda CR250R MX - 2 Stroke 250cc '97 Pontiac Grand Prix GTP - L67 Series II 3800 V6 Supercharged (Sold) Timeslip 08/12/06 AF Community Guidelines
|
|
#21
08-06-2008, 09:49 AM
|
||||
|
||||
|
Re: Front Sway Bar
Good stuff to know Bob! What brand oil filter do you run now since delcos are made by champions?
How long am I looking at for a LIM job on the 3800? Its a really easy motor to work on, but I'd rather take my time I guess. Basically all that needs to be removed is the fuel rails, UIM, LIM, tensioner assembly and alternator, right? The valve covers can stay on this time compared to the 3100/3400?
__________________
-2000 Grand Prix GTP 170,000mi (daily driver) -2000 Olds Alero 100,000mi (soon to be DD with gas at $3.45/gal) -1997 Chev K1500 4x4 115,000mi (Natalie's truck [nans_grandprix]) AF "2.0" Community Guidelines Conservative Victory 2012!!! "I'll Keep my Guns, Freedom, and Money. You can Keep the Change!" ----->>>>> Did You Know? <<<<<-----
|
|
#22
08-06-2008, 10:40 AM
|
||||
|
||||
|
Re: Front Sway Bar
Tim,
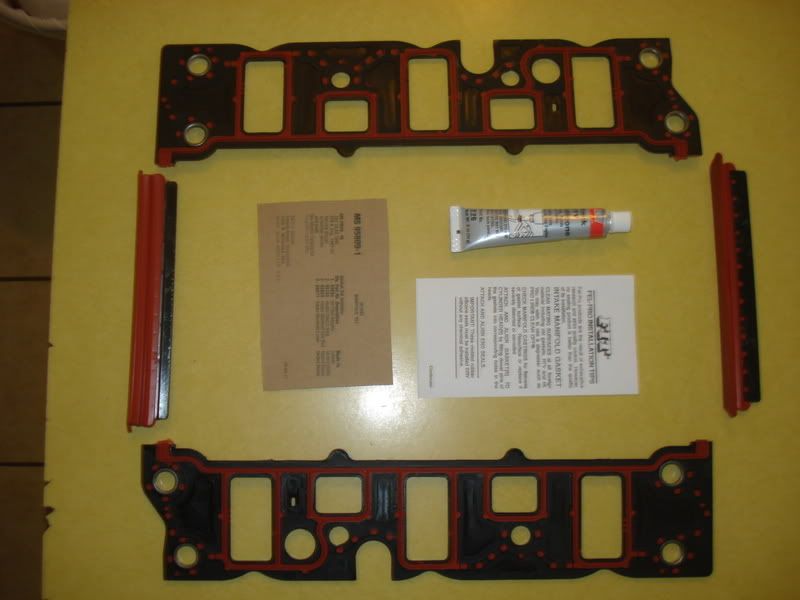
Purolator Pure One for my Regal GS and wife's LS. Mobil 1 in my GTP which incidentally is made by Champion Labs but based on a performance design not the crappy Ecore they use for the AC Delco brand. You could get it done in less than half a day but since it is your car take your time. Really an easy job considering just tedious due to all the parts that have to be removed and re-assembly. The time consuming part is getting it all cleaned up. Gasket surfaces on the cylinder heads, LIM ports, SC ports, making sure dirt doesn't drop into the lifter galley and getting all the old baked on carbon out of the throttle body, supercharger and LIM, etc. You can leave the valve covers on and do not need to undo the fuel pressure and return lines from the rail. After removing the fuel rail retaining nuts and pulling up on the rail and popping off the injectors all you have to do is tie up the fuel rail like shown in pic below. However, be sure to replace the lower fuel injector o-rings. Remove SC pulley drive belt, intake bellows, accelerator cable and bracket in addition to what you mentioned. The EGR heat shield, EGR to LIM pipe, all wiring to sensors and certain sensors, and wiring/connectors to the fuel injectors. Alternator cross bar/brackets at rear bank. On spark plug wires just set them aside after removing the plastic wiring guides. You can leave the throttle body on the supercharger and remove after you get the blower off since you will replace the rubber silicone seal there. Easier that way. Also, follow the exact torquing sequence of all LIM and supercharger bolts per the FSM and proper torque values. Use an in-lb torque wrench and 1/4" drive tools on the SC and LIM bolts. Use low strength threadlocker on the bolts which you can re-use after cleaning them up. 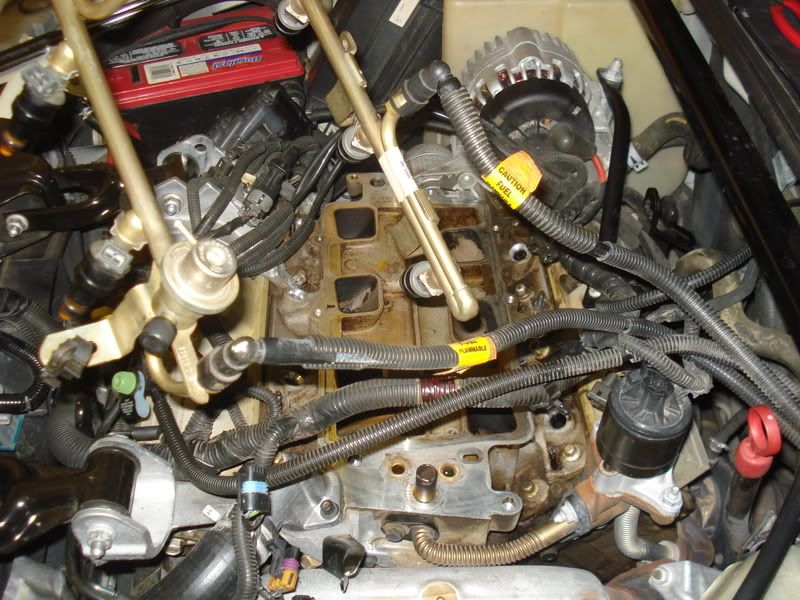
__________________
'08 Pontiac Grand Prix GXP (Dark Slate Metallic) - LS4 5.3L V8 '02 Oldsmobile Alero GL2 - LA1 3400 V6 '99 Buick Regal LS - L36 Series II 3800 V6 '03 Honda CR250R MX - 2 Stroke 250cc '97 Pontiac Grand Prix GTP - L67 Series II 3800 V6 Supercharged (Sold) Timeslip 08/12/06 AF Community Guidelines
|
|
#23
08-06-2008, 09:29 PM
|
||||
|
||||
|
Re: Front Sway Bar
Good Stuff Bob! Thanks for the info!
__________________
-2000 Grand Prix GTP 170,000mi (daily driver) -2000 Olds Alero 100,000mi (soon to be DD with gas at $3.45/gal) -1997 Chev K1500 4x4 115,000mi (Natalie's truck [nans_grandprix]) AF "2.0" Community Guidelines Conservative Victory 2012!!! "I'll Keep my Guns, Freedom, and Money. You can Keep the Change!" ----->>>>> Did You Know? <<<<<-----
|
|
#24
08-08-2008, 11:34 AM
|
||||
|
||||
|
Re: Front Sway Bar
Not to take the off topic, off topic but I was a little interested in a front sway bar, thanks.
 I will be doing this tonight and I'll add some photos to the instructions. For those of us that are a little more pictorial it is helpful.
|
|
#25
08-09-2008, 08:33 PM
|
||||
|
||||
|
Re: Front Sway Bar
Quote:
I got my OEM used sway bar at http://www.moradpartscompany.com/ I'd like to add a couple things & some pics... Just finished... '99 GP GT Here is my helper... he is 4 and knows what a 9/16" is and a 15mm!!  I got the Moog sway bar links from the local Carquest  If anyone has a good idea as to how to remove this bolt let everyone know. This as a PAIN!! Only room for 1/8 of a turn.  wish I would had a torch is all I can say... That tie rod end was a bear to remove!! I editied the instructions a little for my vehicle... Installing a front sway bar By Brian A. Marks with permission from Kevin Li Tools Required:
Parts Required
Last edited by MichEE; 08-10-2008 at 02:06 PM.
|
|
 |
POST REPLY TO THIS THREAD |
 |
|
|


