|
|
| Search | Car Forums | Gallery | Articles | Helper | Air Dried Fresh Beef Dog Food | IgorSushko.com | Corporate |
|
|||||||
| WIP - Street Post topics for any "Works In Progress" street vehicles projects in this sub-forum. |
 |
 Show Printable Version | Show Printable Version |  Subscribe to this Thread
|
|
|
Thread Tools |
|
#91
 04-23-2007, 09:10 AM
|
||||
|
||||
|
Re: Orange 7 WIP
Once the ignition wires were routed to the spark plugs and coil, I could install the Weber carbs and K&N air filters. The carbs and filters are box stock kit items just detailed with paint. They even come with that cool screen mesh for the filter elements.
I made the lettering for the wires, hose and belts. 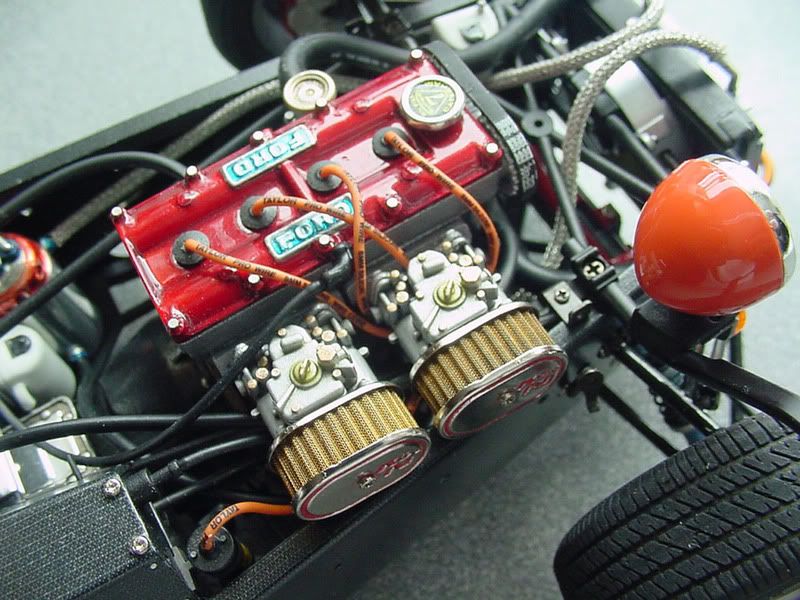 

|
|
#93
04-23-2007, 11:24 AM
|
||||
|
||||
|
Re: Orange 7 WIP
Now THAT is a real photo!!!

__________________
Guideline for happy modeling: Practice on scrap. Always try something new. Less is more. "I have a plan so cunning, you could put a tail on it and call it a weasel" - Edmund Blackadder
|
|
#94
04-24-2007, 08:55 AM
|
||||
|
||||
|
Re: Orange 7 WIP
And now the front wings are attached
 And the completed rear fender assemblies  Now the wheels can be mounted to the car for the final time and thus the hub caps can be installed for the first time 
|
|
#95
04-24-2007, 09:41 AM
|
|||
|
|||
|
Re: Orange 7 WIP
Excellent craftsmanship and wonderful tips as usual. More to refer to when I eventually get around to building mine. I've got a boatload of experience to gain with painting, that's for sure. One thing with the Tamiya kits, though, I continue to find those phillips screw-heads annoying. I can't see building it and leaving them exposed "as is." What do you consider the best alternatives, if any?
BTW, aren't you involved with a 1:1 Super Seven? I recall seeing a picture of you helping to take one off a trailer. Or is that the NEXT build - simultaneous 1:1 and 1:12? 
|
|
#96
04-24-2007, 10:19 AM
|
||||
|
||||
|
Re: Orange 7 WIP
Thanks Jim.
Yes, in my opinion, those little screws, which make assembly so quick on many parts, are the single largest detractor of the finished model looking real. This Orange one is a more or less, Out-Of-the-Box build, (with a few enhancements for fun...), it is not for my collection, it is for someone else. To hide or eliminate those screws on the last two of these I built, I machined my own hardware in aluminum. Time consuming? Yes, but I think it yields the best look. Another alternative is to "cap" them with PE bolt heads. A bit better than the phillips heads, but slightly lacking in thickness for many applications. But if you don't have access to a mill... Yes, I have friends with real 7's. But I'll stick to my Camaro's for a while. Seven's are neat, but not too practical as daily drivers.
|
|
#97
04-25-2007, 09:41 AM
|
||||
|
||||
|
Into the final stretch...
The cowl was painted orange, because the color was handy, any light color would do, and the decals like to be applied over paint better than raw material. I used SMS #1320 Kevlar.
 Here is the decal I cut from the sheet and the solvent and brush I used.  The decal reacted very quickly to the decal solvent. Made the application easy. Just don't over do it with the solvent. I made the front edge conform to the part and let it dry for a bit.  Then tackled the rear and sides. A couple little patches were needed and easy to do. Then it was clear coated with the mix of Dullcoate and Glosscote with a drop or two of Tamiya Clear yellow thrown in. 
|
|
#99
04-26-2007, 08:43 AM
|
||||
|
||||
|
Re: Orange 7 WIP
Quote:
Never put solvent on a decal that is still on the paper backing. Only use solvent where needed. Most decals do not need solvent all over every part of them, just the spots that need extra help to conform. Dip in water, wait for the decal to slide off easily, position on part, then assess what needs solvent. As you become more familiar with the decals you are working with, you may find a little solvent on the part in a tough area before applying the decal can help. You'll have to figure that out though. It's better to go slow and sparingly with the solvent, once you put too much on, it becomes very difficult to salvage the damage that can occur... -Mark
|
|
#100
04-26-2007, 08:44 AM
|
||||
|
||||
|
Re: Orange 7 WIP
The license plate is a custom made decal. Phillips head P/E items from SMS #8117 accentuate it.

|
|
#101
04-26-2007, 11:24 AM
|
||||
|
||||
|
Re: Orange 7 WIP
Just very beautiful build. I love Sevens because they are so versatile yet simple cars. You can go with lots of different colour schemes and it will look good. I have 6 Seven models myself, but only one of them is a Tamiya 1:12 kit, which I am building as a long term project a small phase at a time.
__________________
OPEL Performance In progress: Caterham Super Seven 1:12 etc. Real cars: Pontiac GTO (Holden Monaro), Opel Calibra Turbo 4x4 (13.7s 1/4 mile), Opel Vectra GT 16V (16.0s 1/4 mile)
|
|
|
POST REPLY TO THIS THREAD |
 |
|
|