|
|
|

|
|
| Search | Car Forums | Gallery | Articles | Helper | Quality Dog Food | IgorSushko.com | Corporate |
|
| Latest | 0 Rplys |
|
|||||||
| WIP - Motorsports Post topics for any "Work In Process" motorsports vehicles in this sub-forum. |
 |
 Show Printable Version | Show Printable Version |  Email this Page | Email this Page |  Subscribe to this Thread
|
|
|
Thread Tools |
 10-06-2007, 10:19 AM
|
#31 | |
|
AF Fanatic

Join Date: Dec 2004
Location: Up the creek with no paddle
Posts: 5,889
Thanks: 7
Thanked 16 Times in 15 Posts
|
Re: 1-24 MFH Aston Martin DB-R 9 Silverstone 05
I am so jealous!
 Maybe I'll get some bench time this afternoon / evening... How's the casting going?
__________________
Guideline for happy modeling: Practice on scrap. Always try something new. Less is more. "I have a plan so cunning, you could put a tail on it and call it a weasel" - Edmund Blackadder |
|

|

|
|
10-06-2007, 01:12 PM
|
#32 | |
|
AF Enthusiast
 
Join Date: Mar 2004
Location: Calgary
Posts: 1,071
Thanks: 0
Thanked 0 Times in 0 Posts
|
Re: 1-24 MFH Aston Martin DB-R 9 Silverstone 05
Great job Saint. You and Klutz are making me want to start mine. Good job on the fixes, these were the things that I wondered about too when looking at the kit.
Since Steve is obviously monitoring this thread where did the 2K clear go? Can't seem to find it on the hiroboy site, anybody know? Mike
__________________
    |
|
|
|
|
|
10-13-2007, 02:01 PM
|
#33 | |||
|
Registered User
Thread starter

Join Date: Feb 2003
Location: Berlin
Posts: 1,410
Thanks: 3
Thanked 3 Times in 3 Posts
|
Re: 1-24 MFH Aston Martin DB-R 9 Silverstone 05
Quote:
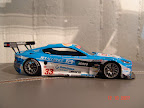
 and then one last layer clear. and then one last layer clear.Today I sprayed the first layer clear... The Zero Aston green looks really awesome  I just took a quick pic still in my paint booth...  Actually I wanted to use the 2K clear from Zero Paints but like I said before the hardener started to dry out but since it was only the top, the rest looked ok, I thought it would be ok... but that wasn't the case. After I mixed everything it immediantly started to clog so there was no way to put it in my airbrush  I mean the paint is good, I used it for a little paint comparsion... but it's useless (for me atleast considering my building speed ) if you can't store it for a longer period of time... I mean the paint is good, I used it for a little paint comparsion... but it's useless (for me atleast considering my building speed ) if you can't store it for a longer period of time... so I used the Finisher's 2-Part Clear (GP1 Set) again which is by far the best clear I've ever used, dries rock hard, doesn't attack decals, dries fast and extremly easy to work with! Quote:
 I started with making the mold and I haven't seen yet how it turned out (I'm curious about bubbles etc...) but so far it's really fun. I finally got everything (including some bottles for the resin, remember Klutz we talked about that)  I built some boxes with old Lego (man I forgot how much fun this is  ), covered them with some tape so the silicone won't come through and filled the bottom wih plasticine, modelling clay whatever it's called ), covered them with some tape so the silicone won't come through and filled the bottom wih plasticine, modelling clay whatever it's called  . I used some old plastic cards to make a "flat" ground like the casting gods said and since I had an old card with my name (raised letters) on I just tried to add my name to the mold (Modeler's never grow up I guess . I used some old plastic cards to make a "flat" ground like the casting gods said and since I had an old card with my name (raised letters) on I just tried to add my name to the mold (Modeler's never grow up I guess  ) )  It's magic or this pic shows the back of the box through a old piece of glas, you decide...  And this is where I am, first part of the 2-part mold is done...  |
|||
|
|
|
|
10-14-2007, 12:50 AM
|
#34 | |
|
AF Fanatic
Join Date: Dec 2004
Location: Up the creek with no paddle
Posts: 5,889
Thanks: 7
Thanked 16 Times in 15 Posts
|
Re: 1-24 MFH Aston Martin DB-R 9 Silverstone 05
Looking good - that color is super! How many costs of base color did you put down in the end?
Nice shopping trip!  I've always wanted to try a blue silicone - just for variety. What color will your resin be? Green? Or did you get some C/F pattern resin?
__________________
Guideline for happy modeling: Practice on scrap. Always try something new. Less is more. "I have a plan so cunning, you could put a tail on it and call it a weasel" - Edmund Blackadder |
|
|
|
|
|
10-14-2007, 08:41 AM
|
#35 | ||
|
Registered User
Thread starter
Join Date: Feb 2003
Location: Berlin
Posts: 1,410
Thanks: 3
Thanked 3 Times in 3 Posts
|
Re: 1-24 MFH Aston Martin DB-R 9 Silverstone 05
Quote:
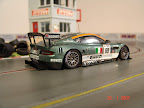
No nothing fancy about the resin it looks almost white but it's a bit see through... I finished the mold which turned out perfect, no bubbles or anything!   And as you can see I tried the resin this morning but I messed it up... I think I didn't stir it well enough so the resin is still soft and that won't change I guess... and if that wasn't bad enough, I got 3 big air bubbles! So I will need to practice a bit more   Ok now some pics of the cleared body!!!    with the chassis + some CF parts, the splitter isn't cleared yet but the mirrors are.    Last edited by Decs0105; 10-14-2007 at 09:46 AM. |
||
|
|
|
|
10-14-2007, 12:20 PM
|
#36 | |
|
AF Enthusiast
Join Date: Mar 2004
Location: Calgary
Posts: 1,071
Thanks: 0
Thanked 0 Times in 0 Posts
|
Re: 1-24 MFH Aston Martin DB-R 9 Silverstone 05
Wow, looks great Dennis. The resin casting looks good, something I'm too afraid to attempt but probably will in the future.
Mike
__________________
|
|
|
|
|
|
10-15-2007, 03:33 AM
|
#37 | |
|
AF Enthusiast

Join Date: Mar 2003
Location: Rostock
Posts: 1,569
Thanks: 0
Thanked 0 Times in 0 Posts
|
Re: 1-24 MFH Aston Martin DB-R 9 Silverstone 05
The paint job looks great an your CF work on the side mirror gives it the extra detail. Very nice. Loke Mike said, I´m too afraid of doing my own castings in resin, so much respect to you. Keep it up!
__________________
Recently finished Projects:
Porsche 911 Carrera RS 3.0 Current Projects: Ferrari 250 GTO LM 1962 (chassis #3387)   |
|
|
|
|
|
10-21-2007, 03:13 PM
|
#38 | |
|
Registered User
Thread starter
Join Date: Feb 2003
Location: Berlin
Posts: 1,410
Thanks: 3
Thanked 3 Times in 3 Posts
|
Re: 1-24 MFH Aston Martin DB-R 9 Silverstone 05
quick update...
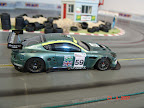
I just finished preparing the body for the decals. 1st step was giving the clear coat one light wetsand with #3200 micromesh then masked everything to prepare all the areas that need CF decals...  followed by some coats Zero semi gloss black. This turned out ok so now I can start with the decals! sorry crappy pic.. the lighting was a bit off  Oh you can also see my first successful resin casted part at the front airintake, it fits nicely  I actually wanted to finish the decals this weekend but that didn't work obviously |
|
|
|
|
|
10-21-2007, 05:43 PM
|
#39 | |
|
AF Enthusiast
 
Join Date: Feb 2006
Location: Manchester
Posts: 759
Thanks: 0
Thanked 2 Times in 2 Posts

|
Re: 1-24 MFH Aston Martin DB-R 9 Silverstone 05
Scrumptious. Truly, truly.
__________________
On the workbench: Completed WIPs: Completed Models Gallery: |
|
|
|
|
|
10-21-2007, 09:14 PM
|
#40 | |
|
AF Enthusiast

Join Date: Sep 2006
Location: USA, Florida
Posts: 590
Thanks: 3
Thanked 6 Times in 6 Posts
|
Re: 1-24 MFH Aston Martin DB-R 9 Silverstone 05
Real nice paint job on the body looks awesome with the black applied to it.
Your resin casting is very cool also can't wait to see it with the CF on it.
__________________
Regards, Dave |
|
|
|
|
|
10-22-2007, 02:27 AM
|
#41 | |
|
AF Fanatic
Join Date: Dec 2004
Location: Up the creek with no paddle
Posts: 5,889
Thanks: 7
Thanked 16 Times in 15 Posts
|
Re: 1-24 MFH Aston Martin DB-R 9 Silverstone 05
Nice one D!
 I am at exactly the same stage  Also used Zero Jet Black. Also used Zero Jet Black.My problem has been with that darned Mr. Resin primer - paint flaking off all over the place  I think I can save it without stripping but well see.... I think I can save it without stripping but well see....
__________________
Guideline for happy modeling: Practice on scrap. Always try something new. Less is more. "I have a plan so cunning, you could put a tail on it and call it a weasel" - Edmund Blackadder |
|
|
|
|
|
10-22-2007, 03:44 PM
|
#42 | ||
|
Registered User
Thread starter
Join Date: Feb 2003
Location: Berlin
Posts: 1,410
Thanks: 3
Thanked 3 Times in 3 Posts
|
Re: 1-24 MFH Aston Martin DB-R 9 Silverstone 05
Quote:
 But you know that's why I always use Tamiya primer... straight from the rattle can. I never had a single problem over the last couple years. But you know that's why I always use Tamiya primer... straight from the rattle can. I never had a single problem over the last couple years. |
||
|
|
|
|
10-23-2007, 12:08 AM
|
#43 | |
|
AF Enthusiast

Join Date: Feb 2003
Location: Chicago
Posts: 528
Thanks: 2
Thanked 17 Times in 16 Posts
|
Re: 1-24 MFH Aston Martin DB-R 9 Silverstone 05
Sweet photos of modeling work.... The green color feels just right to me.
Keep up the good work!
__________________
-- CifeNet |
|
|
|
|
|
10-28-2007, 04:57 AM
|
#44 | |
|
AF Regular

Join Date: Nov 2003
Location: boeblingen
Posts: 221
Thanks: 10
Thanked 0 Times in 0 Posts
|
Re: 1-24 MFH Aston Martin DB-R 9 Silverstone 05
your car is coming along real fine..... looks great.
Can't wait to see the finished product ;-) Well done!
__________________
      |
|
|
|
|
|
11-04-2007, 05:12 PM
|
#45 | |
|
Registered User
Thread starter
Join Date: Feb 2003
Location: Berlin
Posts: 1,410
Thanks: 3
Thanked 3 Times in 3 Posts
|
Re: 1-24 MFH Aston Martin DB-R 9 Silverstone 05
THANKS FOR ALL THE COMMENTS!!! That really keeps me motivated
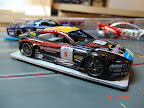
next update... basicly turned parts ok first part is the silver thing which looks like to redirect air? If anyone knows please let me know...  here we go... and since there's another part right under it, I made that too.    Air Jack part... normally they are only some resin pins which are casted together with the body. But they look horrible I drilled out both sides and since there's only one side (depends on track) equipped with that part I only made one.  fuel adapter, again drilled out at the beginning with all the other body prep work and replaced with a turned brass part.  adapters for the antennas. Normally these are white metal parts... but since they are so small I couldn't motivate myself to clean them up. Maybe Klutz can take a comparison shot of them  And as I just saw these two parts need to be swapped.. finally the last thing... turned exhaust tips  EDIT: the green looks wierd on the last few pics... I think I used a completely wrong setting on my cam (took the pics under a lamp...) Last edited by Decs0105; 11-04-2007 at 06:30 PM. |
|
|
|
|
|
|
POST REPLY TO THIS THREAD |
 |
| Thread Tools | |
|
|

