|
|
|

|
|
| Search | Car Forums | Gallery | Articles | Helper | AF 350Z | IgorSushko.com | Corporate |
|
| Latest | 0 Rplys |
|
|||||||
| WIP - Motorsports Post topics for any "Work In Process" motorsports vehicles in this sub-forum. |
 |
 Show Printable Version | Show Printable Version |  Email this Page | Email this Page |  Subscribe to this Thread
|
|
|
Thread Tools |
 02-11-2002, 06:07 AM
|
#16 | |
|
AF Enthusiast

Join Date: Aug 2001
Location: London
Posts: 2,644
Thanks: 0
Thanked 9 Times in 9 Posts
|
Ah, that Tamiya tape will make short work of the masking! Just remember to go light on the first few coats and you will be fine!
I still haven't seen this kit in the shops, and as it doesn't go with much else I shall try to avoid it!!! Nice though! Should look good next to the Calibra! |
|

|

|
|
02-13-2002, 02:59 PM
|
#17 | |
|
"P-Man"
 
Join Date: Mar 2001
Location: Manawatu
Posts: 15,179
Thanks: 0
Thanked 3 Times in 3 Posts

|
UPDATE.
Started the slow process of masking the model up last night ready for the yellow to be sprayed. First off the car was given a very light sanding to remove any overspray on the roof etc. Next off I used Tamiya masking to mask the line on the back panels. After what seemed like ages of getting right I was happy with the correct placement on the tape. Next the front was masked. This was to be the tricky part as it had to be perfect (no bleeding aloud), plus the lines had to be correct around the front air dam. The whole front was masked. Then using a very sharp modeling knife I trimmed around the spoiler line and removed the off cuts . looked just right. Next all the tape was pressed down using a tooth pick to get into all the small lines etc and other bits pressed down firmly with a soft cloth. I used 6mm tape to then overlay over the first (about 4 layers back). Then I cut newspaper to fit over the remaining body and tacked it down with tape. Then I taped over all the rest of the body to stop any oversprays. Its important to tape the inside as well if theres grills etc, as the paint can bleed though. Altogether it took me about 2hours to tape the whole body ready for painting. The sray can was then put in hot water to heat the paint up so that it flows better from the can. The first coat should be a very very light mist coat.. Spray the model about 30-35in away from the model. This first coat should only just cover the car. It looks like shit but the idea of the very first mist coat is to seal the masking tape edges (a heavy coat and it can bleed though). Waited 20mins then do the same again . Another very light mist coat. Another 3rd mist coat was sprayed 20 mins later. After 3 coats you should just be able to see a little bit of white still showing. Leave for another 20mins. Then the car can be sprayed with the heavy final coats. 4 coats later, it was all finished looked brilliant .nice deep gloss to the yellow. Now the fun bit .removing the masking. This needs to be done within the first 20-30mins after spraying when the paint is still soft. Anylonger and the paint will dry to hard and can tear the masking line when taking it off. Im very pleased to say that after removing all the tape it was PERFECT !!!! Pics to follow later on. Bit of a long dribble ..but I thought Id say how its done for those who wonder about it. The kit will be left for about 2 weeks to harden the paint up. Then the small ridge of paint will be sanded out then the whole car polished
__________________
Current Build.....1/12 Scale Camaro......Almost finished!!!    View All My Models Here. |
|
|
|
|
|
02-13-2002, 04:36 PM
|
#18 | ||
|
AF Enthusiast
Join Date: Jan 2002
Location: swindon
Posts: 107
Thanks: 0
Thanked 0 Times in 0 Posts
|
Baaaad idea!!!
Quote:
 Keeping it at room temperature should be fine. It's a lot safer. Keeping it at room temperature should be fine. It's a lot safer.
__________________
Rich. 
|
||
|
|
|
|
02-13-2002, 05:02 PM
|
#19 | ||
|
Horizontally Opposed
Join Date: Mar 2001
Location: Las Vegas, Nevada
Posts: 16,856
Thanks: 0
Thanked 11 Times in 9 Posts

|
Re: Baaaad idea!!!
Quote:
 |
||
|
|
|
|
02-13-2002, 05:25 PM
|
#20 | |
|
AF Enthusiast
Join Date: Jan 2002
Location: swindon
Posts: 107
Thanks: 0
Thanked 0 Times in 0 Posts
|
well on the can it says do not exceed temperatures above 50 degrees celsius. My hot tap is hotter than that. On one can i have it specifies 'do not place in hot water'. I dont know, maybe I have an unusually hot hot tap, but you won't catch me doing it.
__________________
Rich.
|
|
|
|
|
|
02-13-2002, 06:24 PM
|
#21 | |
|
Banned

Join Date: Mar 2001
Posts: 2,770
Thanks: 0
Thanked 0 Times in 0 Posts
|
I heat up my paint cans too. But if it's too hot to put my finger in I don't put in the spray can.
|
|
|
|
|
|
02-14-2002, 01:08 AM
|
#22 | ||
|
"P-Man"
Join Date: Mar 2001
Location: Manawatu
Posts: 15,179
Thanks: 0
Thanked 3 Times in 3 Posts
|
Quote:
__________________
Current Build.....1/12 Scale Camaro......Almost finished!!! View All My Models Here. |
||
|
|
|
|
02-16-2002, 12:47 AM
|
#23 | |
|
"P-Man"
Join Date: Mar 2001
Location: Manawatu
Posts: 15,179
Thanks: 0
Thanked 3 Times in 3 Posts
|
Body pics. Just waiting on sanding and polishing. The inside has to be painted all black yet.
Started on building it now !!! 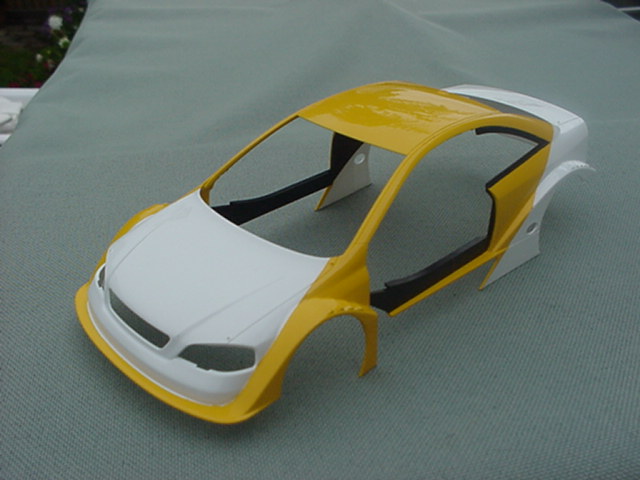  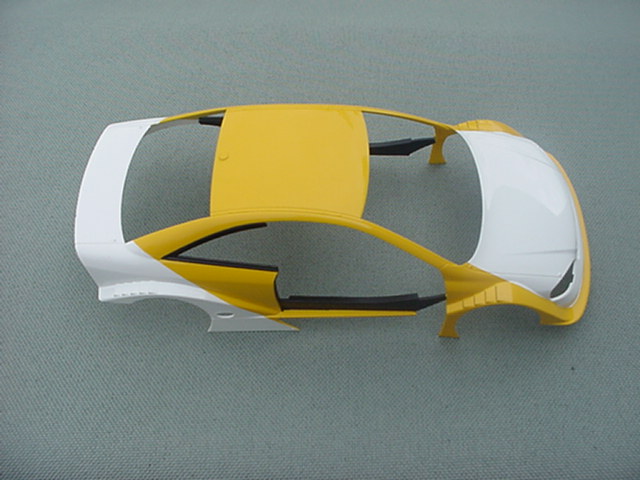
__________________
Current Build.....1/12 Scale Camaro......Almost finished!!! View All My Models Here. |
|
|
|
|
|
02-16-2002, 01:34 AM
|
#24 | |
|
AF Enthusiast
Join Date: Aug 2001
Location: London
Posts: 2,644
Thanks: 0
Thanked 9 Times in 9 Posts
|
As I would have guessed it already looks polished! Superb job!
We really need to get you into carbon decal now Warren, it would really set off a car like this one! It made my Skylines look very special! Oh, and don't make this kit look gorgeous! I am trying to resist buying it!!!  |
|
|
|
|
|
02-16-2002, 01:44 AM
|
#25 | ||
|
"P-Man"
Join Date: Mar 2001
Location: Manawatu
Posts: 15,179
Thanks: 0
Thanked 3 Times in 3 Posts
|
Quote:

__________________
Current Build.....1/12 Scale Camaro......Almost finished!!! View All My Models Here. |
||
|
|
|
|
02-16-2002, 05:10 AM
|
#26 | |
|
I'm still here

Join Date: Nov 2001
Location: Auckland
Posts: 5,630
Thanks: 0
Thanked 0 Times in 0 Posts
|
Nice job on the yellow. Just shows how a little time spent getting the masking 110% can make the painting job go soo much better.
Like Guiddy says it almost looks polished 
__________________

|
|
|
|
|
|
02-16-2002, 02:29 PM
|
#27 | |
|
"P-Man"
Join Date: Mar 2001
Location: Manawatu
Posts: 15,179
Thanks: 0
Thanked 3 Times in 3 Posts
|
Things coming along really well. Not one problem with fitting of parts. Everything went well so far.
Heres a few more pics(just for you Dan !!  ) of how things are going ) of how things are goingROLLCAGE......Almost fell together it was so easy to build 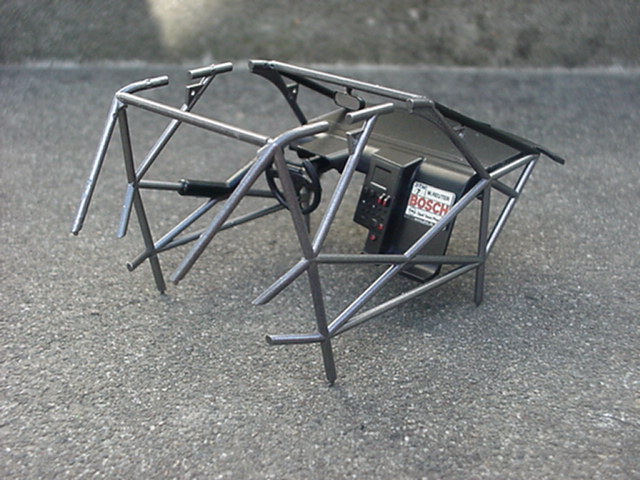 Nice detailed interior   The roll cage has a few more bars and struts to add yet....everything just sitting in ther so far, not glued...just checking fitment etc  Body still has plenty more add on to go...but just getting a quick idea as to how it well look 
__________________
Current Build.....1/12 Scale Camaro......Almost finished!!! View All My Models Here. |
|
|
|
|
|
02-16-2002, 07:34 PM
|
#28 | |
|
AF Enthusiast
Join Date: Jan 2002
Location: swindon
Posts: 107
Thanks: 0
Thanked 0 Times in 0 Posts
|
Looks cool. I'm doing the same kit and was just wondering, when you did the headlights, did you use the supplied metal transfers, or did you just paint it. And did you stick them on using their own adhesive, or did you put them on so that the shiny side was facing outwards [ie. upside - down]?
Also dont you think that using metal transfers for mirrors is the way forward. They look so much better than painted ones. 
__________________
Rich.
|
|
|
|
|
|
02-16-2002, 09:12 PM
|
#29 | ||
|
"P-Man"
Join Date: Mar 2001
Location: Manawatu
Posts: 15,179
Thanks: 0
Thanked 3 Times in 3 Posts
|
Quote:
I searched all over the net to get good pics of the lights as they are different to what is shown in the box pics.
__________________
Current Build.....1/12 Scale Camaro......Almost finished!!! View All My Models Here. |
||
|
|
|
|
02-16-2002, 09:21 PM
|
#30 | |
|
"P-Man"
Join Date: Mar 2001
Location: Manawatu
Posts: 15,179
Thanks: 0
Thanked 3 Times in 3 Posts
|
Here's some more pics to drive you all mad !!!!
Inside is now all finished   Underneath shot......nothing to look at  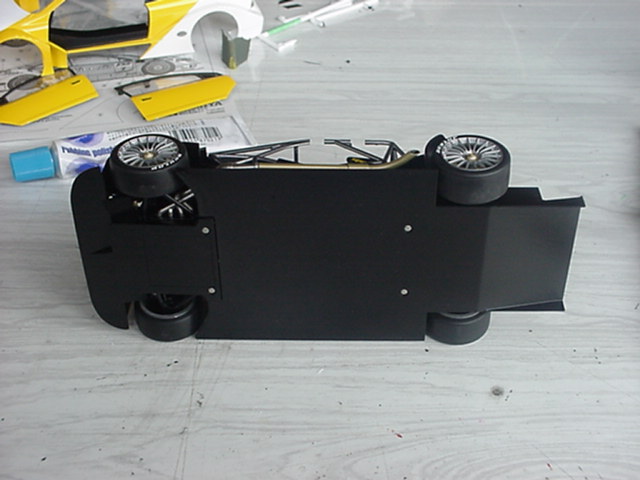 Pic of the body parts all on. Doors fit really well and should not be a problem to get right. Front and rear air dam's attached Now the long job of getting the decals on  
__________________
Current Build.....1/12 Scale Camaro......Almost finished!!! View All My Models Here. |
|
|
|
|
| ||||||||||||||||||||||||||||||||||||||
|
POST REPLY TO THIS THREAD |
 |
|
|


