|
|
| Search | Car Forums | Gallery | Articles | Helper | Air Dried Beef Dog Food | IgorSushko.com | Corporate |
|
|||||||
| Completed Projects / Gallery Post all completed works in this sub-forum. |
 |
 Show Printable Version | Show Printable Version |  Subscribe to this Thread
|
|
|
Thread Tools |
|
#1
 12-31-2003, 10:33 PM
|
|||
|
|||
|
Completed 300ZX
Hey guys,
this is for all intents and purposes my first model (last one was maybe 10+ years ago when I was 13 or so, so safe to say my skills are from scratch  ), much of the advice and How To's here came in really handy, so thanks all. I'm fairly happy with it for my first model, although a lot of things didn't come out as well as I planned, mainly issues relating to glue getting where it should and messing up paint, and bleeding on areas I masked. ), much of the advice and How To's here came in really handy, so thanks all. I'm fairly happy with it for my first model, although a lot of things didn't come out as well as I planned, mainly issues relating to glue getting where it should and messing up paint, and bleeding on areas I masked.The model is Tamya, body paint is Tamya from can. I would appreciate ANY criticism as to how to improve next time (unfortunately you can't really see all its flaws in the pics)  Gloss levels are so so, for my next one I'm not sure how to improve on it though. I was using Mr. Rubbing Compound (and I think it says 1000 on it somewhere), is this too harsh? After using this prior to wax the model was of similar gloss to unpainted plastic.       For next time, can anyone help me with: - how to avoid bleeding for masked areas. I was brushing paint on which I think is a no-no, but sometimes there's no other way. Tips? - When masking areas on the body if I cut with a knife (even lightly) it would go though to the primer underneath, leaving an ugly white line.... can anything be done about that? - Semi gloss paints looked really average, with non smooth surfaces and different levels of gloss resulting. - I was using a white glue to attach the clear fog ligths and blinkers on the front.... this bled to behind the plastic piece and up close you can see the glue, plus it got some blue in it from the paint. What's the best technique for attaching these sorts of pics? - I used a white glue for clear bits and I think a Revell glue (with the needle nose) for all other parts.... is there any other sort I should have in my aresenal? Many thanks, Ben 
|
|
#2
12-31-2003, 11:00 PM
|
||||
|
||||
|
Re: Completed 300ZX
Welcome to Af !!
Sorry for my english, whatever you do a really great job of modeling with this kit.Great paint on your body not higlhy shining but its look really goos and clean,good interior and a great engines. We all hurry to see your next model!! keep your good work
__________________
I'm Back for now Steven
|
|
#3
12-31-2003, 11:04 PM
|
||||
|
||||
|
Re: Re: Completed 300ZX
looks good. I'm not sure how to answer your questions, as I'm just starting to go big into detail on my cars. For your gloss, I say, spray some more clear coat over it.
__________________
RIP Indian Larry RIP
April 28th, 1949 - August 30th 2004 IN GOD WE TRUST VENGEANCE IS MINE SAYETH THE LORD NO FEAR
|
|
#4
01-01-2004, 12:39 AM
|
||||
|
||||
|
OK...
I'll assume your masking problem is with the window trim and such. I use BMF (bare metal foil) to mask window trim and then spray it with my airbrush, but you could also mask it and paint it with a brush. The trick to brush painting trim is the paint has to be thinned to just the right thickness. I put a couple of drops of thinner in the paint bottle lid and mix it as I go. A clear coat over your color coat(s) will give you a good gloss. The use of a polishing cloth set will get you an eye-popping gloss, but it is a lot of work and it's also easy to rub through your color coat. I use either white glue or 5-minute epoxy to install lenses. If you use white glue and you don't like the results you can remove the lenses and clean them up with warm water and try again. Semi-gloss... well, again I'll assume you mean the interior. I paint my interior with what ever color suites (flat or gloss or a mix) and then finish the interior with a coat of semi-gloss clear. This looks right for a plastic and leather interior of a modern car. Nice car BTW...  I just set my 300Z vert. project aside but I should have pix to post soon.
__________________
SCCA 7, The lost Z Contest entry thread: Mystery? Beetle + Boxster = Bugster, P.T. Panel:click here Diablo Roadster: click here, & Porsche C2 Cab
|
|
#5
01-01-2004, 04:32 AM
|
|||
|
|||
|
Re: Completed 300ZX
Glad to have you on board!!
I think you did a pretty good job of this kit, yuo will definately improve on your next project, you just need to fine tune your polishing technique, as far as i can see from your pics, the paint application is good, i cant see any runs or other imperfections, i see a few spots in the bonet or it could be dust or an oil mark (left headlight and near the right wheel arches) anyway im no expert but this is just an inside on how i prep my bodies for polishing. 1.After waiting for the body colour to dry (1 week at least) just to make sure that you have a good solid surface to polish. 2. if the surface of the body isnt suffering from orange peeling i will just get straight into the MR Rubbing Compound 1000 to give the surface a good cut and remove any unwanted imperfections, take extreme care when using this compound since its a lot harsher than the Tamiya compound. 3. I will then follow it up by using Tamiya compound to give it a final polish, this will give you an awesome shine. However if your paint gets a bit of orange peeling, i use K&S micro grade sand paper, this stuff is awesome!! it has a plastic backing and can be used wet or dry. I usually use it wet with water and a drop of dish washing detergent, i work my way through the grades coarse to fine by this time the surface is dull but smooth, then i would follow up with MR Rubbing Compound 1000 and Tamiya Compound. As far as the masking probs that you encontered, as long as you use Tamiya masking tape you cant go wrong, just make sure that you burnish the edges well and if you are hand painting it just start with little paint in your brush, dont go to heavy chances are that it will seap underneath the mask.
|
|
#6
01-01-2004, 04:44 AM
|
||||
|
||||
|
Re: Completed 300ZX
Quote:
1. i'll just repeat what i've seen others say... before spraying your color over the masking tape, spray a layer of clear to "seal" the masking tape... then spray the color... 2. super glue is nice to have... also try tenax-7r or something like that... it's like the revell stuff, but it's thinner and i think it has a stronger hold... uhm... that should be it
|
|
#7
01-01-2004, 07:05 AM
|
|||
|
|||
|
Thanks for the input, snk33y, that's very similar to what I did. The process was, in short:
- sand with 800 - primer, sand with 1000, primer again - wait a week - few coats of blue, I did all the mist and medium coats and the can was out, had to buy new can for final thick coat... hmmmm  - had orange peel so sanded with the plastic sandpapers you mentioned (though only the lighter two, the harshest was taking more than I liked off) - Mr Rubbing compound - Tamiya wax Thanks for the info on Tamiya rubbing compound, I actually suspected this and was going to buy some but the model store didn't have any, so fate played a hand there. Yes there were some marks on the bonnet, maybe dust or I went too thick with my final coat. Schubert, when will super glue come in handy? Ben
|
|
#8
01-01-2004, 09:13 AM
|
||||
|
||||
|
looking good, Ben! There is nothing wrong with the paint and your kit.
looking forward to see your next project. 
__________________
Recent project: Hartge BMW H6-24
|
|
#10
01-01-2004, 12:52 PM
|
||||
|
||||
|
Re: Completed 300ZX
I thinks the best way to get the windows trim whitout a bleeding is to make it with a spray can!
and for your glue, if you get a good experience, you can use a ultra glue or a CA glue
__________________
I'm Back for now Steven
|
|
#11
01-01-2004, 02:27 PM
|
||||
|
||||
|
Re: Completed 300ZX
Quote:
__________________
2002 F150 SuperCab FX4 6" Fabtech, 3" BL, Detroit locker, Edge tuned, Yukon 4.56s, 37" Nittos, Harley lights, Depo fogs, 8K HIDs, Powerstop brakes 1992 Lincoln Mark VII LSC 302 H.O, A9L ECU swap, 65mm TB, 73mm Granetelli MAF, FRPP 30lb injectors, Walbro 255, MSD ignition, Powerdyne BD11 supercharger, Efans, T-5 swap w/ FRPP flywheel, Ram HDX clutch and adjustable Steeda clutch quadrant, 4.10 gears, Nitto NT555R radials 2000 OBS Tahoe Z71 6k HIDs, 33" Goodyears. 280k mile daily beater
|
|
#13
01-01-2004, 02:35 PM
|
||||
|
||||
|
Re: Re: Completed 300ZX
I tried that and it fudged my paint up mike.
__________________
RIP Indian Larry RIP
April 28th, 1949 - August 30th 2004 IN GOD WE TRUST VENGEANCE IS MINE SAYETH THE LORD NO FEAR
|
|
#15
01-01-2004, 06:14 PM
|
||||
|
||||
|
Awesome!
__________________
Air 23 - News, release dates, info, tons of pics, and much more!! Air Jordans Air Jordan release dates  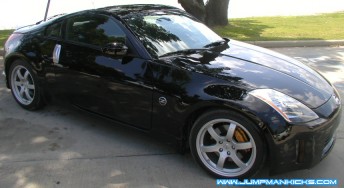 Z33, 287 hp, 274 lb/ft torque. 'Nuff said.
|
|
|
POST REPLY TO THIS THREAD |
 |
|
|


